Generate demo data by using data packages
In previous releases, demo data was delivered as a database. In Microsoft Dynamics 365 Finance, Enterprise edition 7.3, a subset of demo data has been released as data packages. These packages are available in the Shared asset library in Microsoft Dynamics Lifecycle Services (LCS). The packages are designed so that they can be loaded into an empty environment.
Here are some of the benefits of using data packages instead of a database to deliver demo data:
- The download times are significantly faster.
- You can import just the data packages that you require.
- You can edit the spreadsheets to customize the data for your customers.
- Updated demo data can be provided very quickly through LCS.
Note
The demo data packages aren't yet a full replacement for the demo database that is currently provided.
How the packages are organized
The demo data packages are designed to be layered on top of each other, as shown in the following illustration.
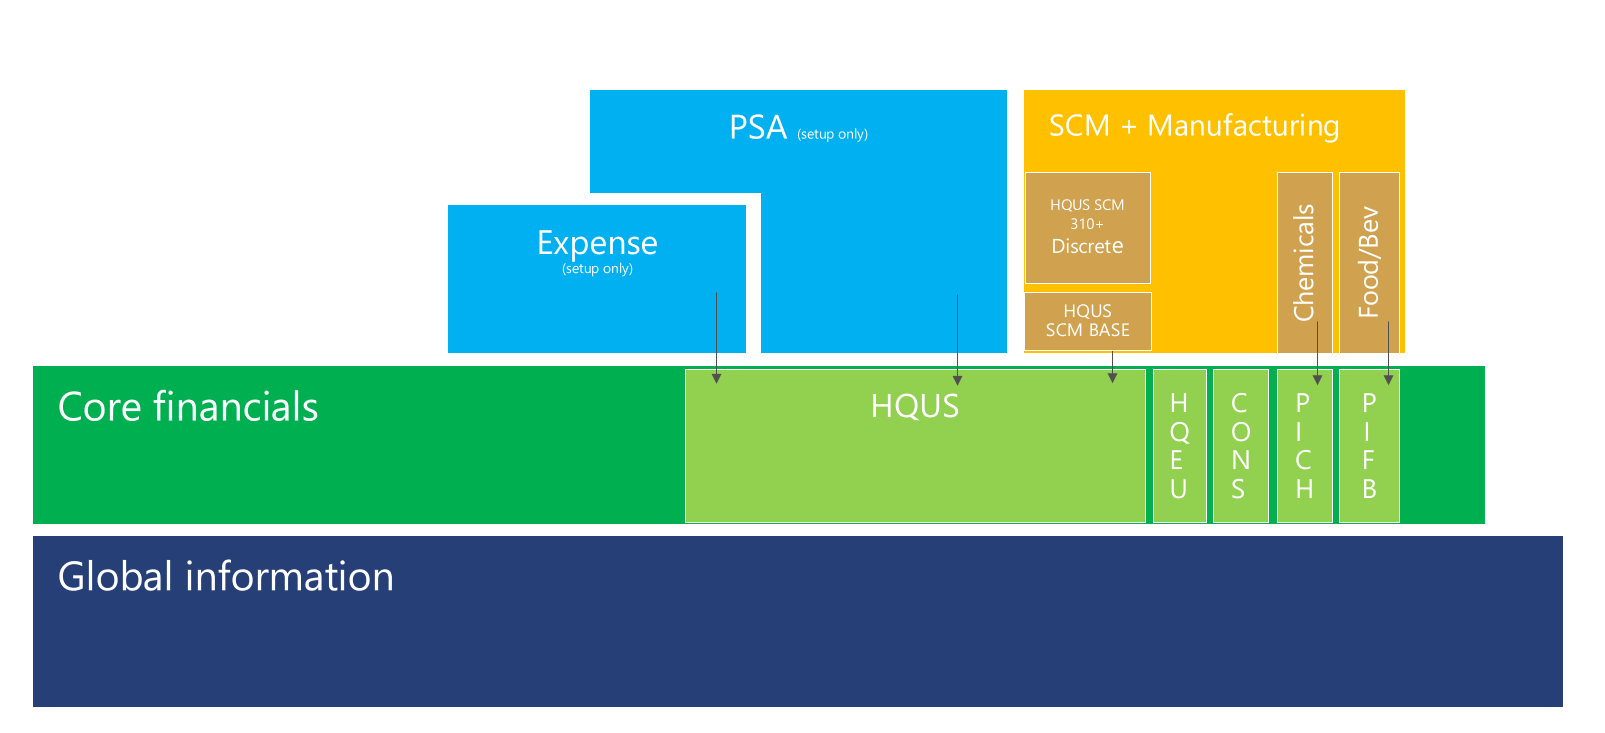
However, the global information for one demo scenario might have completely different requirements than the global information for another demo scenario. For example, the dimensions for one scenario will interfere with the dimensions for another scenario. In this case, a separate global information package will be created, and only packages that are related to that global information can be layered on top of the package.
For example, there is currently a commercial system and shared package as well as a separate public sector system and shared package that can't be used together.
System and Shared package
The base package, System and Shared, is the foundation for all other packages. This package creates legal entities, loads the global address book, and adds other shared information. It must be loaded first to support all the remaining packages. The package is named 100-System and Shared.zip.
After the System and Shared package is loaded, you will see one or more of the following legal entities.
| Legal entity | Description |
|---|---|
| HQUS | The US-based headquarters for your demo company. This company is based on the original USMF data, but it has been changed to remove the manufacturing focus in the name. It includes setup information that is intended for US companies. |
| HQEU | The non-US-based headquarters for your demo company. This company is based on the original DEMF data, but it has been changed to remove the manufacturing focus in the name. It includes setup information that is intended for non-US companies. |
| CONS | A small consolidations company. |
| PICH | A process industries company that is focused on chemicals. |
| PIFB | A process industries company that is focused on food and beverages. |
Financials
The Financials data packages contain data for the general ledger, bank, accounts payable, tax, accounts receivable, fixed assets, and budgeting for a single company. The names of these data packages consist of 200-Financials followed by the legal entity that the packages are intended for. For example, the Financials data package for the HQUS legal entity is named 200-Financials-HQUS.zip.
At least two financial companies are required for cross-company tasks such as centralized payments. To facilitate cross-company tasks, all customers and vendors have been added to each legal entity. The CONS legal entity is required if you want to do consolidations.
The Financials data packages also have five inventory products to support the creation of invoices that can move through the accounts receivable and accounts payable processes. These items use a minimum of inventory and product functionality to support those processes. However, you no longer have to set up products when you want to demonstrate only Financials functionality. More complete products will be added when you import the Supply chain data packages.
Expense management
The expense management data packages contain data for expense management and aren't specific to project management. The names of these data packages consist of 225-Expense followed by the legal entity that the packages are intended for. For example, the Expense management data package for the HQUS legal entity is named 225-Expense management HQUS.zip.
Project management and accounting
The Project management and accounting data packages contain data for project accounting and expense management. The names of these data packages consist of 250-Project management and accounting followed by the legal entity that the packages are intended for. For example, the Project management and accounting data package for the HQUS legal entity is named 250-Project management and accounting-HQUS.zip.
Supply chain
The Supply chain data packages contain data for inventory management, product information, procurement and sourcing, sales and marketing, quality management, warehouse management, transportation management, production control, process manufacturing, costing, and master planning for a single company. Because of the large number of entities, the Supply chain packages for some companies have been split into two packages. You must load both packages to complete the supply chain scenarios. However, you can load these packages as two separate projects.
These names of these data packages consist of 300-Supply chain followed by the legal entity that the packages are intended for. For example, the Supply chain data package for the PICH legal entity is named 300-Supply chain-PICH.zip. The supply chain package for the HQUS legal entity is split into packages that are named 300-Supply chain 1 of 2-HQUS.zip and 300-Supply chain 2 of 2-HQUS.zip.
Demo data package releases
The demo data packages will be released through LCS and will be specific to a release. Note that the contents of a given package are subject to change as we add more demo scenarios and tune the packages. Additional packages will also be released as we add more module areas and industry-specific scenarios.
Package names will include a release identifier. For example, for finance and operations 7.3, Demo data-7.3- will precede the package name that uses the previously described naming conventions. For example, the full name of the Financials package for the HQUS legal entity for finance and operations 7.3 will be Demo data-7.3-200-Financials-HQUS.zip.
Before you load the packages
Before you load the data packages, you must manually follow these steps.
- If you want to sign in as a specific user, change the user's email address to the sign-in address that you want to use. You can make this change in the User information data entity spreadsheet or, after you load data, on the Users page (System administration > Users).
- Start the Ready to post batch scheduler. This batch job automatically posts transactions. You must start the scheduler in every legal entity where data should be processed. Follow the steps in the "The Ready to post process" section later in this article.
- If you aren't using the en-us locale, you may need to alter the source data format to match the format the packages were built on. Once you've loaded a data entity, click into the source data format column which should be specified as value = Excel. From the next page, again select Excel. From within the source data formats page, the bottom fast-tab will be regional settings. Change the language locale to en-us if it isn't specified as en-us. After loading packages, you can change it back to its original non en-us value.
Load the packages
The data packages must be loaded into a specific legal entity in a specific order. The number before the name of the package gives you guidance about the order that the data must be loaded in. For example, you must import 100-System and Shared.zip before you can load the Financials package for the HQUS legal entity, 200-Financials-HQUS.zip. Then, to add Supply chain data to the HQUS legal entity, you can load 300-Supply chain 1 of 2-HQUS.zip and 300-Supply chain 2 of 2-HQUS.zip.
Follow these steps to load the packages.
- Start with an empty instance where no data is loaded.
- Open the Data management workspace.
- Select the Import tile to create an import job.
- Enter a name for the job. For example, enter Import shared information.
- Select Add file.
- Select Upload and add, and browse to the data package that you want to import. You must start with the System and Shared data package.
- Select the data package, and wait for the data to be loaded.
- After the data is loaded, close the dialog box, and then select Import.
- Repeat steps 5 through 8 for every additional package that you want to load. Be sure to switch to the legal entity that the data package is intended for.
Loading package combinations
The following packages can be loaded. When you import any package except the System and Shared package, you must be in the legal entity that is listed in the package name. The System and Shared package can be loaded from any legal entity. However, it's typically loaded from the default company, DAT.
Commercial Data
| Description | Notes |
|---|---|
| 100 - System and Shared | Load this package before you any other package. |
| 200 - Financials - HQUS | You can load this package alone or together with another Financials package. |
| 200 - Financials - HQEU | You can load this package alone or together with another Financials package. |
| 200 - Financials - CONS | You can load this package alone or together with another Financials package. |
| 200 - Financials - PICH | You can load this package alone or together with another Financials package. |
| 200 - Financials - PIFB | You can load this package alone or together with another Financials package. |
| 225 - Expense Management - HQUS | Follow the prerequisite step before starting the import. Load this package after the HQUS Financials package. |
| 250 - Project management - HQUS | Load this package after the HQUS Financials or Expense package. If you want to also use Supply chain, you must import this package first. |
| 300 - Supply chain 1 of 2 (base) - HQUS | Load this package after the HQUS Financials package. If you want to also use Project management, you must import the Project management package first before you import this package. |
| 310 - Supply chain 2 of 2 (Discrete) - HQUS | Load this package after the HQUS Supply chain base package. |
| 300 - Supply chain - PIFB | Load this package after the PICH Supply chain package. |
| 300 - Supply chain - PICH | Load this package after the PIFB Supply chain package. |
| 900 - Financial transactions - HQUS | Load this package after the HQUS Financials package. |
| 900 - Financial transactions - HQEU | You can load this package alone or together with another Financials package. |
Public Sector data
| Description | Notes |
|---|---|
| 100 - Public Sector System and Shared | Load this package before you any other package. |
| 200 - PSUS Financials | You can load this package alone. |
| 900 - PSUS Financial transactions | Load this package after the PSUS Financials package. |
To load the data correctly, you need to load one package at a time, import it, and then load the next one once the import is complete. We are considering additional methods for loading the demo data to improve the process.
Troubleshooting and known issues
Note
We discovered an issue with the Number sequence references entity that causes a random failure during import although the data in the packages is correct. If you see an error during the import of number sequence references, follow these steps to process the failed records.
- Click on the name of the entity (number sequence references) to display a form that lists all of the records in the data package.
- Click on Copy data to target.
- Change the Run for value to Criteria and Change Rows with previous errors to Yes.
- Click Ok and then click Run on the form that appears.
- Repeat these steps until all records import without error.
Note
There is currently an issue that some data entities have the same name, which can cause an import failure for document types and date intervals in the 200 - Financials packages. If you see an error during the import of these entities extract them from the .zip file provided and manually import, making sure to use the document types pointing to DocuTypeEntity and date intervals pointing to LedgerDateIntervalEntity. Once these are imported you can retry the failed records from the 200 - Financials packages.
After you load the packages
Check Ready to post if anything needs to be posted. In some cases individual demo scripts may recommend some setup be done prior to loading this data.
In some cases, there might be data that you want to add because of a special scenario or a missing entity. Add that data after you've finished loading the data packages. You might also want to manually post additional transactions or add your own data packages to enhance the demo experience.
After you load the data packages, you must also manually follow these steps.
- Start the workflow jobs. Select System administration > Workflow infrastructure configuration, and then select OK.
- Set up policy precedence rules. Select Procurement and sourcing > Setup > Policies > Purchasing policies, and then select Parameters. Then select Companies, and move it to the right column.
- Setup policy precedence prior to importing Expense packages. Select Expense management > Setup > Policies > Expense report, and then select Parameters. then select Companies, and move it to the right column.
- After you load the Project management and accounting packages, you must run the Resource capacity roll-up batch job. You can run this job from the Synchronize resource capacity roll-ups page (Project management and accounting > Periodic > Capacity synchronization > Synchronize resource capacity roll-ups). Specify an end date that lets you schedule resources a long time in the future. After the batch job is run, automatic generation of team functionality will be enabled in the project's work breakdown structure (WBS).
- Add Print management settings for each module.
Transactions and automatic posting
Many scenarios for demo data require that transactions be processed after they are imported. You can process transactions by using the Ready to post feature. This feature includes both a page that lets you define the transactions that should be posted, and an entity that lets you import the definitions and automatically run them.
The following transaction types are supported when demo data is posted.
| Document | Entity document ID | Date filter | ID filters | Other filters |
|---|---|---|---|---|
| Budget registry update | BudgetRegistryUpdate | Default date | Budget entry number | Not in use, Status = Draft |
| Costing version | CostingVersion | Not applicable | Version ID | Version Activation blocked = No |
| Customer payment journal | CustomerPaymentJournal | Transaction date | Journal number | Not posted, not workflow, not system blocked |
| Daily journal | GeneralJournal | Transaction date | Journal number | Not posted, not workflow, not system blocked |
| Fixed assets journal | FixedAssetsJournal | Transaction date | Journal number | Not posted, not workflow, not system blocked |
| Free text invoice | FreeTextInvoice | Invoice date | Not applicable | |
| Inventory adjustment journal | InventoryAdjustmentJournal | Transaction date | Journal number | Not posted |
| Invoice journal | InvoiceJournal | Transaction date | Journal number | Not posted, not workflow, not system blocked |
| Price calculation | PriceCalculation | Not applicable | Version ID | Version Activation blocked = No |
| Purchase order | PurchaseOrder | Delivery date | Purchase order ID | Able to confirm/PR/Vendor confirm/invoice |
| Sales order | SalesOrder | Delivery date | Sales order ID | Able to confirm/packing slip/invoice |
| Trade agreement | TradeAgreement | Not applicable | Price/discount journal number | |
| Vendor invoice | VendorInvoice | Posting date | Invoice number | Approved, not in use, not yet |
| Vendor payment journal | VendorPaymentJournal | Transaction date | Journal number | Not posted, not workflow, not system blocked |
For journals that support date ranges, the Ready to post process examines all the journal lines for a date that falls in the specified range. If any line in the journal falls in the date range, the search is stopped, and the whole batch is posted.
The Ready to post process
The Ready to post feature uses a batch to monitor the list of transaction types that you want to post. When the monitor detects a transaction of the type that you want to post, it uses the transaction type to generate a batch that posts those transactions. The batch that is created is the same type of batch that is created when you use the user interface for that transaction type. When the transaction batch is completed, the Ready to post monitor updates the list with the results of the processing. It also adds links to the batch and the original transaction.
Use the Ready to post page to process transactions
- Select System administration > Periodic tasks > Batch job ready to post to open the Ready to post page.
- Select Create posting monitor, and set up the batch parameters so that a recurring batch is running. You must complete this step only one time for each legal entity to start the batch process for posting.
- Select New, and enter a name for the demo data job. The job name must be unique across all companies.
- Select Add line to add a transaction type.
- Select the transaction target. For journals, the target is Post. For other transactions, the target depends on the transaction type.
- Specify a start date and an end date (that is, a date range) to limit the transactions that will be processed (when available).
- Specify a "from" document and a "to" document (that is, a document range) to limit the transactions that will be processed (when available).
- Select Add line to add additional transaction types. You can use the same type on multiple lines.
- Select Mark ready to post. The batch status is changed from Open to Ready, and the posting monitor starts to process each line.
- If you want to process a document immediately, select Process documents. The batch status is changed to Scheduled, and a batch is started without using the posting monitor.
When the batch is running, the status is changed to In Progress.
When the batch is completed, the status is changed to Successful or Error, depending on the results. The posting results are shown at the bottom of the page.
Use the Ready to post entity to process transactions
An entity that is named Demo data posting lets you import a list of document types that you want to post. The entity will create a demo data job on the Ready to post page. If you've started the posting monitor, the transactions are automatically posted after you import the data by using the entity.
The following columns appear in the Ready to post entity.
| Column | Purpose |
|---|---|
| DemoDataJob | The unique ID of the demo data job to run. Use the same ID for every line that belongs to a single job. |
| LineNum | The order that the tasks will be run in. |
| DataProjectId | A link to the data project that contains the Ready to post entity. This information is for export only. |
| DemoDataJobStatus | The status of your demo data project. This information is for export only. |
| Document | The document type to process. |
| DocumentTarget | The process to run. For journals, the target must be Post. For transactions such as sales orders, the target will match the options that appear on the page when you add the task. |
| EndDate | An optional end date that limits the transactions that are processed. |
| FromDocument | An optional "from" document that limits the transactions that are processed. |
| ProcessOnImport | If you change the value to Yes, the demo data job will be set to Ready, and the process monitor will pick it up automatically. No action is required. |
| StartDate | An optional start date that limits the transactions that are processed. |
| ToDocument | An optional "to" document that limits the transactions that are processed. |
Insert the Ready to post entity at the end of your data project, after all the transaction entities. In the data project, specify a sequence number that is larger than the sequence numbers that are used for the transactions entities.
If you have a mixture of transactions, some of which should be processed whereas others should not be processed, you must use date and document ranges to limit the transactions that are processed. If you can't use the ranges, you must use a separate data package for the unposted transactions.
Σχόλια
Σύντομα διαθέσιμα: Καθ' όλη τη διάρκεια του 2024 θα καταργήσουμε σταδιακά τα ζητήματα GitHub ως μηχανισμό ανάδρασης για το περιεχόμενο και θα το αντικαταστήσουμε με ένα νέο σύστημα ανάδρασης. Για περισσότερες πληροφορίες, ανατρέξτε στο θέμα: https://aka.ms/ContentUserFeedback.
Υποβολή και προβολή σχολίων για