Σημείωμα
Η πρόσβαση σε αυτήν τη σελίδα απαιτεί εξουσιοδότηση. Μπορείτε να δοκιμάσετε να εισέλθετε ή να αλλάξετε καταλόγους.
Η πρόσβαση σε αυτήν τη σελίδα απαιτεί εξουσιοδότηση. Μπορείτε να δοκιμάσετε να αλλάξετε καταλόγους.
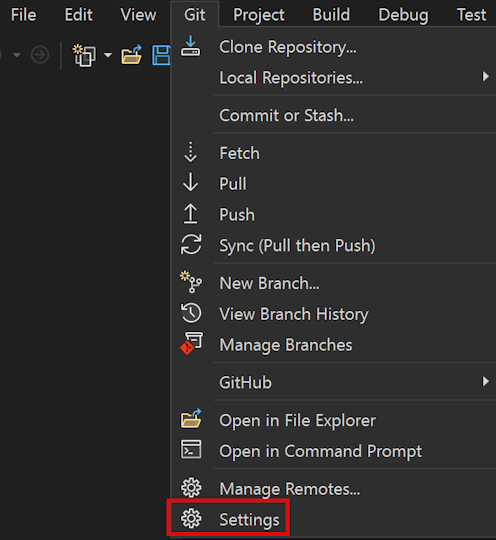
In Visual Studio, you can configure and view common Git settings and preferences, such as your name and email address, your preferred diff and merge tools, and more. The settings and preferences can be viewed and configured by selecting Git > Settings or Tools > Options on the menubar.
The Options pane opens to the All Settings > Source Control > Git Settings section where you can configure general Git options. To configure options to apply to all your repositories, expand the Git Global Config section. To configure options for the current repository only, expand the Git Repository Config section.
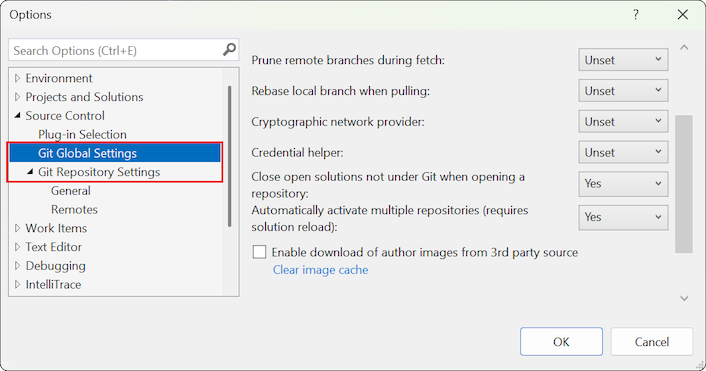
The Options dialog opens to the Source Control > Git Global Settings section where you can configure options to apply to all your repositories. To configure options for the current repository only, expand the Git Repository Settings section.
You can configure two types of settings:
- Git settings - These settings that are saved in Git configuration files. They can be viewed and modified in Visual Studio, but they're managed by Git configuration files.
- Visual Studio settings - These settings configure Git-related settings and preferences that are managed by Visual Studio.
How to configure settings
To configure Git settings in Visual Studio, select Git > Settings from the main menubar.
The Options pane opens to the All Settings > Source Control > Git Settings section, which provides general Git options.
- To view and configure global-level repository settings, expand the Git Global Config section.
- For repository-level settings, expand the Git Repository Config section.

The Options dialog opens to the Source Control > Git Global Settings section where you can configure options to apply to all your repositories.
To configure options for the current repository only, expand the Git Repository Settings section.
Git settings
You can configure and check some of the most common Git configuration settings. You can view and modify the following settings in Visual Studio, even though they're managed by Git configuration files.
- User name and email
- Prune remote branches during fetch
- Rebase local branch when pulling
- Cryptographic network provider
- Credential helper
- Enable commit graph for better Git performance
- Diff and Merge Tools
- Git files
- Remotes
- Other settings
Note
Global Git settings correspond to preferences in Git's user-specific configuration file. Repository settings correspond to preferences in the repository-specific configuration file. For more information about Git configuration, see the Pro Git chapter on customizing Git, the git-config documentation, and the Pro Git reference on configuration files. To configure Git settings not exposed in Visual Studio, use the git config command to write a value to your configuration files: git config [--local|--global|--system] section.key value.
User name and email
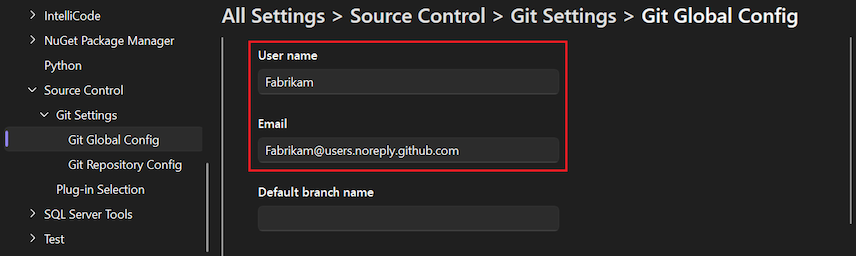
The name and email that you provide is used as the committer information for any commit you make. This setting is available at both global and repository scopes, and corresponds to the git config user.name and user.email settings.
Here's how to change the settings:
Open the Options pane by selecting Git > Settings.
To set your user name and email at the global level, expand the Git Global Config section.
To set your user name and email at the repository level, expand theGit Repository Config section.
Set the User name and Email options to your user name and email address.
Open the Options dialog by selecting Git > Settings.
To set your user name and email at the global level, expand the Git Global Settings section.
To set your user name and email at the repository level, expand theGit Repository Settings section.
Set the User name and Email options to your user name and email address, and select OK.

Prune remote branches during fetch
Pruning removes remote-tracking branches that no longer exist on the remote and helps you keep your branches list clean and up to date. This setting is available at both global and repository scopes, and corresponds to the git config fetch.prune setting.
The following values are available, where True is recommended for the global-level setting:
- True (recommended)
- False
- Unset (default)
Here's how to change this setting:
Open the Options pane by selecting Git > Settings.
To adjust pruning at the global level, expand the Git Global Config section.
To adjust pruning at the repository level, expand theGit Repository Config section.
Set the Prune remote branches during fetch option to True (recommended).

Open the Options dialog by selecting Git > Settings.
To adjust pruning at the global level, expand the Git Global Settings section.
To adjust pruning at the repository level, expand theGit Repository Settings section.
Set the Prune remote branches during fetch option to True (recommended), and select OK.

Rebase local branch when pulling
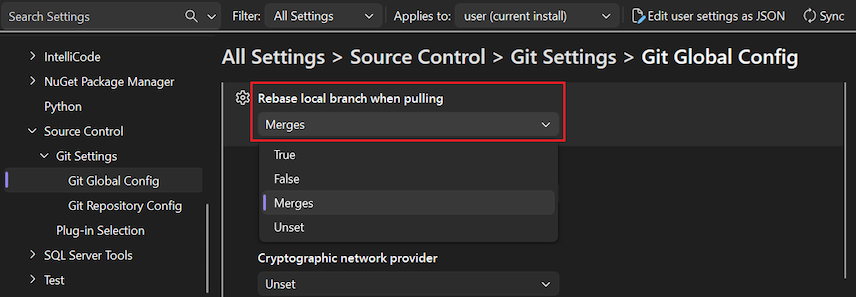
Rebasing sets aside the changes made by commits in the current branch that aren't in the upstream branch. It resets the current branch to the upstream branch and then applies the changes that were set aside. This setting is available at both global and repository scopes, and corresponds to the git config pull.rebase setting.
The following values are available:
- True: Rebase current branch on top of upstream branch after fetch.
- False: Merge the current branch into the upstream branch.
- Merges (or Preserve): Rebase without flattening locally created merge commits.
- Unset (default): Unless specified in other configuration files, merge the current branch into the upstream branch.
Note
It's not possible to configure pull.rebase to Interactive in Visual Studio. Visual Studio doesn't offer interactive rebase support. To configure pull.rebase to use interactive mode, use the command line.
Here's how to change this setting:
Open the Options pane by selecting Git > Settings.
To configure rebasing at the global level, expand the Git Global Config section.
To configure rebasing at the repository level, expand theGit Repository Config section.
Set the Rebase local branch when pulling option to True (recommended).
Open the Options dialog by selecting Git > Settings.
To configure rebasing at the global level, expand the Git Global Settings section.
To configure rebasing at the repository level, expand theGit Repository Settings section.
Set the Rebase local branch when pulling option to your desired value, and select OK.

Cryptographic network provider
Cryptographic network provider is a Git configuration setting at global scope that configures which TLS/SSL backend to use at runtime. This option corresponds to the git config http.sslBackend setting.
The following values are available at the global scope:
- OpenSSL: Use OpenSSL for TLS and SSL protocols.
- Secure Channel: Use Secure Channel (schannel) for TLS and SSL protocols. Schannel is the native Windows solution, which accesses the Windows Credential Store and enables enterprise-wide management of certificates.
- Unset (default): If this setting is unset, OpenSSL is the default.
Here's how to change this setting:
Open the Options pane by selecting Git > Settings.
In the Options pane, expand the Git Global Config section.
Set the Cryptographic network provider option to your desired value, and select OK.

Open the Options dialog by selecting Git > Settings.
In the Options dialog, expand the Git Global Settings section.
Set the Cryptographic network provider option to your desired value, and select OK.

Credential helper
Credential helper is a Git configuration setting at global scope. When Visual Studio performs a remote Git operation, the remote endpoint might reject the request because it requires credentials to be provided with the request. At that time, Git invokes a credential helper, which returns the credentials needed to perform the operation, and then retries the request. The credential helper used corresponds to the git config credential.helper setting.
The following values are available at the global scope:
- GCM: Use Git Credential Manager as the helper.
- Unset (default): If the option is unset, the credential helper specified in the system config is used.
Here's how to change this setting:
Open the Options pane by selecting Git > Settings.
In the Options pane, expand the Git Global Config section.
Set the Credential helper option to your desired value, and select OK.

Open the Options dialog by selecting Git > Settings.
In the Options dialog, expand the Git Global Settings section.
Set the Credential helper option to your desired value, and select OK.

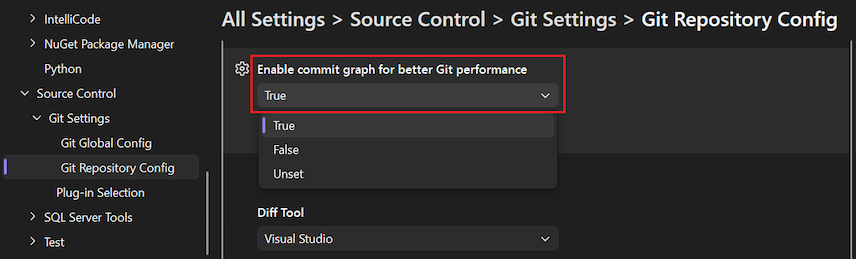
Enable commit graph
The Enable commit graph for better Git performance option instructs Visual Studio to generate a commit graph file in your local repository for quick parsing and sorting of your commits. A commit graph can decrease delays in Git operations and improve performance of repository actions in Visual Studio. For more information, see Supercharge your Git experience in Visual Studio with a commit graph.
Note
It can take a few minutes to generate the commit graph based on the size of your repository. Until the operation completes, you can't run other Git operations in Visual Studio, such as Fetch or Pull.
The following values are available at the local scope:
- True
- False
- Unset (default)
Here's how to configure this setting:
Open the Options pane by selecting Git > Settings.
In the Options pane, expand the Git Repository Config section.
Set the Enable commit graph for better Git performance option to your desired value, and select OK.
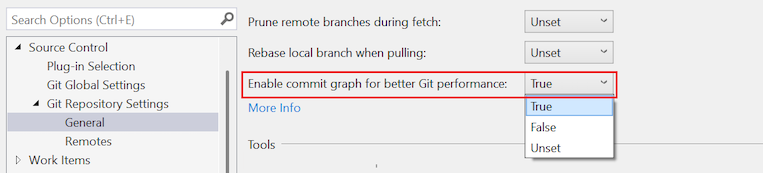
Open the Options dialog by selecting Git > Settings.
In the Options dialog, expand the Git Repository Settings > General section.
Set the Enable commit graph for better Git performance option to your desired value, and select OK.
Diff and Merge Tools
Git shows diffs and merge conflicts in your preferred tools. The configuration corresponds to the git config diff.tool and merge.tool settings. You can specify your Diff Tool and Merge Tool preferences at both global and local scopes.
Here's how to configure these settings:
Open the Options pane by selecting Git > Settings.
To configure the tools at the global level, expand the Git Global Config section, and scroll to the Tools group.
To configure the tools at the repository level, expand theGit Repository Config section, and scroll to the Tools group.
Select Visual Studio in the dropdown list for the Diff Tool or Merge Tool option.
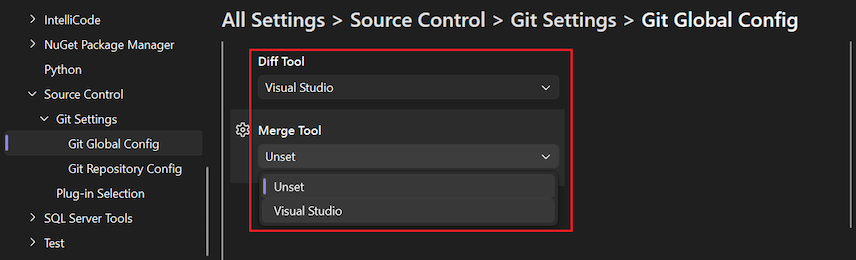
After you configure a tool at the global level, the value is Visual Studio | Global, or for the current repository, Visual Studio | Local. Otherwise, the value is Unset (default).
Open the Options dialog by selecting Git > Settings.
To configure the tools at the global level, expand the Git Global Settings section, and scroll to the Tools group.
To configure the tools at the repository level, expand theGit Repository Settings section, and scroll to the Tools group.
Select the Use Visual Studio link for the Diff Tool or Merge Tool option.

After you configure a tool at the global level, the value is Visual Studio | Global, or for the current repository, Visual Studio | Local. Otherwise, the value is None (default).
To configure other diff and merge tools, use git config with the diff.tool or merge.tool switch.
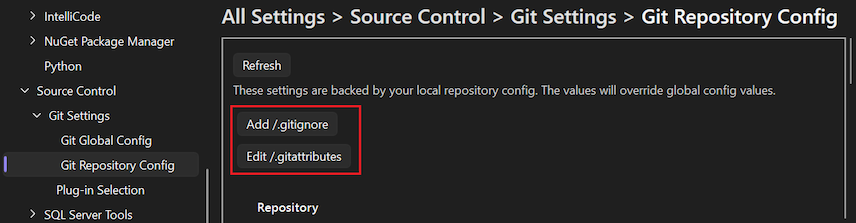
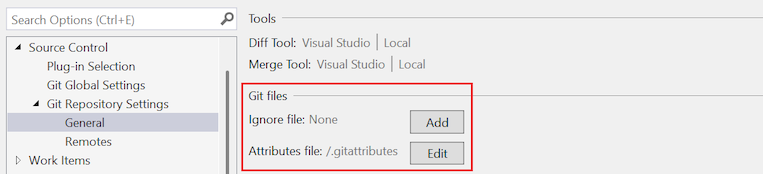
Git files
You can use the Git files options to view and edit the gitignore and gitattributes files for your local repository.
Here's how to work with these settings:
Open the Options pane by selecting Git > Settings.
In the Options pane, expand the Git Repository Config section and scroll to the Git files group.
To add the Ignore file (.gitignore) or Attributes file (.gitattributes), select Add /.gitignore or Add /.gitattributes.
Visual Studio adds the file and changes the button label to Edit <filename>.
To view or edit a file, select Edit <filename>.
Open the Options dialog by selecting Git > Settings.
In the Options dialog, expand the Git Repository Settings > General section.
To add the Ignore file (.gitignore) or Attributes file (.gitattributes), select Add.
Visual Studio adds the file and changes the button label to Edit.
To view or edit the .gitignore or .gitattributes file, select Edit.
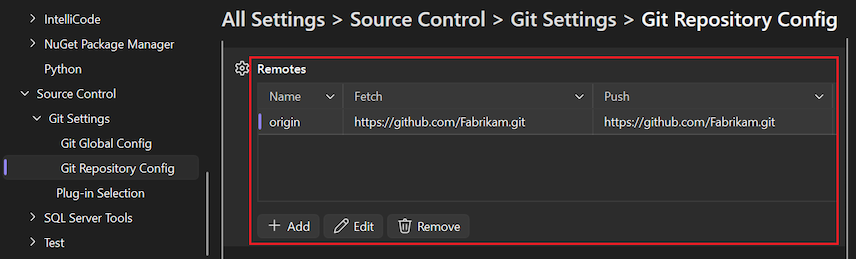
Remotes
You can configure the remotes for your local repository with the Remotes options. You can add and edit remotes, or delete remotes. This setting corresponds to the git remote command and allows you to add, edit, or remove remotes.
Here's how to work with these settings:
Open the Options pane by selecting Git > Settings.
In the Options pane, expand the Git Repository Config section, and scroll to the Remotes group.
Open the Options dialog by selecting Git > Settings.
In the Options dialog, expand the Git Repository Settings > Remotes section.
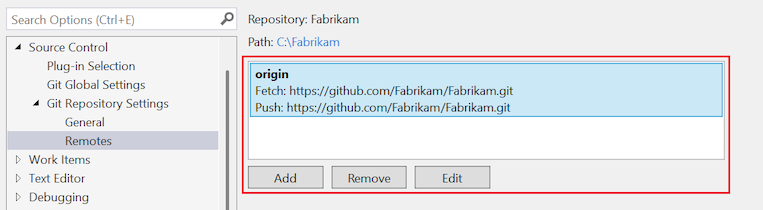
The table lists the set of remotes defined for the repository.
To add more remotes, select Add.
To update a remote, select the remote in the list, and then select Edit.
To delete a remote, select the remote in the list, and then select Remove.
Other settings
To view all of your other Git configuration settings, you can open and view the configuration files themselves, or you can run git config --list to display the settings.
Visual Studio settings
The following settings manage Git-related preferences in Visual Studio, and are managed by Visual Studio instead of Git configuration files. Most of the settings are configured in the All Settings > Source Control > Git Settings section of the Options pane.
- Default location
- Default branch name
- Close non-Git solutions
- Automatically activate multiple repositories
- Enable download of author images from third-party sources
- Commit changes after merge by default
- Enable push --force
- Open folder in Solution Explorer when opening a Git repository
- Automatically load the solution when opening a Git repository
- Automatically check out branches with double-click or the Enter key
- Restore the Git Repository window on restart
The following settings configure Git-related preferences in Visual Studio, and are managed by Visual Studio instead of Git configuration files. All of the settings in this section are configured in the Source Control > Git Global Settings section of the Options dialog.
- Default location
- Default branch name
- Close open solutions not under Git when opening a repository
- Automatically activate multiple repositories
- Enable download of author images from third-party sources
- Commit changes after merge by default
- Enable push --force
- Open folder in Solution Explorer when opening a Git repository
- Automatically load the solution when opening a Git repository
- Automatically check out branches with double-click or the Enter key
- Restore the Git Repository window on restart
Default location
This setting configures the default folder in which repositories are cloned.


Default branch name
This setting configures the default branch for new repositories that you create locally. If you leave the value blank, Visual Studio uses your locally installed Git by default.
The setting is located in the All Settings > Source Control > Git Settings > Git Global Config section.


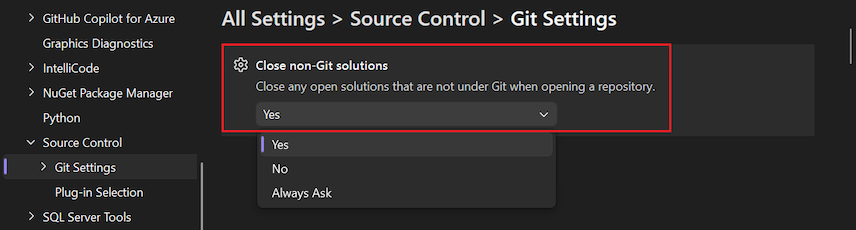
Close non-Git solutions
Close open solutions not under Git when opening a repository
By default, Visual Studio closes any open solution or folder when you switch to another repository. When it does so, it might also load the solution or folder of the new repository based on if you choose to Open folder in Solution Explorer when opening a Git repository and Automatically load the solution when opening a Git repository.
This setting maintains the consistency between the open code and open repository. If your solution isn't in the same folder root as your repository, you can select this option and keep the solution open when you switch to its repository.
The following values are available:
- Yes: When a repository opens, the current open solution is always closed.
- No: When a repository opens, Visual Studio checks if the current solution is under Git. If it isn't, the solution remains open.
- Always ask (default): When a repository opens, a dialog prompts you to keep the current solution open or close it.

Automatically activate multiple repositories
This setting lets you control whether Visual Studio spends resources on activating multiple repositories at once, or whether to optimize your workflow by activating a single repository at a time. If you primarily work with a single repository, you can unselect this setting to improve the performance of Visual Studio. If you change the setting, the change doesn't take effect until the next time the solution loads.
The following values are available:
- Yes (default): Visual Studio activates multiple repositories.
- No: Visual Studio only activates one repository.


For more information, see Work with multiple repos.
Enable download of author images from third-party source
This option is a Visual Studio-specific setting at global scope. When the option is selected, author images are downloaded from the Gravatar image service, if available, and displayed in the Commit and History views.


Important
To provide author images in the Commit and History views, the tool creates an MD5 hash for the author email addresses stored in the active repository. The hash is sent to Gravatar to find a matching hash value for users registered with the service. If a match is found, the user image is retrieved from the service and displayed in Visual Studio. If the user isn't registered with the service, a randomly generated image is returned. Visual Studio doesn't record email addresses or share them with Gravatar or other third-parties.
Commit changes after merge by default
When you select this option, Git automatically creates a new commit when a branch is merged with the current branch.


- When the option is selected,
git mergecommands issued by Visual Studio run with the--commitoption. - When the option isn't selected,
git mergecommands issued by Visual Studio run with the--no-commit --no-ffoptions.
For more information on these options, see --commit and --no-commit and --no-ff.
Enable push --force-with-lease
When you select this option, you can push --force-with-lease from within Visual Studio. By default, this option isn't selected.
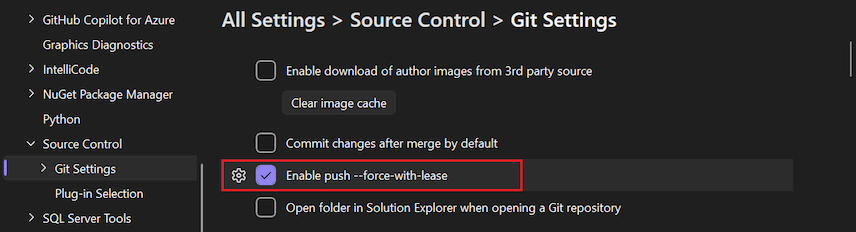

For more information, see push --force-with-lease.
Open folder in Solution Explorer when opening a Git repository
When you use Visual Studio to open or switch to a Git repository, Visual Studio loads the Git content so you can view changes, commits, branches, and manage your repository from within the IDE. Visual Studio also loads the code of the repository in Solution Explorer. Visual Studio scans the repository folder for solutions, CMakeLists.txt, or other recognized view files and displays them as a list in Solution Explorer. From there, you can select a solution to load or the folder to view the directory contents. When you unselect this option, Visual Studio doesn't open the repository folder in Solution Explorer. This option essentially allows you to open Visual Studio as a Git repository manager only. The setting is selected by default.


Automatically load the solution when opening a Git repository
This setting is applicable only when the Open folder in Solution Explorer when opening a Git repository option is selected. When you open a Git repository in Visual Studio, and the subsequent folder scan detects only one solution in your repository, Visual Studio automatically loads that solution. If you unselect this setting, Solution Explorer displays the single solution in the repository in the list of views, but it doesn't load the solution. By default, this setting isn't selected.


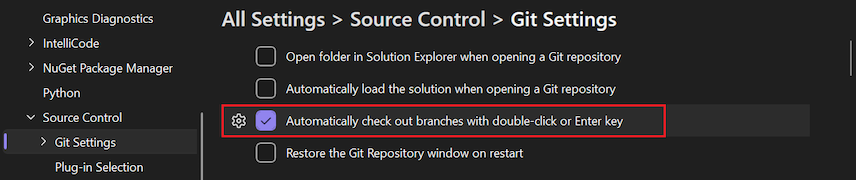
Automatically check out branches with double-click or the Enter key
The Git Repository window has a list of branches displayed in a tree structure. Single selecting a branch switches the commit history pane to display the commits for the selected branch. To check out a branch, right-click and select Checkout. If you select this setting, double-clicking or pressing Enter checks out the branch and display its commits.

Restore the Git Repository window on restart
If checked, the Git Repository window opens along with other permanent windows when you start the Visual Studio IDE, if the window was open when Visual Studio was last closed. The position of the window is saved in the window layout. If you moved the window or docked it, it opens just where you had it before. Clear the checkbox to prevent the window from opening when Visual Studio starts. You can still open the window manually by selecting View > Git Repository on the main menubar command. The keyboard shortcut is Ctrl+0, Ctrl+R, or Ctrl+Q and searching on Git Repository.
If you use this window regularly, it can be convenient to open it automatically when you start the IDE. However, opening and populating the window on startup can use many computing resources. If you're not actively using the window, it's more efficient to disable this behavior.


For more information, see Browse a repository.
Related content
Important
If you have a suggestion for us, please let us know! We appreciate the opportunity to engage with you on design decisions via the Developer Community portal.
- Getting started with Git in Visual Studio video on YouTube
- Enhanced productivity with Git in Visual Studio blog post
- Options dialog box