Create custom roles with Microsoft Defender XDR Unified RBAC
Applies to:
- Microsoft Defender for Endpoint Plan 2
- Microsoft Defender XDR
- Microsoft Defender for Identity
- Microsoft Defender for Office 365 P2
- Microsoft Defender Vulnerability Management
- Microsoft Defender for Cloud
Create a custom role
The following steps guide you on how to create custom roles in Microsoft Defender XDR Unified RBAC.
Important
You must be a Global Administrator or Security Administrator in Microsoft Entra ID, or have all the Authorization permissions assigned in Microsoft Defender XDR Unified RBAC to perform this task. For more information on permissions, see Permission pre-requisites.
Sign in to the Microsoft Defender portal.
In the navigation pane, select Permissions.
Select Roles under Microsoft Defender XDR to get to the Permissions and roles page.
Select Create custom role.
Enter the Role name and description.
Select Next to choose the permissions you want to assign. Permissions are organized in three different categories:
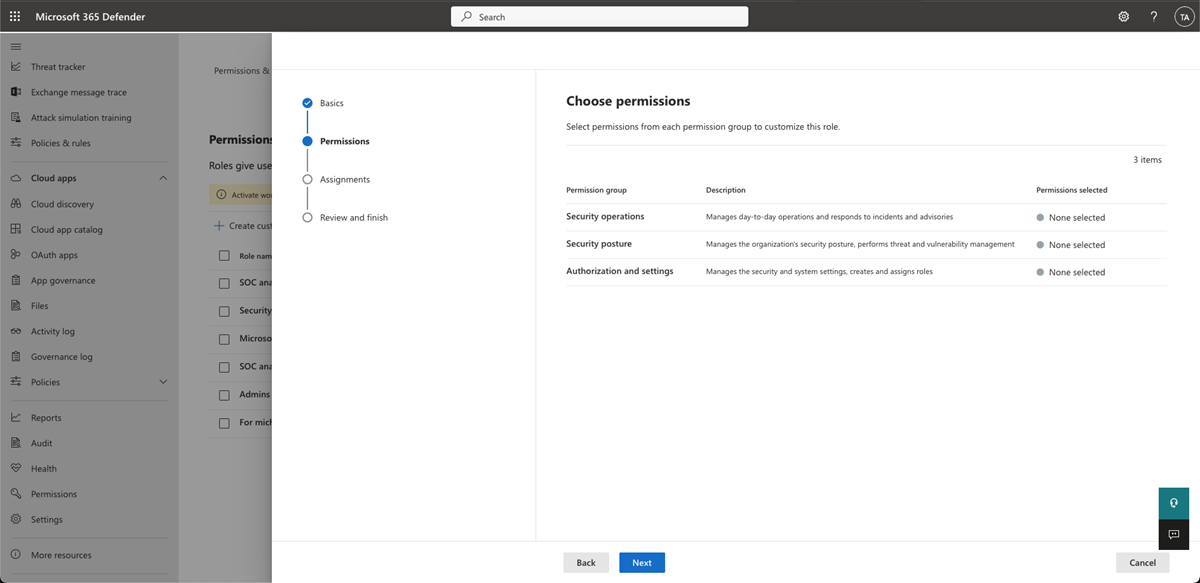
Select a permission category (for example, Security operations), and then review the permissions available. You can choose to assign the following different levels of permissions:
- Select all read-only permissions – Users will be assigned with all the read-only permissions in this category.
- Select all read and manage permissions – Users will be assigned all permissions in this category (read and manage permissions).
- Select custom permissions – Users will be assigned the custom permissions selected.
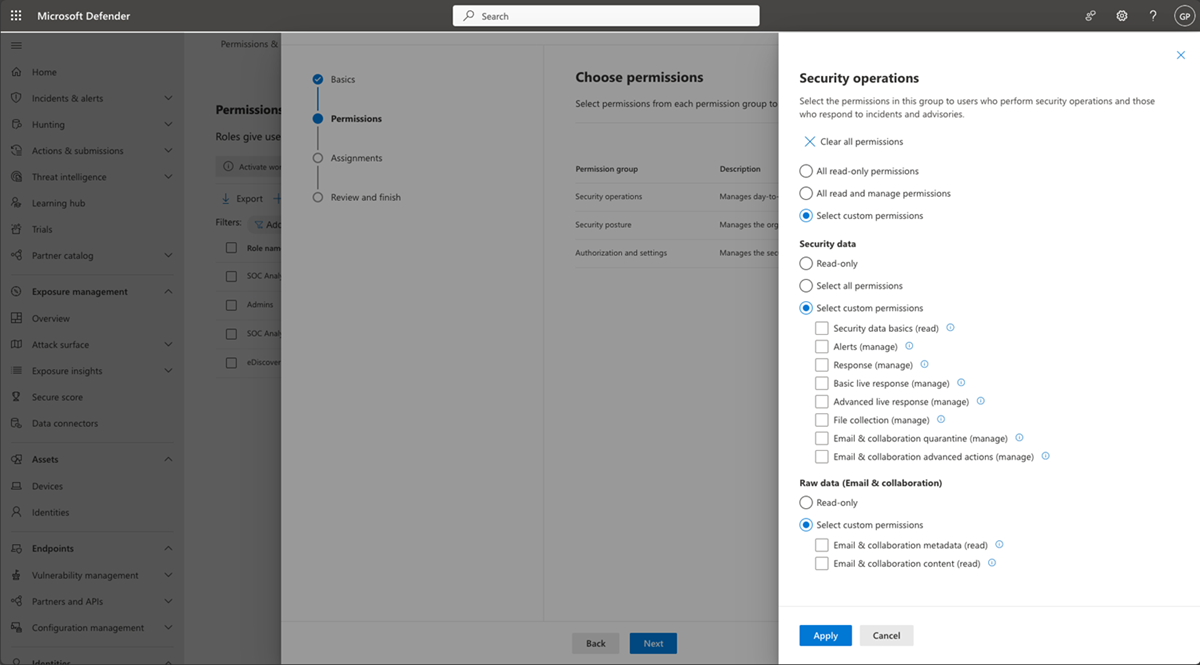
For more information on the RBAC custom permissions, see About RBAC custom permissions.
Note
If all read-only or all read and manage permissions are assigned, any new permissions added to this category in the future will be automatically assigned under this role.
If you have assigned custom permissions and new permissions are added to this category, you will need to re-assign your roles with the new permissions if needed.
Once you have selected your permissions, select Apply and then Next to assign users and data sources.
Select Add assignments and Enter the Assignment name.
Under data sources, choose if the assigned users will have the selected permissions across all the available products, or only for specific data sources:
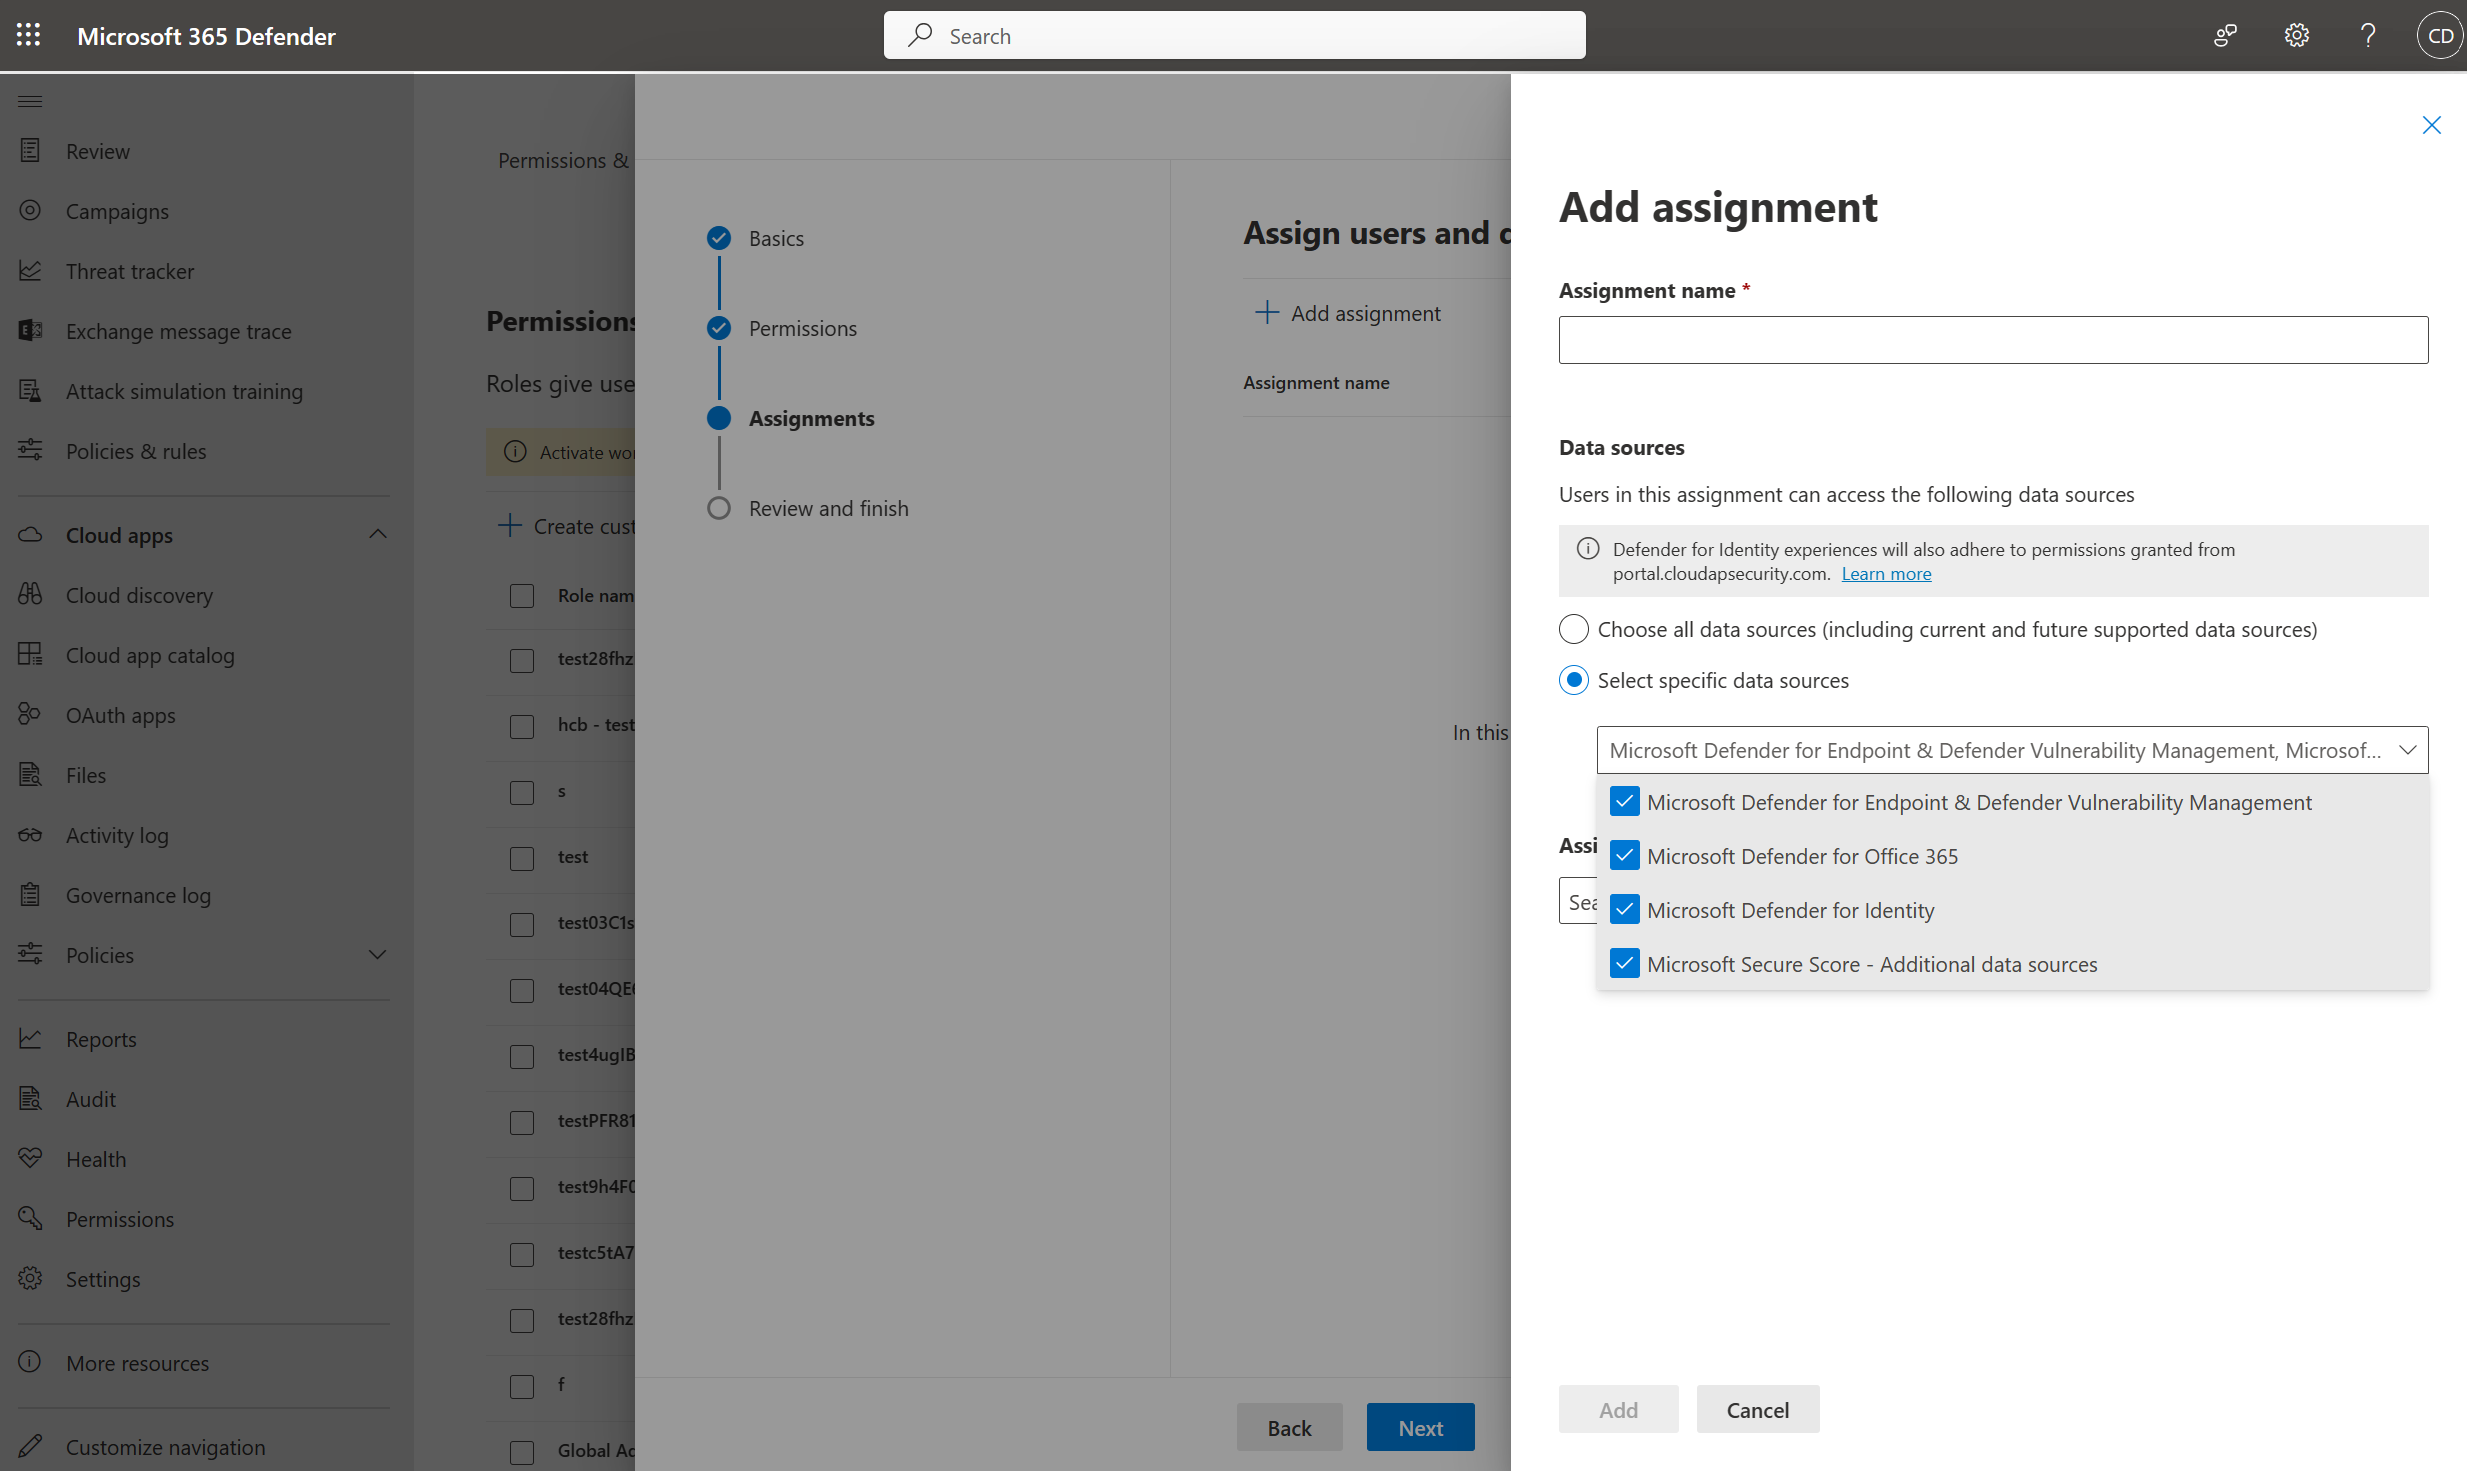
If a user selects all read-only permissions for a single data source, for example, Microsoft Defender for Endpoint, they will not be able to read alerts for Microsoft Defender for Office 365 or Microsoft Defender for Identity.
Note
By selecting Choose all data sources all supported data sources within Microsoft Defender XDR Unified RBAC and any future data sources that are added will be automatically assigned to this assignment.
In Assigned users and groups choose the Microsoft Entra security groups or individual users to assign the role to, and select Add.
Note
In Microsoft Defender XDR Unified RBAC, you can create as many assignments as needed under the same role with same permissions. For example, you can have an assignment within a role that has access to all data sources and then a separate assignment for a team that only needs access to Endpoint alerts from the Defender for Endpoint data source. This enables maintaining the minimum number of roles.
Select Next to review and finish creating the role and then select Submit.


Create a role to access and manage roles and permissions
To access and manage roles and permissions, without being a Global Administrator or Security Administrator in Microsoft Entra ID, you need to create a role with Authorization permissions. To create this role:
Sign in to the Microsoft Defender portal as Global Administrator or Security Administrator.
In the navigation pane, select Permissions.
Select Roles under Microsoft Defender XDR.
Select Create custom role.
Enter the Role name and description.
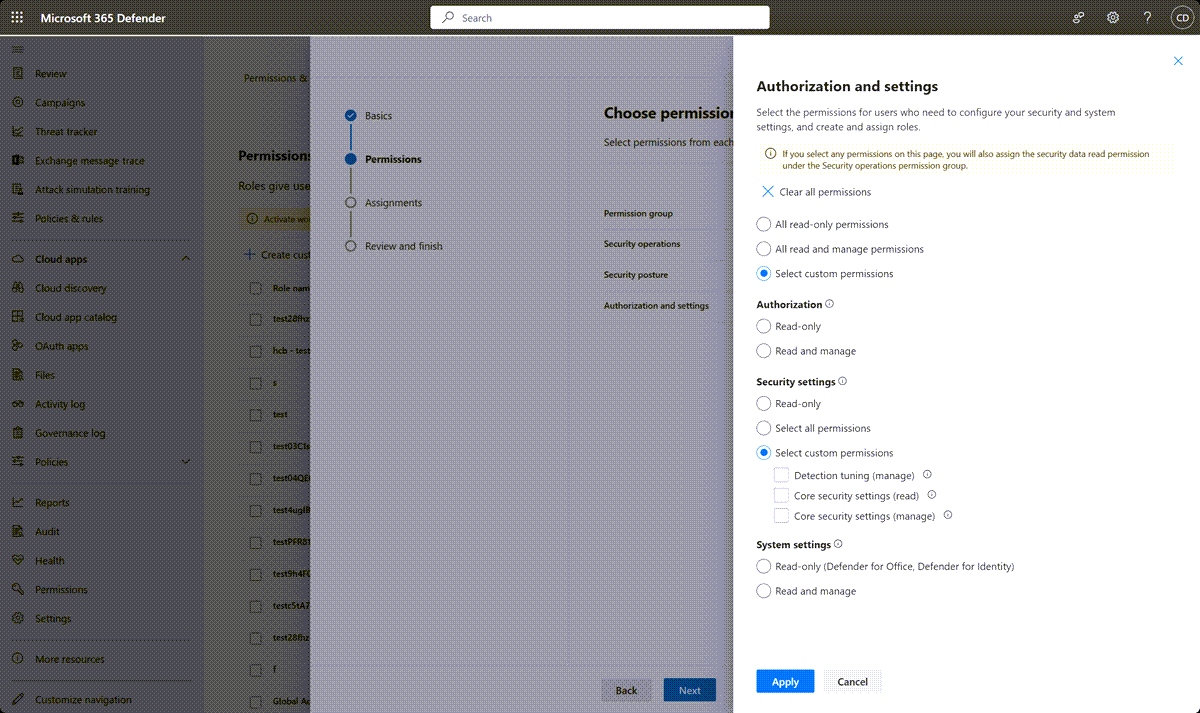
Select Next and choose the Authorization and settings option.
On the Authorization and settings category flyout, choose Select custom permissions and under Authorization select either:
- Select all permissions - users will be able to create and manage roles and permissions.
- Read-only - uses will be able to access and view roles and permissions in a read-only mode.
Select Apply and then Next to assign users and data sources.
Select Add assignments and enter the Assignment name.
To choose the data sources users assigned the Authorization permission will have access to:
- Select Choose all data sources to grant users permissions to create new roles and manage roles for all data sources.
- Select Select specific data sources to grant users permissions to create new roles and manage roles for a specific data source. For example, select Microsoft Defender for Endpoint from the dropdown to grant users the Authorization permission for the Microsoft Defender for Endpoint data source only.
In Assigned users and groups – choose the Microsoft Entra security groups or individual users to assign the role to, and select Add.
Select Next to review and finish creating the role and then select Submit.

Note
For the Microsoft Defender XDR security portal to start enforcing the permissions and assignments configured in your new or imported roles, you'll need to activate the new Microsoft Defender XDR Unified RBAC model. For more information, see Activate Microsoft Defender XDR Unified RBAC.
Next steps
Tip
Do you want to learn more? Engage with the Microsoft Security community in our Tech Community: Microsoft Defender XDR Tech Community.
Feedback
Coming soon: Throughout 2024 we will be phasing out GitHub Issues as the feedback mechanism for content and replacing it with a new feedback system. For more information see: https://aka.ms/ContentUserFeedback.
Submit and view feedback for