Copy or move a database - Azure SQL Managed Instance
Applies to: ![]() Azure SQL Managed Instance
Azure SQL Managed Instance
This article describes how to copy or move a database online across instances in Azure SQL Managed Instance. Both database copy and move operations are supported across different Azure subscriptions within the same Azure tenant.
Overview
You can perform an online copy or move operation of a database across managed instances by using Always On availability group technology. The copy and move feature creates a new database on the destination instance as a copy of the source database. With this feature, data replication is reliable, consistent, asynchronous, and near real-time.
When you copy a database, the source database remains online during the operation and after it's completed.
Conversely, when you move a database, the source database gets dropped after the operation is completed.
You can run multiple database copy and move operations from the source managed instance to one or more target instances.
Copying and moving a database is different from point-in-time restore (PITR) because it creates a copy of the database after the operation is completed. PITR creates a copy of the database from a specified moment in the past.
Important
When you move a database to a new destination, existing PITR backups don't move with the database, and they're not available. The database starts a new backup chain on the destination instance the moment the move operation is completed.
When to use the feature
Moving or copying a database is useful when you want to:
- Manage database growth and performance requirements.
- Balance workloads across multiple managed instances.
- Move databases to an instance with more available resources to handle the workload.
- Consolidate multiple databases from several instances.
- Create database parity between dev, test, and production environments.
Workflow
Here's the workflow for copying or moving a database:
Choose the database, source managed instance, and destination instance, and then start the operation.
The database gets seeded to the destination server. Check the status to determine whether the operation is in progress or whether it has succeeded.
After the seeding finishes, the operation state shows as ready for completion.
Until the operation has been manually completed, all changes that happen to the source database are applied to the destination database. You can cancel the operation at any time. You have 24 hours to explicitly complete the operation. If you don't complete the operation within 24 hours, it's automatically canceled and the destination database is dropped.
After you manually complete the operation, your destination database comes online and is ready for read/write workloads.
If you choose to move the database, the source database gets dropped. If you choose to copy the database, the source database remains online, but data synchronization stops.
An example workflow for a move operation is illustrated in the following diagram:
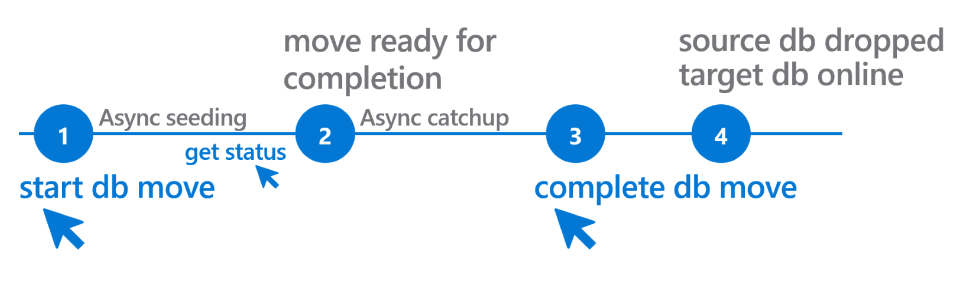
The design of the database move operation guarantees there's no data loss. When a user completes the move operation, the source database stops accepting any workloads and the transaction is replicated to the destination database. Only then, the destination database becomes online, and the source database dropped. This design ensures all data from the source database is moved to the destination database.
The database copy operation is similar to database move. The only important difference is how the operation ends. Completing the database copy operation stops replication of the transaction log to the destination database. Although the user explicitly issues the command to complete the copy operation, the user doesn't control exact moment when log replication stops. Finally, both source and destination database are online, independent, and ready for read-write workload.
Prerequisites
Before you can copy or move a database, you must meet the following requirements:
- You must have read permissions for the resource group that contains the source managed instance, and you must have write permissions at the database level for both the source and destination instances.
- If the source and destination instances are in different virtual networks, there must be network connectivity between the virtual networks of the two instances, such as with Azure virtual network peering. Also, inbound and outbound traffic on port 5022 and port range 11000-11999 needs to be allowed for the TCP protocol. This applies to both subnets, hosting the source and the destination instance. Here is documentation on how to establish network connectivity between instances in different Azure VNets.
Copy or move database
You can copy or move a database to another managed instance by using the Azure portal. To do so:
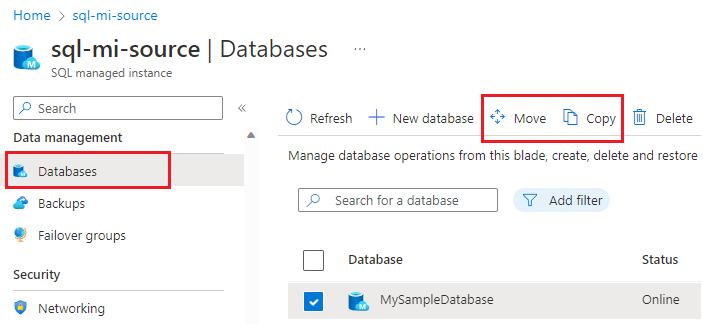
Go to your managed instance in the Azure portal.
Under Data management, select Databases.
Select one or more databases, and then select either the Copy or Move option at the top of the pane.
Selecting Move drops the source database when the operation is completed, and selecting Copy leaves the source database online when the operation is completed. Selecting either option opens the Move Managed Database or Copy Managed Database page. After the page opens, you can select more databases to include in the operation.
On the Source details pane, provide details for the source database and managed instance.
On the Destination details pane, provide details for the destination managed instance.
Select Review + Start to validate your source and destination details, and then select Start to begin the operation.
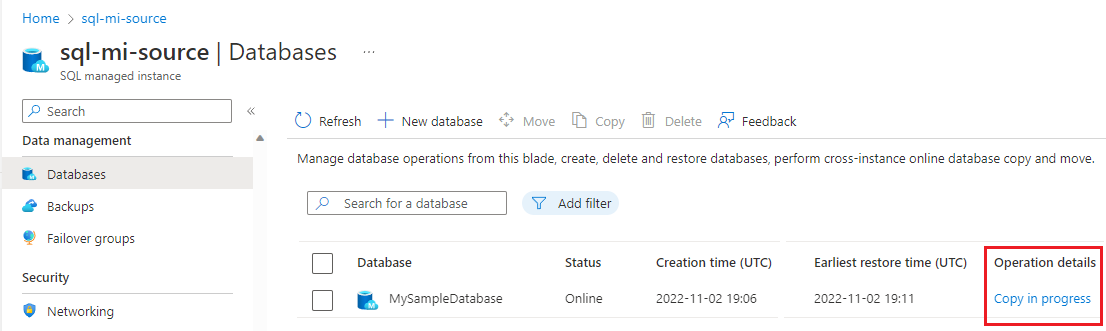
Selecting Start takes you back to the Databases page of your instance, where you can monitor the progress of the operation.
On the Databases page, check the Operation details column to verify that the status of your operation is Move in progress or Copy in progress.
If you need to cancel, select In progress, select the database you're working with, and then select Cancel operation to stop seeding and drop the destination database.
Monitor the operation. After the seeding is completed, the Operation details column displays a status of Move ready for completion or Copy ready for completion.
Select Ready for completion to open the Operation details column, choose the database that you're ready to copy or move, and then select Complete to finalize the operation and bring the destination database online.
Changes made to the source database are replicated to the destination database during this time, until you select Complete. If you don't complete the operation within 24 hours, it's automatically canceled, and the destination database is dropped. Selecting Complete finalizes the operation and takes you back to the Databases page, where you can verify that the operation is complete.
If you moved the database, the database name is unavailable because it's now offline.
Performance of copy and move operations
Both database copy and move operations have two phases. The first one is initial seeding and the second one is the replication of changes from the source database to the destination database. Typically, initial seeding is a more demanding phase of the operation. The time it takes for the initial seeding to complete depends on the size of data and the number of active copy or move operations. Intensity of the workload that is happening on the source and destination Azure SQL Managed Instance and the speed of the network between source and destination will also influence seeding speed. Under optimal circumstances, and when the connectivity between source and destination is established using recommended global VNet peering, seeding speed is up to 360 GB per hour. The seeding process and its speed can be monitored via DMV sys.dm_hadr_physical_seeding_stats.
SELECT
	role_desc,
	transfer_rate_bytes_per_second,
	transferred_size_bytes,
	database_size_bytes,
	start_time_utc,
	estimate_time_complete_utc,
	end_time_utc,
	local_physical_seeding_id
FROM
	sys.dm_hadr_physical_seeding_stats;
Limitations
Consider the following limitations of the copy and move feature:
- The source and destination instances can't be the same.
- Both the source instance and destination instance need to be in the same Azure region.
- You can copy and move user databases only. Copying and moving system databases isn't supported.
- A database can participate in only a single move or copy operation at a time.
- The source instance can run up to eight copy or move operations at a time. You can start more than eight operations, but some are queued and processed later, as managed by the service.
- You can't rename a database during a copy or move operation.
- Database tags aren't copied with copy or move operation.
- Database copy and move operations don't copy or move PITR backups.
- You can't copy or move a database that's part of a failover group, or that's using the Managed Instance link.
- The source or destination managed instance shouldn't be configured with a failover group (geo-disaster recovery) setup.
- You'll need to reconfigure transactional replication, change data capture (CDC), or distributed transactions after you move a database that relies on these features.
Related content
More documentation related to database copy and move.
- Azure PowerShell documentation for database copy and database move.
- Azure CLI documentation for database copy and database move.
- Enabling connectivity between SQL Managed Instances.
For other data movement options, review:
Feedback
Coming soon: Throughout 2024 we will be phasing out GitHub Issues as the feedback mechanism for content and replacing it with a new feedback system. For more information see: https://aka.ms/ContentUserFeedback.
Submit and view feedback for