Configure and use imported PKCS certificates with Intune
Microsoft Intune supports the use of imported public key pair (PKCS) certificates, commonly used for S/MIME encryption with Email profiles. Certain email profiles in Intune support an option to enable S/MIME where you can define an S/MIME signing certificate and S/MIME encryption cert.
Important
As announced in this Microsoft Tech Community blog, support for Azure Active Directory Authentication Library (ADAL) ends in December 2022. For your PowerShell scripts or custom code to continue to work to import user PFX certificates to Intune, they must be updated to leverage Microsoft Authentication Library (MSAL). Additionally, the global Intune application ID should be updated with the unique Application (client) ID assigned to your app after registering it in Microsoft Entra ID to prevent future authentication issues.
On GitHub, the sample PowerShell script to help simplify importing PFX certificates has been updated to reference MSAL and the Microsoft Entra Application (client) ID. Script samples in this article are also updated where applicable.
For more information, view the PFXImport PowerShell Project readme file on GitHub, and download the updated sample script.
S/MIME encryption is challenging because email is encrypted with a specific certificate:
- You must have the private key of the certificate that encrypted the email on the device where you're reading the email so it can be decrypted.
- Before a certificate on a device expires, you should import a new certificate so devices can continue to decrypt new email. Renewal of these certificates isn't supported.
- Encryption certificates are renewed regularly, which means that you might want to keep past certificate on your devices, to ensure that older email can continue to be decrypted.
Because the same certificate needs to be used across devices, it's not possible to use SCEP or PKCS certificate profiles for this purpose as those certificate delivery mechanisms deliver unique certificates per device.
For more information about using S/MIME with Intune, Use S/MIME to encrypt email.
Supported platforms
Intune supports import of PFX certificates for the following platforms:
- Android device administrator
- Android Enterprise:
- Fully Managed
- Corporate-Owned Work Profile
- Personally-Owned Work Profile
- iOS/iPadOS
- macOS
- Windows 10/11
Important
Microsoft Intune is ending support for Android device administrator management on devices with access to Google Mobile Services (GMS) on December 31, 2024. After that date, device enrollment, technical support, bug fixes, and security fixes will be unavailable. If you currently use device administrator management, we recommend switching to another Android management option in Intune before support ends. For more information, see Ending support for Android device administrator on GMS devices.
Requirements
To use imported PKCS certificates with Intune, you'll need the following infrastructure:
Certificate Connector for Microsoft Intune:
The certificate connector handles requests for PFX files imported to Intune for S/MIME email encryption for a specific user. Ensure that each connector you install has access to the private key that is used to encrypt the passwords of the uploaded PFX files.
For information about the certificate connector, see:
Windows Server:
The certificate connector installs on a Windows Server that meets the connectors prerequisites.
Visual Studio 2015 or above (optional):
You use Visual Studio to build the helper PowerShell module with cmdlets for importing PFX certificates to Microsoft Intune. To get the helper PowerShell cmdlets, see PFXImport PowerShell Project in GitHub.
How it works
When you use Intune to deploy an imported PFX certificate to a user, there are two components at play in addition to the device:
Intune Service: Stores the PFX certificates in an encrypted state and handles the deployment of the certificate to the user device. The passwords protecting the private keys of the certificates are encrypted before they're uploaded using either a hardware security module (HSM) or Windows Cryptography, ensuring that Intune can't access the private key at any time.
Certificate Connector for Microsoft Intune: When a device requests a PFX certificate that was imported to Intune, the encrypted password, the certificate, and the device's public key are sent to the connector. The connector decrypts the password using the on-premises private key, and then re-encrypts the password (and any plist profiles if using iOS) with the device key before sending the certificate back to Intune. Intune then delivers the certificate to the device and the device decrypts it with the device's private key and install the certificate.
Import PFX Certificates to Intune
You use Microsoft Graph to import your users PFX certificates into Intune. The helper PFXImport PowerShell Project at GitHub provides you with cmdlets to do the operations with ease.
If you prefer to use your own custom solution using Graph, use the userPFXCertificate resource type.
Build 'PFXImport PowerShell Project' cmdlets
To make use of the PowerShell cmdlets, you build the project yourself using Visual Studio. The process is straight forward and while it can run on the server, we recommended you run it on your workstation.
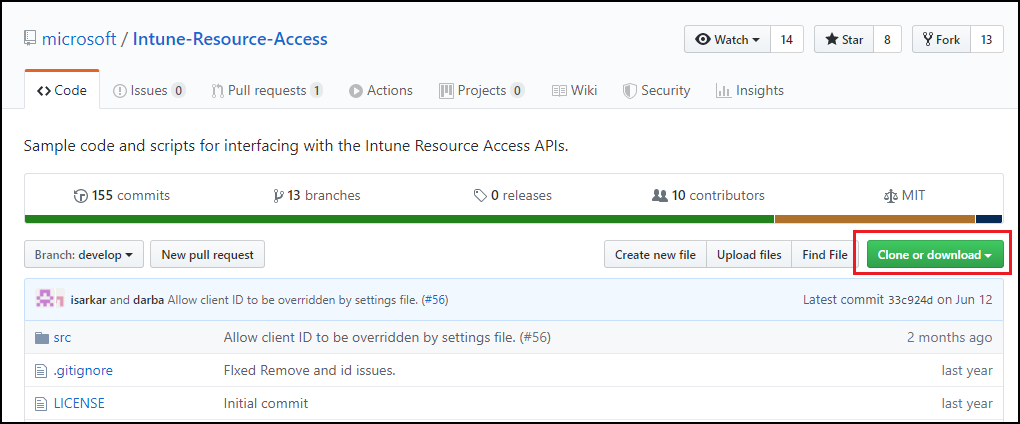
Go to the root of the Intune-Resource-Access repository on GitHub, and then either download or clone the repository with Git to your machine.
Go to
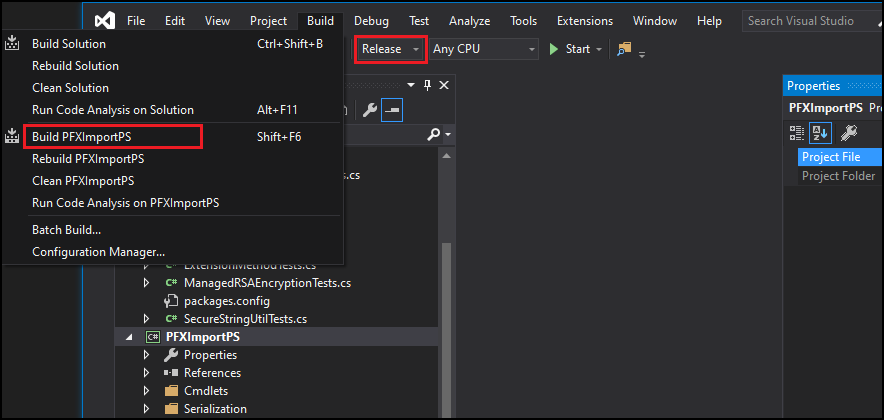
.\Intune-Resource-Access-develop\src\PFXImportPowershell\and open the project with Visual Studio using the file PFXImportPS.sln.On the top, change from Debug to Release.
Go to Build and select Build PFXImportPS. In a few moments, you'll see the Build succeeded confirmation at the bottom left of Visual Studio.
The build process creates a new folder with the PowerShell Module at
.\Intune-Resource-Access-develop\src\PFXImportPowershell\PFXImportPS\bin\Release.You'll use this Release folder for the next steps.
Create the encryption Public Key
You import PFX Certificates and their private keys to Intune. The password protecting the private key is encrypted with a public key that is stored on-premises. You can use either Windows cryptography, a hardware security module, or another type of cryptography to generate and store the public/private key pairs. Depending on the type of cryptography used, the public/private key pair can be exported in a file format for backup purposes.
The PowerShell module provides methods to create a key using Windows cryptography. You can also use other tools to create a key.
To create the encryption key using Windows cryptography
Copy the Release folder that's created by Visual Studio to the server where you installed the Certificate Connector for Microsoft Intune. This folder contains the PowerShell module.
On the server, open PowerShell as an Administrator and then navigate to the Release folder that contains the PowerShell module.
To import the module, run
Import-Module .\IntunePfxImport.psd1to import the module.Next, run
Add-IntuneKspKey -ProviderName "Microsoft Software Key Storage Provider" -KeyName "PFXEncryptionKey"Tip
The provider you use must be selected again when you import PFX Certificates. You can use the Microsoft Software Key Storage Provider, although it is supported to use a different provider. The key name is also provided as an example, and you can use a different key name of your choice.
If you plan to import the certificate from your workstation, you can export this key to a file with the following command:
Export-IntunePublicKey -ProviderName "<ProviderName>" -KeyName "<KeyName>" -FilePath "<File path\Filename.PFX>"The private key must be imported on each server that hosts the Certificate Connector for Microsoft Intune so that imported PFX certificates can be processed successfully.
To use a hardware security module (HSM)
You can use a hardware security module (HSM) to generate and store the public/private key pair. For more information, see the HSM provider's documentation.
Import PFX Certificates
The following process uses the PowerShell cmdlets as an example of how to import the PFX certificates. You can pick different options depending on your requirements.
Options include:
Intended Purpose (groups certificates together based on a tag):
- unassigned
- smimeEncryption
- smimeSigning
Padding Scheme:
- oaepSha256
- oaepSha384
- oaepSha512
Select the Key Storage Provider that matches the provider you used to create the key.
To import the PFX certificate
Export the certificates from any Certification Authority (CA) by following the documentation from the provider. For Microsoft Active Directory Certificate Services, you can use this sample script.
On the server, open PowerShell as an Administrator and then navigate to the Release folder that contains the PowerShell module IntunePfxImport.psd1.
Note
The following changes must be made for GCC High and DoD tenants prior to running IntunePfxImport.psd1.
Use a text editor or PowerShell ISE to edit the file, which updates the service endpoints for the GCC High environment. Notice that these updates change the URIs from .com to .us suffixes. There are a total of two updates within IntunePfxImport.psd1. One for AuthURI and the second for GraphURI:
PrivateData = @{
    AuthURI = "login.microsoftonline.us"
    GraphURI = "https://graph.microsoft.us"
    SchemaVersion = "beta"

    ClientId = "00000000-0000-0000-0000-000000000000" # Client Id from Azure app registration

    ClientSecret = ""  # client secret from app registration when using application permissions to authenticate

    TenantId = "00000000-0000-0000-0000-000000000000" # TenantId is required when using client secret
    }
After saving the changes, restart PowerShell.
To import the module, run
Import-Module .\IntunePfxImport.psd1To authenticate to Intune Graph, run
Set-IntuneAuthenticationToken -AdminUserName "<Admin-UPN>"Note
As the authentication is run against Graph, you must provide permissions to the AppID. If it's the first time you've used this utility, a Global administrator is required. The PowerShell cmdlets use the same AppID as the one used with PowerShell Intune Samples.
Convert the password for each PFX file you're importing to a secure string by running
$SecureFilePassword = ConvertTo-SecureString -String "<PFXPassword>" -AsPlainText -Force.To create a UserPFXCertificate object, run
$userPFXObject = New-IntuneUserPfxCertificate -PathToPfxFile "<FullPathPFXToCert>" $SecureFilePassword "<UserUPN>" "<ProviderName>" "<KeyName>" "<IntendedPurpose>"For example:
$userPFXObject = New-IntuneUserPfxCertificate -PathToPfxFile "C:\temp\userA.pfx" $SecureFilePassword "userA@contoso.com" "Microsoft Software Key Storage Provider" "PFXEncryptionKey" "smimeEncryption"Note
When you import the certificate from a system other than the server where the connector is installed, you must use the following command that includes the key file path:
$userPFXObject = New-IntuneUserPfxCertificate -PathToPfxFile "<FullPathToPFX>" $SecureFilePassword "<UserUPN>" "<ProviderName>" "<KeyName>" "<IntendedPurpose>" "<PaddingScheme>" "<File path to public key file>"VPN is not supported as a IntendedPurpose.
Import the UserPFXCertificate object to Intune by running
Import-IntuneUserPfxCertificate -CertificateList $userPFXObjectTo validate the certificate was imported, run
Get-IntuneUserPfxCertificate -UserList "<UserUPN>"As a best practice to clean up the Microsoft Entra token cache without waiting for it to expire on it’s own, run
Remove-IntuneAuthenticationToken
For more information about other available commands, see the readme file at PFXImport PowerShell Project at GitHub.
Create a PKCS imported certificate profile
After importing the certificates to Intune, create a PKCS imported certificate profile, and assign it to Microsoft Entra groups.
Note
After you create a PKCS imported certificate profile, the Intended Purpose and Key storage provider (KSP) values in the profile are read-only and can't be edited. If you need a different value for either of these settings, create and deploy a new profile.
Sign in to the Microsoft Intune admin center.
Select and go to Devices > Manage devices > Configuration > Create.
Enter the following properties:
- Platform: Choose the platform of your devices.
- Profile: Select PKCS imported certificate. Or, select Templates > PKCS imported certificate.
Select Create.
In Basics, enter the following properties:
- Name: Enter a descriptive name for the profile. Name your profiles so you can easily identify them later. For example, a good profile name is PKCS imported certificate profile for entire company.
- Description: Enter a description for the profile. This setting is optional, but recommended.
Select Next.
In Configuration settings, enter the following properties:
Intended purpose: Specify the intended purpose of the certificates that are imported for this profile. Administrators can import certificates with different intended purposes (like S/MIME signing or S/MIME encryption). The intended purpose selected in the certificate profile matches the certificate profile with the right imported certificates. Intended purpose is a tag to group imported certificates together and doesn't guarantee that certificates imported with that tag will meet the intended purpose.
Key storage provider (KSP): For Windows, select where to store the keys on the device.
This step applies only to Android Enterprise devices profiles for Fully Managed, Dedicated, and Corporate-Owned work Profile.
In Apps, configure Certificate access to manage how certificate access is granted to applications. Choose from:
- Require user approval for apps (default) – Users must approve use of a certificate by all applications.
- Grant silently for specific apps (require user approval for other apps) – With this option, select Add apps, and then select one or more apps that will silently use the certificate without user interaction.
Select Next.
In Assignments, select the user or groups that will receive your profile. For more information on assigning profiles, see Assign user and device profiles.
Select Next.
(Applies to Windows 10/11 only) In Applicability Rules, specify applicability rules to refine the assignment of this profile. You can choose to assign or not assign the profile based on the OS edition or version of a device.
For more information, see Applicability rules in Create a device profile in Microsoft Intune.
Select Next.
In Review + create, review your settings. When you select Create, your changes are saved, and the profile is assigned. The policy is also shown in the profiles list.
Support for third-party partners
The following partners provide supported methods or tools you can use to import PFX certificates to Intune.
DigiCert
If you use the DigiCert PKI Platform service, you can use the DigiCert Import Tool for Intune S/MIME Certificates to import PFX certificates to Intune. Use of this tool replaces the need to follow the instructions in the section Import PFX Certificates to Intune that's detailed earlier in this article.
To learn more about the DigiCert Import tool, including how to obtain the tool, see https://knowledge.digicert.com/tutorials/microsoft-intune.html in the DigiCert knowledge base.
EverTrust
If you use EverTrust as your PKI solution, standalone or combined to an existing PKI, you can configure EverTrust Horizon to import PFX certificates to Intune. After you complete the integration, you won’t need to follow the instructions in the section Import PFX Certificates to Intune that's detailed earlier in this article.
To learn more about EverTrust’s integration with Intune, see https://evertrust.fr/horizon-and-intune-integration/.
KeyTalk
If you use the KeyTalk service, you can configure their service to import PFX certificates to Intune. After you complete the integration, you won’t need to follow the instructions in the section Import PFX Certificates to Intune to Intune that's detailed earlier in this article.
To learn more about KeyTalk’s integration with Intune, see https://keytalk.com/support in the KeyTalk knowledge base.
Next steps
Intune UI displays Windows Server devices as distinct from Windows clients for the Security Management for Microsoft Defender for Endpoint scenario
To support the Security Management for Microsoft Defender for Endpoint (MDE security configuration) scenario, Intune will soon differentiate Windows devices in Microsoft Entra ID as either Windows Server for devices that run Windows Server, or as Windows for devices that run Windows 10 or Windows 11.
With this change, you'll be able to improve policy targeting for Microsoft Defender for Endpoint security configuration. For example, you'll be able to use dynamic groups that consist of only Windows Server devices, or only Windows client devices (Windows 10/11).