How to change the database server in a SharePoint farm
Summary
In a SharePoint farm, you may have to migrate databases from one server that is running SQL Server to another. If you don't use a SQL Server client alias during the SharePoint installation, or you if you have to rename the database server for various reasons (for example, after a security breach), follow the steps in this article to change the database server.
Through good planning and high availability, you can perform these steps in a production environment without having to stop all services.
Change the database server
This article assumes that all SharePoint databases are hosted on a single SQL Server instance. Adjust the parameters in these steps as necessary for your environment.
Before you start, create a backup of the configuration database for troubleshooting in case the SharePoint farm becomes inaccessible when you perform the steps.
Important
Before you begin, make sure that you understand this action plan. If the SharePoint farm becomes completely inaccessible, or if the configuration database becomes corrupted, you will have to restore the functionality from the latest farm backup.
Step 1: Create a new SQL alias on all SharePoint servers in the farm
To do this, follow these steps:
- Make sure that you use a user account that's a member of the following:
- The Administrators group
- The db_owner fixed database role
- Start the SQL Server Client Network Utility (cliconfg.exe). This utility is typically located in the C:\Windows\SysWOW64 (32-bit) or C:\Windows\System32 (64-bit) folder.
- On the General tab, verify that TCP/IP is enabled.
- On the Alias tab, click Add.
Note The Add Network Library Configuration window appears. - In the Server alias box, enter the name of the new SQL Server alias.
- In the Network libraries area, click TCP/IP.
- In the Server name box in the Connection parameters area, enter the Fully Qualified Domain Name of the new server that's running SQL Server, and then click OK.
- Repeat steps 2 to 7 on all SharePoint servers that connect to the instance of SQL Server that hosts the databases.
Step 2: Point the SharePoint databases to the new SQL alias
This step changes the SQL Server instance pointer on all SharePoint databases. If you want to store the databases on different SQL Server instances, modify the script accordingly.
Important
The SharePoint configuration database and Central Administration content database must reside on the same SQL Server instance.
To change the SQL Server instance pointer, run the following PowerShell script in an elevated SharePoint Management Shell window:
$SPDBs = Get-SPDatabase
 ForEach ($DB in $SPDBs)
 {
     $DB.ChangeDatabaseInstance('SPSQLRenamed')
 }
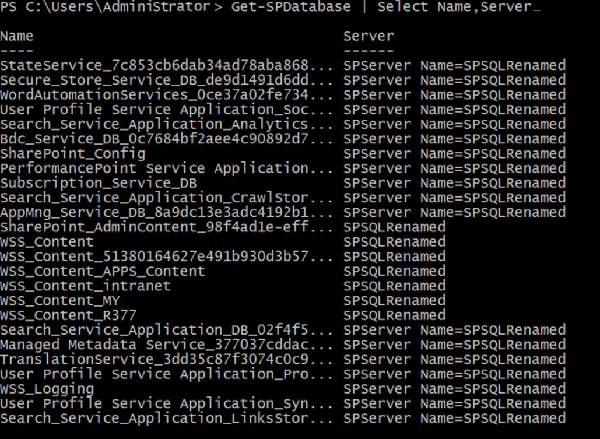
To verify the change, run the following PowerShell cmdlet in an elevated SharePoint Management Shell window:
Get-SPDatabase | Select Name,Server
You should receive a result that's similar to the following example:
Step 3: Point the default database instance for the web applications to the new SQL Server instance
This step is required so that when you create databases without specifying the database server, they won't connect to the old SQL Server instance.
The following action plan is going to point all databases to the same SQL Server instance (the one that serves the configuration database). Modify this script to match your requirements.
Run the following PowerShell script in an elevated SharePoint Management Shell window:
$ConfigDB = Get-SPDatabase | ?{$_.Name -eq 'SharePoint_Config'}
 $WebApps = Get-SPWebApplication -IncludeCentralAdministration
 ForEach ($WebApp in $WebApps)
 {
     $WebApp.Parent.DefaultDatabaseInstance = $ConfigDB.ServiceInstance
     $webapp.Parent.Update()
     $webapp.Update()
 }
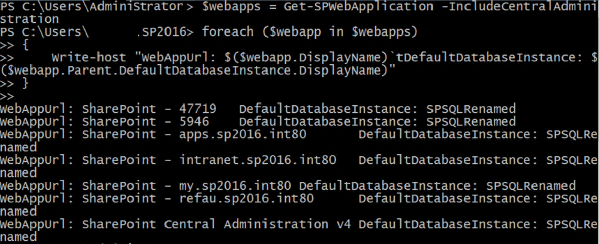
To verify the change, run the following PowerShell cmdlet in an elevated SharePoint Management Shell window:
$webapps = Get-SPWebApplication -IncludeCentralAdministration
 foreach ($webapp in $webapps)
 {
     Write-host "WebAppUrl: $($webapp.DisplayName)`tDefaultDatabaseInstance: $($webapp.Parent.DefaultDatabaseInstance.DisplayName)"
 }
You should receive a result that resembles the following example:
Step 4: Change the Distributed Cache cluster configuration
Important
This step describes how to directly modify the SharePoint configuration database. Direct database modification is generally not supported for most SharePoint-related databases. The actions that are specified here are permitted only for this specific purpose. We do not grant permission to use these steps to make any other changes.
To do this, follow these steps:
Get the current configuration object from the server that's running SQL Server by using the following SQL query:
SELECT [ID],[Properties]
FROM [SharePoint_Config].[dbo].[Objects]
WITH (NOLOCK)
WHERE Properties like '%_cacheConfigStorageLocation%'
The query returns a single row that has two columns. One column is for the GUID of the configuration item, and the other is for the content of the configuration item, as in the following example:
<object type="Microsoft.SharePoint.DistributedCaching.Utilities.SPDistributedCacheClusterInfo, Microsoft.SharePoint, Version=16.0.0.0, Culture=neutral, PublicKeyToken=Token"><fld type="Microsoft.SharePoint.DistributedCaching.Utilities.SPDistributedCacheClusterConfigStorageLocation, Microsoft.SharePoint, Version=16.0.0.0, Culture=neutral, PublicKeyToken=Token" name="_cacheConfigStorageLocation"><object type="Microsoft.SharePoint.DistributedCaching.Utilities.SPDistributedCacheClusterConfigStorageLocation, Microsoft.SharePoint, Version=16.0.0.0, Culture=neutral, PublicKeyToken=Token"><sFld type="String" name="_provider">SPDistributedCacheClusterProvider</sFld><sFld type="String" name="_connectionString">Data Source=SPSQLRenamed;Initial Catalog=SharePoint_Config;Integrated Security=True;Persist Security Info=False;Enlist=False;Pooling=True;Min Pool Size=0;Max Pool Size=100;PoolBlockingPeriod=Auto;Asynchronous Processing=False;Connection Reset=True;MultipleActiveResultSets=False;Replication=False;Connect Timeout=15;Encrypt=False;TrustServerCertificate=False;Load Balance Timeout=0;Packet Size=8000;Type System Version=Latest;Application Name=".Net SqlClient Data Provider";User Instance=False;Context Connection=False;Transaction Binding="Implicit Unbind";ApplicationIntent=ReadWrite;MultiSubnetFailover=False;TransparentNetworkIPResolution=True;ConnectRetryCount=1;ConnectRetryInterval=10;Column Encryption Setting=Disabled</sFld></object></fld><sFld type="String" name="_clusterSize">medium</sFld><sFld type="Boolean" name="_enableHA">False</sFld><sFld type="Boolean" name="_isInitialized">True</sFld><sFld type="Boolean" name="_isDataCacheSecurityEnabled">False</sFld><sFld type="Boolean" name="m_DeploymentLocked">False</sFld><fld type="System.Collections.Hashtable, mscorlib, Version=4.0.0.0, Culture=neutral, PublicKeyToken=Token" name="m_UpgradedPersistedFields" /><fld name="m_Properties" type="null" /><sFld type="String" name="m_LastUpdatedUser">SP2016\Administrator</sFld><sFld type="String" name="m_LastUpdatedProcess">psconfigui (3536)</sFld><sFld type="String" name="m_LastUpdatedMachine">SP16APP1</sFld><sFld type="DateTime" name="m_LastUpdatedTime">Time</sFld><fld name="m_LastUpdatedStackTrace" type="null" /><sFld type="Int32" name="m_LastUpdatedThreadId">31</sFld><sFld type="Guid" name="m_LastUpdatedCorrelationId">CorrelationId</sFld></object>.Copy the result into Notepad, and then replace the following with the new SQL Server instance:
Data Source=SPSQLRenamed;Initial Catalog=SharePoint_Config;Run the following SQL command to update the configuration object:
UPDATE Objects
SET Properties = '[content in Notepad]'
WHERE ID = '[GUID of the configuration object in the query result]'
Step 5: Reprovision the Distributed Cache service on all Distributed Cache servers
To do this, follow these steps:
On one of the Distributed Cache servers, gracefully shut down the service by running the following PowerShell cmdlet in an elevated PowerShell prompt:
Use-CacheCluster
Stop-CacheHost -Graceful -CachePort 22233 -ComputerName $env:COMPUTERNAME
Wait until the service is stopped. You can monitor the status by using the following PowerShell cmdlet:
Get-CacheHostWhen the service is stopped, you should receive a result that's similar to the following example:

Remove the local server from the Distributed Cache cluster by running the following PowerShell cmdlet:
Remove-SPDistributedCacheServiceInstanceRestore the local server to the Distributed Cache cluster by running the following PowerShell cmdlet:
Add-SPDistributedCacheServiceInstanceOpen Registry Editor, and then verify that the ConnectionString value of the HKLM\SOFTWARE\Microsoft\AppFabric\V1.0\Configuration key is updated. Here is an example:

Repeat step 1 to 5 on each of the other servers in the Distributed Cache cluster.
Step 6: Remove reference to the old server
To do this, run the following PowerShell cmdlet in an elevated SharePoint Management Shell window:
$OldServer = Get-SPServer | ?{$_.Address -eq '<The name of the SQL Server to be removed>'}
 $OldServer.Delete()
Step 7: Verify the change
To verify that the database server is successfully changed, run the following cmdlet:
Get-SPServer
You should receive a result that resembles the following example:

More Information
Still need help? Go to SharePoint Community.
Feedback
Coming soon: Throughout 2024 we will be phasing out GitHub Issues as the feedback mechanism for content and replacing it with a new feedback system. For more information see: https://aka.ms/ContentUserFeedback.
Submit and view feedback for