Note
Access to this page requires authorization. You can try signing in or changing directories.
Access to this page requires authorization. You can try changing directories.
You can change the service level of an existing volume by moving the volume to another capacity pool in the same NetApp account that uses the service level you want for the volume. This in-place service-level change for the volume doesn't require that you migrate data. It also doesn't affect access to the volume.
This functionality enables you to meet your workload needs on demand. You can change an existing volume to use a higher service level for better performance, or to use a lower service level for cost optimization. For example, if the volume is in a capacity pool that uses the Standard service level and you want the volume to use the Premium service level, you can move the volume dynamically to a capacity pool that uses the Premium service level.
The capacity pool that you want to move the volume to must already exist. The capacity pool can contain other volumes. If you want to move the volume to a brand-new capacity pool, you need to create the capacity pool before you move the volume.
Considerations
Dynamically changing the service level of a volume is supported within the same NetApp account. You can't move the volume to a capacity pool in a different NetApp Account.
You can't convert a Flexible service level capacity pool to Standard, Premium, or Ultra. Standard, Premium, and Ultra service level capacity pools can't be converted to the Flexible service level.
After the volume is moved to another capacity pool, you no longer have access to the previous volume activity logs and volume metrics. The volume starts with new activity logs and metrics under the new capacity pool.
If you have Azure Monitor diagnostic settings configured on the volume, the pool change operation doesn't automatically migrate or remove them. Because the volume's ARM resource ID changes when it moves to a new capacity pool, any diagnostic settings on the original resource path become orphaned and continue to emit data to the configured destination (Log Analytics workspace, Event Hub, or storage account). To avoid this situation, remove diagnostic settings from the volume before performing volume move. After the volume is moved to a new pool and if you want to enable diagnostic settings again, go to the volume and create new diagnostic settings.
If you move a volume to a capacity pool of a higher service level (for example, moving from Standard to Premium or Ultra service level), you must wait at least 24 hours before you can move that volume again to a capacity pool of a lower service level (for example, moving from Ultra to Premium or Standard). You can always change to higher service level without wait time.
If the target capacity pool is of the manual QoS type, the volume's throughput isn't changed with the volume move. You can modify the allotted throughput in the target manual capacity pool.
Regardless of the source pool’s QoS type, when the target pool is of the auto QoS type, the volume's throughput is changed with the move to match the service level of the target capacity pool.
If you use cool access, see Manage Azure NetApp Files storage with cool access for more considerations.
If you're using a custom IAM role with an Azure NetApp Files datastore for Azure VMware Service, ensure you have the correct permissions to update the service level. For specific permissions, see prerequisites.
Move a volume to another capacity pool
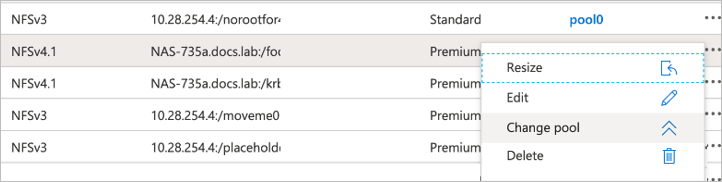
On the Volumes page, right-click the volume whose service level you want to change. Select Change Pool.
In the Change pool window, select the capacity pool you want to move the volume to.
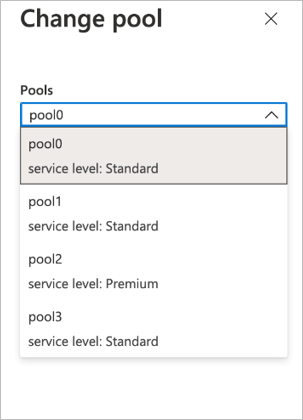
Select OK.
Next steps
- Service levels for Azure NetApp Files
- Create a capacity pool
- Manage the allotted throughput of a manual QoS volume
- Storage hierarchy of Azure NetApp Files
- Resource limits for Azure NetApp Files
- Cost model for Azure NetApp Files
- Metrics for Azure NetApp Files
- Troubleshoot issues for changing the capacity pool of a volume