Note
Access to this page requires authorization. You can try signing in or changing directories.
Access to this page requires authorization. You can try changing directories.
Important
This feature is in Public Preview. Workspace admins can control access to this feature from the Previews page. See Manage Azure Databricks previews.
Access control
Features are governable Unity Catalog objects. Access to a feature is controlled by the CREATE FEATURE, READ FEATURE, and MANAGE Unity Catalog privileges. For full descriptions, see Unity Catalog privileges reference.
CREATE FEATURE— Required to create a feature in a schema.create_featureandregister_featurerequireCREATE FEATUREon the parent schema. Following the principle of least privilege, grantCREATE FEATUREat the schema level; you can also grant it on a catalog to allow creating features in any schema in that catalog.READ FEATURE— Required to read a feature and its data.get_feature,create_training_set, and reading materialized feature data for training or serving requireREAD FEATUREon the feature.READ FEATUREgranted on a schema or catalog applies to all current and future features it contains.MANAGE— Required to manage a feature's lifecycle and grants. Deleting a feature withdelete_feature, and materializing a feature withmaterialize_featuresordelete_materialized_feature, requireMANAGEon the feature.
All feature operations also require USE CATALOG on the parent catalog and USE SCHEMA on the parent schema. For how MANAGE and READ FEATURE apply to materialization, see Permissions.
Feature View API
Feature constructor and register_feature()
The recommended approach is to construct a Feature object locally and use register_feature to persist it to Unity Catalog. This two-step workflow lets you experiment with features (including create_training_set) before registering them.
Feature(
    source: DataSource,                                    # Required: DeltaTableSource, StreamSource, or RequestSource
    function: Union[AggregationFunction, ColumnSelection], # Required: Aggregation or column selection
    entity: Optional[List[str]] = None,                    # Required for aggregation: entity columns
    timeseries_column: Optional[str] = None,               # Required for aggregation: timestamp column
    name: Optional[str] = None,                            # Optional: Feature name (auto-generated if omitted)
    description: Optional[str] = None,                     # Optional: Feature description
)
FeatureEngineeringClient.register_feature() registers a locally constructed Feature in Unity Catalog.
FeatureEngineeringClient.register_feature(
    feature: Feature,       # Required: A Feature instance (not already registered)
    catalog_name: str,      # Required: UC catalog name
    schema_name: str,       # Required: UC schema name
) -> Feature
from databricks.feature_engineering.entities import Feature, DeltaTableSource, AggregationFunction, Sum, RollingWindow
from datetime import timedelta

# Step 1: Construct the feature locally
feature = Feature(
    source=DeltaTableSource(catalog_name="main", schema_name="store", table_name="transactions"),
    entity=["user_id"],
    timeseries_column="transaction_time",
    function=AggregationFunction(Sum(input="amount"), RollingWindow(window_duration=timedelta(days=7))),
)

# Step 2: Register in Unity Catalog
fe = FeatureEngineeringClient()
registered_feature = fe.register_feature(
    feature=feature,
    catalog_name="main",
    schema_name="store",
)
create_feature()
FeatureEngineeringClient.create_feature() validates, constructs, and immediately registers a feature in Unity Catalog in a single step. Use this when you don't need to experiment with the feature locally first.
FeatureEngineeringClient.create_feature(
    source: DataSource,                                    # Required: DeltaTableSource, StreamSource, or RequestSource
    function: Union[AggregationFunction, ColumnSelection], # Required: Aggregation or column selection
    catalog_name: str,                                     # Required: The catalog name for the feature
    schema_name: str,                                      # Required: The schema name for the feature
    entity: Optional[List[str]] = None,                    # Required for aggregation: entity columns
    timeseries_column: Optional[str] = None,               # Required for aggregation: timestamp column
    name: Optional[str] = None,                            # Optional: Feature name (auto-generated if omitted)
    description: Optional[str] = None,                     # Optional: Feature description
) -> Feature
Parameters:
source: The data source used in feature computation (DeltaTableSource,StreamSource, orRequestSource).function: AnAggregationFunctionthat bundles the operator (for example,Sum(input="amount")), input column, and time window together. OrColumnSelection("column_name")for pass-through features.catalog_name: The Unity Catalog catalog name for the feature.schema_name: The Unity Catalog schema name for the feature.entity: List of column names that define the aggregation level (primary keys). Required for aggregation features. For example,["user_id"]aggregates per user.timeseries_column: The timestamp column used for time window aggregation. Required for aggregation features.name: Optional feature name. If omitted, auto-generated from the input column, function, and window (for example,amount_avg_rolling_7d).description: Optional description of the feature.
Returns: A validated Feature instance
Raises: ValueError if any validation fails
delete_feature()
Deletes a feature from Unity Catalog by its fully qualified name.
FeatureEngineeringClient.delete_feature(
    full_name: str,  # Required: '<catalog>.<schema>.<feature_name>'
) -> None
fe.delete_feature(full_name="main.store.amount_sum_rolling_7d")
Before deleting a feature, remove or update any models or feature specs that reference it. If the feature has been materialized, delete the materialized feature first. See How to delete a materialized feature.
Auto-generated names
When name is omitted, a name is automatically generated. Generated names follow the pattern: {column}_{function}_{window}. For example:
price_avg_rolling_1h(1-hour average price)transaction_count_rolling_30d_1d(30-day count of transaction with 1d delay from event timestamp)
Supported functions
Aggregation functions
Note
Aggregation functions are wrapped in an AggregationFunction together with a time window, as described in time windows. Each function takes an input parameter specifying the source column to aggregate.
| Function | Description | Example use case |
|---|---|---|
Sum(input="column") |
Total of values | Per user daily app usage in minutes |
Avg(input="column") |
Average of values | Mean transaction amount |
Count(input="column") |
Number of records | Number of logins per user |
Min(input="column") |
Minimum value | Lowest heart rate recorded by a wearable device |
Max(input="column") |
Maximum value | Highest transaction amount per session |
StddevPop(input="column") |
Population standard deviation | Daily transaction amount variability across all customers |
StddevSamp(input="column") |
Sample standard deviation | Variability of ad campaign click-through rates |
VarPop(input="column") |
Population variance | Spread of sensor readings for IoT devices in a factory |
VarSamp(input="column") |
Sample variance | Spread of movie ratings over a sampled group |
ApproxCountDistinct(input="column", relativeSD=0.05) |
Approximate unique count | Distinct count of items purchased |
ApproxPercentile(input="column", percentile=0.95, accuracy=100) |
Approximate percentile | p95 response latency |
First(input="column") |
First value | First login timestamp |
Last(input="column") |
Last value | Most recent purchase amount |
ColumnSelection (pass-through)
ColumnSelection selects a single column from a source without applying any aggregation. It is wrapped directly in the function parameter (not inside AggregationFunction). The return type is inferred from the source schema.
| Function | Description | Example use case |
|---|---|---|
ColumnSelection("col") |
Latest value of a column (no aggregation) | Most recent vendor category, pass-through of a request field |
ColumnSelection can be used with any data source:
DeltaTableSource: Returns the latest value per entity key via a point-in-time join (no lookback window aggregation).StreamSource: Returns the latest value per entity key from the stream (no lookback window aggregation).RequestSource: Passes through the value provided at inference time (or extracted from the labeled DataFrame at training time).
from databricks.feature_engineering.entities import (
    ColumnSelection, DeltaTableSource, Feature, FieldDefinition,
    RequestSource, ScalarDataType,
)

delta_source = DeltaTableSource(
    catalog_name="main", schema_name="feature_store", table_name="transactions",
)

request_source = RequestSource(
    schema=[
        FieldDefinition(name="session_duration", data_type=ScalarDataType.DOUBLE),
    ]
)

# ColumnSelection from a Delta table
latest_amount = Feature(
    source=delta_source,
    function=ColumnSelection("amount"),
    entity=["user_id"],
    timeseries_column="transaction_time",
    name="latest_transaction_amount",
)

# ColumnSelection from a RequestSource
session_feature = Feature(
    source=request_source,
    function=ColumnSelection("session_duration"),
    name="session_duration",
)
Example: aggregation and column selection features
The following example shows features defined over the same data source.
from databricks.feature_engineering.entities import (
    AggregationFunction, Feature, Sum, Avg, ApproxCountDistinct,
    ColumnSelection, RollingWindow,
)
from datetime import timedelta

window = RollingWindow(window_duration=timedelta(days=7))

sum_feature = Feature(
    source=source,
    entity=["user_id"],
    timeseries_column="event_time",
    function=AggregationFunction(Sum(input="amount"), window),
)

avg_feature = Feature(
    source=source,
    entity=["user_id"],
    timeseries_column="event_time",
    function=AggregationFunction(Avg(input="amount"), window),
)

distinct_count = Feature(
    source=source,
    entity=["user_id"],
    timeseries_column="event_time",
    function=AggregationFunction(ApproxCountDistinct(input="product_id", relativeSD=0.01), window),
)

# Column selection (no aggregation, no time window)
latest_amount = Feature(
    source=source,
    function=ColumnSelection("amount"),
    entity=["user_id"],
    timeseries_column="event_time",
    name="latest_amount",
)
Features with filter conditions
The filter_condition parameter allows you to filter rows from the source table before computing aggregations. This functions as a SQL WHERE clause that is applied prior to grouping and aggregating data.
Note
filter_condition filters rows before aggregation, like a SQL WHERE clause applied before GROUP BY. It does not change the granularity, which is always defined by entity on the feature definition.
Filters are useful when working with large source tables that include a superset of data needed for feature computation, and minimize the need for creating separate views on top of these tables.
from databricks.feature_engineering.entities import AggregationFunction, Sum, Count, RollingWindow, DeltaTableSource
from datetime import timedelta

# Source with filter applied at the source level
high_value_transactions = DeltaTableSource(
    catalog_name="main",
    schema_name="ecommerce",
    table_name="transactions",
    filter_condition="amount > 100",  # Only transactions over $100
)

high_value_sales = Feature(
    source=high_value_transactions,
    entity=["user_id"],
    timeseries_column="transaction_time",
    function=AggregationFunction(Sum(input="amount"), RollingWindow(window_duration=timedelta(days=30))),
)

# Multiple conditions
completed_orders_source = DeltaTableSource(
    catalog_name="main",
    schema_name="ecommerce",
    table_name="orders",
    filter_condition="status = 'completed' AND payment_method = 'credit_card'",
)

completed_orders = Feature(
    source=completed_orders_source,
    entity=["user_id"],
    timeseries_column="order_time",
    function=AggregationFunction(Count(input="order_id"), RollingWindow(window_duration=timedelta(days=7))),
)

# Filter on a StreamSource
from databricks.feature_engineering.entities import StreamSource

purchase_stream = StreamSource(
    full_name="main.ecommerce.transactions_stream",
    filter_condition="value.event_type = 'purchase'",
)

purchase_total = Feature(
    source=purchase_stream,
    entity=["value.user_id"],
    timeseries_column="value.event_time",
    function=AggregationFunction(Sum(input="value.amount"), RollingWindow(window_duration=timedelta(hours=1))),
)
Data sources
DeltaTableSource
DeltaTableSource is an ephemeral Python object used to define how features are computed from a source table. It does not create a new table. It specifies the configuration for reading data and aggregating features.
DeltaTableSource(
    catalog_name: str,                              # Required: Catalog name
    schema_name: str,                               # Required: Schema name
    table_name: str,                                # Required: Table name
    filter_condition: Optional[str] = None,         # Optional: SQL WHERE clause to filter source data
    transformation_sql: Optional[str] = None,       # Optional: SQL SELECT expression for column transformations
    dataframe_schema: Optional[str] = None,         # Required if transformation_sql is set: schema of the resulting DataFrame
)
Parameters:
catalog_name,schema_name,table_name: Identify the source Delta table in Unity Catalog.filter_condition: A SQLWHEREclause applied before aggregation. Example:"status = 'completed'".transformation_sql: A SQLSELECTexpression applied to the source table. Use this to rename columns, cast types, or compute derived columns before aggregation. If omitted, all columns are selected (*). Example:"user_id, CAST(amount AS DOUBLE) AS amount, event_time".dataframe_schema: The schema of the resulting DataFrame after transformations, in Spark StructType JSON format (fromdf.schema.json()). Required iftransformation_sqlis provided. This tells the system the column names and types that result from your transformation.
When both filter_condition and transformation_sql are set, the resulting query is: SELECT {transformation_sql} FROM {table} WHERE {filter_condition}.
Note
The timeseries_column (specified on the feature definition, not on DeltaTableSource) must be of type TimestampType or DateType. Integer types can work but cause loss in precision for time window aggregates.
Example: Using transformation_sql for column transformations
source = DeltaTableSource(
    catalog_name="main",
    schema_name="analytics",
    table_name="raw_events",
    transformation_sql="user_id, CAST(price_cents AS DOUBLE) / 100 AS price, event_time",
    filter_condition="event_type = 'purchase'",
    dataframe_schema=spark.sql(
        "SELECT user_id, CAST(price_cents AS DOUBLE) / 100 AS price, event_time FROM main.analytics.raw_events LIMIT 0"
    ).schema.json(),
)
Example: Deriving transformation_sql and dataframe_schema from a PySpark DataFrame
You can write your transformation as a PySpark query, then extract the schema from the resulting DataFrame:
df = spark.sql(f"""
  SELECT user_id, CAST(amount AS DOUBLE) / 100 AS amount_dollars, event_time
  FROM main.analytics.events
  WHERE event_date >= date_sub(current_date(), 7)
  LIMIT 0
""")

# Use df.schema.json() as the dataframe_schema
source = DeltaTableSource(
    catalog_name="main",
    schema_name="analytics",
    table_name="events",
    transformation_sql="user_id, CAST(amount AS DOUBLE) / 100 AS amount_dollars, event_time",
    filter_condition="event_date >= date_sub(current_date(), 7)",
    dataframe_schema=df.schema.json(),
)
Note
transformation_sql supports only row-wise expressions (column renames, casts, arithmetic). Aggregation functions like COUNT(*) or SUM() are not supported. Use AggregationFunction on the feature definition instead.
DeltaTableSource.from_sql()
As a convenience, you can create a DeltaTableSource from a SQL query. The method parses the query to automatically extract the table name, transformation_sql, and filter_condition.
DeltaTableSource.from_sql(
    sql: str,                           # Required: SQL SELECT query
    spark: SparkSession,                # Required: active SparkSession (for schema inference)
) -> DeltaTableSource
Only simple SELECT ... FROM ... [WHERE ...] queries are supported. Complex SQL (JOINs, subqueries, CTEs, UNIONs) is rejected. For complex queries, construct DeltaTableSource directly with transformation_sql and filter_condition.
from databricks.feature_engineering.entities import (
    AggregationFunction,
    DeltaTableSource,
    Feature,
    Sum,
    TumblingWindow,
)

source = DeltaTableSource.from_sql(
    spark=spark,
    sql=f"SELECT customer_id, event_ts, amount * 2 AS doubled_amount, amount FROM {CATALOG}.{SCHEMA}.{TABLE}",
)

feature = Feature(
    source=source,
    function=AggregationFunction(Sum(input="doubled_amount"), time_window=TumblingWindow(window_duration=timedelta(days=7))),
    entity=["customer_id"], timeseries_column="event_ts",
)
Iterate with to_dataframe()
Use source.to_dataframe() to preview the data that will be used for feature computation. This is useful for iterating on filter_condition and transformation_sql until they produce the expected results.
source = DeltaTableSource(
    catalog_name="main",
    schema_name="analytics",
    table_name="events",
    filter_condition="event_type = 'purchase'",
)

# Preview the filtered source data
source.to_dataframe().display()
Understanding entities
Entity columns define the level of aggregation for your features. They are specified on the Feature definition, not on DeltaTableSource. Entities determine:
- How data is grouped: Features are aggregated per unique combination of entity values (similar to
GROUP BYin SQL) - The primary key structure: Each unique entity combination results in one row of computed features
Example: Customer-level features
The following code aggregates features at the customer level (one row per customer):
from databricks.feature_engineering.entities import DeltaTableSource

source = DeltaTableSource(
    catalog_name="main",
    schema_name="analytics",
    table_name="user_events",
)

Feature(
    source=source,
    entity=["user_id"],                # Features aggregated per user
    timeseries_column="event_time",    # Timestamp for time windows
    function=AggregationFunction(Sum(input="amount"), RollingWindow(window_duration=timedelta(days=7))),
)
Example: Customer-Store-level features
To aggregate features at a more detailed level (one row per customer-store combination), use multiple entity columns:
source = DeltaTableSource(
    catalog_name="main",
    schema_name="retail",
    table_name="transactions",
)

Feature(
    source=source,
    entity=["user_id", "store_id"],  # Features aggregated per user-store pair
    timeseries_column="transaction_time",
    function=AggregationFunction(Sum(input="amount"), RollingWindow(window_duration=timedelta(days=7))),
)
When you need features at different levels of aggregation (for example, customer-level and customer-store-level), use different entity values in your feature definitions. The same DeltaTableSource can be shared across features with different entity configurations.
StreamSource
StreamSource references a Stream. The Stream contains connection, authentication, schema, and ingestion configuration for the streaming source. For Kafka, column references in feature definitions must be prefixed with value. or key. to indicate which part of the message to read.
StreamSource(
    full_name: str,                       # Required: Three-part Stream name (catalog.schema.stream)
    filter_condition: Optional[str],      # Optional: SQL WHERE clause applied before aggregation
)
Parameters:
full_name: The full three-part name of a Stream (for example,"my_catalog.my_schema.my_stream").filter_condition(optional): A SQLWHEREclause applied to stream data before aggregation, using dot-prefixed column references (for example,"value.event_type = 'purchase'").
from databricks.feature_engineering.entities import StreamSource

stream_source = StreamSource(
    full_name="my_catalog.my_schema.my_stream",
    filter_condition="value.event_type = 'purchase'",
)
RequestSource
RequestSource defines a schema for data that is provided at inference time in the request payload rather than looked up from a pre-materialized table. During training, these columns are extracted from the labeled DataFrame passed to create_training_set. During model serving, the caller must include them in the HTTP request payload.
RequestSource is used with ColumnSelection (to pass through a value directly). It does not support aggregation functions or time windows.
Defining the schema
Define the schema as a list of FieldDefinition objects, each specifying a column name and a ScalarDataType:
from databricks.feature_engineering.entities import (
    FieldDefinition, RequestSource, ScalarDataType,
)

request_source = RequestSource(
    schema=[
        FieldDefinition(name="transaction_amount", data_type=ScalarDataType.DOUBLE),
        FieldDefinition(name="vendor_id", data_type=ScalarDataType.STRING),
        FieldDefinition(name="transaction_id", data_type=ScalarDataType.STRING),
        FieldDefinition(name="transaction_time", data_type=ScalarDataType.DATE),
    ]
)
Supported data types
RequestSource supports the scalar types defined in ScalarDataType: INTEGER, FLOAT, BOOLEAN, STRING, DOUBLE, LONG, TIMESTAMP, DATE, SHORT. Complex types like arrays, maps, and structs are not supported.
How request data is hydrated
| Context | Behavior |
|---|---|
Training (create_training_set) |
Columns are extracted from the labeled DataFrame. Types are validated against the declared schema. Mismatches raise an error (no implicit casting). |
| Serving (model endpoint) | Columns are pulled from dataframe_records or dataframe_split in the HTTP request. JSON values are cast to the declared types (e.g., JSON number → DOUBLE). |
Model signature
When a model is logged using log_model with a training set that includes RequestSource features, the RequestSource columns are added to the MLflow model signature as required inputs. This means the serving endpoint's API schema reflects which fields callers must provide at inference time.
Training and inference API
create_training_set()
Creates a training dataset with point-in-time correct feature computation. For details, see Train models with Feature Views.
FeatureEngineeringClient.create_training_set(
    df: DataFrame,                                # DataFrame with training data
    features: Optional[List[Feature]],            # List of Feature objects
    label: Union[str, List[str], None],           # Label column name(s)
    exclude_columns: Optional[List[str]] = None,  # Optional: columns to exclude
) -> TrainingSet
log_model()
Logs a model with feature metadata for lineage tracking and automatic feature lookup during inference. For details, see Train models with Feature Views.
FeatureEngineeringClient.log_model(
    model,                                    # Trained model object
    artifact_path: str,                       # Path to store model artifact
    flavor: ModuleType,                       # MLflow flavor module (e.g., mlflow.sklearn)
    training_set: TrainingSet,                # TrainingSet used for training
    registered_model_name: Optional[str],     # Optional: register model in Unity Catalog
)
score_batch()
Performs offline batch inference with automatic feature lookup. Uses the feature metadata stored with the model to compute point-in-time correct features, ensuring consistency with training.
FeatureEngineeringClient.score_batch(
    model_uri: str,                           # URI of logged model (e.g., "models:/catalog.schema.model/1")
    df: DataFrame,                            # DataFrame with entity keys and timestamps
) -> DataFrame
The input DataFrame must contain the entity and timeseries columns used during training. Features are automatically computed from the source data.
fe = FeatureEngineeringClient()

# Batch scoring with automatic feature lookup
predictions = fe.score_batch(
    model_uri="models:/main.ecommerce.fraud_model/1",
    df=inference_df,
)
predictions.display()
Time windows
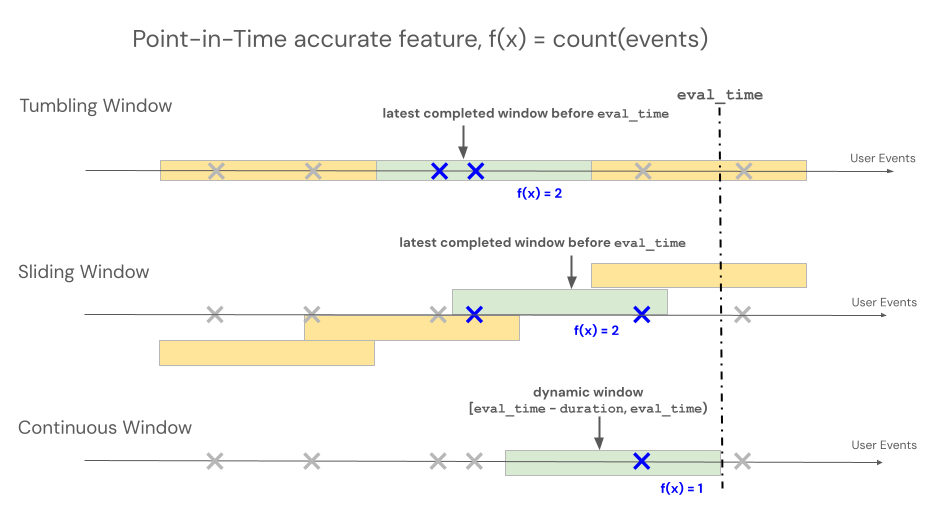
Feature Views support three different window types to control lookback behavior for time window-based aggregations: rolling, tumbling, and sliding.
- Rolling windows look back from the event time. Duration and delay are explicitly defined.
- Tumbling windows are fixed, non-overlapping time windows. Each data point belongs to exactly one window.
- Sliding windows are overlapping, rolling time windows with a configurable slide interval.
The following illustration shows how they work.
Rolling window
Note
RollingWindow was previously named ContinuousWindow. If you are migrating from an earlier SDK version, update your imports accordingly.
Rolling windows are up-to-date and real-time aggregates, typically used over streaming data. In streaming pipelines, the rolling window emits a new row only when the contents of the fixed-length window change, such as when an event enters or leaves. When a rolling window feature is used in training pipelines, an accurate point-in-time feature calculation is performed on the source data using the fixed-length window duration immediately preceding a specific event's timestamp. This helps prevent online-offline skew or data leakage. Features at time T aggregate events from [T − duration, T).
class RollingWindow(TimeWindow):
    window_duration: datetime.timedelta
    delay: Optional[datetime.timedelta] = None
The following table lists the parameters for a rolling window. The window start and end times are based on these parameters as follows:
- Start time:
evaluation_time - window_duration - delay(inclusive) - End time:
evaluation_time - delay(exclusive)
| Parameter | Constraints |
|---|---|
delay (optional) |
Must be ≥ 0 (shifts the window backward in time from the evaluation timestamp). Use delay to account for any system delay between the time the event is created and the event timestamp to prevent future event leakage into training datasets. For example, if there is a delay of one minute between the time that events are created and these events are eventually landed into a source table where they are assigned a timestamp, then the delay would be timedelta(minutes=1). |
window_duration |
Must be > 0 |
from databricks.feature_engineering.entities import RollingWindow
from datetime import timedelta

# Look back 7 days from evaluation time
window = RollingWindow(window_duration=timedelta(days=7))
Define a rolling window with delay using code below.
# Look back 7 days, offset by 1 minute to account for data ingestion delay
window = RollingWindow(
    window_duration=timedelta(days=7),
    delay=timedelta(minutes=1)
)
Rolling window examples
window_duration=timedelta(days=7): This creates a 7-day lookback window ending at the current evaluation time. For an event at 2:00 PM on Day 7, this includes all events from 2:00 PM on Day 0 up to (but not including) 2:00 PM on Day 7.window_duration=timedelta(hours=1), delay=timedelta(minutes=30): This creates a 1-hour lookback window ending 30 minutes before the evaluation time. For an event at 3:00 PM, this includes all events from 1:30 PM up to (but not including) 2:30 PM. This is useful to account for data ingestion delays.
Tumbling window
For features defined using tumbling windows, aggregations are computed over a pre-determined fixed-length window that advances by a slide interval, producing non-overlapping windows that fully partition time. As a result, each event in the source contributes to exactly one window. Features at time t aggregate data from windows ending at or before t (exclusive). Windows start at the Unix epoch.
class TumblingWindow(TimeWindow):
    window_duration: datetime.timedelta
The following table lists the parameters for a tumbling window.
| Parameter | Constraints |
|---|---|
window_duration |
Must be > 0 |
from databricks.feature_engineering.entities import TumblingWindow
from datetime import timedelta

window = TumblingWindow(
    window_duration=timedelta(days=7)
)
Tumbling window example
window_duration=timedelta(days=5): This creates pre-determined fixed-length windows of 5 days each. Example: Window #1 spans Day 0 to Day 4, Window #2 spans Day 5 to Day 9, Window #3 spans Day 10 to Day 14, and so on. Specifically, Window #1 includes all events with timestamps starting at00:00:00.00on Day 0 up to (but not including) any events with timestamp00:00:00.00on Day 5. Each event belongs to exactly one window.
Sliding window
For features defined using sliding windows, aggregations are computed over a pre-determined fixed-length window that advances by a slide interval, producing overlapping windows. Each event in the source can contribute to feature aggregation for multiple windows. Features at time t aggregate data from windows ending at or before t (exclusive). Windows start at the Unix epoch.
class SlidingWindow(TimeWindow):
    window_duration: datetime.timedelta
    slide_duration: datetime.timedelta
The following table lists the parameters for a sliding window.
| Parameter | Constraints |
|---|---|
window_duration |
Must be > 0 |
slide_duration |
Must be > 0 and < window_duration |
from databricks.feature_engineering.entities import SlidingWindow
from datetime import timedelta

window = SlidingWindow(
    window_duration=timedelta(days=7),
    slide_duration=timedelta(days=1)
)
Sliding window example
window_duration=timedelta(days=5), slide_duration=timedelta(days=1): This creates overlapping 5-day windows that advance by 1 day each time. Example: Window #1 spans Day 0 to Day 4, Window #2 spans Day 1 to Day 5, Window #3 spans Day 2 to Day 6, and so on. Each window includes events from00:00:00.00on the start day up to (but not including)00:00:00.00on the end day. Because windows overlap, a single event can belong to multiple windows (in this example, each event belongs to up to 5 different windows).
Materialization triggers
Triggers control when a materialization pipeline runs. The trigger type depends on the feature type.
CronSchedule
Use CronSchedule for aggregation features (AggregationFunction). The pipeline runs on a fixed schedule defined by a Quartz cron expression.
from databricks.feature_engineering.entities import CronSchedule

trigger = CronSchedule(
    quartz_cron_expression="0 0 * * * ?",  # Hourly
    timezone_id="UTC",
)
TableTrigger
Use TableTrigger for ColumnSelection features backed by a DeltaTableSource. The pipeline runs whenever the upstream Delta table receives a new commit.
from databricks.feature_engineering.entities import TableTrigger

trigger = TableTrigger()
StreamingMode
Use StreamingMode for features backed by a StreamSource. The pipeline runs as a continuous streaming pipeline.
from databricks.feature_engineering import FeatureEngineeringClient
from databricks.feature_engineering.entities import (
    StreamSource, Feature, AggregationFunction, Sum,
    RollingWindow, OnlineStoreConfig, StreamingMode,
)
from datetime import timedelta

fe = FeatureEngineeringClient()

stream_source = StreamSource(full_name="my_catalog.my_schema.my_stream")

streaming_feature = fe.create_feature(
    source=stream_source,
    entity=["value.user_id"],
    timeseries_column="value.event_time",
    function=AggregationFunction(
        operator=Sum(input="value.amount"),
        time_window=RollingWindow(window_duration=timedelta(hours=1)),
    ),
    catalog_name="my_catalog",
    schema_name="my_schema",
    name="user_purchase_sum",
)

fe.materialize_features(
    features=[streaming_feature],
    online_config=OnlineStoreConfig(
        catalog_name="my_catalog",
        schema_name="my_schema",
        table_name_prefix="streaming_features_serving",
        online_store_name="feature_store_online",
    ),
    trigger=StreamingMode(),
)
Choosing a trigger
| Feature type | Trigger | When it runs |
|---|---|---|
Aggregation (AggregationFunction) from DeltaTableSource |
CronSchedule |
On a fixed cron schedule |
ColumnSelection (from DeltaTableSource) |
TableTrigger |
On each source table commit |
Features from StreamSource |
StreamingMode |
Continuous streaming |
You cannot materialize features that require different trigger types in a single materialize_features call. Issue separate calls instead.
Migrate beta features to Public Preview
Feature Views Public Preview introduces first-class Feature entities in Unity Catalog, governed by the CREATE FEATURE and READ FEATURE privileges, and requires databricks-feature-engineering version 0.16.0 or later. Features created during the beta (with version 0.15.0) are stored as Unity Catalog functions and do not support all Public Preview functionality. To get long-term Public Preview support, recreate your beta features with version 0.16.0. Features must be deleted and recreated, not just re-materialized.
For more information on features, see Feature Views.
What you need to do
- Upgrade to 0.16.0. This is the required client version for Public Preview features (batch and streaming).
- Recreate your features. Beta Feature Views must be deleted and recreated, not re-materialized, because they do not support all Public Preview functionality.
- Migrate before the window closes. Existing beta features must be migrated before July 22, 2026.
Identify beta and Public Preview features
Public Preview features appear as a Feature object in Unity Catalog, for example in Catalog Explorer. Beta features appear as a function with a YAML definition. Any feature represented as a function is a beta feature that you need to migrate.
Migrate beta features
Migrating a beta feature has three parts:
- Recreate the feature as a Public Preview feature.
- Re-materialize the feature, so its offline and online tables are rebuilt under the new feature.
- After you verify the migrated features, delete the beta features and their materializations.
Recreate the features
Use list_beta_feature_views to find your beta features, Feature.clone() to create an unregistered copy, and register_feature to re-register each copy as a Public Preview feature. Cloning clears the registration, catalog, and schema so the feature can be re-registered.
To avoid name collisions, register migrated features with a different name or in a different schema than the beta features. The following example re-registers each feature in its original schema with a _migrated name suffix.
# Update this to the catalog whose beta Feature Views you want to migrate.
CATALOG_TO_MIGRATE = "main"

from databricks.feature_engineering import FeatureEngineeringClient

fe = FeatureEngineeringClient()

# 1. Find every beta Feature View in the catalog. Returns Feature objects,
#    scanned across all schemas in the catalog.
beta_features = fe.list_beta_feature_views(catalog_name=CATALOG_TO_MIGRATE)

# Keep each beta feature paired with its migrated counterpart for the next steps.
migrations = []
for beta_feature in beta_features:
    catalog_name, schema_name, leaf_name = beta_feature.full_name.split(".")
    # 2. Clone the feature as an unregistered copy, renamed with a "_migrated" suffix.
    cloned = beta_feature.clone(new_name=f"{leaf_name}_migrated")
    # 3. Re-register the clone as a Public Preview feature.
    migrated = fe.register_feature(
        feature=cloned,
        catalog_name=catalog_name,
        schema_name=schema_name,
    )
    migrations.append((beta_feature, migrated))
Re-materialize the migrated features
If a beta feature was materialized, re-materialize its Public Preview counterpart so its offline and online tables are rebuilt under the new feature. Provide the offline and online store configurations for the migrated feature, and reconstruct the trigger from the beta feature's existing materialization.
from databricks.feature_engineering.entities import (
    CronSchedule,
    OfflineStoreConfig,
    OnlineStoreConfig,
    TableTrigger,
)

for beta_feature, migrated in migrations:
    # Inspect the beta feature's existing materializations to see what to rebuild and
    # to reconstruct the same trigger.
    trigger = None
    needs_offline = needs_online = False
    for mf in fe.list_materialized_features(feature_name=beta_feature.full_name):
        needs_online = needs_online or bool(mf.is_online)
        needs_offline = needs_offline or not mf.is_online
        # Rebuild the trigger from the materialized feature.
        if mf.cron_schedule_trigger is not None:
            trigger = CronSchedule(
                quartz_cron_expression=mf.cron_schedule_trigger.cron_expression,
                timezone_id="UTC",  # Materialized schedules run in UTC.
            )
        elif mf.table_trigger is not None:
            trigger = TableTrigger()
        elif mf.streaming_mode is not None:
            # Streaming features use StreamingMode, which can be reused as-is.
            trigger = mf.streaming_mode
    if not (needs_offline or needs_online):
        continue  # The beta feature was never materialized.

    catalog_name, schema_name, _ = migrated.full_name.split(".")
    fe.materialize_features(
        features=[migrated],
        offline_config=OfflineStoreConfig(
            catalog_name=catalog_name,
            schema_name=schema_name,
            table_name_prefix="migrated_features",
        )
        if needs_offline
        else None,
        online_config=OnlineStoreConfig(
            catalog_name=catalog_name,
            schema_name=schema_name,
            table_name_prefix="migrated_features",
            online_store_name="my_online_store",
        )
        if needs_online
        else None,
        trigger=trigger,
    )
Note
Materializing each feature in its own materialize_features call creates a separate pipeline. To reduce compute cost, group features that share an offline and online destination and trigger into a single materialize_features call by passing them together in features.
Delete the beta features
Warning
Delete beta features and their materializations only after you have verified that the migrated features and their materialized data are correct. Deletion is irreversible.
After verifying the migrated features, delete each beta feature's materializations and then the beta feature itself.
for beta_feature, _ in migrations:
    # Delete the beta feature's materializations first.
    mfs = list(fe.list_materialized_features(feature_name=beta_feature.full_name))
    offline_mfs = [mf for mf in mfs if not mf.is_online]
    if offline_mfs:
        # Aggregation features pair an offline and online table; deleting the offline
        # materialized feature removes its paired online table too.
        for mf in offline_mfs:
            fe.delete_materialized_feature(materialized_feature=mf)
    else:
        # Online-only features (ColumnSelection, streaming) have no offline pair; delete
        # the online materialized feature directly.
        for mf in mfs:
            fe.delete_materialized_feature(materialized_feature=mf)
    # Then delete the beta feature definition.
    fe.delete_feature(full_name=beta_feature.full_name)