Using one temperature sensor with I2C protocol and .NET Micro framework on netduino board
I wanted to play with a temperature sensor. And when the time came to choose one, I was amaze to see how many of those sensor exists. Some were simple resistor like the light sensor I used in one of my previous example, some were more like transistors, and couple integrated more advanced features. And I choose a TC74 from Microchip as it includes an I2C communication protocol and was extremely cheap (less than 1€ for the cheap). And they were sold by 2 so I get 2 of them ![]() My main idea was to be able to get the temperature of both of them.
My main idea was to be able to get the temperature of both of them.
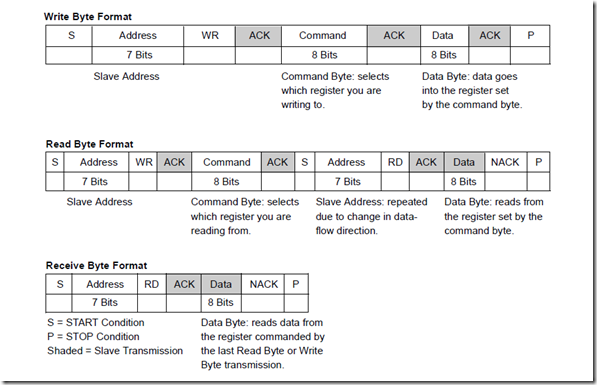
So I started to understand how I2C was working. The basic idea is simple: you have a clock going from the master (the netduino board in my case) to slaves (the TC74) and a line with data which is bidirectional. So the master can speak to the slave and the slave to the master.
Good explanation on how this bus works in details in Wikipedia for example. The main difficulty with this protocol is to understand that you are sending information and can continue to send or receive some depending on what you’ve asked. But I’ll explain this later. Every device has an address on the bus and will respond when this address is send on the bus. That’s the ACK below.
This table is coming from the TC74 documentation and explain how to write, read and receive a byte from the TC74.
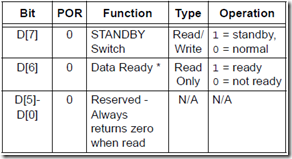
There are simple commands and more complex one. The more complex one are usually accessing registers to setup and tweak a bit the device. In the case of the TC74, the register can be read and write. But it’s extremely simple as there are only 2 registers. One to see if a temperature is ready to read and one to put the device in standby mode or read if it is standby.
And the associated value to the register is simple also. D[7] is the high bit and D[0] the lowest one.
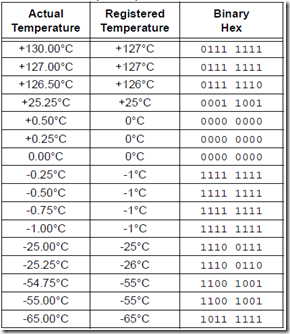
Then the read function return the temperature in a sbyte according the to table bellow:
Last but not least, here is how to connect the pins:
You don’t have to forget to put a resistor between the SDA and SCL lines like in the schema here. I used 10KΩ resistors and it’s working perfectly. I need to run more tests to see how long the cables cans be. I guess that if I need long cables, I’ll need to lower the value of this resistor.
That’s it for the hardware part. Now, on the soft part, I started to search using bing and found couple of good articles to explain how to use I2C. This first one gives you an overall example and this second one a class to be used with multiples slaves. What I liked with the second one is that it’s easy to use it with multiples slaves. And in the future, I may want to add other sensors like a barometer and humidity sensor using I2C. Or even create my own I2C sensor as there are existing chip to be the interface.
On top of this code, I’ve implemented a class called TC74 which implement all features of this sensor and calling the I2C class. So the overall code is quite simple.
 namespace TC74
{
    //Command Code Function
    //RTR 00h Read Temperature (TEMP)
    //RWCR 01h Read/Write Configuration
    //(CONFIG)
    public enum TC74Command: byte
    {
        ReadTemperature = 0x00,
        ReadWriteRegister = 0x01
    };

    public enum TC74Config: byte
    {
        READY = 0x40,
        STANDBY = 0x80
    };
    /// <summary>
    /// This is an I2C temperature sensor.
    /// </summary>
    public class TC74Device
    {
        private I2CDevice.Configuration _slaveConfig;
        private const int TransactionTimeout = 3000; // ms
        private const byte ClockRateKHz = 100;
        public byte Address { get; private set; }

        /// <summary>
        /// Constructor
        /// </summary>
        /// <param name="address">I2C device address
of the TC74 temperature sensor</param>
        public TC74Device(byte address)
        {
            Address = address;
            _slaveConfig = new I2CDevice.Configuration(address,
ClockRateKHz);
        }


        public sbyte ReadTemperature()
        {
            // write register address
            I2CBus.GetInstance().Write(_slaveConfig, new byte[]
{ (byte)TC74Command.ReadTemperature }, TransactionTimeout);

            // get the byte result
            byte[] data = new byte[1];
            I2CBus.GetInstance().Read(_slaveConfig, data,
TransactionTimeout);
            //force the convertion to a signed byte
            return (sbyte)data[0];
        }

        public byte ReadRegister()
        {
            // get the Register
            byte[] data = new byte[1];
            I2CBus.GetInstance().ReadRegister(_slaveConfig,
(byte)TC74Command.ReadWriteRegister, data, TransactionTimeout);

            return data[0];
        }

        public void Init()
        {
            byte[] data = new byte[2] { (byte)TC74Command.ReadWriteRegister, 0x00 };
            I2CBus.GetInstance().Write(_slaveConfig, data, TransactionTimeout);
            I2CBus.GetInstance().Write(_slaveConfig, new byte[]
{ (byte)TC74Command.ReadTemperature }, TransactionTimeout);
        }

        public bool IsReady()
        {
            bool bready = false;
            byte ret = ReadRegister();
            if ((ret | (byte)TC74Config.READY) == (byte)TC74Config.READY)
                bready = true;
            return bready;
        }

        public void Standby(bool stdby)
        {
            byte[] data = new byte[2] { (byte)TC74Command.ReadWriteRegister, 0x00 };
            if (stdby)
                data[1] = (byte)TC74Config.STANDBY;
            I2CBus.GetInstance().Write(_slaveConfig, data, TransactionTimeout);
        }

    }
}
Starting with the constructor, the address need to be stored. This address is b1001101 (0x4D) as I have a TC74A5-5.0VCT. We will use it later in a sample code. And this device works very well at 100KHz.
Then the function Init is there to initialize the device. First it write in the internal register the value 0 to make sure it is not in standby mode. And then it write ReadTemperature to make sure we’ll be able to read the temperature.
The register function read the register and return the byte value.
The IsReady function read the register to check if the device is ready. It is only ready when power is up for enough time and before shut down. It is also not ready when the device is on standby mode.
Standby set or unset the standby mode. It write in the register the STANDBY value which is 0x80 (b10000000).
So pretty straight forward code and simple as well.
 public static void Main()
{
    TC74Device MyTC74 = new TC74Device(0x4D); //0x4D
    byte MyData;
    sbyte MyTemp;
    Thread.Sleep(1000);
    MyTC74.Init();
    while (MyTC74.IsReady())
    {
        MyTemp = MyTC74.ReadTemperature();
        Debug.Print("Temperature :" + MyTemp);
        MyData = MyTC74.ReadRegister();
        Debug.Print("Register :" + MyData);
        Thread.Sleep(1000);
        //MyTC74.Standby(true);
    }
}
The basic example to use this sensor is also quite easy. The device is initialized with the 0x4D address. Then the device is initialized. And the temperature and register are ready every second, if you want to test the Standby function, just unhide the last line, it will put the device in the standby mode and the device won’t be ready so the code will return.
If you’ve done something wrong, exception will be raised and your code will stop.
Now that’s how to pilot one sensor. The question is what can be done to read 2 identical sensors with the same address? I did it ![]() and it will be the topic of the next post. Stay tune!
and it will be the topic of the next post. Stay tune!
Comments
Anonymous
August 28, 2012
hi,you have the electric diagram for this??Anonymous
February 17, 2014
Hi, I'm trying to use the code with an TC74A0, but I get the exception when running... I already measured the voltages on the sensor, pin by pin, and seems to be all right. Any idea?? I'm using ND 4.2.0 firmware. tnx in andvanceAnonymous
September 24, 2015
Please include your Using statements, and your References.


