Note
Access to this page requires authorization. You can try signing in or changing directories.
Access to this page requires authorization. You can try changing directories.
VMware HCX is an application mobility platform designed for simplifying application migration, rebalancing workloads, and optimizing disaster recovery across data centers and clouds.
VMware HCX has two component services: HCX Cloud Manager and HCX Connector. These components work together for VMware HCX operations.
This article shows you how to install and activate the VMware HCX Cloud Manager and VMware HCX Connector components.
HCX Cloud manager is typically deployed as the destination (cloud side), but it can also be used as the source in cloud-to-cloud deployments - among two different Azure VMware Solution private clouds, for example. HCX Connector is deployed at the source (on-premises environment). A download link is provided for deploying HCX Connector appliance from within the HCX Cloud Manager.
This article also teaches you how to do the following tasks:
- Install VMware HCX Cloud through the Azure portal.
- Download and deploy the VMware HCX Connector in on-premises.
- Activate VMware HCX with a license key.
After deploying HCX, follow the recommended Next steps.
Prerequisite
Install VMware HCX Cloud
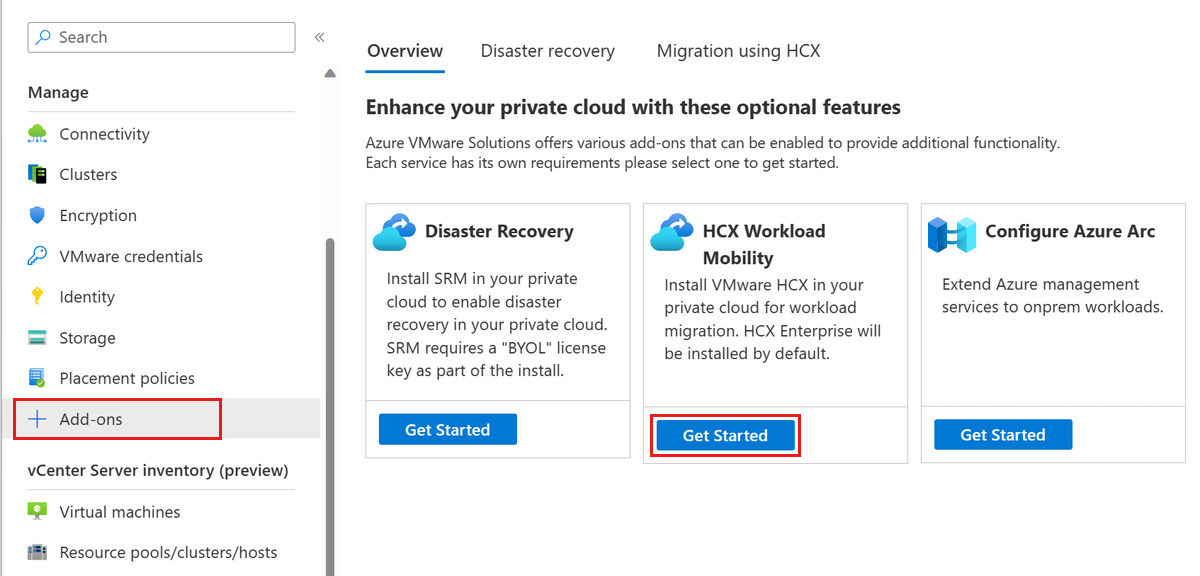
In your Azure VMware Solution private cloud, select Manage > Add-ons.
Select Get started for HCX Workload Mobility.
If you're installing HCX add-on on Azure VMware Solution in an Azure virtual network, then follow this step:
- Specify a unique /24 CIDR address block for HCX uplink and management. This IP block is utilized for HCX service mesh appliances management and uplink interfaces.
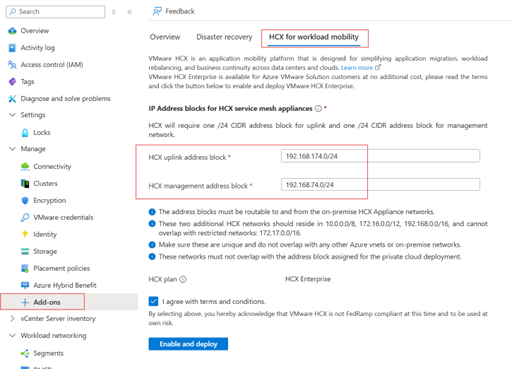
Select the I agree with terms and conditions checkbox and then select Install.
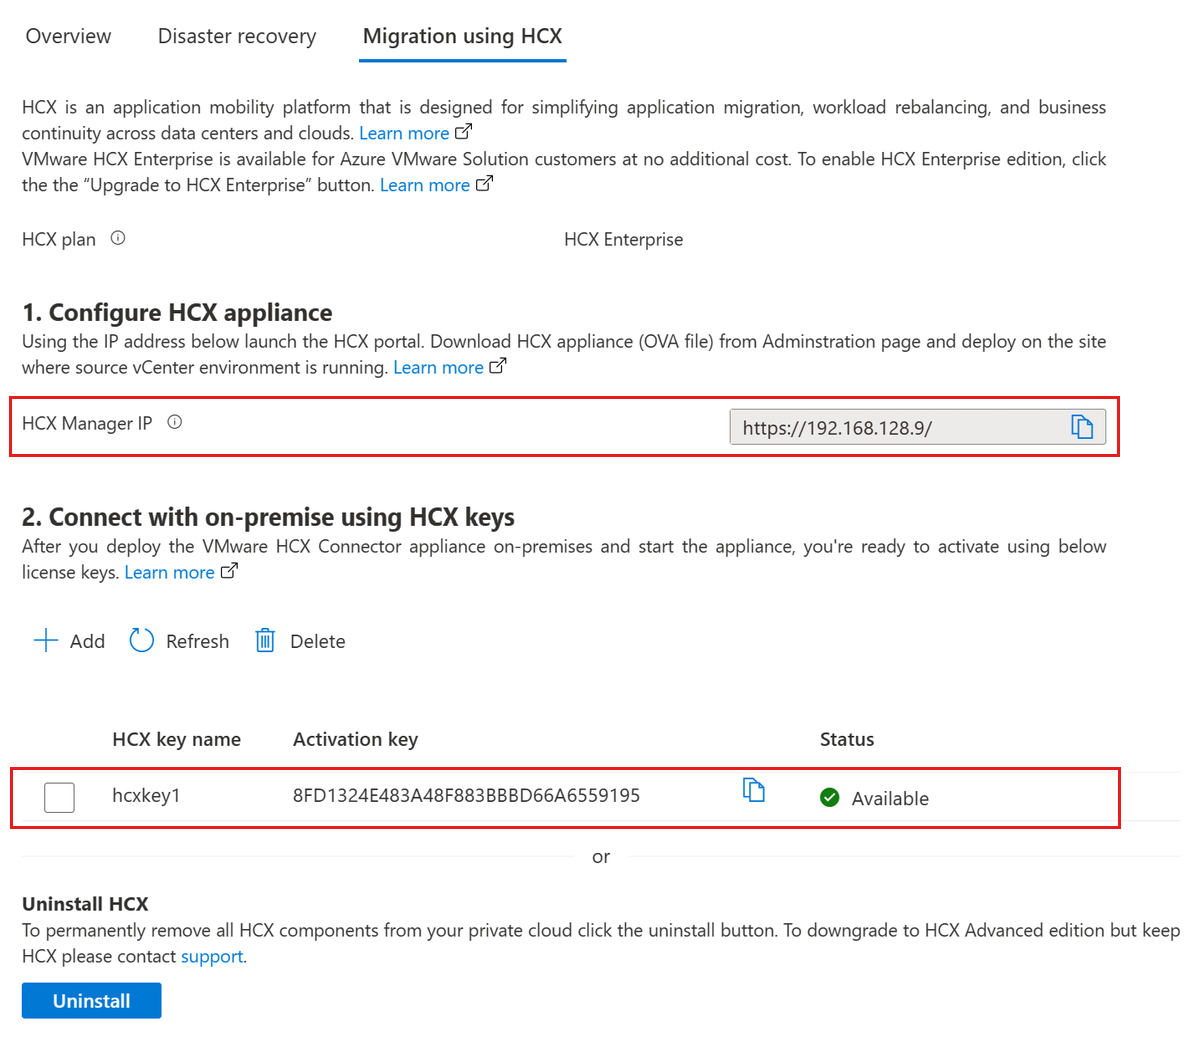
Once installed, you should see the HCX Manager IP and the HCX keys required for the HCX on-premises connector site pairing on the Migration using HCX tab.
Note
When initiating a site pair where source is Azure VMware Solution in an Azure Virtual Network, you can use IP address. If you need to use FQDN, raise a support case.
Important
If you don't see the HCX key after installing, select the ADD button to generate the key which you can then use for site pairing.


VMware HCX license edition
HCX offers various services based on the type of license installed with the system. Advanced delivers basic connectivity and mobility services to enable hybrid interconnect and migration services. HCX Enterprise offers more services than what standard licenses provide. Some of those services include; Mobility Groups, Replication assisted vMotion (RAV), Mobility Optimized Networking, Network Extension High availability, OS assisted Migration, and others.
Note
VMware HCX Enterprise is available for Azure VMware Solution customers at no additional cost.
HCX is now installed as Enterprise for all new HCX installations in Azure VMware solution.
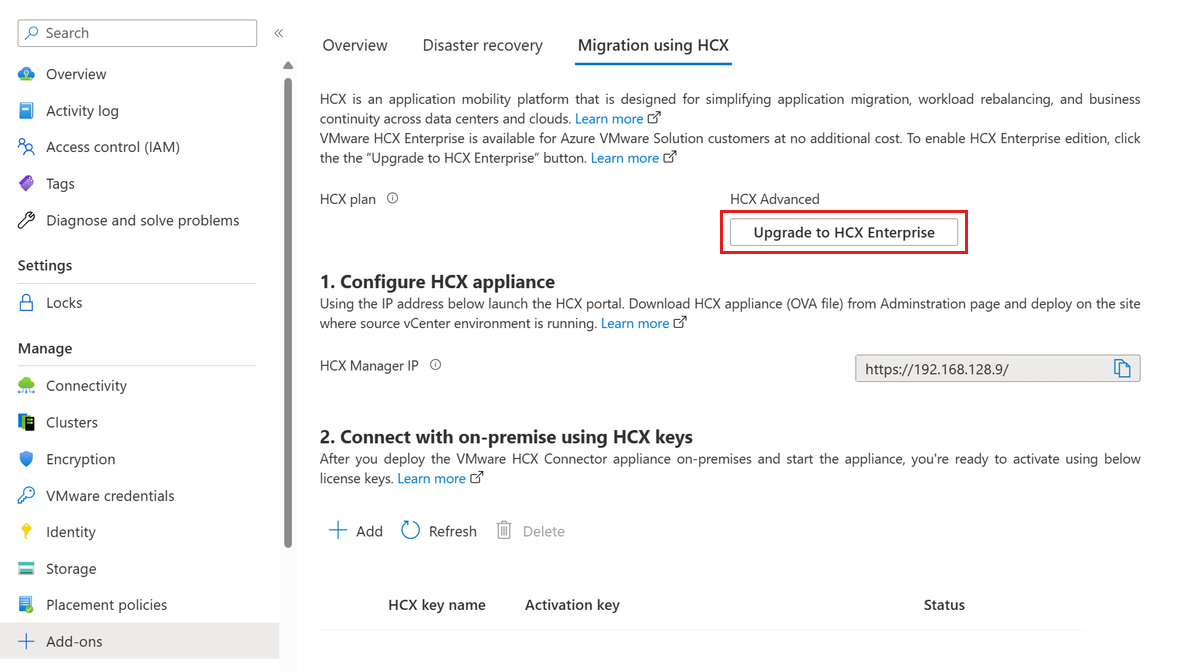
Existing HCX Advanced customers can upgrade to HCX Enterprise using the Azure portal. Use the following steps to upgrade to HCX Enterprise using Azure portal.
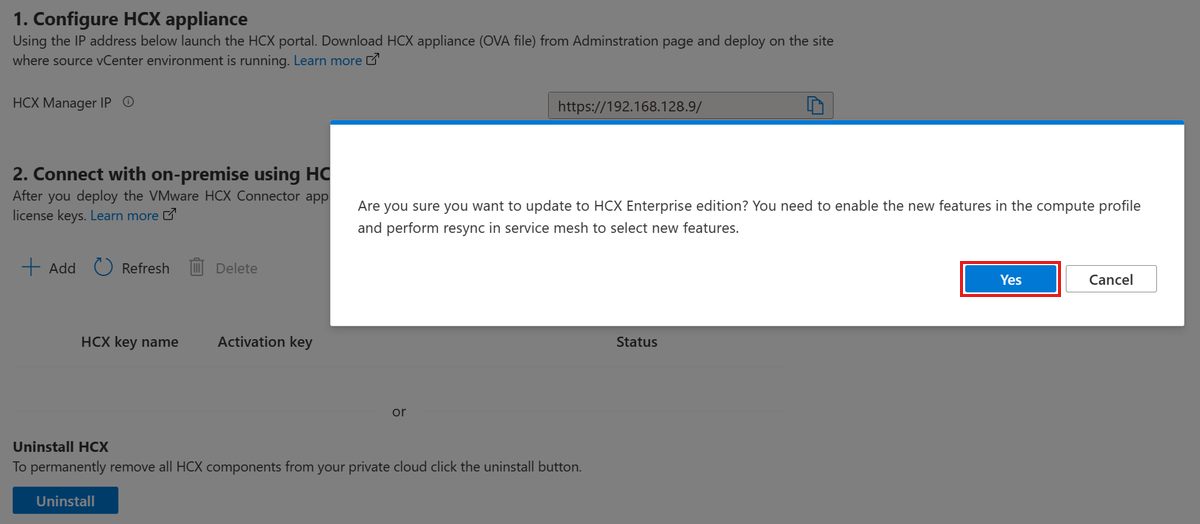
Under Manage in the left navigation, select Add-ons, then the Migration using HCX tab.
Select the Upgrade to HCX Enterprise button to enable HCX Enterprise edition.
Confirm the update to HCX Enterprise edition by selecting Yes.
Important
If you upgraded VMware HCX from advanced to Enterprise, enable the new features in the compute profile and perform resync in service mesh to select a new feature like, Replication Assisted vMotion (RAV).
Change Compute profile after HCX upgrade to HCX Enterprise.
- On HCX UI, select Infrastructure > Interconnect, then select Edit.
- Select services you want activated like, Replication Assisted vMotion (RAV) and OS assisted Migration, which is available with VMware HCX Enterprise only.
- Select Continue, review the settings, then select Finish to create the Compute Profile.
If compute profile is being used in service mesh(es), resync service mesh.
- Go to Interconnect > Service Mesh.
- Select Resync, then verify that the changes appear in the Service Mesh configuration.
Downgrading from HCX Enterprise Edition to HCX Advanced is possible without redeploying.
Verify that you reverted to an HCX Advanced configuration state and you aren't using the Enterprise features.
If you plan to downgrade, verify that no scheduled migrations, Enterprise services like RAV or HCX MON, etc. are active. Open a support request to request downgrade.


Download and deploy the VMware HCX Connector on-premises
Use the following steps to download the VMware HCX Connector OVA file, and then deploy the VMware HCX Connector to your on-premises vCenter Server.
Open a browser window, sign in to the Azure VMware Solution HCX Manager on
https://x.x.x.9port 443 with the cloudadmin@vsphere.local user credentialsUnder Administration > System Updates, select Request Download Link. If the box is greyed, wait a few seconds for it to generate a link.
Either download or receive a link for the VMware HCX Connector OVA file you deploy on your local vCenter Server.
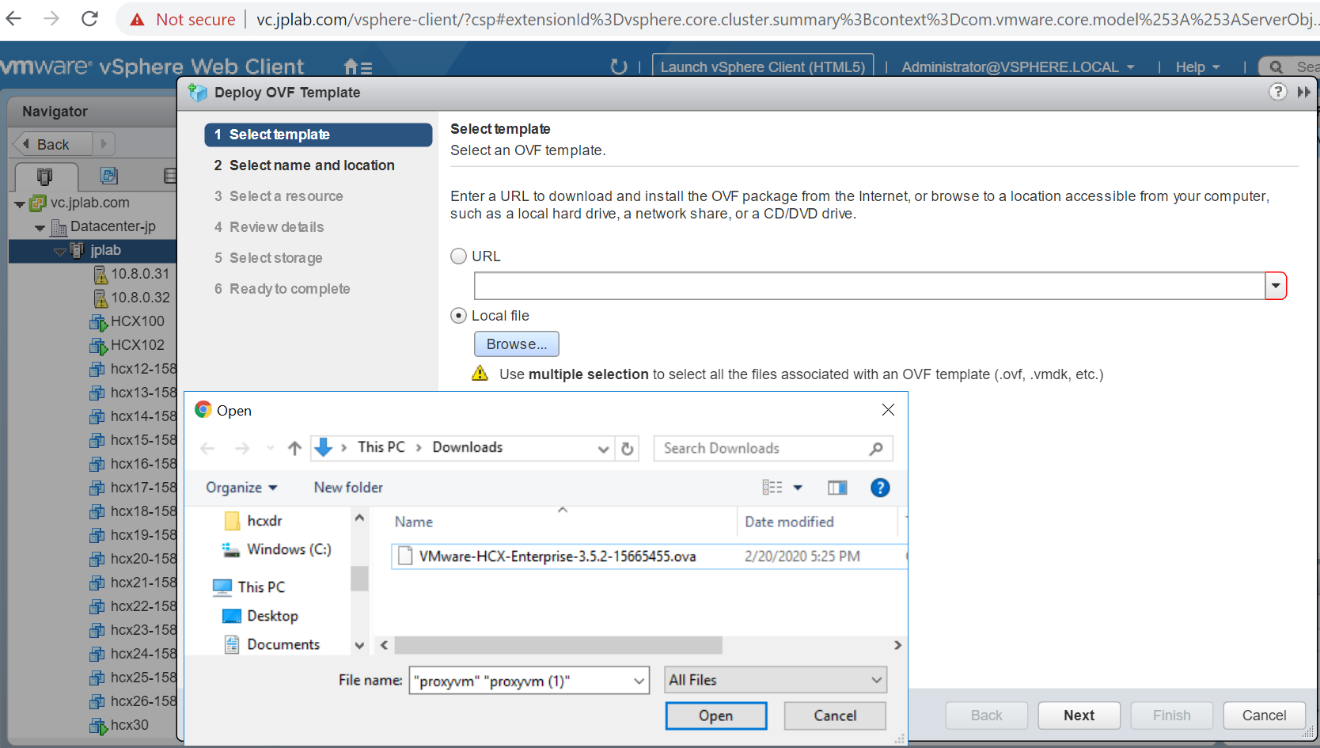
In your on-premises vCenter Server, select an OVF template to deploy the VMware HCX Connector to your on-premises vSphere cluster.
Navigate to and select the OVA file that you downloaded and then select Open.
Select a name and location, and select a resource or cluster where you're deploying the VMware HCX Connector. Then review the details and required resources and select Next.
Review license terms, select the required storage and network, and then select Next.
Select the VMware HCX management network segment that you defined during the planning state. Then select Next.
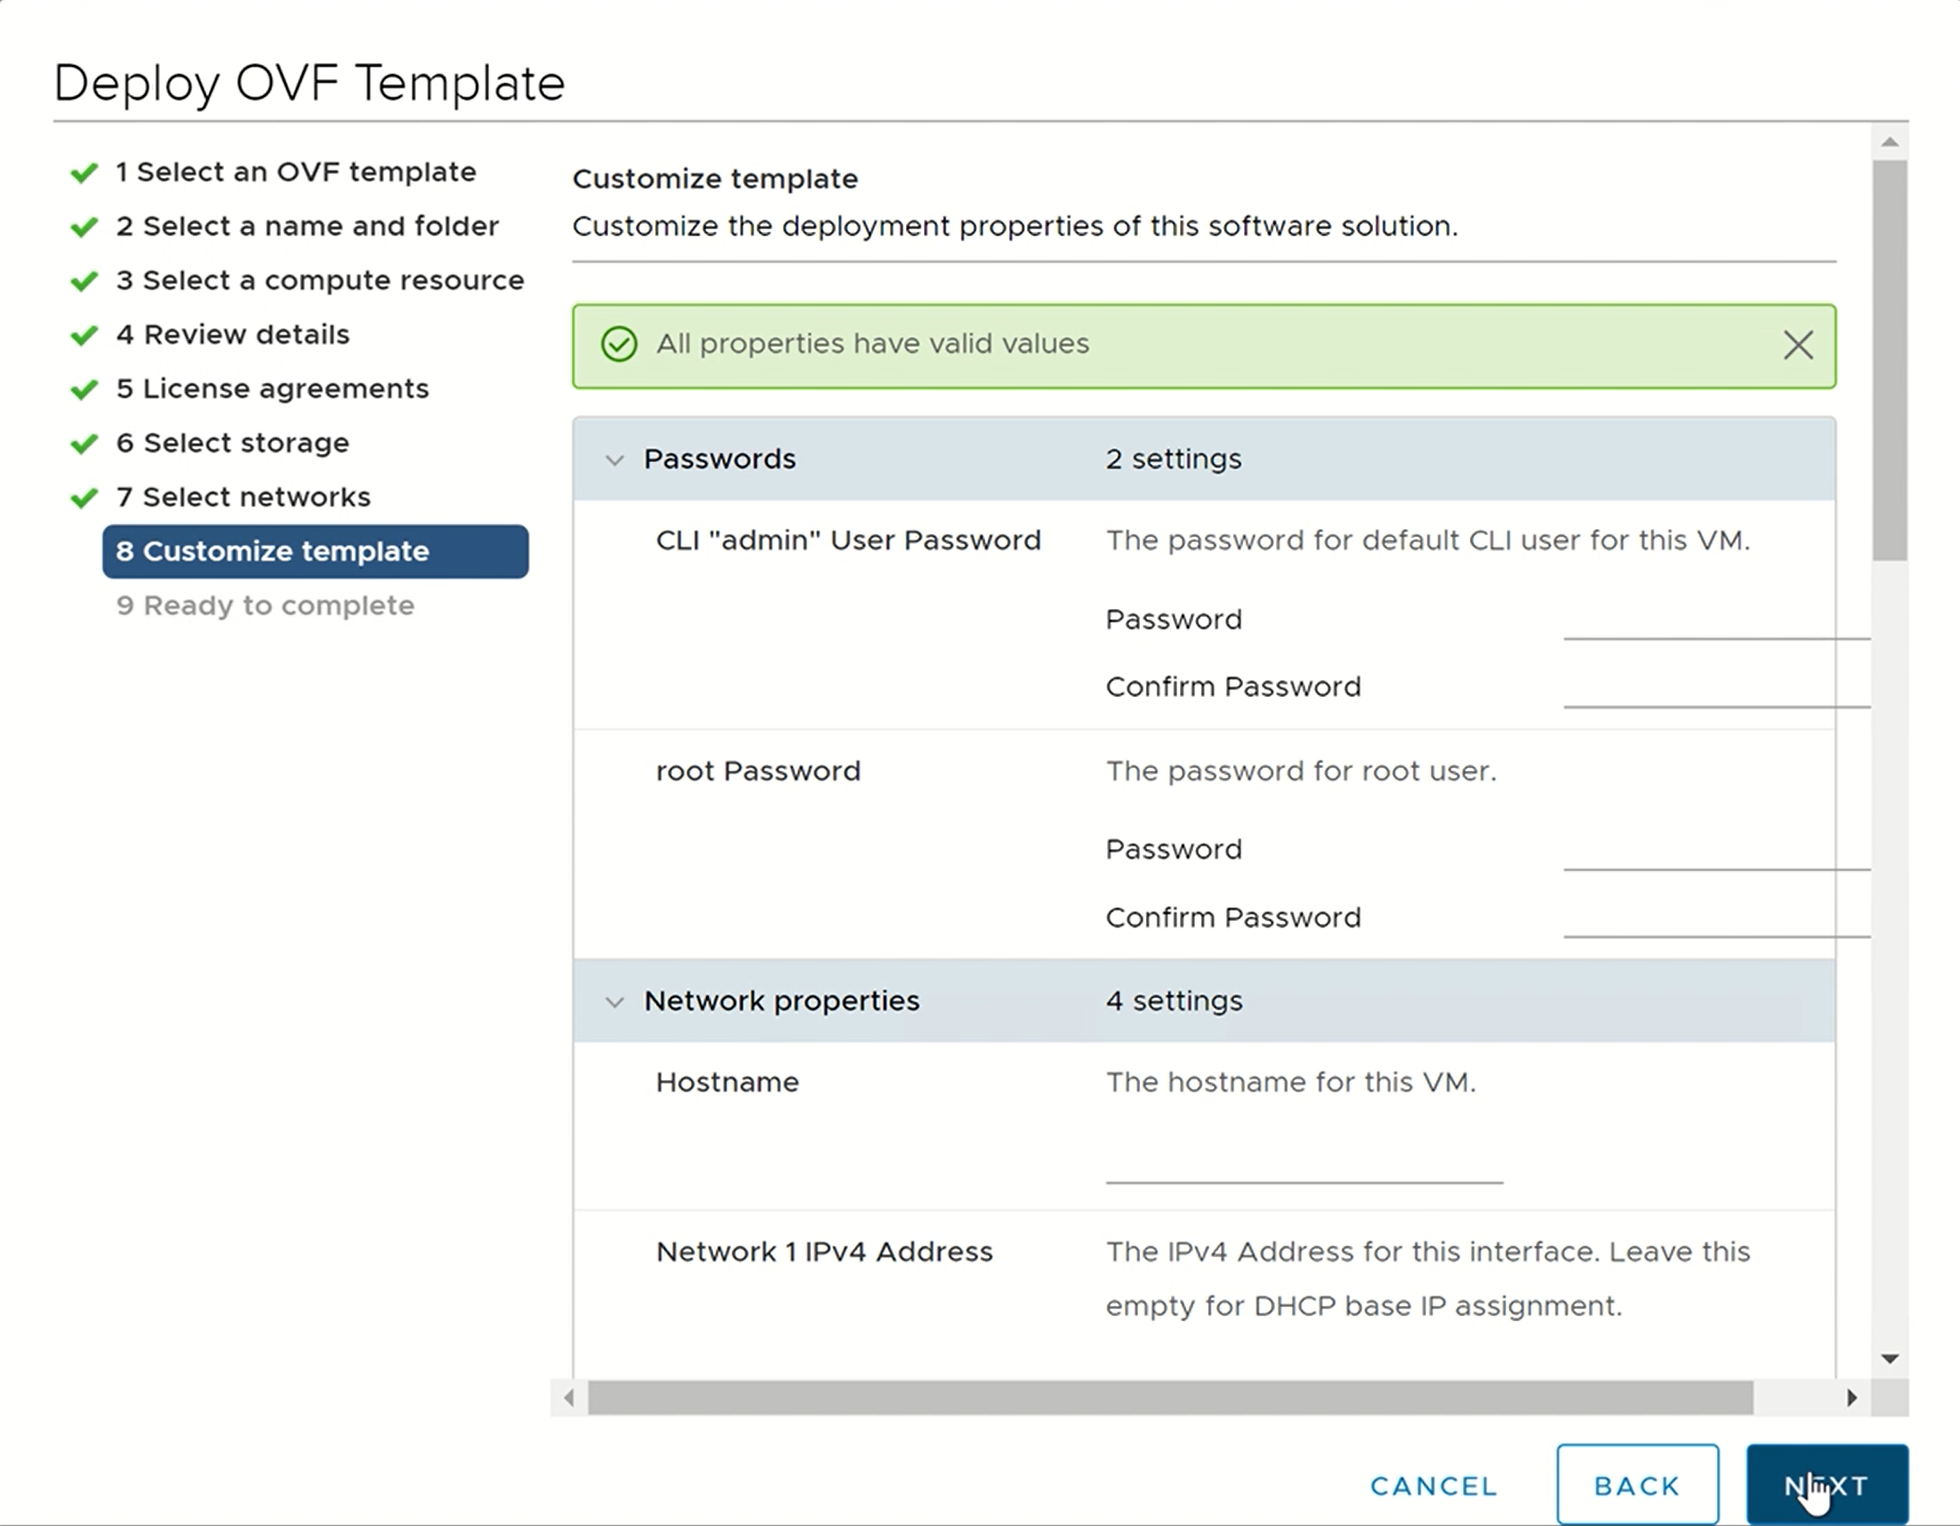
In Customize template, enter all required information and then select Next.
Verify and then select Finish to deploy the VMware HCX Connector OVA.
Important
You need to turn on the virtual appliance manually. After powering on, wait 10-15 minutes before proceeding to the next step.


Activate VMware HCX
After deploying the VMware HCX Connector OVA on-premises and starting the appliance, you're ready to activate it. First, you need to get a license key from the Azure VMware Solution portal and activate it in VMware HCX Manager. Then you need a key for each on-premises HCX connector deployed.
In your Azure VMware Solution private cloud, select Manage > Add-ons > Migration using HCX. Then copy the Activation key.

Sign in to the on-premises VMware HCX Manager at
https://HCXManagerIP:9443with theadmincredentials. Make sure to include the9443port number with the VMware HCX Manager IP address.Tip
You defined the admin user password during the VMware HCX Manager OVA file deployment.
In Licensing, enter your key for HCX Advanced Key and select Activate.
Important
VMware HCX Manager must have open internet access or a proxy configured.
In Datacenter Location, provide the nearest location for installing the VMware HCX Manager on-premises. Then select Continue.
In System Name, modify the name or accept the default and select Continue.
Select Yes, Continue.
In Connect your vCenter, provide the FQDN or IP address of your vCenter server and the appropriate credentials, and then select Continue.
Tip
The vCenter Server is where you deployed the VMware HCX Connector in your datacenter.
In Configure SSO/PSC, provide your Platform Services Controller's FQDN or IP address, and select Continue.
Note
Typically, it's the same as your vCenter Server FQDN or IP address.
Verify that the information entered is correct and select Restart.
Note
You'll experience a delay after restarting before being prompted for the next step.
After the services restart, you'll see vCenter Server displayed as green on the screen that appears. Both vCenter Server and SSO must have the appropriate configuration parameters, which should be the same as the previous screen.

Next steps
Continue to the next tutorial to configure the VMware HCX Connector. After you configured the VMware HCX Connector, you have a production-ready environment for creating virtual machines (VMs) and migration.