Quickstart: Create Intel SGX VM in the Azure Marketplace
This tutorial guides you through the process of deploying Intel SGX VMs using Azure Marketplace. Otherwise, we recommend following the VM deployment flow using portal or CLI.
Prerequisites
If you don't have an Azure subscription, create an account before you begin.
Note
Free trial accounts do not have access to the VMs in this tutorial. Please upgrade to a Pay-As-You-Go subscription.
Sign in to Azure
Sign in to the Azure portal.
At the top, select Create a resource.
In the Get Started default pane, search Azure Confidential Computing (Virtual Machine) .
Click the Azure Confidential Computing (Virtual Machine) template.
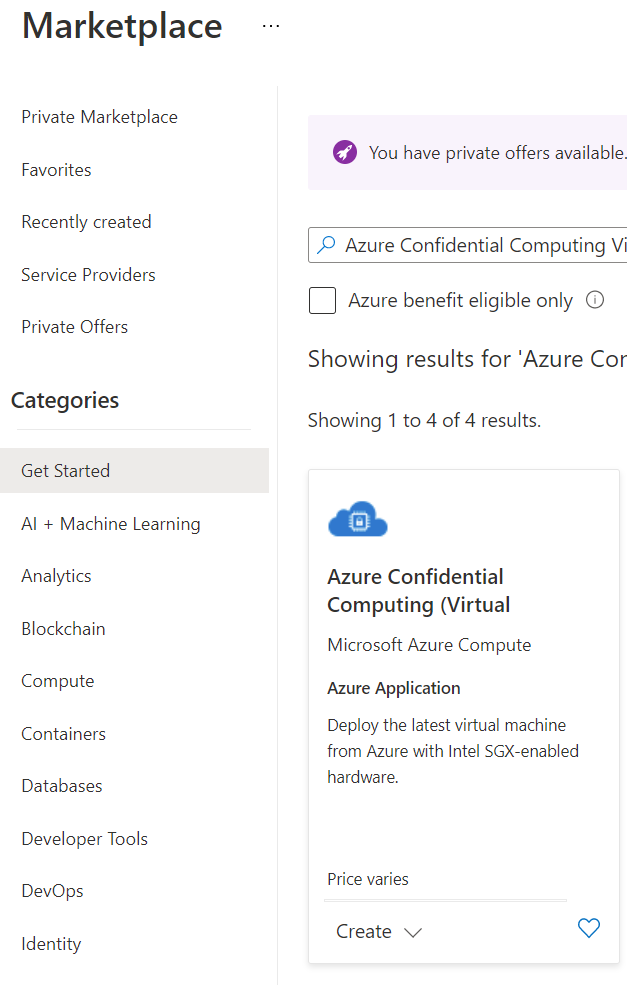
On the Virtual machine landing page, select Create.
Configure an Intel SGX Virtual Machine
In the Basics tab, select your Subscription and Resource Group (group needs to be empty to deploy this template).
For Virtual machine name, enter a name for your new VM.
Type or select the following values:
Region: Select the Azure region that's right for you.
Note
Intel SGX VMs run on specialized hardware in specific regions. For the latest regional availability, look for DCsv2-series or DCsv3/DCdsv3-series in available regions.
Configure the operating system image that you would like to use for your virtual machine. This setup only support Gen 2 VM and image deployments
- Choose Image: For this tutorial, select Ubuntu 20.04 LTS (Gen 2). You may also select Windows Server Datacenter 2019, or and Ubuntu 18.04 LTS. If you choose to do so, you'll be redirected in this tutorial accordingly.
Fill in the following information in the Basics tab:
Authentication type: Select SSH public key if you're creating a Linux VM.
Note
You have the choice of using an SSH public key or a Password for authentication. SSH is more secure. For instructions on how to generate an SSH key, see Create SSH keys on Linux and Mac for Linux VMs in Azure.
Username: Enter the Administrator name for the VM.
SSH public key: If applicable, enter your RSA public key.
Password: If applicable, enter your password for authentication.
Fill in the following information in the "Virtual Machine Settings" tab:
Choose the VM SKU Size
DCsv2-series supports Standard SSD, Premium SSD is supported across DC1, DC2 and DC4.
DCsv3 and DCdsv3-series supports Standard SSD, Premium SSD and Ultra Disk
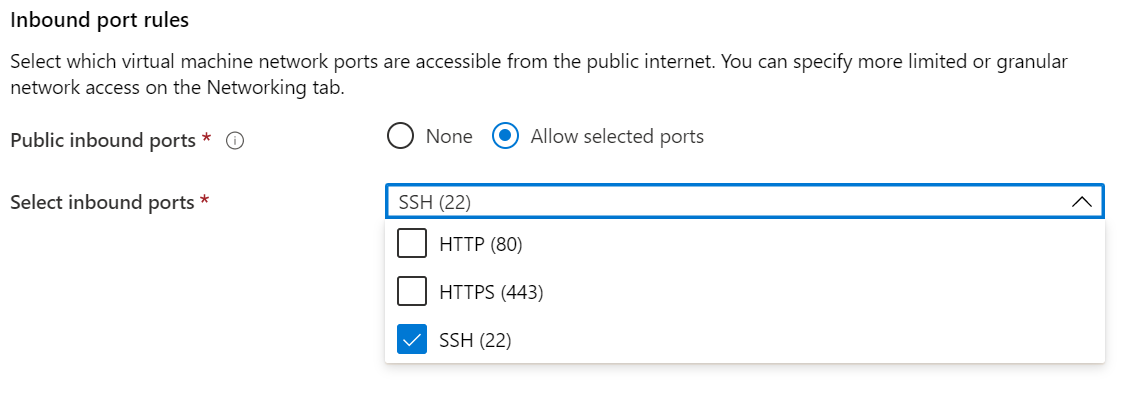
Public inbound ports: Choose Allow selected ports and select SSH (22) and HTTP (80) in the Select public inbound ports list. If you're deploying a Windows VM, select HTTP (80) and RDP (3389). In this quickstart, this step is necessary to connect to the VM.
Note
Allowing RDP/SSH ports is not recommended for production deployments.
Choose the Monitoring option if necessary
Select Review + create.
In the Review + create pane, select Create.
Note
Proceed to the next section and continue with this tutorial if you deployed a Linux VM. If you deployed a Windows VM, follow these steps to connect to your Windows VM
Connect to the Linux VM
Open your SSH client of choice, like Bash on Linux or PowerShell on Windows. The ssh command is typically included in Linux, macOS, and Windows. If you are using Windows 7 or older, where Win32 OpenSSH is not included by default, consider installing WSL or using Azure Cloud Shell from the browser. In the following command, replace the VM user name and IP address to connect to your Linux VM.
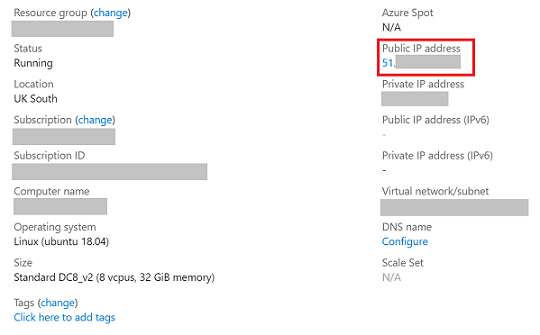
ssh azureadmin@40.55.55.555
You can find the Public IP address of your VM in the Azure portal, under the Overview section of your virtual machine.
Intel SGX Drivers
Note
Intel SGX drivers as already part of the Ubuntu & Windows Azure Gallery Images. To ensure you are using the latest drivers, visit the Intel SGX DCAP drivers list.
Clean up resources
When no longer needed, you can delete the resource group, virtual machine, and all related resources.
Select the resource group for the virtual machine, then select Delete. Confirm the name of the resource group to finish deleting the resources.
Next steps
In this quickstart, you deployed and connected to your Intel SGX VM. For more information, see Solutions on Virtual Machines.
Discover how you can build confidential computing applications, by continuing to the Open Enclave SDK samples on GitHub.
Feedback
Coming soon: Throughout 2024 we will be phasing out GitHub Issues as the feedback mechanism for content and replacing it with a new feedback system. For more information see: https://aka.ms/ContentUserFeedback.
Submit and view feedback for