Dell PowerEdge R350
This article describes the Dell PowerEdge R350 appliance, supported for OT sensors in an enterprise deployment. The Dell PowerEdge R350 is also available for the on-premises management console.
| Appliance characteristic | Description |
|---|---|
| Hardware profile | E1800 |
| Performance | Max bandwidth: 1 Gbps Max devices: 10,000 Up to 8x RJ45 monitoring ports or 6x SFP (OPT) |
| Physical Specifications | Mounting: 1U Dimensions (H x W x D) 1.70 in x 17.09 in x 22.18 in Dimensions (H x W x D) 4.28 cm x 43.4 cm x 56.3 cm |
| Status | Supported, available as a preconfigured appliance |
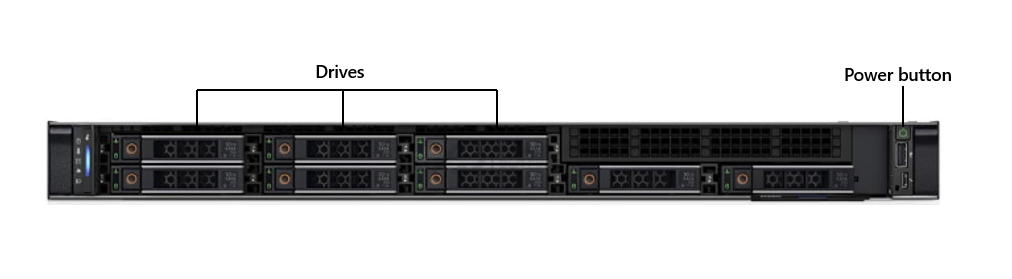
The following image shows a view of the Dell PowerEdge R350 front panel:
The following image shows a view of the Dell PowerEdge R350 back panel:

Specifications
| Component | Technical specifications |
|---|---|
| Chassis | 1U rack server |
| Dimensions | (H x W x D) 1.70 in x 17.09 in x 22.18 in, 4.28 cm x 43.4 cm x 56.3 cm |
| Weight | Max 28.96 lb/13.14 Kg |
| Processor | Intel Xeon E-2334 3.4 GHz 8M Cache 4C/8T, Turbo (65 W), 3200 MT/s, XE Only |
| Memory | 32 GB = 2x 16 GB 3200MT/s DDR4 ECC UDIMM |
| Storage | 4x 1 TB Hard Drive SATA 6 Gbps 7.2 K 512n 3.5in Hot-Plug with PERC H755 Controller Card - RAID 10 |
| Network controller | On-board: Broadcom 5720 Dual Port 1 Gb On-Board LOM On-board LOM: iDRAC9, Enterprise 15G External: Broadcom 5719 Quad Port 1 GbE BASE-T Adapter, PCIe Low Profile |
| Management | iDRAC9 Enterprise |
| Device access | Two rear USB 3.0 |
| One front | USB 3.0 |
| Power | Dual, Hot-Plug, Redundant Power Supply (1+1), 600 W |
| Rack support | ReadyRails Sliding Rails With Cable Management Arm |
Dell PowerEdge R350 - Bill of Materials
| Quantity | PN | Description |
|---|---|---|
| 1 | 210-BBTW | OEM R350XE Server |
| 1 | 990-10090 | EX-Works |
| 1 | 412-AAPW | Heatsink for 80 W or less CPU |
| 1 | 370-AAIP | Performance Optimized |
| 1 | 370-AGNY | 3200MT/s UDIMM |
| 2 | 370-AGQU | 16 GB UDIMM, 3200MT/s, ECC |
| 1 | 384-BBBH | Power Saving BIOS Settings |
| 1 | 800-BBDM | UEFI BIOS Boot Mode with GPT Partition |
| 1 | 450-AADY | C13 to C14, PDU Style, 10 AMP, 6.5 Feet (2 m), Power Cord |
| 1 | 330-BBWS | Riser Config 0, 1 x8, 1 x16 slots |
| 1 | 384-BCYX | OEM R350 Motherboard with Broadcom 5720 Dual Port 1 Gb On-Board LOM |
| 1 | 385-BBQV | iDRAC9, Enterprise 15G |
| 1 | 542-BBBP | On-Board LOM |
| 1 | 470-AFBU | BOSS Blank |
| 1 | 379-BCRF | iDRAC, Legacy Password |
| 1 | 379-BCQV | iDRAC Group Manager, Enabled |
| 1 | 611-BBBF | No Operating System |
| 1 | 605-BBFN | No Media Required |
| 1 | 770-BDEL | ReadyRails Sliding Rails With Cable Management Arm |
| 1 | 709-BBIJ | Parts Only Warranty 15 Months |
| 1 | 865-BBPG | ProSupport and Next Business Day Onsite Service Initial, 15 Month(s) |
| 1 | 338-CCOZ | Intel Xeon E-2334 3.4 GHz, 8M Cache, 4C/8T, Turbo (65W), 3200 MT/s, XE Only |
| 1 | 325-BEIF | Brand/Bezel, Dell Branded, PowerEdge R350XE |
| 1 | 389-ECFF | PowerEdge R350 CE and CCC Marking |
| 1 | 321-BGVQ | 3.5" Chassis with up to 4 Hot Plug Hard Drives |
| 1 | 750-ADOY | Standard Fan |
| 1 | 429-ABHN | DVD +/-RW, SATA, Internal for Hot Plug Chassis |
| 1 | 405-ABBT | PERC H755 Controller Card |
| 1 | 461-AADZ | No Trusted Platform Module |
| 1 | 683-11870 | No Installation Service Selected (Contact Sales Rep for more details) |
| 1 | 865-BBPF | ProSupport and Next Business Day Onsite Service Extension, 24 Month(s) |
| 4 | 400-BLLH | 1 TB Hard Drive SATA 6 Gbps 7.2K 512n 3.5in Hot-Plug |
| 1 | 540-BBDF | Broadcom 5719 Quad Port 1 GbE BASE-T Adapter, PCIe Low Profile |
| 1 | 780-BCDQ | RAID 10 |
| 2 | 450-AKMP | Dual, Hot-Plug, Redundant Power Supply (1+1), 600W |
Optional Components
| Quantity | PN | Description |
|---|---|---|
| 2 | 450-AMJH | Dual, Hot-Plug, Power Supply, 700W MM HLAC (200-220Vac) Titanium, Redundant (1+1), by LiteOn, NAF |
Optional Storage Controllers
Multi-disk RAID arrays combine multiple physical drives into one logical drive for increased redundancy and performance. The optional modules below are tested in our lab for compatibility and sustained performance:
| Quantity | PN | Description |
|---|---|---|
| 1 | 405-ABBT | PERC H755 Controller Card (RAID10) |
Optional port expansion
Optional modules for additional monitoring ports can be installed:
| Location | Type | Specifications |
|---|---|---|
| PCIe Expansion Slot 1 or 2 |
Quad Port Ethernet | 540-BBDV Intel QP i350 4 x 1Gbe Copper, PCIe Low Profile |
| PCIe Expansion Slot 1 or 2 |
Quad Port Ethernet | 540-BBDF Broadcom 5719 Quad Port 1 GbE BASE-T Adapter, PCIe Low Profile |
| PCIe Expansion Slot 1 or 2 |
Dual Port Ethernet | 540-BCSE Intel X710-T2L DP 2 x 10Gbe Copper, PCIe Low Profile |
| PCIe Expansion Slot 1 or 2 |
Dual Port SFP+ | 540-BBML Intel X710 DP 2 x 10Gbe SFP+, PCIe Low Profile |
| PCIe Expansion Slot 1 or 2 |
Dual Port SFP+ | 540-BBVI Broadcom 57412 Dual Port 10 GbE SFP+ Adapter, PCIe Low Profile |
| PCIe Expansion Slot 1 or 2 |
SFP+ Transceiver | 407-BCBN or 407-BBOU - SFP+ 10G SR |
| PCIe Expansion Slot 1 or 2 |
SFP+ Transceiver | 407-BBOP - SFP+ 10G LR |
| PCIe Expansion Slot 1 or 2 |
SFP+ Transceiver | 407-BBOS - SFP+ 1G COPPER |
| PCIe Expansion Slot 1 or 2 |
INTEL X710 SFP+ Transceiver | 407-BBVJ - SFP+ 1G/10G SR (INTEL ONLY) |
Dell PowerEdge R350 installation
This section describes how to install Defender for IoT software on the Dell PowerEdge R350 appliance.
Before installing the software on the Dell appliance, you need to adjust the appliance's BIOS configuration.
Note
Installation procedures are only relevant if you need to re-install software on a pre-configured device, or if you buy your own hardware and configure the appliance yourself.
Prerequisites
To install the Dell PowerEdge R350 appliance, you need:
An Enterprise license for Dell Remote Access Controller (iDrac)
A BIOS configuration XML
Set up the BIOS and RAID array
This procedure describes how to configure the BIOS configuration for an unconfigured sensor appliance. If any of the steps below are missing in the BIOS, make sure that the hardware matches the specifications above.
Dell BIOS iDRAC is a system management software designed to give administrators control of Dell hardware remotely. It allows administrators to monitor system performance, configure settings, and troubleshoot hardware issues from a web browser. It can also be used to update system BIOS and firmware. The BIOS can be set up locally or remotely. To set up the BIOS remotely from a management computer, you need to define the iDRAC IP address and the management computer's IP address on the same subnet.
To configure the iDRAC IP address:
Power up the sensor.
If the OS is already installed, select the F2 key to enter the BIOS configuration.
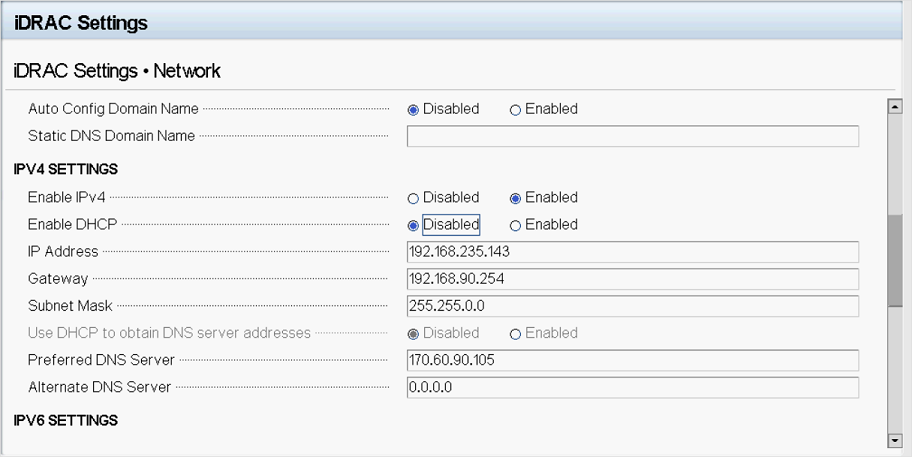
Select iDRAC Settings.
Select Network.
Note
During the installation, you must configure the default iDRAC IP address and password mentioned in the following steps. After the installation, you change these definitions.
Change the static IPv4 address to 10.100.100.250.
Change the static subnet mask to 255.255.255.0.
Select Back > Finish.
To configure the Dell BIOS:
This procedure describes how to update the Dell PowerEdge R350 configuration for your OT deployment.
Configure the appliance BIOS only if you didn't purchase your appliance from Arrow, or if you have an appliance, but don't have access to the XML configuration file.
Access the appliance's BIOS directly by using a keyboard and screen, or use iDRAC.
If the appliance isn't a Defender for IoT appliance, open a browser and go to the IP address configured beforehand. Sign in with the Dell default administrator privileges. Use root for the username and calvin for the password.
If the appliance is a Defender for IoT appliance, sign in by using XXX for the username and XXX for the password.
After you access the BIOS, go to Device Settings.
Choose the RAID-controlled configuration by selecting Integrated RAID controller 1: Dell PERC<PERC H755 Adapter> Configuration Utility.
Select Configuration Management.
Select Create Virtual Disk.
In the Select RAID Level field, select RAID10. In the Virtual Disk Name field, enter ROOT and select Physical Disks.
Select Check All and then select Apply Changes
Select Ok.
Scroll down and select Create Virtual Disk.
Select the Confirm check box and select Yes.
Select OK.
Return to the main screen and select System BIOS.
Select Boot Settings.
For the Boot Mode option, select UEFI.
Select Back, and then select Finish to exit the BIOS settings.
Install Defender for IoT software on the Dell PowerEdge R350
This procedure describes how to install Defender for IoT software on the Dell PowerEdge R350.
The installation process takes about 20 minutes. After the installation, the system restarts several times.
To install the software:
Verify that the version media is mounted to the appliance in one of the following ways:
Connect an external CD or disk-on-key that contains the sensor software you downloaded from the Azure portal.
Mount the ISO image by using iDRAC. After signing in to iDRAC, select the virtual console, and then select Virtual Media.
In the Map CD/DVD section, select Choose File.
Choose the version ISO image file for this version from the dialog box that opens.
Select the Map Device button.
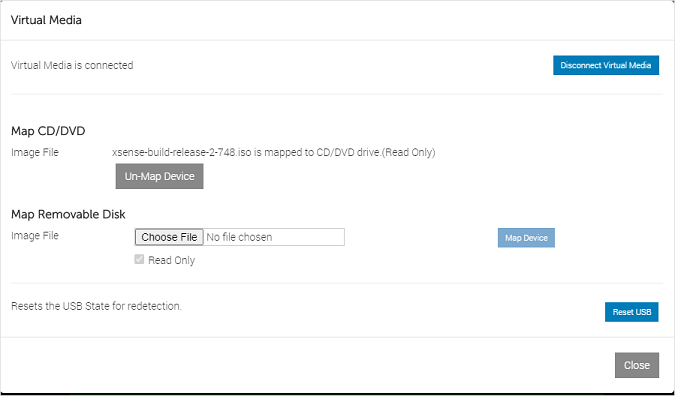
The media is mounted. Select Close.
Start the appliance. When you're using iDRAC, you can restart the servers by selecting the Console Control button. Then, on the Keyboard Macros, select the Apply button, which starts the Ctrl+Alt+Delete sequence.
Continue by installing OT sensor or on-premises management software. For more information, see Defender for IoT software installation.
Next steps
Continue understanding system requirements for physical or virtual appliances. For more information, see Which appliances do I need?.
Then, use any of the following procedures to continue:
Feedback
Coming soon: Throughout 2024 we will be phasing out GitHub Issues as the feedback mechanism for content and replacing it with a new feedback system. For more information see: https://aka.ms/ContentUserFeedback.
Submit and view feedback for