Create a pull request status server with Node.js
Azure DevOps Services | Azure DevOps Server 2022 - Azure DevOps Server 2019
The pull request (PR) workflow provides developers with an opportunity to get feedback on their code from peers as well as from automated tools. 3rd party tools and services can participate in the PR workflow by using the PR Status API. This article guides you through the process of creating a status server to validate PRs in an Azure DevOps Services Git repository. For more information about PR status, see Customize and extend pull request workflows with pull request status.
Prerequisites
- An organization in Azure DevOps with a Git repo. If you don't have an organization, sign up to upload and share code in free unlimited private Git repositories.
- Install VS Code or other code editor of your choice. The instructions in this guide use VS Code but the steps in other code editors are similar.
Install Node.js
To install Node.js, download the LTS release appropriate for your platform. The download contains an installer, which you can run to install the Node.js runtime on your local machine. When installing Node.js, be sure to keep the npm package manager portion of the install, which is selected by default.
Create a basic web server using Express
The steps in this section use Express, which is a lightweight web framework for Node.js that provides a number of HTTP utility methods that simplify creating a web server. This framework provides you with the basic functions needed to listen to PR events.
From the command line, create a new project folder for your web server.
mkdir pr-server
cd pr-server
Use the
npm initcommand to create a newpackage.jsonfile for the project.npm initPress Enter to accept the defaults for all of the options except the entry point. Change it to
app.jsentry point: (index.js) app.jsInstall Express in the pr-server directory using the following command. This installs Express and saves it to the dependencies list.
npm install expressCreate a simple Express app to build upon for the PR status server. The following steps are based on the Express Hello world example. Open the project folder in VS Code by running the following command from the
pr-serverfolder.code .Create a new file
(Ctrl + N)and paste in the following sample code.const express = require('express') const app = express() app.get('/', function (req, res) { res.send('Hello World!') }) app.listen(3000, function () { console.log('Example app listening on port 3000!') })Save the file as
app.js.Run the basic web server using the following command:
node app.jsVerify the server is running by browsing to
http://localhost:3000/.
Listen for HTTP POST requests
The web server is going to receive POST requests from Azure DevOps Services, so you need to handle those requests in your server.
At the end of the
app.jsfile, add the following code, and save the file.app.post('/', function (req, res) { res.send('Received the POST') })Re-run your web server using the following command:
node app.js
Configure a service hook for PR events
Service hooks are an Azure DevOps Services feature that can alert external services when certain events occur. For this sample, you'll want to set up two service hooks for PR events, so the status server can be notified. The first will be for the Pull request created event and the second will be for the Pull request updated event.
In order to receive the service hook notifications, you'll need to expose a port to the public internet. The ngrok utility is very useful for doing this in a development environment.
Download and unzip the appropriate ngrok release for your platform.
Use ngrok to start listening on the same port as your sample server - port 3000. Run the following command in a new command window.
ngrok http 3000Ngrok will create a public URL that forwards to
localhost:3000. Note that URL as you will need it in the next step. It will look something like this:http://c3c1bffa.ngrok.ioBrowse to your project in Azure DevOps, e.g.
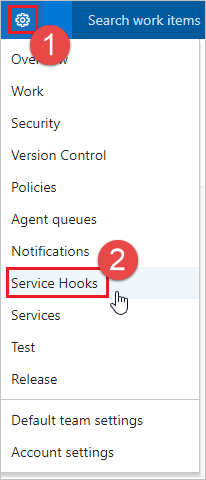
https://dev.azure.com/<your account>/<your project name>From the navigation menu, hover over the gear and select Service Hooks.
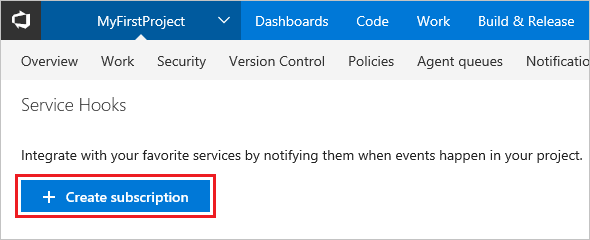
If this is your first service hook, select + Create subscription.
If you already have other service hooks configured, select the green plus
(+)to create a new service hook subscription.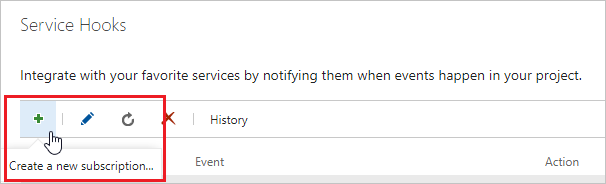
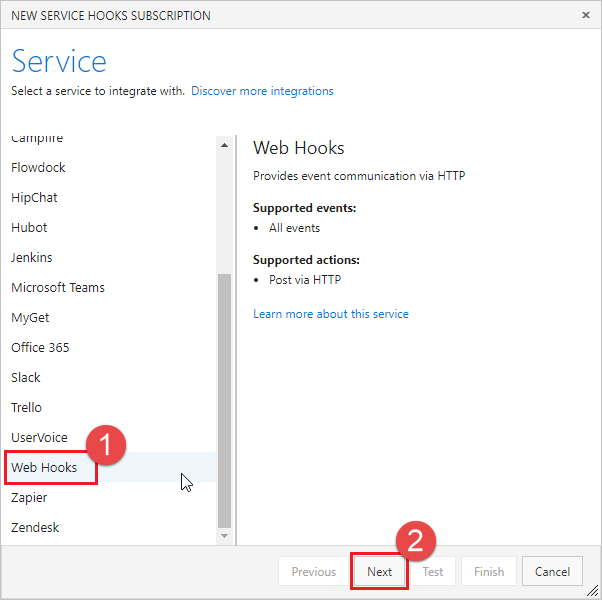
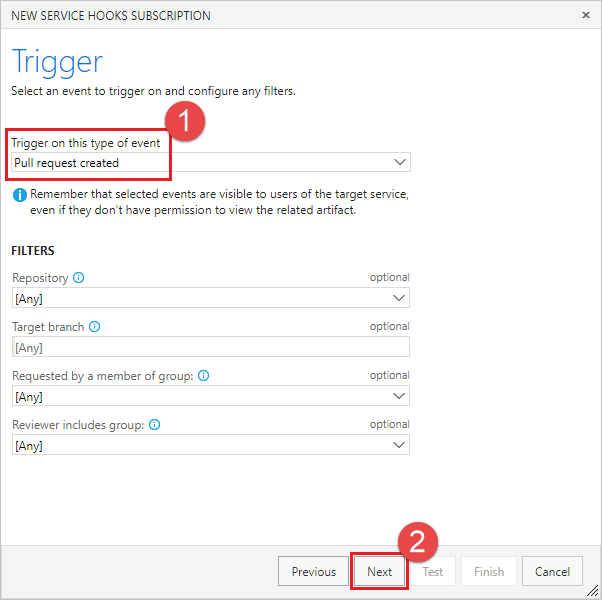
On the New Service Hooks Subscription dialog, select Web Hooks from the list of services, then select Next.
Select Pull request created from the list of event triggers, then select Next.
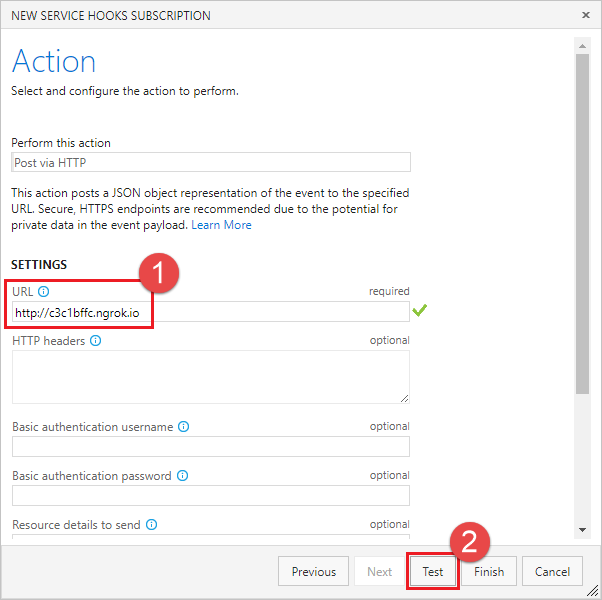
In the Action page, enter the URL from ngrok in the URL box. Select Test to send a test event to your server.
In the ngrok console window, you'll see an incoming
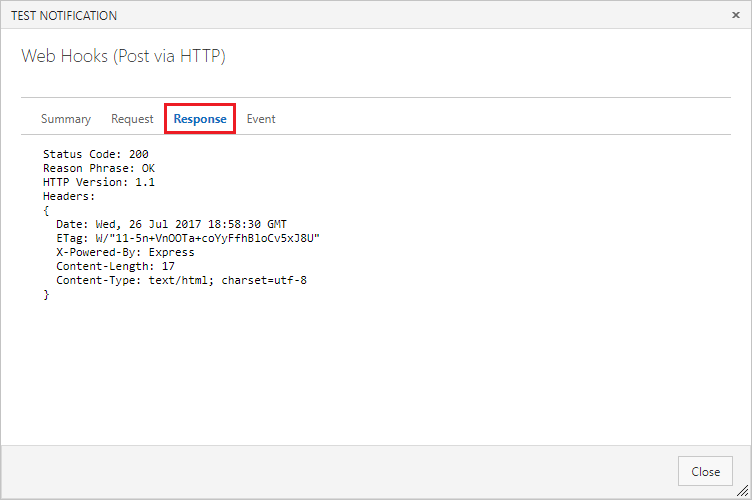
POSTthat returned a200 OK, indicating your server received the service hook event.HTTP Requests ------------- POST / 200 OKIn the Test Notification window, select the Response tab to see the details of the response from your server. You should see a content length of 17 that matches the length of the string from your POST handler (i.e. "Received the POST").
Close the Test Notification window, and select Finish to create the service hook.
Go through steps 3-9 again but this time configure the Pull request updated event.
Important
Be sure to go through the preceding steps twice and create service hooks for both the Pull request created and Pull request updated events.
Post status to PRs
Now that your server can receive service hook events when new PRs are created, update it to post back status to the PR.
Service hook requests include a JSON payload describing the event. To help parse the JSON returned by the service hook, install the body-parser package.
npm install body-parserUpdate
app.jsto use body-parser for parsingapplication/json.var bodyParser = require('body-parser') app.use(bodyParser.json())To simplify making REST API calls to Azure Repos, install the azure-devops-node-api package.
npm install azure-devops-node-apiUpdate
app.jsto use the azure-devops-node-api package, set up the details for a connection to your account, and get an instance of the Git API.const vsts = require("azure-devops-node-api") const collectionURL = process.env.COLLECTIONURL const token = process.env.TOKEN var authHandler = vsts.getPersonalAccessTokenHandler(token) var connection = new vsts.WebApi(collectionURL, authHandler) var vstsGit = connection.getGitApi().then( vstsGit => { vstsGit.createPullRequestStatus(prStatus, repoId, pullRequestId).then( result => { console.log(result); }, error => { console.log(error); }) }, error => { console.log(error); } );Create an environment variable for your collection URL, replacing
<your account>with the name of your Azure DevOps organization.setx COLLECTIONURL "https://dev.azure.com/<your account>"Create a personal auth token (PAT) for your app to use, following these instructions: Authenticating with personal access tokens. You should create a new PAT for every service that you use to access your account, naming it appropriately.
Create an environment variable for your PAT.
setx TOKEN "yourtokengoeshere"Update the
post()function to read the PR details from the service hook payload. You'll need these values in order to post back status.var repoId = req.body.resource.repository.id var pullRequestId = req.body.resource.pullRequestId var title = req.body.resource.titleBuild the status object to post on the PR.
Stateis an enum of type GitStatusState. Usesucceededto indicate that the PR has passed the status check and is ready to merge.The
descriptionis a string value that will be displayed to the user in the Status section and activity feed in the PR details view.The
targetUrlis a URL that will be used to create a link for the description text in the Status section and activity feed. This is the place where users can go to get more information about the status, for example, a build report or test run. If no URL is specified, the description will appear as text with no link.The context
nameandgenreare used to categorize the status and distinguish it from other services posting status.var prStatus = { "state": "succeeded", "description": "Ready for review", "targetUrl": "https://visualstudio.microsoft.com", "context": { "name": "wip-checker", "genre": "continuous-integration" } }Instead of just blindly posting the
succeededstatus, inspect the PR title to see if the user has indicated if the PR is a work in progress by adding WIP to the title. If so, change the status posted back to the PR.if (title.includes("WIP")) { prStatus.state = "pending" prStatus.description = "Work in progress" }Finally, post the status using the
createPullRequestStatus()method. It requires the status object, the repo ID, and the pull request ID. Output the response to the node console so you can see the result of the post.vstsGit.createPullRequestStatus(prStatus, repoId, pullRequestId).then( result => { console.log(result) })The resulting method should look something like this:
app.post("/", function (req, res) {

    // Get the details about the PR from the service hook payload
    var repoId = req.body.resource.repository.id
    var pullRequestId = req.body.resource.pullRequestId
    var title = req.body.resource.title

    // Build the status object that we want to post.
    // Assume that the PR is ready for review...
    var prStatus = {
        "state": "succeeded",
        "description": "Ready for review",
        "targetUrl": "https://visualstudio.microsoft.com",
        "context": {
            "name": "wip-checker",
            "genre": "continuous-integration"
        }
    }

    // Check the title to see if there is "WIP" in the title.
    if (title.includes("WIP")) {

        // If so, change the status to pending and change the description.
        prStatus.state = "pending"
        prStatus.description = "Work in progress"
    }

    // Post the status to the PR
    vstsGit.createPullRequestStatus(prStatus, repoId, pullRequestId).then( result => {
        console.log(result)
    })

    res.send("Received the POST")
})
Save
app.jsand restart your node app.node app.js
Create a new PR to test the status server
Now that your server is running and listening for service hook notifications, create a pull request to test it out.
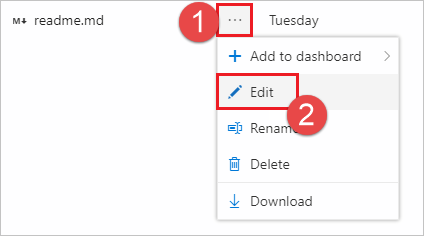
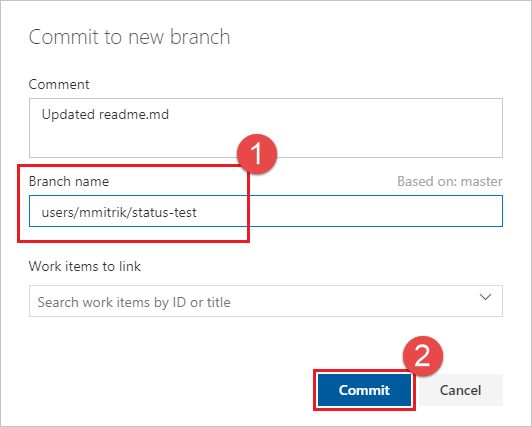
Start in the files view. Edit the readme.md file in your repo (or any other file if you don't have a readme.md).
Make an edit and commit the changes to the repo.

Be sure to commit the changes to a new branch so you can create a PR in the next step.
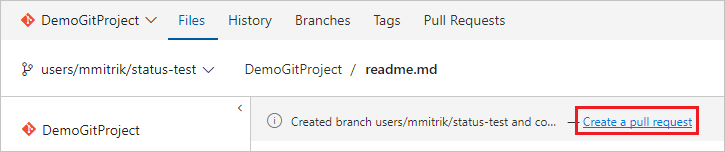
Select the Create a pull request link.
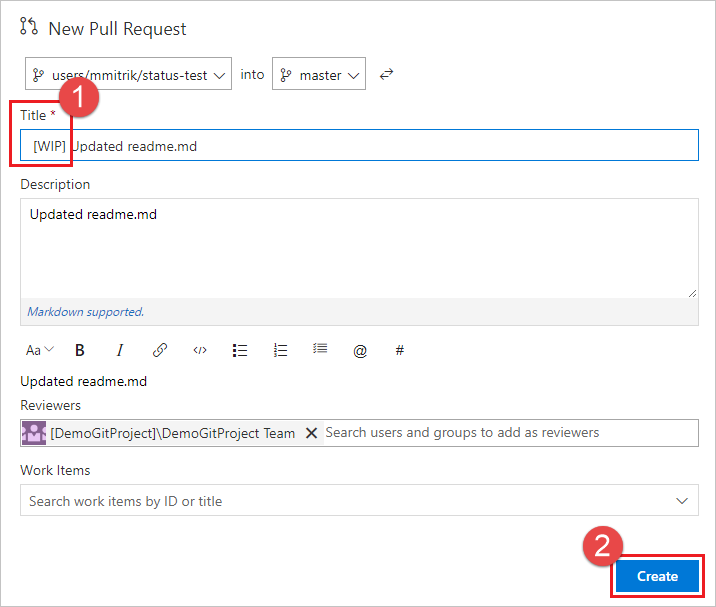
Add WIP in the title to test the functionality of the app. Select Create to create the PR.
Once the PR has been created, you will see the status section, with the Work in progress entry which links to the URL specified in the payload.
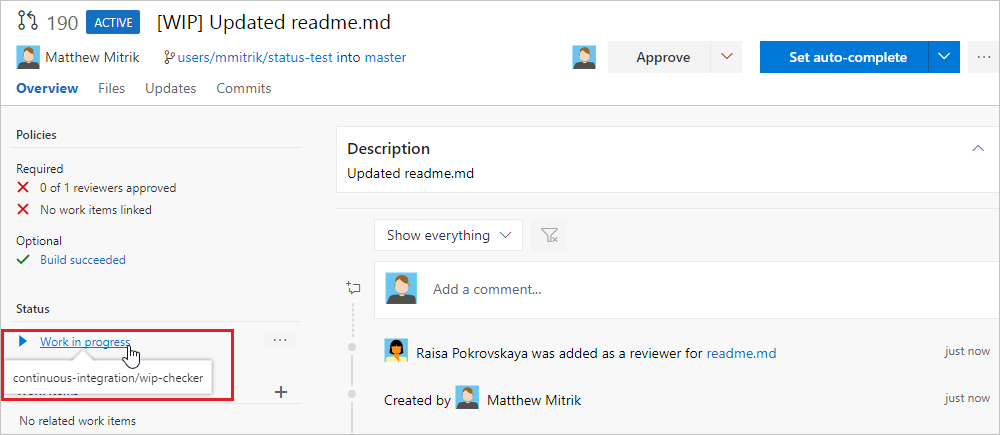
Update the PR title and remove the WIP text and note that the status changes from Work in progress to Ready for review.
Next Steps
- In this article, you learned the basics of how to create a service that listens for PR events via service hooks and can post status messages using the status API. For more information about the pull request status API see the REST API documentation.
- Configure a branch policy for an external service.