Deploy the Azure Blob Storage on IoT Edge module to your device
Applies to: ![]() IoT Edge 1.5
IoT Edge 1.5 ![]() IoT Edge 1.4
IoT Edge 1.4
Important
IoT Edge 1.5 LTS and IoT Edge 1.4 LTS are supported releases. IoT Edge 1.4 LTS is end of life on November 12, 2024. If you are on an earlier release, see Update IoT Edge.
There are several ways to deploy modules to an IoT Edge device and all of them work for Azure Blob Storage on IoT Edge modules. The two simplest methods are to use the Azure portal or Visual Studio Code templates.
Prerequisites
An IoT hub in your Azure subscription.
An IoT Edge device.
If you don't have an IoT Edge device set up, you can create one in an Azure virtual machine. Follow the steps in one of the quickstart articles to Create a virtual Linux device or Create a virtual Windows device.
Azure IoT Edge extension. The Azure IoT Edge tools for Visual Studio Code extension is in maintenance mode.
Azure IoT Hub extension if deploying from Visual Studio Code.
Deploy from the Azure portal
The Azure portal guides you through creating a deployment manifest and pushing the deployment to an IoT Edge device.
Select your device
- Sign in to the Azure portal and navigate to your IoT hub.
- Select Devices under the Device management menu.
- Select the target IoT Edge device from the list.
- Select Set Modules.
Configure a deployment manifest
A deployment manifest is a JSON document that describes which modules to deploy, how data flows between the modules, and desired properties of the module twins. The Azure portal has a wizard that walks you through creating a deployment manifest. It has three steps organized into tabs: Modules, Routes, and Review + Create.
Add modules
In the IoT Edge Modules section of the page, select the Add dropdown and select IoT Edge Module to display the Add IoT Edge Module page.
On the Settings tab, provide a name for the module and then specify the container image URI:
- IoT Edge Module Name:
azureblobstorageoniotedge - Image URI:
mcr.microsoft.com/azure-blob-storage:latest
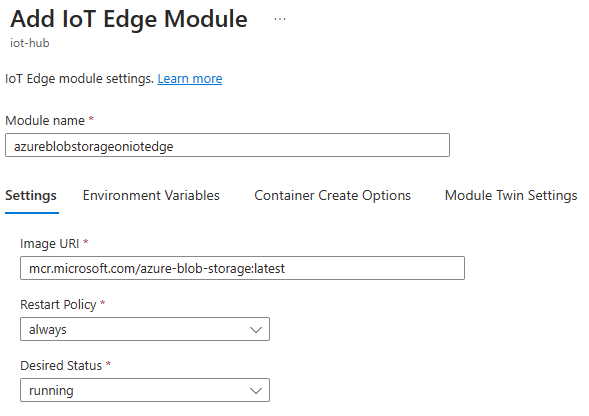
Don't select Add until you've specified values on the Module Settings, Container Create Options, and Module Twin Settings tabs as described in this procedure.
Important
Azure IoT Edge is case-sensitive when you make calls to modules, and the Storage SDK also defaults to lowercase. Changing the name to lowercase helps to ensure that your connections to the Azure Blob Storage on IoT Edge module aren't interrupted.
- IoT Edge Module Name:
Open the Container Create Options tab.
Copy and paste the following JSON into the box, to provide storage account information and a mount for the storage on your device.
{
  "Env":[
    "LOCAL_STORAGE_ACCOUNT_NAME=<local storage account name>",
    "LOCAL_STORAGE_ACCOUNT_KEY=<local storage account key>"
  ],
  "HostConfig":{
    "Binds":[
        "<mount>"
    ],
    "PortBindings":{
      "11002/tcp":[{"HostPort":"11002"}]
    }
  }
}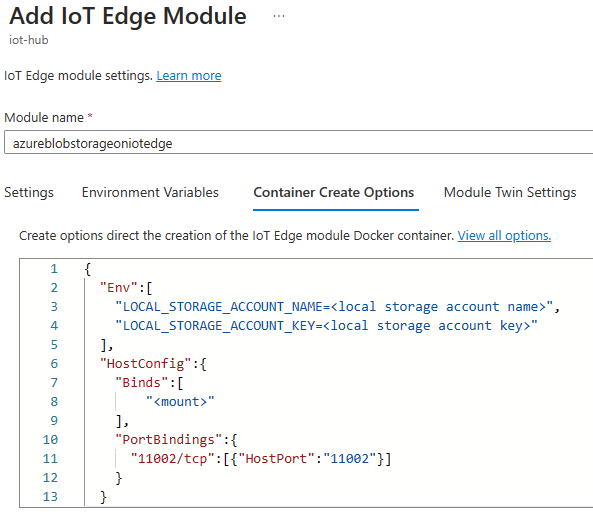
Update the JSON that you copied into Container Create Options with the following information:
Replace
<local storage account name>with a name that you can remember. Account names should be 3 to 24 characters long, with lowercase letters and numbers. No spaces.Replace
<local storage account key>with a 64-byte base64 key. You can generate a key with tools like GeneratePlus. You use these credentials to access the blob storage from other modules.Replace
<mount>according to your container operating system. Provide the name of a volume or the absolute path to an existing directory on your IoT Edge device where the blob module stores its data. The storage mount maps a location on your device that you provide to a set location in the module.
For Linux containers, the format is <your storage path or volume>:/blobroot. For example:
- Use volume mount:
my-volume:/blobroot - Use bind mount:
/srv/containerdata:/blobroot. Make sure to follow the steps to grant directory access to the container user
Important
Do not change the second half of the storage mount value, which points to a specific location in the Blob Storage on IoT Edge module. The storage mount must always end with :/blobroot for Linux containers.
IoT Edge does not remove volumes attached to module containers. This behavior is by design, as it allows persisting the data across container instances such as upgrade scenarios. However, if these volumes are left unused, then it may lead to disk space exhaustion and subsequent system errors. If you use docker volumes in your scenario, then we encourage you to use docker tools such as docker volume prune and docker volume rm to remove the unused volumes, especially for production scenarios.
On the Module Twin Settings tab, copy the following JSON and paste it into the box.
{
  "deviceAutoDeleteProperties": {
    "deleteOn": <true, false>,
    "deleteAfterMinutes": <timeToLiveInMinutes>,
    "retainWhileUploading": <true,false>
  },
  "deviceToCloudUploadProperties": {
    "uploadOn": <true, false>,
    "uploadOrder": "<NewestFirst, OldestFirst>",
    "cloudStorageConnectionString": "DefaultEndpointsProtocol=https;AccountName=<your Azure Storage Account Name>;AccountKey=<your Azure Storage Account Key>; EndpointSuffix=<your end point suffix>",
    "storageContainersForUpload": {
      "<source container name1>": {
        "target": "<your-target-container-name>"
      }
    },
    "deleteAfterUpload": <true,false>
  }
}
Configure each property with an appropriate value, as indicated by the placeholders. If you're using the IoT Edge simulator, set the values to the related environment variables for these properties as described by deviceToCloudUploadProperties and deviceAutoDeleteProperties.
Tip
The name for your
targetcontainer has naming restrictions, for example using a$prefix is unsupported. To see all restrictions, view Container Names.Note
If your container target is unnamed or null within
storageContainersForUpload, a default name will be assigned to the target. If you wanted to stop uploading to a container, it must be removed completely fromstorageContainersForUpload. For more information, see thedeviceToCloudUploadPropertiessection of Store data at the edge with Azure Blob Storage on IoT Edge.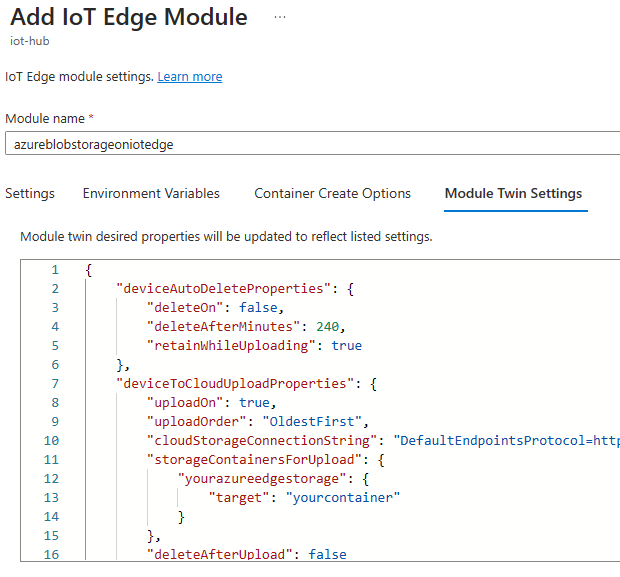
For information on configuring deviceToCloudUploadProperties and deviceAutoDeleteProperties after your module is deployed, see Edit the Module Twin. For more information about desired properties, see Define or update desired properties.
Select Add.
Select Next: Routes to continue to the routes section.
Specify routes
Keep the default routes and select Next: Review + create to continue to the review section.
Review deployment
The review section shows you the JSON deployment manifest that was created based on your selections in the previous two sections. There are also two modules declared that you didn't add: $edgeAgent and $edgeHub. These two modules make up the IoT Edge runtime and are required defaults in every deployment.
Review your deployment information, then select Create.
Verify your deployment
After you create the deployment, you return to the Devices page of your IoT hub.
- Select the IoT Edge device that you targeted with the deployment to open its details.
- In the device details, verify that the blob storage module is listed as both Specified in deployment and Reported by device.
It might take a few moments for the module to be started on the device and then reported back to IoT Hub. Refresh the page to see an updated status.
Deploy from Visual Studio Code
Azure IoT Edge provides templates in Visual Studio Code to help you develop edge solutions. Use the following steps to create a new IoT Edge solution with a blob storage module and to configure the deployment manifest.
Important
The Azure IoT Edge Visual Studio Code extension is in maintenance mode.
Select View > Command Palette.
In the command palette, enter and run the command Azure IoT Edge: New IoT Edge solution.

Follow the prompts in the command palette to create your solution.
Field Value Select folder Choose the location on your development machine for Visual Studio Code to create the solution files. Provide a solution name Enter a descriptive name for your solution or accept the default EdgeSolution. Select module template Choose Existing Module (Enter full image URL). Provide a module name Enter an all-lowercase name for your module, like azureblobstorageoniotedge.
It's important to use a lowercase name for the Azure Blob Storage on IoT Edge module. IoT Edge is case-sensitive when referring to modules, and the Storage SDK defaults to lowercase.Provide Docker image for the module Provide the image URI: mcr.microsoft.com/azure-blob-storage:latest Visual Studio Code takes the information you provided, creates an IoT Edge solution, and then loads it in a new window. The solution template creates a deployment manifest template that includes your blob storage module image, but you need to configure the module's create options.
Open deployment.template.json in your new solution workspace and find the modules section. Make the following configuration changes:
Copy and paste the following code into the
createOptionsfield for the blob storage module:```json "Env":[ "LOCAL_STORAGE_ACCOUNT_NAME=<local storage account name>", "LOCAL_STORAGE_ACCOUNT_KEY=<local storage account key>" ], "HostConfig":{ "Binds": ["<mount>"], "PortBindings":{ "11002/tcp": [{"HostPort":"11002"}] } }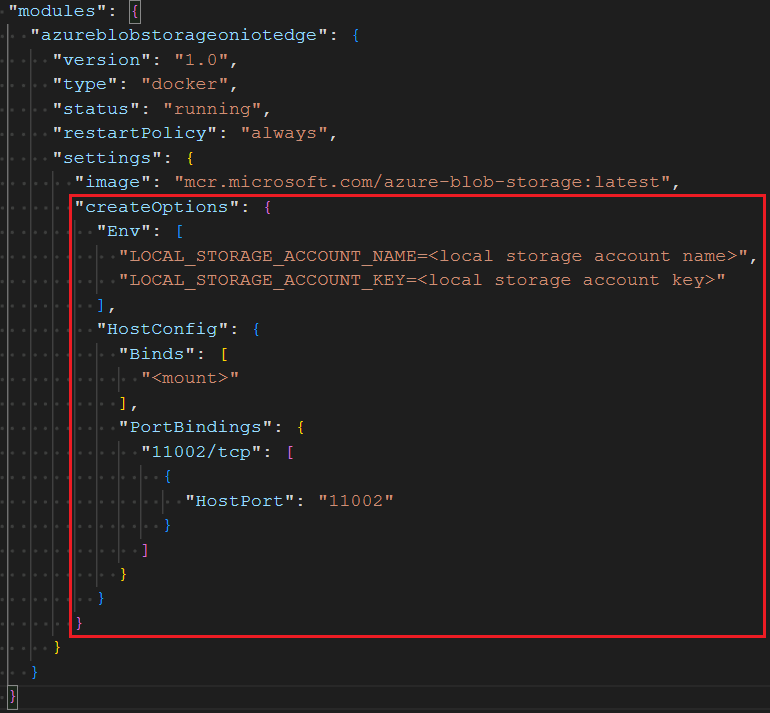
Replace
<local storage account name>with a name that you can remember. Account names should be 3 to 24 characters long, with lowercase letters and numbers. No spaces.Replace
<local storage account key>with a 64-byte base64 key. You can generate a key with tools like GeneratePlus. You use these credentials to access the blob storage from other modules.Replace
<mount>according to your container operating system. Provide the name of a volume or the absolute path to a directory on your IoT Edge device where you want the blob module to store its data. The storage mount maps a location on your device that you provide to a set location in the module.For Linux containers, the format is <your storage path or volume>:/blobroot. For example:
- Use volume mount:
my-volume:/blobroot - Use bind mount:
/srv/containerdata:/blobroot. Make sure to follow the steps to grant directory access to the container user
Important
Do not change the second half of the storage mount value, which points to a specific location in the Blob Storage on IoT Edge module. The storage mount must always end with :/blobroot for Linux containers.
IoT Edge does not remove volumes attached to module containers. This behavior is by design, as it allows persisting the data across container instances such as upgrade scenarios. However, if these volumes are left unused, then it may lead to disk space exhaustion and subsequent system errors. If you use docker volumes in your scenario, then we encourage you to use docker tools such as docker volume prune and docker volume rm to remove the unused volumes, especially for production scenarios.
- Use volume mount:
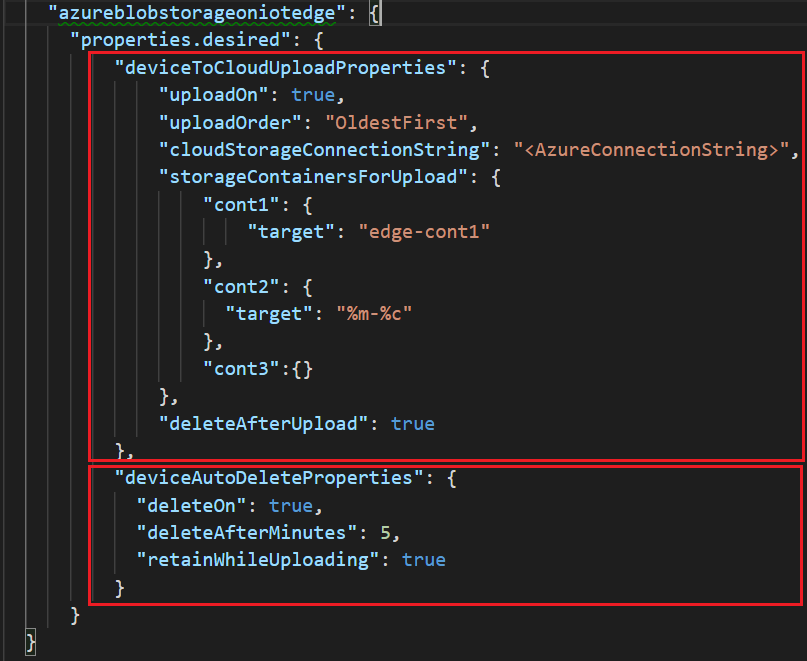
Configure deviceToCloudUploadProperties and deviceAutoDeleteProperties for your module by adding the following JSON to the deployment.template.json file. Configure each property with an appropriate value and save the file. If you're using the IoT Edge simulator, set the values to the related environment variables for these properties, which you can find in the explanation section of deviceToCloudUploadProperties and deviceAutoDeleteProperties
"<your azureblobstorageoniotedge module name>":{
  "properties.desired": {
    "deviceAutoDeleteProperties": {
      "deleteOn": <true, false>,
      "deleteAfterMinutes": <timeToLiveInMinutes>,
      "retainWhileUploading": <true, false>
    },
    "deviceToCloudUploadProperties": {
      "uploadOn": <true, false>,
      "uploadOrder": "<NewestFirst, OldestFirst>",
      "cloudStorageConnectionString": "DefaultEndpointsProtocol=https;AccountName=<your Azure Storage Account Name>;AccountKey=<your Azure Storage Account Key>;EndpointSuffix=<your end point suffix>",
      "storageContainersForUpload": {
        "<source container name1>": {
          "target": "<target container name1>"
        }
      },
      "deleteAfterUpload": <true, false>
    }
  }
}
For information on configuring deviceToCloudUploadProperties and deviceAutoDeleteProperties after your module is deployed, see Edit the Module Twin. For more information about container create options, restart policy, and desired status, see EdgeAgent desired properties.
Save the deployment.template.json file.
Right-click deployment.template.json and select Generate IoT Edge deployment manifest.
Visual Studio Code takes the information that you provided in deployment.template.json and uses it to create a new deployment manifest file. The deployment manifest is created in a new config folder in your solution workspace. Once you have that file, you can follow the steps in Deploy Azure IoT Edge modules with Azure CLI 2.0.
Deploy multiple module instances
If you want to deploy multiple instances of the Azure Blob Storage on IoT Edge module, you need to provide a different storage path and change the HostPort value that the module binds to. The blob storage modules always expose port 11002 in the container, but you can declare which port it's bound to on the host.
Edit Container Create Options (in the Azure portal) or the createOptions field (in the deployment.template.json file in Visual Studio Code) to change the HostPort value:
"PortBindings":{
  "11002/tcp": [{"HostPort":"<port number>"}]
}
When you connect to additional blob storage modules, change the endpoint to point to the updated host port.
Configure proxy support
If your organization is using a proxy server, you need to configure proxy support for the edgeAgent and edgeHub runtime modules. This process involves two tasks:
- Configure the runtime daemons and the IoT Edge agent on the device.
- Set the HTTPS_PROXY environment variable for modules in the deployment manifest JSON file.
This process is described in Configure an IoT Edge device to communicate through a proxy server.
In addition, a blob storage module also requires the HTTPS_PROXY setting in the manifest deployment file. You can directly edit the deployment manifest file, or use the Azure portal.
Navigate to your IoT Hub in the Azure portal and select Devices under the Device management menu
Select the device with the module to configure.
Select Set Modules.
In the IoT Edge Modules section of the page, select the blob storage module.
On the Update IoT Edge Module page, select the Environment Variables tab.
Add
HTTPS_PROXYfor the Name and your proxy URL for the Value.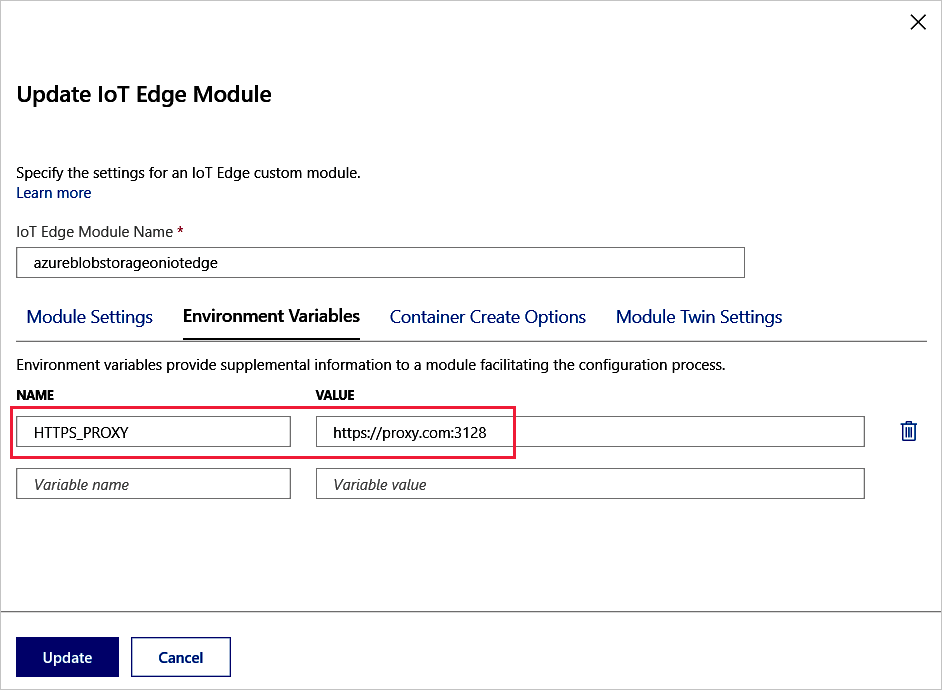
Select Update, then Review + Create.
See the proxy is added to the module in deployment manifest and select Create.
Verify the setting by selecting the module from the device details page, and on the lower part of the IoT Edge Modules Details page select the Environment Variables tab.

Next steps
Learn more about Azure Blob Storage on IoT Edge.
For more information about how deployment manifests work and how to create them, see Understand how IoT Edge modules can be used, configured, and reused.