Run an R job to train a model
APPLIES TO:  Azure CLI ml extension v2 (current)
This article explains how to take the R script that you adapted to run in production and set it up to run as an R job using the Azure Machine Learning CLI V2.
Note
Although the title of this article refers to training a model, you can actually run any kind of R script as long as it meets the requirements listed in the adapting article.
Prerequisites
- An Azure Machine Learning workspace.
- A registered data asset that your training job uses.
- Azure CLI and ml extension installed. Or use a compute instance in your workspace, which has the CLI preinstalled.
- A compute cluster or compute instance to run your training job.
- An R environment for the compute cluster to use to run the job.
Create a folder with this structure
Create this folder structure for your project:
📁 r-job-azureml
├─ src
│  ├─ azureml_utils.R
│  ├─ r-source.R
├─ job.yml
Important
All source code goes in the src directory.
- The r-source.R file is the R script that you adapted to run in production. Make sure you follow the steps to crate and log your model in this script.
- The azureml_utils.R file is necessary. Use this source code for the contents of the file.
Prepare the job YAML
Azure Machine Learning CLI v2 has different different YAML schemas for different operations. You use the job YAML schema to submit a job in the job.yml file that is a part of this project.
You need to gather specific pieces of information to put into the YAML:
- The name of the registered data asset you use as the data input (with version):
azureml:<REGISTERED-DATA-ASSET>:<VERSION> - The name of the environment you created (with version):
azureml:<R-ENVIRONMENT-NAME>:<VERSION> - The name of the compute cluster:
azureml:<COMPUTE-CLUSTER-NAME>
Tip
For Azure Machine Learning artifacts that require versions (data assets, environments), you can use the shortcut URI azureml:<AZUREML-ASSET>@latest to get the latest version of that artifact if you don't need to set a specific version.
Sample YAML schema to submit a job
Edit your job.yml file to contain the following. Make sure to replace values shown <IN-BRACKETS-AND-CAPS> and remove the brackets.
$schema: https://azuremlschemas.azureedge.net/latest/commandJob.schema.json
# the Rscript command goes in the command key below. Here you also specify
# which parameters are passed into the R script and can reference the input
# keys and values further below
# Modify any value shown below <IN-BRACKETS-AND-CAPS> (remove the brackets)
command: >
Rscript <NAME-OF-R-SCRIPT>.R
--data_file ${{inputs.datafile}}
--other_input_parameter ${{inputs.other}}
code: src   # this is the code directory
inputs:
  datafile: # this is a registered data asset
    type: uri_file
    path: azureml:<REGISTERED-DATA-ASSET>@latest
  other: 1  # this is a sample parameter, which is the number 1 (as text)
environment: azureml:<R-ENVIRONMENT-NAME>@latest
compute: azureml:<COMPUTE-CLUSTER-OR-INSTANCE-NAME>
experiment_name: <NAME-OF-EXPERIMENT>
description: <DESCRIPTION>
Submit the job
In the following commands in this section, you may need to know:
- The Azure Machine Learning workspace name
- The resource group name where the workspace is
- The subscription where the workspace is
Find these values from Azure Machine Learning studio:
- Sign in and open your workspace.
- In the upper right Azure Machine Learning studio toolbar, select your workspace name.
- You can copy the values from the section that appears.

To submit the job, run the following commands in a terminal window:
Change directories into the
r-job-azureml.cd r-job-azuremlSign in to Azure. If you're doing this from an Azure Machine Learning compute instance, use:
az login --identityIf you're not on the compute instance, omit
--identityand follow the prompt to open a browser window to authenticate.Make sure you have the most recent versions of the CLI and the
mlextension:az upgradeIf you have multiple Azure subscriptions, set the active subscription to the one you're using for your workspace. (You can skip this step if you only have access to a single subscription.) Replace
<SUBSCRIPTION-NAME>with your subscription name. Also remove the brackets<>.az account set --subscription "<SUBSCRIPTION-NAME>"Now use CLI to submit the job. If you're doing this on a compute instance in your workspace, you can use environment variables for the workspace name and resource group as show in the following code. If you aren't on a compute instance, replace these values with your workspace name and resource group.
az ml job create -f job.yml --workspace-name $CI_WORKSPACE --resource-group $CI_RESOURCE_GROUP
Once you've submitted the job, you can check the status and results in studio:
- Sign in to Azure Machine Learning studio.
- Select your workspace if it isn't already loaded.
- On the left navigation, select Jobs.
- Select the Experiment name that you used to train your model.
- Select the Display name of the job to view details and artifacts of the job, including metrics, images, child jobs, outputs, logs, and code used in the job.
Register model
Finally, once the training job is complete, register your model if you want to deploy it. Start in the studio from the page showing your job details.
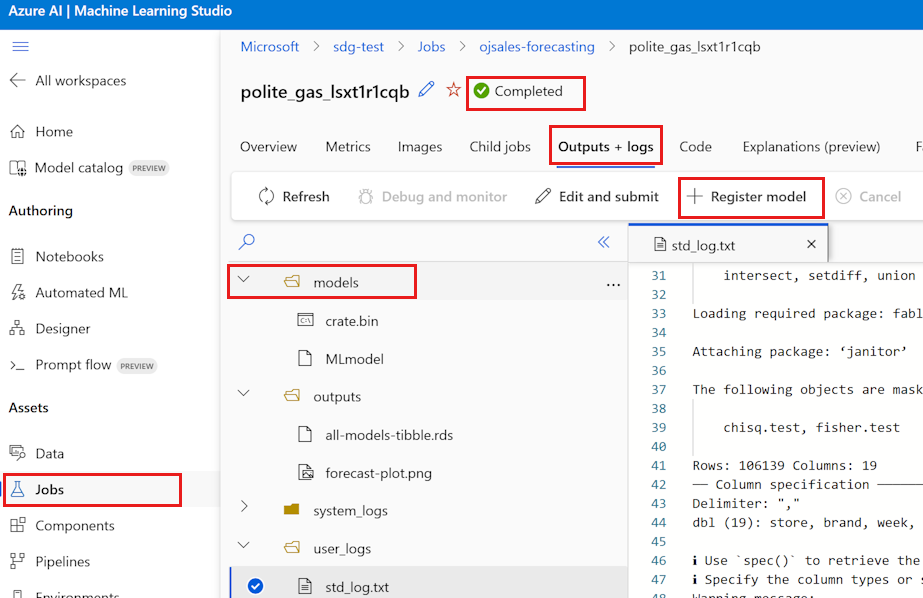
Once your job completes, select Outputs + logs to view outputs of the job.
Open the models folder to verify that crate.bin and MLmodel are present. If not, check the logs to see if there was an error.
On the toolbar at the top, select + Register model.
Don't use the MLflow model type, even though it's detected. Change Model type from the default MLflow to Unspecified type. Leaving it as MLflow will cause an error.
For Job output, select models, the folder that contains the model.
Select Next.
Supply the name you wish to use for your model. Add Description, Version, and Tags if you wish.
Select Next.
Review the information.
Select Register.
At the top of the page, you'll see a confirmation that the model is registered. The confirmation looks similar to this:

Select Click here to go to this model. if you wish to view the registered model details.
Next steps
Now that you have a registered model, learn How to deploy an R model to an online (real time) endpoint.