Tutorial: Design an Azure Database for MariaDB database by using the Azure portal
Important
Azure Database for MariaDB is on the retirement path. We strongly recommend that you migrate to Azure Database for MySQL. For more information about migrating to Azure Database for MySQL, see What's happening to Azure Database for MariaDB?.
Azure Database for MariaDB is a managed service you can use to run, manage, and scale highly available MySQL databases in the cloud. By using the Azure portal, you can easily manage your server and design a database.
In this tutorial, you use the Azure portal to learn how to:
- Create an Azure Database for MariaDB
- Configure the server firewall
- Use the mysql command-line tool to create a database
- Load sample data
- Query data
- Update data
- Restore data
If you don't have an Azure subscription, create a free Azure account before you begin.
Sign in to the Azure portal
In your browser, sign in to the Azure portal. Enter your credentials to sign in to the portal. The default view is your service dashboard.
Create an Azure Database for MariaDB server
You create an Azure Database for MariaDB server with a defined set of compute and storage resources. The server is created in an Azure resource group.
Select the Create a resource button (+) in the upper left corner of the portal.
Select Databases > Azure Database for MariaDB. You can also type MariaDB in the search box to find the service.
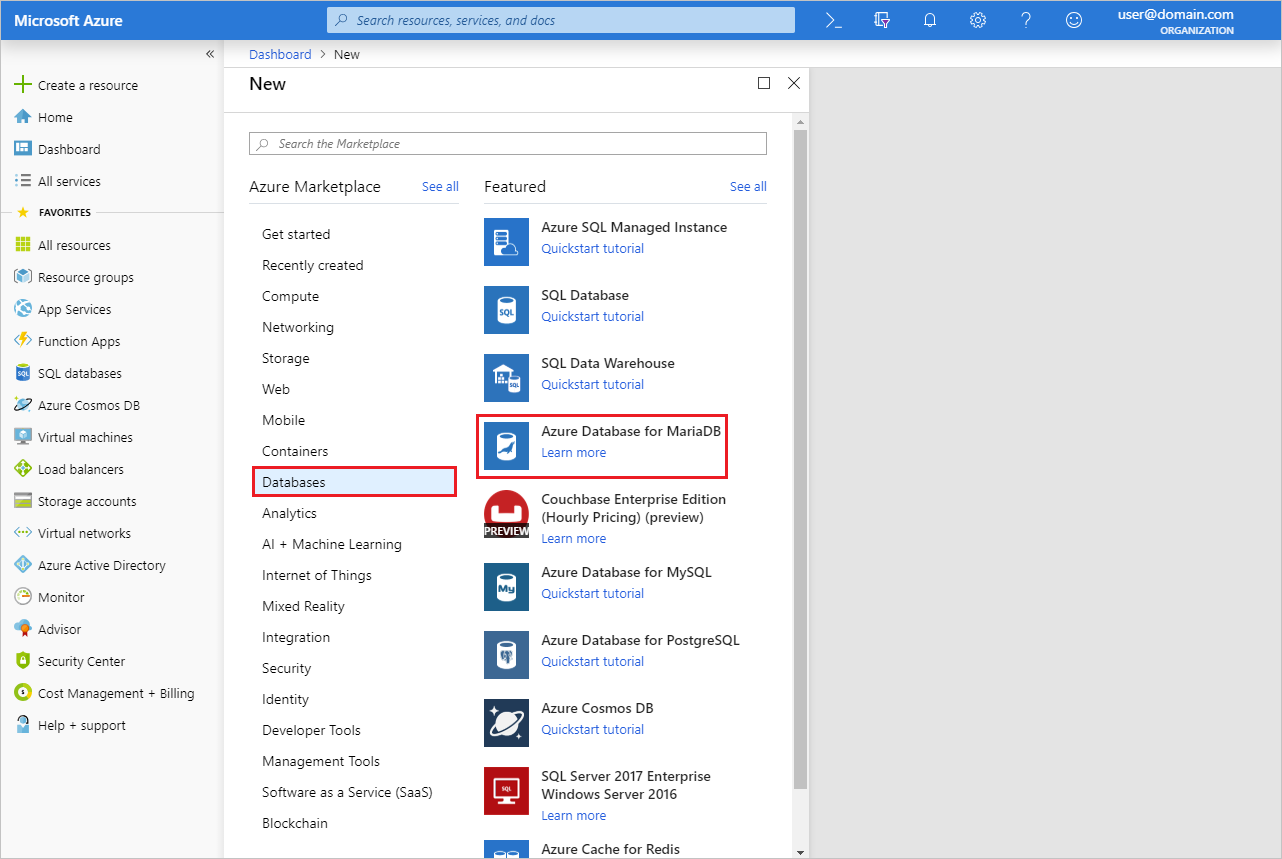
Select the Azure Database for MariaDB tile. Enter or select the required information.
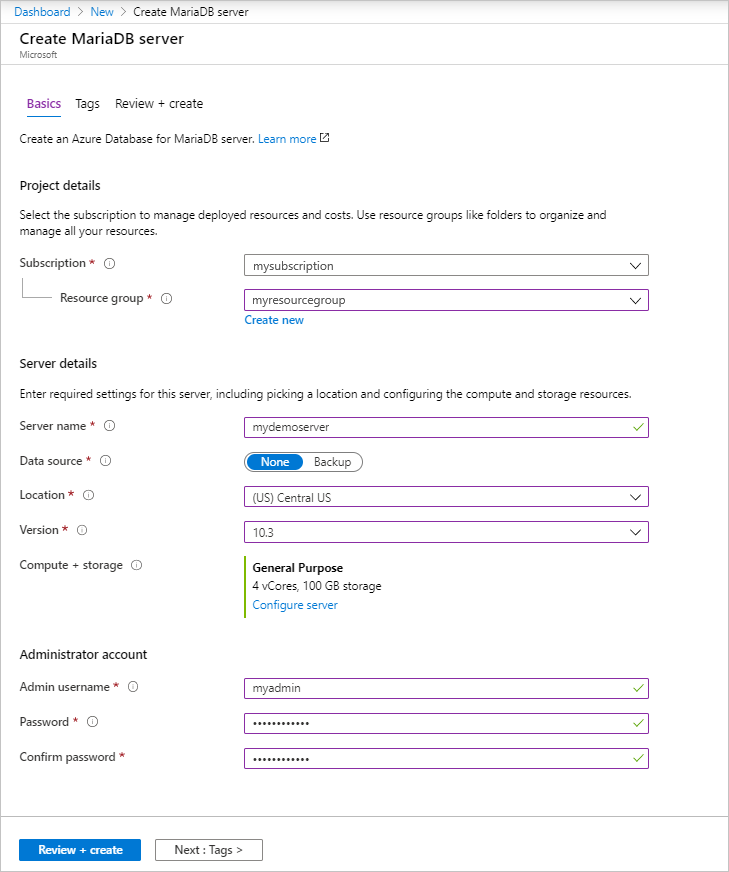
Setting Suggested value Field description Server name a unique server name Choose a unique name that identifies your Azure Database for MariaDB server. For example, mydemoserver. The domain name .mariadb.database.azure.com is appended to the server name you enter. The server name can contain only lowercase letters, numbers, and the hyphen (-) character. It must contain between 3 and 63 characters. Subscription your subscription Select the Azure subscription that you want to use for your server. If you have multiple subscriptions, choose the subscription in which you are billed for the resource. Resource group myresourcegroup Enter a new resource group name or select an existing resource group. Select source Blank Select Blank to create a new server. (If you're creating a server from a geo-backup of an existing Azure Database for MariaDB server, select Backup). Server admin login myadmin A sign-in account to use when you connect to the server. The admin sign-in name can't be azure_superuser, admin, administrator, root, guest, or public. Password your choice Enter a new password for the server admin account. It must contain between 8 and 128 characters. Your password must contain characters from three of the following categories: English uppercase letters, English lowercase letters, numbers (0-9), and non-alphanumeric characters (!, $, #, %, and so on). Confirm password your choice Confirm the admin account password. Location the region closest to your users Select the location that is closest to your users or to your other Azure applications. Version the latest version The latest version (unless you have specific requirements for using a different version). Pricing tier See description. The compute, storage, and backup configurations for your new server. Select Pricing tier > General Purpose. Keep the default values for the following settings: - Compute Generation (Gen 5)
- vCore (4 vCores)
- Storage (100 GB)
- Backup Retention Period (7 days)
To enable your server backups in geo-redundant storage, for Backup Redundancy Options, select Geographically Redundant.
To save this pricing tier selection, select OK. The next screenshot captures these selections.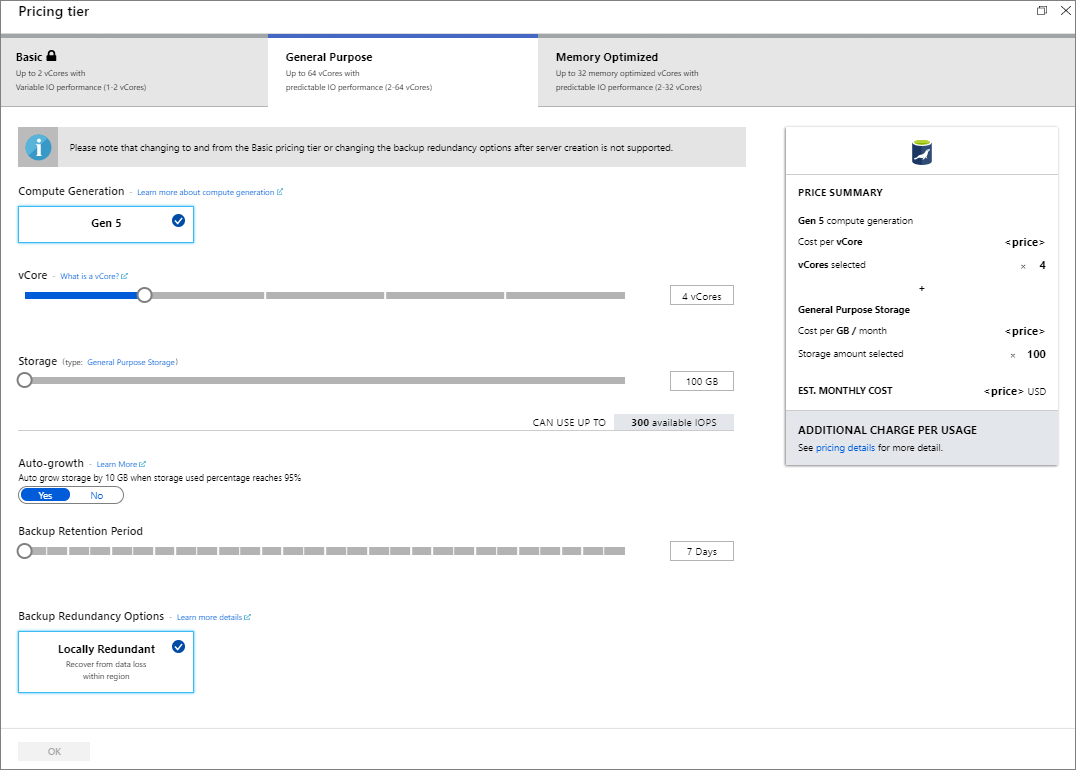
Tip
With auto-growth enabled your server increases storage when you are approaching the allocated limit, without impacting your workload.
Select Review + create. You can select on the Notifications button on the toolbar to monitor the deployment process. Deployment can take up to 20 minutes.
Configure the firewall
An Azure Database for MariaDB is protected by a firewall. By default, all connections to the server and to databases inside the server are rejected. Before you connect to Azure Database for MariaDB for the first time, configure the firewall to add the client computer's public network IP address (or the IP address range).
Select your newly created server, and then select Connection security.
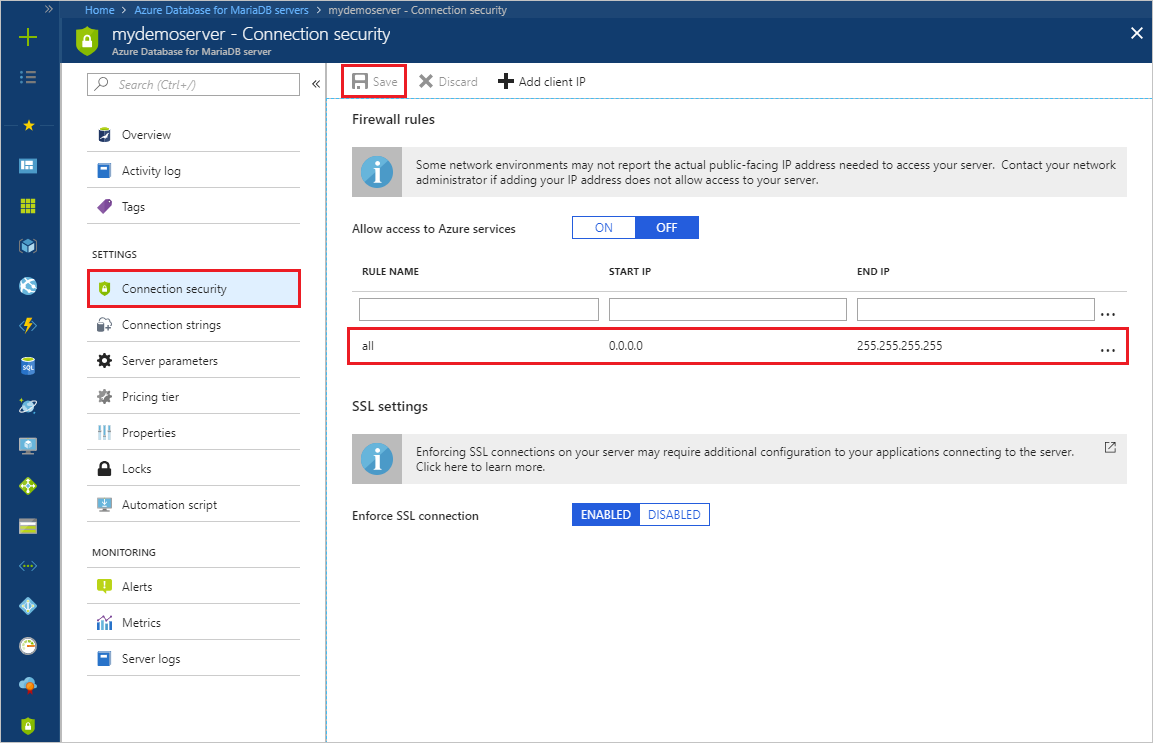
You can select Add My IP or configure firewall rules here. Remember to select Save after you create the rules.
You can now connect to the server by using the mysql command-line tool or MySQL Workbench.
Tip
The Azure Database for MariaDB server communicates over port 3306. If you try to connect from inside a corporate network, outbound traffic over port 3306 might not be allowed by your network's firewall. In this case, to connect to the Azure Database for MariaDB server, your IT department must open port 3306.
Get connection information
Get values for Server name (fully qualified) and Server admin login name for your Azure Database for MariaDB server from the Azure portal. You use the fully qualified server name to connect to your server by using the mysql command-line tool.
In the Azure portal, in the left menu, select All resources. Enter the server name and search for your Azure Database for MariaDB server. Select the server name to view the server details.
On the Overview page, make a note of the values for Server name and Server admin login name. You can also select the copy button next to each field to copy the value to the clipboard.
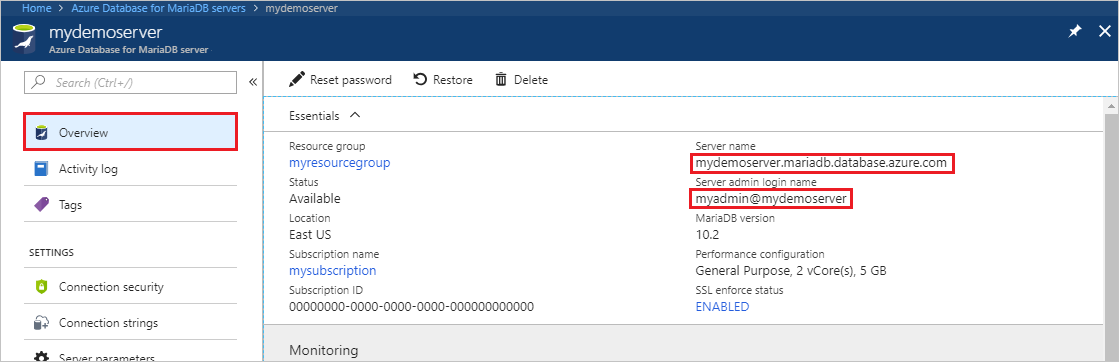
In our example, the server name is mydemoserver.mariadb.database.azure.com and the server admin login name is myadmin@mydemoserver.
Connect to the server by using mysql
Use the mysql command-line tool to establish a connection to your Azure Database for MariaDB server. You can run the mysql command-line tool from Azure Cloud Shell in the browser or from your computer by using the mysql tools installed locally. To open Azure Cloud Shell, select the Try It button on a code block in this article or go to the Azure portal and select the >_ icon in the top right toolbar.
Enter the command to connect:
mysql -h mydemoserver.mariadb.database.azure.com -u myadmin@mydemoserver -p
Create a blank database
When you're connected to the server, create a blank database to work with:
CREATE DATABASE mysampledb;
At the prompt, run the following command to switch the connection to your newly created database:
USE mysampledb;
Create tables in the database
Now that you know how to connect to the Azure Database for MariaDB database, you can complete some basic tasks.
First, create a table and load it with some data. Let's create a table that stores inventory information:
CREATE TABLE inventory (
    id serial PRIMARY KEY,
    name VARCHAR(50),
    quantity INTEGER
);
Load data in the tables
Now that you have a table, insert some data in the table. In the open Command Prompt window, run the following query to insert some rows of data:
INSERT INTO inventory (id, name, quantity) VALUES (1, 'banana', 150);
INSERT INTO inventory (id, name, quantity) VALUES (2, 'orange', 154);
Query and update the data in the tables
Run the following query to retrieve information from the database table:
SELECT * FROM inventory;
You can also update the data in the tables:
UPDATE inventory SET quantity = 200 WHERE name = 'banana';
The row is updated when you retrieve data:
SELECT * FROM inventory;
Restore a database to a previous point in time
Imagine that you accidentally deleted an important database table and can't recover the data easily. In Azure Database for MariaDB, you can restore the server to a point in time by creating a copy of the databases on your new server. You can use this new server to recover your deleted data. The following steps restore the sample server to a point in time before the table was added:
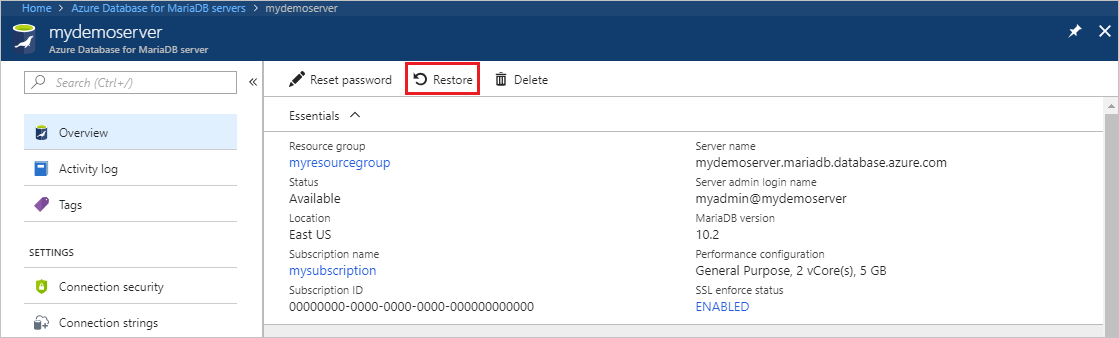
In the Azure portal, locate your Azure Database for MariaDB. On the Overview page, select Restore.
On the Restore page, enter or select the following information:
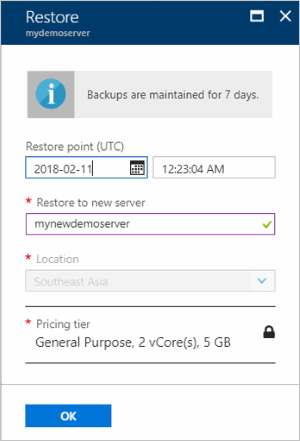
- Restore point: Select a point in time that you want to restore to, in the timeframe listed. Make sure you convert your local time zone to UTC.
- Restore to new server: Enter a new server name to restore to.
- Location: The region is same as the source server and can't be changed.
- Pricing tier: The pricing tier is the same as the source server and can't be changed.
Select OK to restore the server to a point in time restore to a point in time before the table was deleted. Restoring a server creates a new copy of the server at the point in time that you selected.
Next steps
In this tutorial, you use the Azure portal to learned how to:
- Create an Azure Database for MariaDB
- Configure the server firewall
- Use mysql command-line tool to create a database
- Load sample data
- Query data
- Update data
- Restore data
Feedback
Coming soon: Throughout 2024 we will be phasing out GitHub Issues as the feedback mechanism for content and replacing it with a new feedback system. For more information see: https://aka.ms/ContentUserFeedback.
Submit and view feedback for