Tutorial: Send push notifications to specific Android apps using Azure Notification Hubs
Note
For information about Firebase Cloud Messaging deprecation and migration steps, see Google Firebase Cloud Messaging migration.
This tutorial shows you how to use Azure Notification Hubs to send push notifications to a specific app user on a specific device. An ASP.NET WebAPI backend is used to authenticate clients and to generate notifications, as shown in the guidance article Registering from your app backend. This tutorial builds on the notification hub that you created in the Tutorial: Push notifications to Android devices by using Azure Notification Hubs and Firebase Cloud Messaging.
In this tutorial, you take the following steps:
- Create the backend Web API project that authenticates users.
- Update the Android application.
- Test the app
Prerequisites
Complete the Tutorial: Push notifications to Android devices by using Azure Notification Hubs and Firebase Cloud Messaging before doing this tutorial.
Create the WebAPI project
The following sections discuss the creation of a new ASP.NET WebAPI backend. This process has three main purposes:
- Authenticate clients: You add a message handler to authenticate client requests and associate the user with the request.
- Register for notifications by using the WebAPI backend: You add a controller to handle new registrations for a client device to receive notifications. The authenticated username is automatically added to the registration as a tag.
- Send notifications to clients: You add a controller to provide a way for users to trigger a secure push to devices and clients associated with the tag.
Create the new ASP.NET Core 6.0 web API backend by doing the following actions:
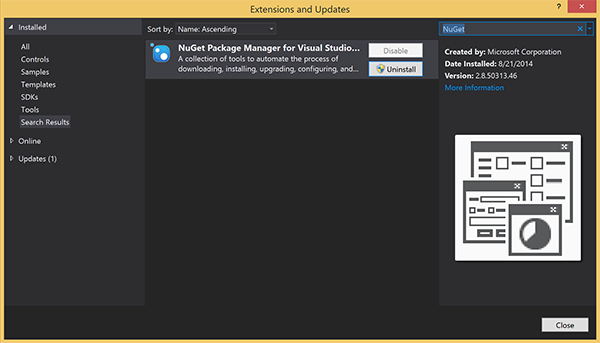
To check, start Visual Studio. On the Tools menu, select Extensions and Updates. Search for NuGet Package Manager in your version of Visual Studio, and make sure you have the latest version. If your version is not the latest version, uninstall it, and then reinstall the NuGet Package Manager.
Note
Make sure you have installed the Visual Studio Azure SDK for website deployment.
Start Visual Studio or Visual Studio Express.
Select Server Explorer, and sign in to your Azure account. To create the web site resources on your account, you must be signed in.
In Visual Studio's File menu, select New > Project.
Enter Web API in the search box.
Select the ASP.NET Core Web API project template and select Next.
In the Configure your new project dialog, name the project AppBackend and select Next.
In the Additional information dialog:
- Confirm the Framework is .NET 6.0 (Long-term support).
- Confirm the checkbox for Use controllers(uncheck to use minimal APIs) is checked.
- Uncheck Enable OpenAPI support.
- Select Create.
Remove the WeatherForecast template files
- Remove the WeatherForecast.cs and Controllers/WeatherForecastController.cs example files from the new AppBackend project.
- Open Properties\launchSettings.json.
- Change launchUrl properties from weatherforcast to appbackend.
In the Configure Microsoft Azure Web App window, select a subscription and then, in the App Service plan list, do either of the following actions:
- Select an Azure App Service plan that you've already created.
- Select Create a new app service plan, and then create one.
You do not need a database for this tutorial. After you have selected your app service plan, select OK to create the project.
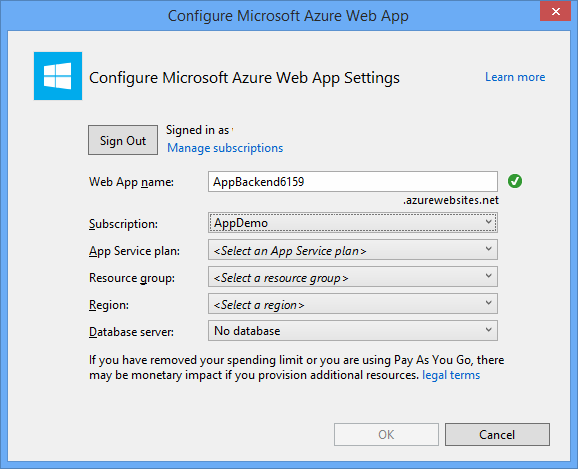
If you don't see this page for configure app service plan, continue with the tutorial. You can configure it while publishing the app later.
Authenticate clients to the WebAPI backend
In this section, you create a new message-handler class named AuthenticationTestHandler for the new backend. This class is derived from DelegatingHandler and added as a message handler so that it can process all requests that come into the backend.
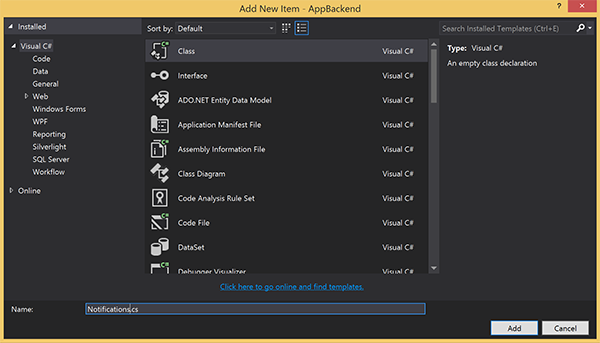
In Solution Explorer, right-click the AppBackend project, select Add, and then select Class.
Name the new class AuthenticationTestHandler.cs, and then select Add to generate the class. This class authenticates users by using Basic Authentication for simplicity. Your app can use any authentication scheme.
In AuthenticationTestHandler.cs, add the following
usingstatements:using System.Net.Http; using System.Threading; using System.Security.Principal; using System.Net; using System.Text; using System.Threading.Tasks;In AuthenticationTestHandler.cs, replace the
AuthenticationTestHandlerclass definition with the following code:The handler authorizes the request when the following three conditions are true:
- The request includes an Authorization header.
- The request uses basic authentication.
- The user name string and the password string are the same string.
Otherwise, the request is rejected. This authentication is not a true authentication and authorization approach. It is only a simple example for this tutorial.
If the request message is authenticated and authorized by
AuthenticationTestHandler, the basic authentication user is attached to the current request on HttpContext. User information in HttpContext will be used by another controller (RegisterController) later to add a tag to the notification registration request.public class AuthenticationTestHandler : DelegatingHandler { protected override Task<HttpResponseMessage> SendAsync( HttpRequestMessage request, CancellationToken cancellationToken) { var authorizationHeader = request.Headers.GetValues("Authorization").First(); if (authorizationHeader != null && authorizationHeader .StartsWith("Basic ", StringComparison.InvariantCultureIgnoreCase)) { string authorizationUserAndPwdBase64 = authorizationHeader.Substring("Basic ".Length); string authorizationUserAndPwd = Encoding.Default .GetString(Convert.FromBase64String(authorizationUserAndPwdBase64)); string user = authorizationUserAndPwd.Split(':')[0]; string password = authorizationUserAndPwd.Split(':')[1]; if (VerifyUserAndPwd(user, password)) { // Attach the new principal object to the current HttpContext object HttpContext.Current.User = new GenericPrincipal(new GenericIdentity(user), new string[0]); System.Threading.Thread.CurrentPrincipal = System.Web.HttpContext.Current.User; } else return Unauthorized(); } else return Unauthorized(); return base.SendAsync(request, cancellationToken); } private bool VerifyUserAndPwd(string user, string password) { // This is not a real authentication scheme. return user == password; } private Task<HttpResponseMessage> Unauthorized() { var response = new HttpResponseMessage(HttpStatusCode.Forbidden); var tsc = new TaskCompletionSource<HttpResponseMessage>(); tsc.SetResult(response); return tsc.Task; } }Note
Security note: The
AuthenticationTestHandlerclass does not provide true authentication. It is used only to mimic basic authentication and is not secure. You must implement a secure authentication mechanism in your production applications and services.To register the message handler, add the following code at the end of the
Registermethod in the Program.cs file:config.MessageHandlers.Add(new AuthenticationTestHandler());Save your changes.
Register for notifications by using the WebAPI backend
In this section, you add a new controller to the WebAPI backend to handle requests to register a user and a device for notifications by using the client library for notification hubs. The controller adds a user tag for the user that was authenticated and attached to HttpContext by AuthenticationTestHandler. The tag has the string format, "username:<actual username>".
In Solution Explorer, right-click the AppBackend project and then select Manage NuGet Packages.
In the left pane, select Online and then, in the Search box, type Microsoft.Azure.NotificationHubs.
In the results list, select Microsoft Azure Notification Hubs, and then select Install. Complete the installation, and then close the NuGet Package Manager window.
This action adds a reference to the Azure Notification Hubs SDK by using the Microsoft.Azure.Notification Hubs NuGet package.
Create a new class file that represents the connection with the notification hub that's used to send notifications. In Solution Explorer, right-click the Models folder, select Add, and then select Class. Name the new class Notifications.cs, and then select Add to generate the class.
In Notifications.cs, add the following
usingstatement at the top of the file:using Microsoft.Azure.NotificationHubs;Replace the
Notificationsclass definition with the following code, and replace the two placeholders with the connection string (with full access) for your notification hub and the hub name (available at Azure portal):public class Notifications { public static Notifications Instance = new Notifications(); public NotificationHubClient Hub { get; set; } private Notifications() { Hub = NotificationHubClient.CreateClientFromConnectionString("<your hub's DefaultFullSharedAccessSignature>", "<hub name>"); } }Important
Enter the name and the DefaultFullSharedAccessSignature of your hub before proceeding further.
Next, create a new controller named RegisterController. In Solution Explorer, right-click the Controllers folder, select Add, and then select Controller.
Select API Controller - Empty, and then select Add.
In the Controller name box, type RegisterController to name the new class, and then select Add.

In RegisterController.cs, add the following
usingstatements:using Microsoft.Azure.NotificationHubs; using Microsoft.Azure.NotificationHubs.Messaging; using AppBackend.Models; using System.Threading.Tasks; using System.Web;Add the following code inside the
RegisterControllerclass definition. In this code, you add a user tag for the user that's attached to HttpContext. The user was authenticated and attached to HttpContext by the message filter that you added,AuthenticationTestHandler. You can also add optional checks to verify that the user has rights to register for the requested tags.private NotificationHubClient hub; public RegisterController() { hub = Notifications.Instance.Hub; } public class DeviceRegistration { public string Platform { get; set; } public string Handle { get; set; } public string[] Tags { get; set; } } // POST api/register // This creates a registration id public async Task<string> Post(string handle = null) { string newRegistrationId = null; // make sure there are no existing registrations for this push handle (used for iOS and Android) if (handle != null) { var registrations = await hub.GetRegistrationsByChannelAsync(handle, 100); foreach (RegistrationDescription registration in registrations) { if (newRegistrationId == null) { newRegistrationId = registration.RegistrationId; } else { await hub.DeleteRegistrationAsync(registration); } } } if (newRegistrationId == null) newRegistrationId = await hub.CreateRegistrationIdAsync(); return newRegistrationId; } // PUT api/register/5 // This creates or updates a registration (with provided channelURI) at the specified id public async Task<HttpResponseMessage> Put(string id, DeviceRegistration deviceUpdate) { RegistrationDescription registration = null; switch (deviceUpdate.Platform) { case "mpns": registration = new MpnsRegistrationDescription(deviceUpdate.Handle); break; case "wns": registration = new WindowsRegistrationDescription(deviceUpdate.Handle); break; case "apns": registration = new AppleRegistrationDescription(deviceUpdate.Handle); break; case "fcm": registration = new FcmRegistrationDescription(deviceUpdate.Handle); break; default: throw new HttpResponseException(HttpStatusCode.BadRequest); } registration.RegistrationId = id; var username = HttpContext.Current.User.Identity.Name; // add check if user is allowed to add these tags registration.Tags = new HashSet<string>(deviceUpdate.Tags); registration.Tags.Add("username:" + username); try { await hub.CreateOrUpdateRegistrationAsync(registration); } catch (MessagingException e) { ReturnGoneIfHubResponseIsGone(e); } return Request.CreateResponse(HttpStatusCode.OK); } // DELETE api/register/5 public async Task<HttpResponseMessage> Delete(string id) { await hub.DeleteRegistrationAsync(id); return Request.CreateResponse(HttpStatusCode.OK); } private static void ReturnGoneIfHubResponseIsGone(MessagingException e) { var webex = e.InnerException as WebException; if (webex.Status == WebExceptionStatus.ProtocolError) { var response = (HttpWebResponse)webex.Response; if (response.StatusCode == HttpStatusCode.Gone) throw new HttpRequestException(HttpStatusCode.Gone.ToString()); } }Save your changes.

Send notifications from the WebAPI backend
In this section, you add a new controller that exposes a way for client devices to send a notification. The notification is based on the username tag that uses Azure Notification Hubs .NET Library in the ASP.NET WebAPI backend.
Create another new controller named NotificationsController the same way you created RegisterController in the previous section.
In NotificationsController.cs, add the following
usingstatements:using AppBackend.Models; using System.Threading.Tasks; using System.Web;Add the following method to the NotificationsController class:
This code sends a notification type that's based on the Platform Notification Service (PNS)
pnsparameter. The value ofto_tagis used to set the username tag on the message. This tag must match a username tag of an active notification hub registration. The notification message is pulled from the body of the POST request and formatted for the target PNS.Depending on the PNS that your supported devices use to receive notifications, the notifications are supported by a variety of formats. For example, on Windows devices, you might use a toast notification with WNS that isn't directly supported by another PNS. In such an instance, your backend needs to format the notification into a supported notification for the PNS of devices you plan to support. Then use the appropriate send API on the NotificationHubClient class.
public async Task<HttpResponseMessage> Post(string pns, [FromBody]string message, string to_tag)
{
    var user = HttpContext.Current.User.Identity.Name;
    string[] userTag = new string[2];
    userTag[0] = "username:" + to_tag;
    userTag[1] = "from:" + user;

    Microsoft.Azure.NotificationHubs.NotificationOutcome outcome = null;
    HttpStatusCode ret = HttpStatusCode.InternalServerError;

    switch (pns.ToLower())
    {
        case "wns":
            // Windows 8.1 / Windows Phone 8.1
            var toast = @"<toast><visual><binding template=""ToastText01""><text id=""1"">" +
                        "From " + user + ": " + message + "</text></binding></visual></toast>";
            outcome = await Notifications.Instance.Hub.SendWindowsNativeNotificationAsync(toast, userTag);
            break;
        case "apns":
            // iOS
            var alert = "{\"aps\":{\"alert\":\"" + "From " + user + ": " + message + "\"}}";
            outcome = await Notifications.Instance.Hub.SendAppleNativeNotificationAsync(alert, userTag);
            break;
        case "fcm":
            // Android
            var notif = "{ \"data\" : {\"message\":\"" + "From " + user + ": " + message + "\"}}";
            outcome = await Notifications.Instance.Hub.SendFcmNativeNotificationAsync(notif, userTag);
            break;
    }

    if (outcome != null)
    {
        if (!((outcome.State == Microsoft.Azure.NotificationHubs.NotificationOutcomeState.Abandoned) ||
            (outcome.State == Microsoft.Azure.NotificationHubs.NotificationOutcomeState.Unknown)))
        {
            ret = HttpStatusCode.OK;
        }
    }

    return Request.CreateResponse(ret);
}
To run the application and ensure the accuracy of your work so far, select the F5 key. The app opens a web browser, and it is displayed on the ASP.NET home page.
Publish the new WebAPI backend
Next, you deploy the app to an Azure website to make it accessible from all devices.
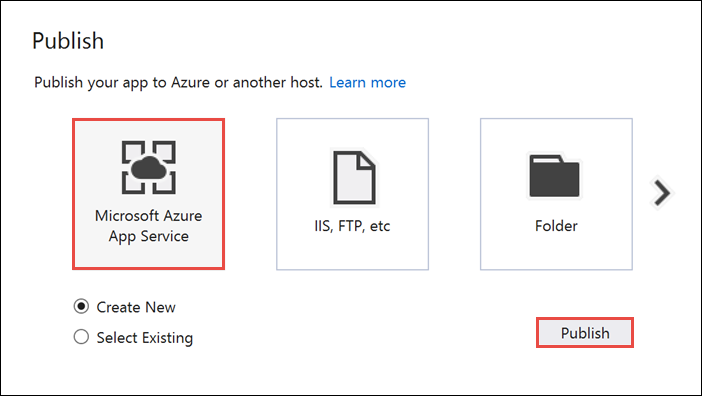
Right-click the AppBackend project, and then select Publish.
Select Microsoft Azure App Service as your publish target, and then select **Publish. The Create App Service window opens. Here you can create all the necessary Azure resources to run the ASP.NET web app in Azure.
In the Create App Service window, select your Azure account. Select Change Type > Web App. Keep the default Web App Name, and then select the Subscription, Resource Group, and App Service Plan.
Select Create.
Make a note of the Site URL property in the Summary section. This URL is your back-end endpoint later in the tutorial.
Select Publish.
After you've completed the wizard, it publishes the ASP.NET web app to Azure and then opens the app in the default browser. Your application is viewable in Azure App Services.
The URL uses the web app name that you specified earlier, with the format http://<app_name>.azurewebsites.net.
Create the Android Project
The next step is to update the Android application created in the Tutorial: Push notifications to Android devices by using Azure Notification Hubs and Firebase Cloud Messaging.
Open your
res/layout/activity_main.xmlfile, replace the following content definitions:It adds new EditText controls for logging in as a user. Also a field is added for a username tag that will be part of notifications you send:
<RelativeLayout xmlns:android="http://schemas.android.com/apk/res/android"
xmlns:tools="http://schemas.android.com/tools" android:layout_width="match_parent"
android:layout_height="match_parent"
tools:context=".MainActivity">

<EditText
    android:id="@+id/usernameText"
    android:layout_width="match_parent"
    android:layout_height="wrap_content"
    android:ems="10"
    android:hint="@string/usernameHint"
    android:layout_above="@+id/passwordText"
    android:layout_alignParentEnd="true" />
<EditText
    android:id="@+id/passwordText"
    android:layout_width="match_parent"
    android:layout_height="wrap_content"
    android:ems="10"
    android:hint="@string/passwordHint"
    android:inputType="textPassword"
    android:layout_above="@+id/buttonLogin"
    android:layout_alignParentEnd="true" />
<Button
    android:id="@+id/buttonLogin"
    android:layout_width="wrap_content"
    android:layout_height="wrap_content"
    android:text="@string/loginButton"
    android:onClick="login"
    android:layout_above="@+id/toggleButtonFCM"
    android:layout_centerHorizontal="true"
    android:layout_marginBottom="24dp" />
<ToggleButton
    android:layout_width="wrap_content"
    android:layout_height="wrap_content"
    android:textOn="WNS on"
    android:textOff="WNS off"
    android:id="@+id/toggleButtonWNS"
    android:layout_toLeftOf="@id/toggleButtonFCM"
    android:layout_centerVertical="true" />
<ToggleButton
    android:layout_width="wrap_content"
    android:layout_height="wrap_content"
    android:textOn="FCM on"
    android:textOff="FCM off"
    android:id="@+id/toggleButtonFCM"
    android:checked="true"
    android:layout_centerHorizontal="true"
    android:layout_centerVertical="true" />
<ToggleButton
    android:layout_width="wrap_content"
    android:layout_height="wrap_content"
    android:textOn="APNS on"
    android:textOff="APNS off"
    android:id="@+id/toggleButtonAPNS"
    android:layout_toRightOf="@id/toggleButtonFCM"
    android:layout_centerVertical="true" />
<EditText
    android:layout_width="match_parent"
    android:layout_height="wrap_content"
    android:id="@+id/editTextNotificationMessageTag"
    android:layout_below="@id/toggleButtonFCM"
    android:layout_centerHorizontal="true"
    android:hint="@string/notification_message_tag_hint" />
<EditText
    android:layout_width="match_parent"
    android:layout_height="wrap_content"
    android:id="@+id/editTextNotificationMessage"
    android:layout_below="@+id/editTextNotificationMessageTag"
    android:layout_centerHorizontal="true"
    android:hint="@string/notification_message_hint" />
<Button
    android:layout_width="wrap_content"
    android:layout_height="wrap_content"
    android:text="@string/send_button"
    android:id="@+id/sendbutton"
    android:onClick="sendNotificationButtonOnClick"
    android:layout_below="@+id/editTextNotificationMessage"
    android:layout_centerHorizontal="true" />
<TextView
    android:layout_width="wrap_content"
    android:layout_height="wrap_content"
    android:text="Hello World!"
    android:id="@+id/text_hello"
    />
</RelativeLayout>
Open your
res/values/strings.xmlfile and replace thesend_buttondefinition with the following lines that redefine the string for thesend_buttonand add strings for the other controls:<string name="usernameHint">Username</string> <string name="passwordHint">Password</string> <string name="loginButton">1. Sign in</string> <string name="send_button">2. Send Notification</string> <string name="notification_message_hint">Notification message</string> <string name="notification_message_tag_hint">Recipient username</string>Your
main_activity.xmlgraphical layout should now look like the following image: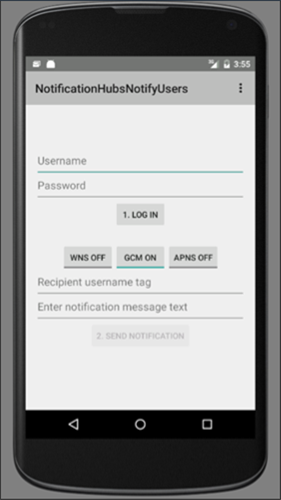
Create a new class named
RegisterClientin the same package as yourMainActivityclass. Use the code below for the new class file.import java.io.IOException; import java.io.UnsupportedEncodingException; import java.util.Set; import org.apache.http.HttpResponse; import org.apache.http.HttpStatus; import org.apache.http.client.ClientProtocolException; import org.apache.http.client.HttpClient; import org.apache.http.client.methods.HttpPost; import org.apache.http.client.methods.HttpPut; import org.apache.http.client.methods.HttpUriRequest; import org.apache.http.entity.StringEntity; import org.apache.http.impl.client.DefaultHttpClient; import org.apache.http.util.EntityUtils; import org.json.JSONArray; import org.json.JSONException; import org.json.JSONObject; import android.content.Context; import android.content.SharedPreferences; import android.util.Log; public class RegisterClient { private static final String PREFS_NAME = "ANHSettings"; private static final String REGID_SETTING_NAME = "ANHRegistrationId"; private String Backend_Endpoint; SharedPreferences settings; protected HttpClient httpClient; private String authorizationHeader; public RegisterClient(Context context, String backendEndpoint) { super(); this.settings = context.getSharedPreferences(PREFS_NAME, 0); httpClient = new DefaultHttpClient(); Backend_Endpoint = backendEndpoint + "/api/register"; } public String getAuthorizationHeader() { return authorizationHeader; } public void setAuthorizationHeader(String authorizationHeader) { this.authorizationHeader = authorizationHeader; } public void register(String handle, Set<String> tags) throws ClientProtocolException, IOException, JSONException { String registrationId = retrieveRegistrationIdOrRequestNewOne(handle); JSONObject deviceInfo = new JSONObject(); deviceInfo.put("Platform", "fcm"); deviceInfo.put("Handle", handle); deviceInfo.put("Tags", new JSONArray(tags)); int statusCode = upsertRegistration(registrationId, deviceInfo); if (statusCode == HttpStatus.SC_OK) { return; } else if (statusCode == HttpStatus.SC_GONE){ settings.edit().remove(REGID_SETTING_NAME).commit(); registrationId = retrieveRegistrationIdOrRequestNewOne(handle); statusCode = upsertRegistration(registrationId, deviceInfo); if (statusCode != HttpStatus.SC_OK) { Log.e("RegisterClient", "Error upserting registration: " + statusCode); throw new RuntimeException("Error upserting registration"); } } else { Log.e("RegisterClient", "Error upserting registration: " + statusCode); throw new RuntimeException("Error upserting registration"); } } private int upsertRegistration(String registrationId, JSONObject deviceInfo) throws UnsupportedEncodingException, IOException, ClientProtocolException { HttpPut request = new HttpPut(Backend_Endpoint+"/"+registrationId); request.setEntity(new StringEntity(deviceInfo.toString())); request.addHeader("Authorization", "Basic "+authorizationHeader); request.addHeader("Content-Type", "application/json"); HttpResponse response = httpClient.execute(request); int statusCode = response.getStatusLine().getStatusCode(); return statusCode; } private String retrieveRegistrationIdOrRequestNewOne(String handle) throws ClientProtocolException, IOException { if (settings.contains(REGID_SETTING_NAME)) return settings.getString(REGID_SETTING_NAME, null); HttpUriRequest request = new HttpPost(Backend_Endpoint+"?handle="+handle); request.addHeader("Authorization", "Basic "+authorizationHeader); HttpResponse response = httpClient.execute(request); if (response.getStatusLine().getStatusCode() != HttpStatus.SC_OK) { Log.e("RegisterClient", "Error creating registrationId: " + response.getStatusLine().getStatusCode()); throw new RuntimeException("Error creating Notification Hubs registrationId"); } String registrationId = EntityUtils.toString(response.getEntity()); registrationId = registrationId.substring(1, registrationId.length()-1); settings.edit().putString(REGID_SETTING_NAME, registrationId).commit(); return registrationId; } }This component implements the REST calls required to contact the app backend to register for push notifications. It also locally stores the registrationIds created by the Notification Hub as detailed in Registering from your app backend. It uses an authorization token stored in local storage when you click the Sign in button.
In your
MainActivityclass, and add a field for theRegisterClientclass and a string for your ASP.NET backend's endpoint. Be sure to replace<Enter Your Backend Endpoint>with your actual backend endpoint obtained previously. For example,http://mybackend.azurewebsites.net.private RegisterClient registerClient; private static final String BACKEND_ENDPOINT = "<Enter Your Backend Endpoint>"; FirebaseInstanceId fcm; String FCM_token = null;In your
MainActivityclass, in theonCreatemethod, remove, or comment out the initialization of thehubfield and the call to theregisterWithNotificationHubsmethod. Then add code to initialize an instance of theRegisterClientclass. The method should contain the following lines:@Override protected void onCreate(Bundle savedInstanceState) { super.onCreate(savedInstanceState); mainActivity = this; FirebaseService.createChannelAndHandleNotifications(getApplicationContext()); fcm = FirebaseInstanceId.getInstance(); registerClient = new RegisterClient(this, BACKEND_ENDPOINT); setContentView(R.layout.activity_main); }Add the following
importstatements to yourMainActivity.javafile.import android.util.Base64; import android.view.View; import android.widget.EditText; import android.widget.Button; import android.widget.ToggleButton; import java.io.UnsupportedEncodingException; import android.content.Context; import java.util.HashSet; import android.widget.Toast; import org.apache.http.client.ClientProtocolException; import java.io.IOException; import org.apache.http.HttpStatus; import android.os.AsyncTask; import org.apache.http.HttpResponse; import org.apache.http.client.methods.HttpPost; import org.apache.http.entity.StringEntity; import org.apache.http.impl.client.DefaultHttpClient; import android.app.AlertDialog; import android.content.DialogInterface; import com.google.firebase.iid.FirebaseInstanceId; import com.google.firebase.iid.InstanceIdResult; import com.google.android.gms.tasks.OnSuccessListener; import java.util.concurrent.TimeUnit;Replace code on the onStart method with the following code:
super.onStart();
Button sendPush = (Button) findViewById(R.id.sendbutton);
sendPush.setEnabled(false);
Then, add the following methods to handle the Sign in button click event and sending push notifications.
public void login(View view) throws UnsupportedEncodingException {
    this.registerClient.setAuthorizationHeader(getAuthorizationHeader());

    final Context context = this;
    new AsyncTask<Object, Object, Object>() {
        @Override
        protected Object doInBackground(Object... params) {
            try {

                FirebaseInstanceId.getInstance().getInstanceId().addOnSuccessListener(new OnSuccessListener<InstanceIdResult>() {
                    @Override
                    public void onSuccess(InstanceIdResult instanceIdResult) {
                        FCM_token = instanceIdResult.getToken();
                        Log.d(TAG, "FCM Registration Token: " + FCM_token);
                    }
                });
                TimeUnit.SECONDS.sleep(1);
                registerClient.register(FCM_token, new HashSet<String>());
            } catch (Exception e) {
                DialogNotify("MainActivity - Failed to register", e.getMessage());
                return e;
            }
            return null;
        }

        protected void onPostExecute(Object result) {
            Button sendPush = (Button) findViewById(R.id.sendbutton);
            sendPush.setEnabled(true);
            Toast.makeText(context, "Signed in and registered.",
                    Toast.LENGTH_LONG).show();
        }
    }.execute(null, null, null);
}

private String getAuthorizationHeader() throws UnsupportedEncodingException {
    EditText username = (EditText) findViewById(R.id.usernameText);
    EditText password = (EditText) findViewById(R.id.passwordText);
    String basicAuthHeader = username.getText().toString()+":"+password.getText().toString();
    basicAuthHeader = Base64.encodeToString(basicAuthHeader.getBytes("UTF-8"), Base64.NO_WRAP);
    return basicAuthHeader;
}

/**
    * This method calls the ASP.NET WebAPI backend to send the notification message
    * to the platform notification service based on the pns parameter.
    *
    * @param pns     The platform notification service to send the notification message to. Must
    *                be one of the following ("wns", "fcm", "apns").
    * @param userTag The tag for the user who will receive the notification message. This string
    *                must not contain spaces or special characters.
    * @param message The notification message string. This string must include the double quotes
    *                to be used as JSON content.
    */
public void sendPush(final String pns, final String userTag, final String message)
        throws ClientProtocolException, IOException {
    new AsyncTask<Object, Object, Object>() {
        @Override
        protected Object doInBackground(Object... params) {
            try {

                String uri = BACKEND_ENDPOINT + "/api/notifications";
                uri += "?pns=" + pns;
                uri += "&to_tag=" + userTag;

                HttpPost request = new HttpPost(uri);
                request.addHeader("Authorization", "Basic "+ getAuthorizationHeader());
                request.setEntity(new StringEntity(message));
                request.addHeader("Content-Type", "application/json");

                HttpResponse response = new DefaultHttpClient().execute(request);

                if (response.getStatusLine().getStatusCode() != HttpStatus.SC_OK) {
                    DialogNotify("MainActivity - Error sending " + pns + " notification",
                            response.getStatusLine().toString());
                    throw new RuntimeException("Error sending notification");
                }
            } catch (Exception e) {
                DialogNotify("MainActivity - Failed to send " + pns + " notification ", e.getMessage());
                return e;
            }

            return null;
        }
    }.execute(null, null, null);
}
The
loginhandler for the Sign in button generates a basic authentication token using on the input username and password (it represents any token your authentication scheme uses), then it usesRegisterClientto call the backend for registration.The
sendPushmethod calls the backend to trigger a secure notification to the user based on the user tag. The platform notification service thatsendPushtargets depends on thepnsstring passed in.Add the following
DialogNotifymethod to theMainActivityclass.protected void DialogNotify(String title, String message) { AlertDialog alertDialog = new AlertDialog.Builder(MainActivity.this).create(); alertDialog.setTitle(title); alertDialog.setMessage(message); alertDialog.setButton(AlertDialog.BUTTON_NEUTRAL, "OK", new DialogInterface.OnClickListener() { public void onClick(DialogInterface dialog, int which) { dialog.dismiss(); } }); alertDialog.show(); }In your
MainActivityclass, update thesendNotificationButtonOnClickmethod to call thesendPushmethod with the user's selected platform notification services as follows./** * Send Notification button click handler. This method sends the push notification * message to each platform selected. * * @param v The view */ public void sendNotificationButtonOnClick(View v) throws ClientProtocolException, IOException { String nhMessageTag = ((EditText) findViewById(R.id.editTextNotificationMessageTag)) .getText().toString(); String nhMessage = ((EditText) findViewById(R.id.editTextNotificationMessage)) .getText().toString(); // JSON String nhMessage = "\"" + nhMessage + "\""; if (((ToggleButton)findViewById(R.id.toggleButtonWNS)).isChecked()) { sendPush("wns", nhMessageTag, nhMessage); } if (((ToggleButton)findViewById(R.id.toggleButtonFCM)).isChecked()) { sendPush("fcm", nhMessageTag, nhMessage); } if (((ToggleButton)findViewById(R.id.toggleButtonAPNS)).isChecked()) { sendPush("apns", nhMessageTag, nhMessage); } }In the
build.gradlefile, add the following line to theandroidsection after thebuildTypessection.useLibrary 'org.apache.http.legacy'If your app is targeting API level 28 (Android 9.0) or above, include the following declaration within the
<application>element ofAndroidManifest.xml.<uses-library android:name="org.apache.http.legacy" android:required="false" />Build the project.
Test the app
Run the application on a device or an emulator using Android Studio.
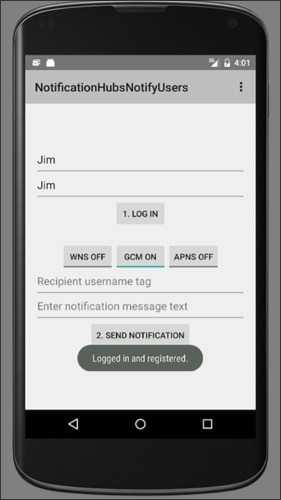
In the Android app, enter a username and password. They must both be the same string value and they must not contain spaces or special characters.
In the Android app, click Sign in. Wait for a toast message that states Signed in and registered. It enables the Send Notification button.
Click the toggle buttons to enable all platforms where you ran the app and registered a user.
Enter the user's name that receives the notification message. That user must be registered for notifications on the target devices.
Enter a message for the user to receive as a push notification message.
Click Send Notification. Each device that has a registration with the matching username tag receives the push notification.
Next steps
In this tutorial, you learned how to push notifications to specific users that have tags associated with their registrations. To learn how to push location-based notifications, advance to the following tutorial:
Feedback
Coming soon: Throughout 2024 we will be phasing out GitHub Issues as the feedback mechanism for content and replacing it with a new feedback system. For more information see: https://aka.ms/ContentUserFeedback.
Submit and view feedback for