Quickstart: Create and configure Route Server using Azure PowerShell
This article helps you configure Azure Route Server to peer with a Network Virtual Appliance (NVA) in your virtual network using Azure PowerShell. Route Server learns routes from your NVA and program them on the virtual machines in the virtual network. Azure Route Server also advertises the virtual network routes to the NVA. For more information, see Azure Route Server.
Important
Azure Route Servers created before November 1, 2021, that don't have a public IP address associated, are deployed with the public preview offering. The public preview offering is not backed by General Availability SLA and support. To deploy Azure Route Server with the General Availability offering, and to achieve General Availability SLA and support, please delete and recreate your Route Server.
Prerequisites
- An Azure account with an active subscription. Create an account for free.
- Make sure you have the latest PowerShell modules, or you can use Azure Cloud Shell in the portal.
- Review the service limits for Azure Route Server.
- If you're running PowerShell locally, you also need to run
Connect-AzAccountto create a connection with Azure.
Create resource group and a virtual network
Create a resource group
Before you can create an Azure Route Server, you have to create a resource group to host the Route Server. Create a resource group with New-AzResourceGroup. This example creates a resource group named myRouteServerRG in the WestUS location:
$rg = @{
    Name = 'myRouteServerRG'
    Location = 'WestUS'
}
New-AzResourceGroup @rg
Create a virtual network
Create a virtual network with New-AzVirtualNetwork. This example creates a default virtual network named myVirtualNetwork in the WestUS location: If you already have a virtual network, you can skip to the next section.
$vnet = @{
    Name = 'myVirtualNetwork'
    ResourceGroupName = 'myRouteServerRG'
    Location = 'WestUS'
    AddressPrefix = '10.0.0.0/16'
}
$virtualNetwork = New-AzVirtualNetwork @vnet
Add a dedicated subnet
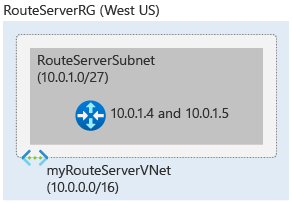
Azure Route Server requires a dedicated subnet named RouteServerSubnet. The subnet size has to be at least /27 or shorter prefix (such as /26 or /25) or you'll receive an error message when deploying the Route Server. Create a subnet configuration named RouteServerSubnet with Add-AzVirtualNetworkSubnetConfig:
$subnet = @{
    Name = 'RouteServerSubnet'
    VirtualNetwork = $virtualNetwork
    AddressPrefix = '10.0.0.0/24'
}
$subnetConfig = Add-AzVirtualNetworkSubnetConfig @subnet

$virtualnetwork | Set-AzVirtualNetwork

$vnetInfo = Get-AzVirtualNetwork -Name myVirtualNetwork -ResourceGroupName myRouteServerRG
$subnetId = (Get-AzVirtualNetworkSubnetConfig -Name RouteServerSubnet -VirtualNetwork $vnetInfo).Id
Create the Route Server
To ensure connectivity to the backend service that manages Route Server configuration, assigning a public IP address is required. Create a Standard Public IP named RouteServerIP with New-AzPublicIpAddress:
$ip = @{
    Name = 'myRouteServerIP'
    ResourceGroupName = 'myRouteServerRG'
    Location = 'WestUS'
    AllocationMethod = 'Static'
    IpAddressVersion = 'Ipv4'
    Sku = 'Standard'
}
$publicIp = New-AzPublicIpAddress @ip
Create the Azure Route Server with New-AzRouteServer. This example creates an Azure Route Server named myRouteServer in the WestUS location. The HostedSubnet is the resource ID of the RouteServerSubnet created in the previous section.
$rs = @{
    RouteServerName = 'myRouteServer'
    ResourceGroupName = 'myRouteServerRG'
    Location = 'WestUS'
    HostedSubnet = $subnetId
    PublicIP = $publicIp
}
New-AzRouteServer @rs
Create BGP peering with an NVA
To establish BGP peering from the Route Server to your NVA use Add-AzRouteServerPeer:
The your_nva_ip is the virtual network IP assigned to the NVA. The your_nva_asn is the Autonomous System Number (ASN) configured in the NVA. The ASN can be any 16-bit number other than the ones in the range of 65515-65520. This range of ASNs is reserved by Microsoft.
$peer = @{
    PeerName = 'myNVA'
    PeerIp = 'your_nva_ip'
    PeerAsn = 'your_nva_asn'
    RouteServerName = 'myRouteServer'
    ResourceGroupName = myRouteServerRG'
}
Add-AzRouteServerPeer @peer
To set up peering with a different NVA or another instance of the same NVA for redundancy, use the same command as above with different PeerName, PeerIp, and PeerAsn.
Complete the configuration on the NVA
To complete the configuration on the NVA and enable the BGP sessions, you need the IP and the ASN of Azure Route Server. You can get this information by using Get-AzRouteServer:
$routeserver = @{
    RouteServerName = 'myRouteServer'
    ResourceGroupName = 'myRouteServerRG'
}
Get-AzRouteServer @routeserver
The output looks like the following:
RouteServerAsn : 65515
RouteServerIps : {10.5.10.4, 10.5.10.5}
Important
We recommend peering each NVA with both Route Server instances to ensure that virtual network routes are advertised over the NVA connections and achieve high availability.
Configure route exchange
If you have a virtual network gateway (ExpressRoute or VPN) in the same virtual network, you can enable BranchToBranchTraffic to exchange routes between the gateway and the Route Server.
Important
The Azure VPN gateway must be configured in active-active mode and have the ASN set to 65515.
Warning
When you create or delete a Route Server in a virtual network that contains a virtual network gateway (ExpressRoute or VPN), expect downtime until the operation is complete. If you have an ExpressRoute circuit connected to the virtual network where you're creating or deleting the Route Server, the downtime doesn't affect the ExpressRoute circuit or its connections to other virtual networks.
- To enable route exchange between Azure Route Server and the gateway(s), use Update-AzRouteServer with the -AllowBranchToBranchTraffic flag:
$routeserver = @{
    RouteServerName = 'myRouteServer'
    ResourceGroupName = 'myRouteServerRG'
    AllowBranchToBranchTraffic
}
Update-AzRouteServer @routeserver
- To disable route exchange between Azure Route Server and the gateway(s), use Update-AzRouteServer without the -AllowBranchToBranchTraffic flag:
$routeserver = @{
    RouteServerName = 'myRouteServer'
    ResourceGroupName = 'myRouteServerRG'
}
Update-AzRouteServer @routeserver
Troubleshooting
Use the Get-AzRouteServerPeerAdvertisedRoute to view routes advertised by the Azure Route Server.
$remotepeer = @{
    RouteServerName = 'myRouteServer'
    ResourceGroupName = 'myRouteServerRG'
    PeerName = 'myNVA'
}
Get-AzRouteServerPeerAdvertisedRoute @remotepeer
Use the Get-AzRouteServerPeerLearnedRoute to view routes learned by the Azure Route Server.
$remotepeer = @{
    RouteServerName = 'myRouteServer'
    ResourceGroupName = 'myRouteServerRG'
    PeerName = 'myNVA'
}
Get-AzRouteServerPeerLearnedRoute @remotepeer
Clean up resources
If you no longer need the Azure Route Server, use the first command to remove the BGP peering, and then the second command to remove the Route Server.
- Remove the BGP peering between Azure Route Server and an NVA with Remove-AzRouteServerPeer:
$remotepeer = @{
    PeerName = 'myNVA'
    RouteServerName = 'myRouteServer'
    ResourceGroupName = 'myRouteServerRG'
}
Remove-AzRouteServerPeer @remotepeer
- Remove the Azure Route Server with Remove-AzRouteServer:
$routeserver = @{
    RouteServerName = 'myRouteServer'
    ResourceGroupName = 'myRouteServerRG'
}
Remove-AzRouteServer @routeserver
Next steps
After you've created the Azure Route Server, continue on to learn more about how Azure Route Server interacts with ExpressRoute and VPN Gateways:
Feedback
Coming soon: Throughout 2024 we will be phasing out GitHub Issues as the feedback mechanism for content and replacing it with a new feedback system. For more information see: https://aka.ms/ContentUserFeedback.
Submit and view feedback for