Create virtual machines in an availability zone using the Azure portal
Applies to: ✔️ Linux VMs ✔️ Windows VMs
This article steps through using the Azure portal to create highly resilient virtual machines in availability zones. Azure availability zones are physically separate locations within each Azure region that are tolerant to local failures. Use availability zones to protect your applications and data against unlikely datacenter failures.
To use availability zones, create your virtual machines in a supported Azure region.
Sign in to the Azure portal.
Click Create a resource > Compute > Virtual machine.
In the Virtual machines page, select Create and then Virtual machine. The Create a virtual machine page opens.
In the Basics tab, under Project details, make sure the correct subscription is selected and then choose a resource group or create a new one.
Under Instance details, type a name for the Virtual machine name.
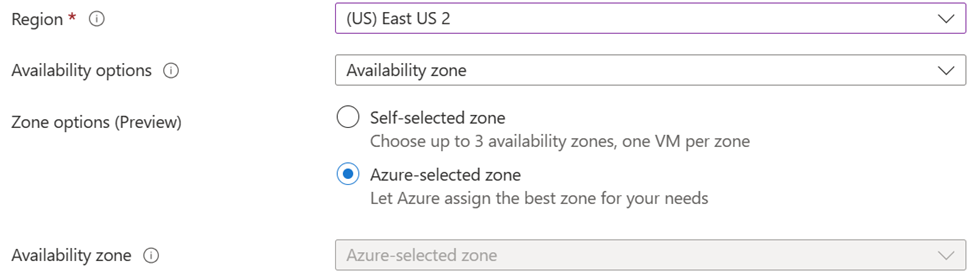
For Availability options, leave the default of Availability zone.
For Availability zone, the drop-down defaults to Zone 1. If you choose multiple zones, a new VM is created in each zone. For example, if you select all three zones, then three VMs are created. The VM names are the original name you entered, with -1, -2, and -3 appended to the name based on number of zones selected. If you want, you can edit each of the default VM names.

Complete the rest of the page as usual. If you want to create a load balancer, go to the Networking tab > Load Balancing > Load balancing options. You can choose either an Azure load balancer or an Application gateway.
For an Azure load balancer:
- You can select an existing load balancer or select Create a load balancer.
- To create a new load balancer, for Load balancer name type a load balancer name.
- Select the Type of load balancer, either Public or Internal.
- Select the Protocol, either TCP or UDP.
- You can leave the default Port and Backend port, or change them if needed. The backend port you select will be opened up on the Network Security Group (NSG) of the VM.
- When you're done, select Create.
For an Application Gateway:
- Select either an existing application gateway or Create an application gateway.
- To create a new gateway, type the name for the application gateway. The Application Gateway can load balance multiple applications. Consider naming the Application Gateway according to the workloads you wish to load balance, rather than specific to the virtual machine name.
- In Routing rule, type a rule name. The rule name should describe the workload you are load balancing.
- For HTTP load balancing, you can leave the defaults and then select Create. For HTTPS load balancing, you have two options:
- Upload a certificate and add the password (application gateway manages certificate storage). For certificate name, type a friendly name for the certificate.
- Use a key vault (application gateway will pull a defined certificate from a defined key vault). Select your Managed identity, Key Vault, and Certificate.
Important
After the VMs and application gateway are deployed, log in to the VMs to ensure that either the application gateway certificate is uploaded onto the VMs or the domain name of the VM certificate matches with the domain name of the application gateway.
Note
A separate subnet will be defined for Application Gateway upon creation. For more information, see Application Gateway infrastructure configuration.
Leave the remaining defaults and then select the Review + create button at the bottom of the page.
On the Create a virtual machine page, you can see the details about the VM you are about to create. When you're ready, select Create.
If you are creating a Linux VM and the Generate new key pair window opens, select Download private key and create resource. Your key file will download as myKey.pem.
When the deployment is finished, select Go to resource.
Create a Zonal Virtual Machine in an Azure-selected Zone
Important
These features are currently in PREVIEW. See the Supplemental Terms of Use for Microsoft Azure Previews for legal terms that apply to Azure features that are in beta, preview, or otherwise not yet released into general availability.
If you would like the resiliency benefits of a Zonal Virtual Machine and want help with selecting a zone, you can have Azure select the best-fit zone for your deployment.
Note
Please review the Restrictions section before deploying your VM using an Azure-Selected Zone.
- Sign in to the Azure portal using this link enabling the feature.
- In the Basics tab, under Project details, make sure the correct subscription is selected and then choose a resource group or create a new one.
- Under Instance details, type a name for the Virtual machine name.
- For Availability options, Ensure Availability zone is selected.
- For Zone options (Preview), select Azure-selected zone. The Availability zone selection should now be grayed out.
- Configure the rest of your Virtual Machine as normal for deployment.
Restrictions
Regions
Deploying a VM into an Azure-selected zone is available in all Zonal Regions except the following regions.
- BrazilSouth
- CentralIndia
- EastUS
- JapanEast
- KoreaCentral
Disks
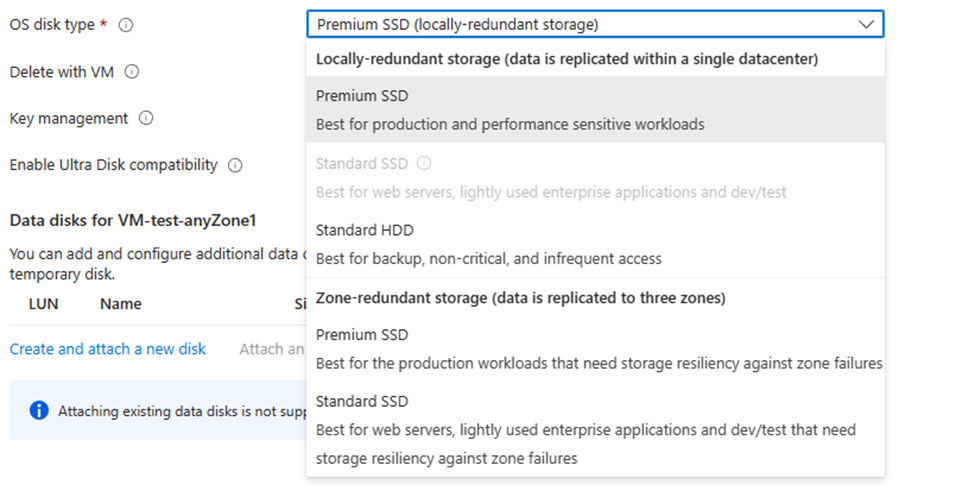
Existing OS and Data Disks are currently not supported. New Data Disk Source Type must be "none".
Supported Disk types
- Standard HDDs (hard disk drives)
- Premium SSDs
- Premium SSD V2
- Ultra Disks
- Standard SSD ZRS
Unsupported Disk types
- Standard SSD LRS
Other resources
- Existing Public IPs aren't supported for an Azure-selected zone. They can be added after deployment.
- New Public IPs must be Zone Redundant or use an Azure-Selected Zone.
- Load Balancers and Application Gateways must be Zonally Resilient to attach during the VM deployment.
- Proximity Placement Groups, Capacity Reservation Groups, and Azure Dedicated Host aren't supported.
- Site Recovery configuration isn't available during VM creation but can be configured after deployment.
Next steps
In this article, you learned how to create a VM in an availability zone. Learn more about availability for Azure VMs.