Create and set up bookable resources
A resource in Service Scheduling is anything that needs to be scheduled. You can set up Generic, Contact, User, Equipment, Account, Crew, Facility, or Pool as bookable resources.
Create a new bookable resource
Make sure that you have the required security role or equivalent permissions. Learn more in Manage security roles in service scheduling
You can create a new bookable resource in the Customer Service admin center app or Customer Service Hub app.
Go to one of the apps, and perform the following steps.
- In the site map, select Service Scheduling in Operations. The Service Scheduling page appears.
- In the Resources section, select Manage.
The Active Bookable Resources view is displayed. You can switch between various system views using the dropdown list.
On the command bar, select New to create a new bookable resource.
In the General section:
Select a Resource Type. You can select from the following options:
- Generic
- Contact
- User
- Equipment
- Account
- Crew
- Facility
- Pool
The field name is automatically populated. Look up for the record. You can also create a new record using the Quick Create dialog.
Select a Time Zone.
Note
If the Resource Type is Facility or Equipment, the time zone is automatically populated as per the facility’s or equipment’s time zone and it isn't editable.
Select Save. A new resource is created and activated by default.
Resource Characteristics and Resource Categories sections are displayed.
In the Resource Characteristics section, select the ellipses (...) and then select Add New Bookable Resource Characteristics to add characteristics.
- Use the tooltips to help fill in your information and then select Save.
- Look up and assign Rating Value. You can also create a new rating value.
- Assign the characteristic to a Resource.
In the Resource Categories section, select the ellipses (...) and then select Add New Bookable Resource Category to add a category.

In the Scheduling section:
Select the Start Location and the End Location to specify which location the resource is at when starting and ending work.
Select an Organizational Unit for the resource.
Note
If the Resource Type is Facility or Equipment, the organizational unit is automatically populated as per the facility’s or equipment’s organizational unit and it isn't editable.
Select whether the resource should be displayed on the schedule board in the Display On Schedule Board box.
Select whether you want to enable the resource for availability search in the Enable for Availability Search box.

Once you're ready, select Save.
Set work hours for the resources
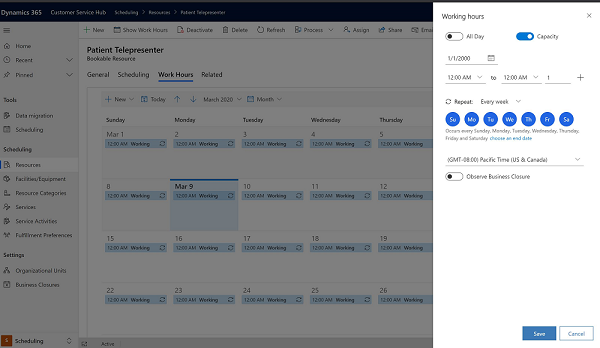
You can set work hours for the bookable resources where you can define when the resources are available to be booked for services in the Customer Service admin center or Customer Service Hub app.
Go to one of the apps, and perform the following steps.
- In the site map, select Service scheduling in Operations.
- In the Resources section, select Manage.
The Active Bookable Resources view appears.
Open the resource record you want to set work hours for.
Select Show Work Hours.
From the Set up dropdown list, select the schedule display as required.
Note
Monthly schedules are the default display; you can select weekly and daily schedules.
Double-click a date on the calendar that's the first day for which you want to set work hours.
In the Edit Schedule dialog, select one of the following and then select OK.
This date only
This option changes only the selected day.
Skip to step 12.
From <this date> onward
This option changes only the schedule going forward.
Entire recurring weekly schedule from start to end
This option changes this entire schedule from the start to end date.
Selecting this option might change past days, which could affect reports regarding hours worked in the past.
In the Weekly Schedule dialog, in the Set the recurring weekly schedule section, select one of the following:
Are the same each day
The new schedule is the same for every day of the week. After you select this option, select the days of the week that the resource is available.
Vary by day
The new schedule is different for one or more days of the week. After you select this option, select the days of the week that the resource is available.
None. User is not working
The new schedule includes time that the resource isn't working.
In the Weekly Schedule dialog, you can also do any of the following:
If the schedule is for more than one day, select the days of the week this schedule is effective.
If the resource doesn't work during business closures, select the Observe option.
Under Date Range, in the Starting on box, you can change the date the schedule starts.
You can’t change the date the schedule ends. To end a schedule, you must define a new schedule on that date.
Select the work hours link for the schedule you want to modify.
If work hours weren't set previously, the link is displayed as "Set Work Hours."
In the Set Work Hours and Service Restrictions dialog, complete the following fields, and then select OK:
Date
Select a date from which the work hours for services are to be considered.
Start
Select the time the work day starts.
End
Select the time the work day ends.
To add a break in the work hours, such as a lunch break, select Add Break, and then select the start and end time of the break.
To close the Weekly Schedule dialog, select Save and Close.

Note
To define a time when a service won’t be available, on the Service Restrictions tab, select New. In the Edit a Service Restriction dialog, select the service, select the start and end time between which the service is unavailable, and then select OK.