Note
Access to this page requires authorization. You can try signing in or changing directories.
Access to this page requires authorization. You can try changing directories.
This guide shows you how to mirror an Azure Cosmos DB for NoSQL account into Microsoft Fabric when the account has public network access disabled and is reachable only over a private endpoint or virtual network. Instead of maintaining large DataFactory and Power Query Online IP allow lists, you use a Fabric virtual network data gateway that runs inside your virtual network, together with a trusted-workspace network ACL bypass.
You perform most steps in the Azure portal and the Fabric portal. Three Azure Cosmos DB account settings don't have a portal control, so this guide provides Azure CLI and Azure PowerShell commands for them.
Important
The mirroring interface can't use a virtual network data gateway connection. The New mirrored Azure Cosmos DB experience only offers cloud connections, so the gateway connection that you create in Step 7 isn't selectable there. As a result, you must create a private-network mirrored database by using the Fabric REST API, as described in Step 8. This behavior is a current product gap in Fabric mirroring, not a configuration error.
Why this approach
Fabric needs two kinds of access to mirror an Azure Cosmos DB account that's locked down to a private network:
- Control plane (metadata reads during setup) is handled by the trusted-workspace network ACL bypass that you configure in steps 3 through 5.
- Data plane (replication) is handled by the virtual network data gateway that runs inside your virtual network, which you configure in steps 6 through 8.
Because the gateway reaches Azure Cosmos DB privately, you don't add or maintain Fabric's service-tag IP ranges, and your account's public network access stays disabled the whole time.
Choose how the gateway subnet reaches Azure Cosmos DB
This approach removes the DataFactory and Power Query Online IP allow lists entirely. Only the way the gateway subnet reaches your account differs, based on how you configure private connectivity:
| Azure Cosmos DB network configuration | Public network access | How the gateway subnet is permitted |
|---|---|---|
| Private endpoint (validated in this guide) | Disabled | The gateway subnet resolves the account to its private endpoint through private DNS. |
| Virtual network service endpoints | Enabled with Selected networks | Enable the Microsoft.AzureCosmosDB service endpoint on the gateway's delegated subnet, and then add that subnet as a virtual network rule on the account. |
In both cases, you allow your own subnet or private endpoint, never Fabric's service-tag ranges. The remaining steps are identical.
Note
This guide is written and validated for the private endpoint configuration with public network access disabled. The virtual network service endpoint variant uses the same mechanism, but it isn't separately validated end to end.
Prerequisites
- An Azure Cosmos DB for NoSQL account that's configured for Fabric mirroring, including:
- Continuous backup with 7-day or 30-day retention.
- Microsoft Entra ID authentication enabled and local authentication (account keys) disabled.
- Public network access set to Disabled behind an approved private endpoint.
- A Fabric workspace on a Fabric capacity, in the same Azure region as the Azure Cosmos DB account. Use a shared workspace instead of My workspace, because workspace IDs are more readily available in shared workspaces.
- The
Microsoft.PowerPlatformresource provider registered on your subscription. See Register the Microsoft.PowerPlatform resource provider. - Permissions to complete the configuration:
- You must be an Azure subscription owner to authorize the trusted Fabric workspace.
- You must be an Admin in the target Fabric workspace.
Tip
Get your Fabric workspace ID before you start. Open the workspace in the Fabric portal, and copy the GUID from the URL segment /groups/{workspace-id}/. You enter it in Step 1.
Note
Step 1 defines shell variables, such as RESOURCE_GROUP, COSMOS_ACCOUNT, and FABRIC_WORKSPACE_ID, that the later steps reuse. Run the whole walkthrough in the same terminal session. If you close the session, rerun Step 1 to redefine the variables.
Register the Microsoft.PowerPlatform resource provider
When you register this provider, the virtual network data gateway can create its link into your virtual network.
To register the provider in the Azure portal:
- Open your subscription, and then select Settings > Resource providers.
- Search for
Microsoft.PowerPlatform, select it, and then select Register. Skip this step if the provider already shows Registered.
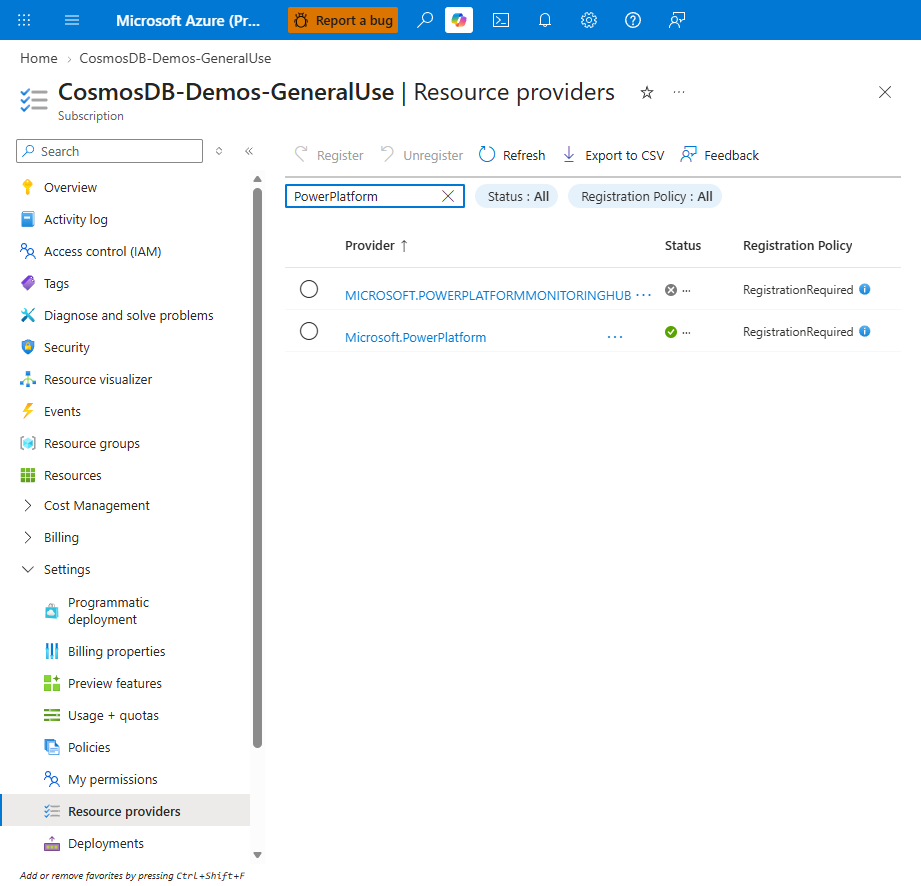
Alternatively, register the provider by using the Azure CLI or Azure PowerShell.
az account set --subscription "<subscriptionId>"
az provider register --namespace Microsoft.PowerPlatform

# Verify. Repeat until the command returns "Registered", because registration is asynchronous.
az provider show --namespace Microsoft.PowerPlatform --query registrationState -o tsv
Prepare the Azure Cosmos DB account and network
Complete the following steps to sign in, define your variables, create the gateway subnet, and configure the Azure Cosmos DB account for trusted access.
Step 1: Sign in and define your variables
Sign in to Azure and define the values that the commands in this article reuse. Run these commands once in the terminal that you keep open for the whole walkthrough. The later steps reference these variables, so you don't reenter the values. The commands capture your principal ID and tenant ID for you.
# Sign in and set your subscription context.
az login
az account set --subscription "<subscriptionId>"

# Values you provide.
RESOURCE_GROUP="<resource-group-name>"        # Resource group of the Azure Cosmos DB account
COSMOS_ACCOUNT="<account-name>"               # Azure Cosmos DB account name
COSMOS_DATABASE="<cosmos-mirror-database>"    # Database to mirror
FABRIC_WORKSPACE_ID="<fabric-workspace-id>"   # GUID from the Fabric workspace URL
MIRROR_NAME="<env>-mirror"                    # Name for the mirrored database

# Values derived and captured for you.
COSMOS_ENDPOINT="${COSMOS_ACCOUNT}.documents.azure.com"
PRINCIPAL_ID=$(az ad signed-in-user show --query id -o tsv)
TENANT_ID=$(az account show --query tenantId -o tsv)
Step 2: Create the delegated gateway subnet
A standard private-link Azure Cosmos DB deployment includes only your web app and private endpoint subnets. It doesn't include a gateway subnet. The virtual network data gateway needs its own dedicated, delegated subnet.
Your account is reachable through an approved private endpoint, with public network access disabled. This configuration is the starting point.
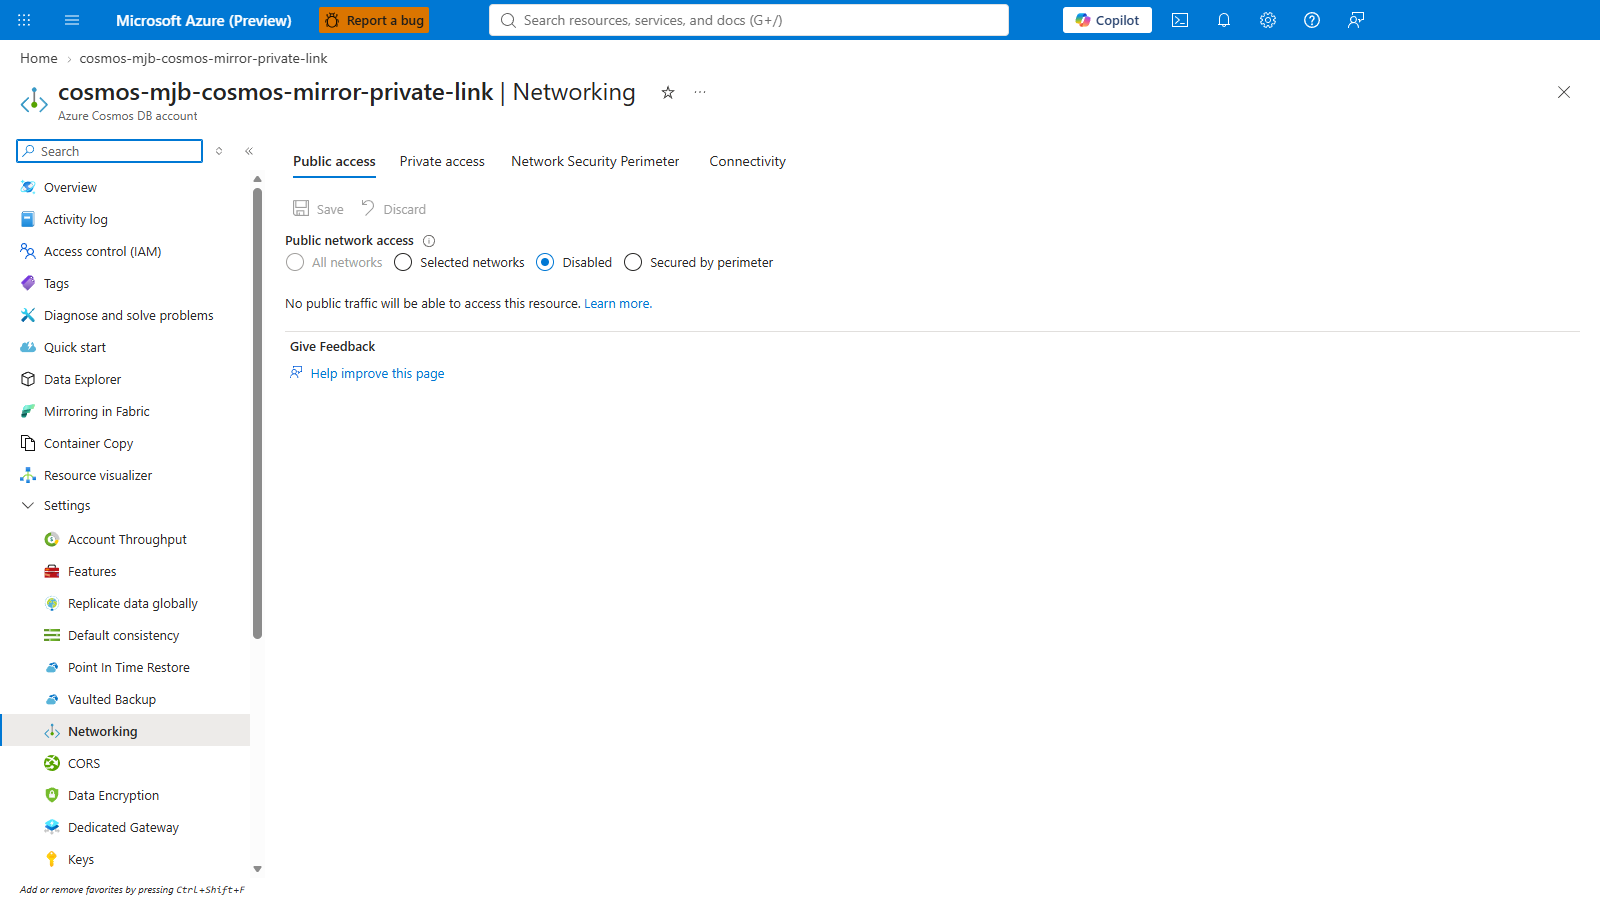
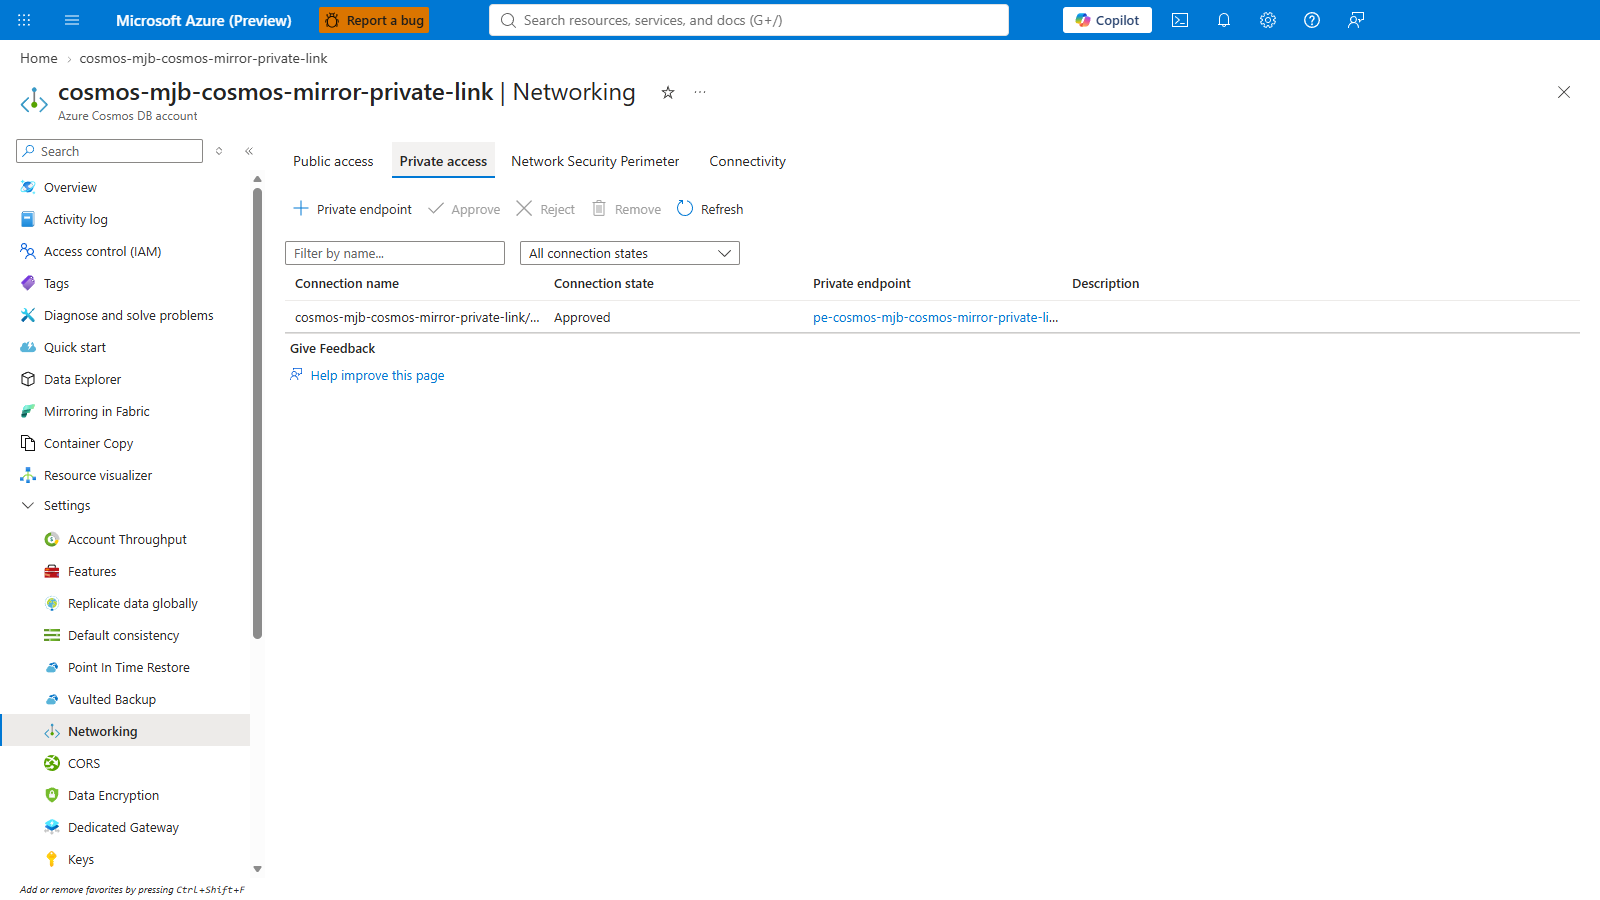
From the Azure Cosmos DB account, select Networking > Private access, open the private endpoint, and then open its virtual network. You can also go directly to the virtual network.
Select Subnets > + Subnet.
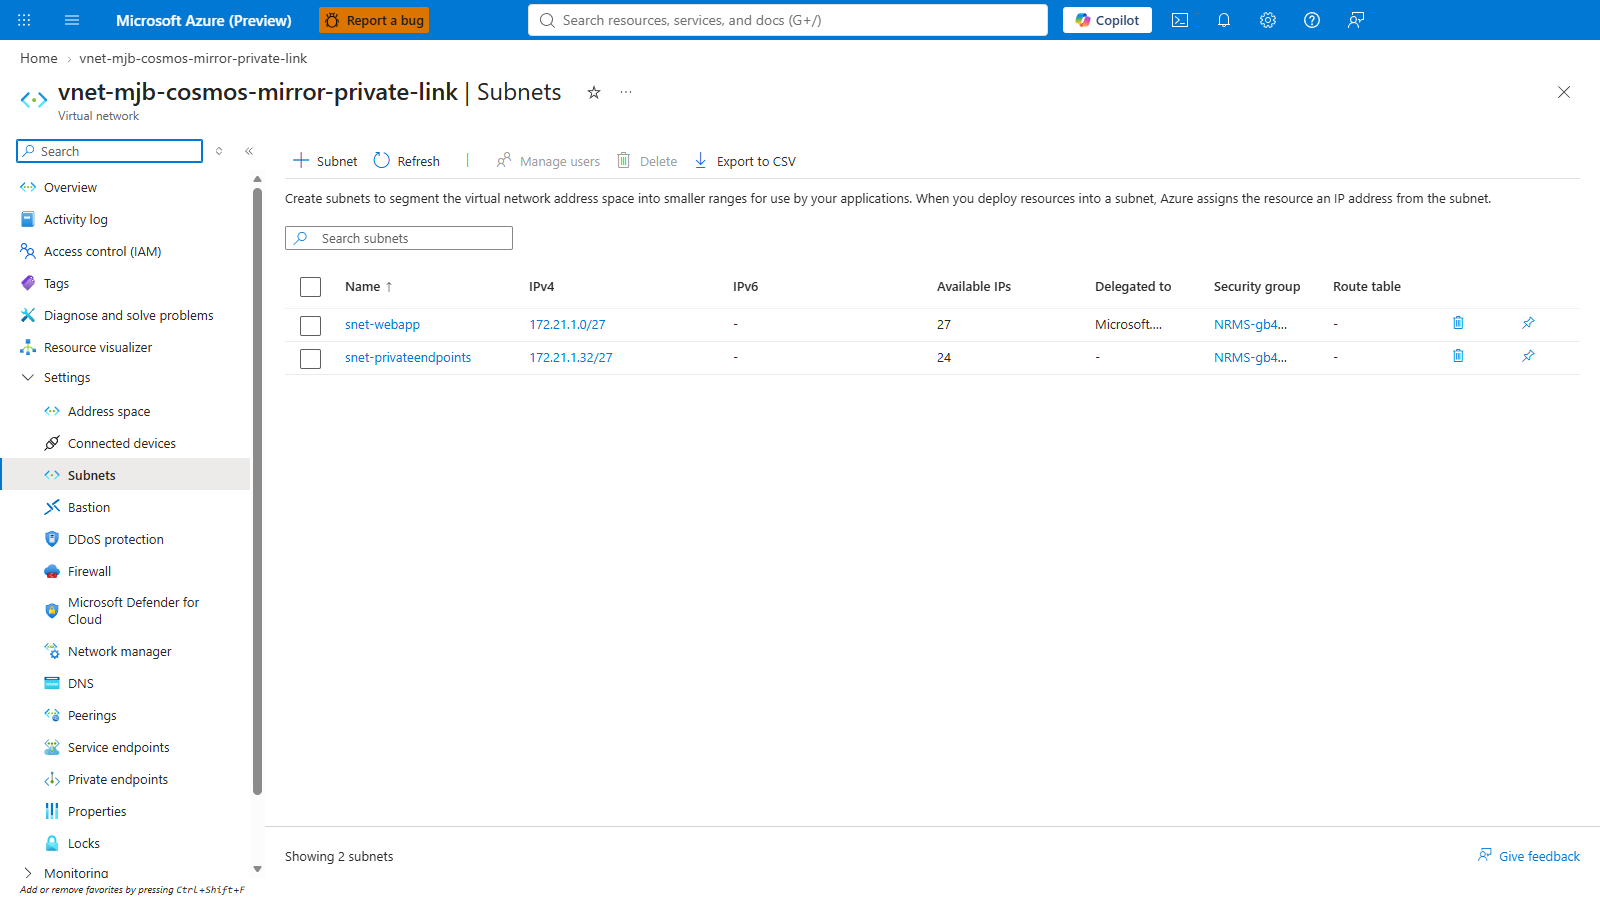
Configure the subnet with the following settings:
Setting Value Notes Name snet-fabricUse any name that's dedicated to the gateway. Size or address range /27(32 addresses)The minimum size is /27. A smaller range is rejected. The range must not overlap other subnets.Enable private subnet (no default outbound access) Cleared Leave this option cleared so the subnet keeps default outbound access to Microsoft Entra ID, which the OAuth sign-in in Step 7 requires. Subnet delegation Microsoft.PowerPlatform/vnetaccesslinksRequired. This delegation makes the subnet a gateway subnet. Private endpoint network policies Disabled Recommended. 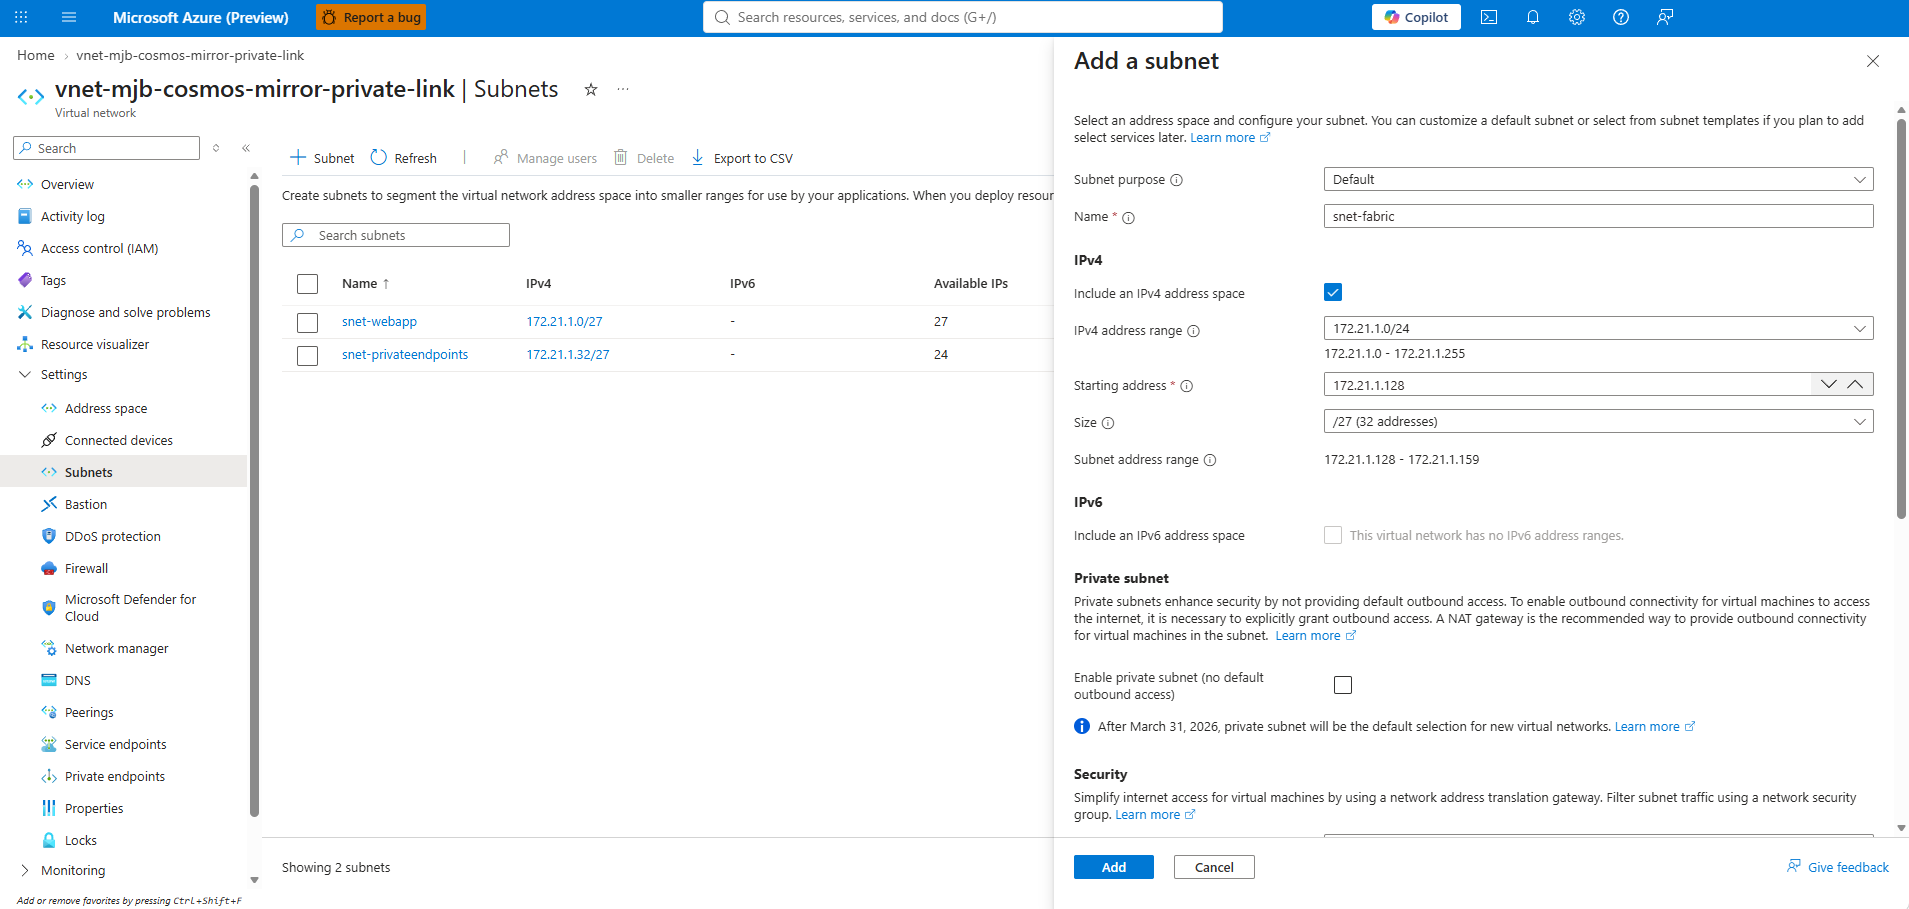
Under Subnet delegation, select
Microsoft.PowerPlatform/vnetaccesslinks.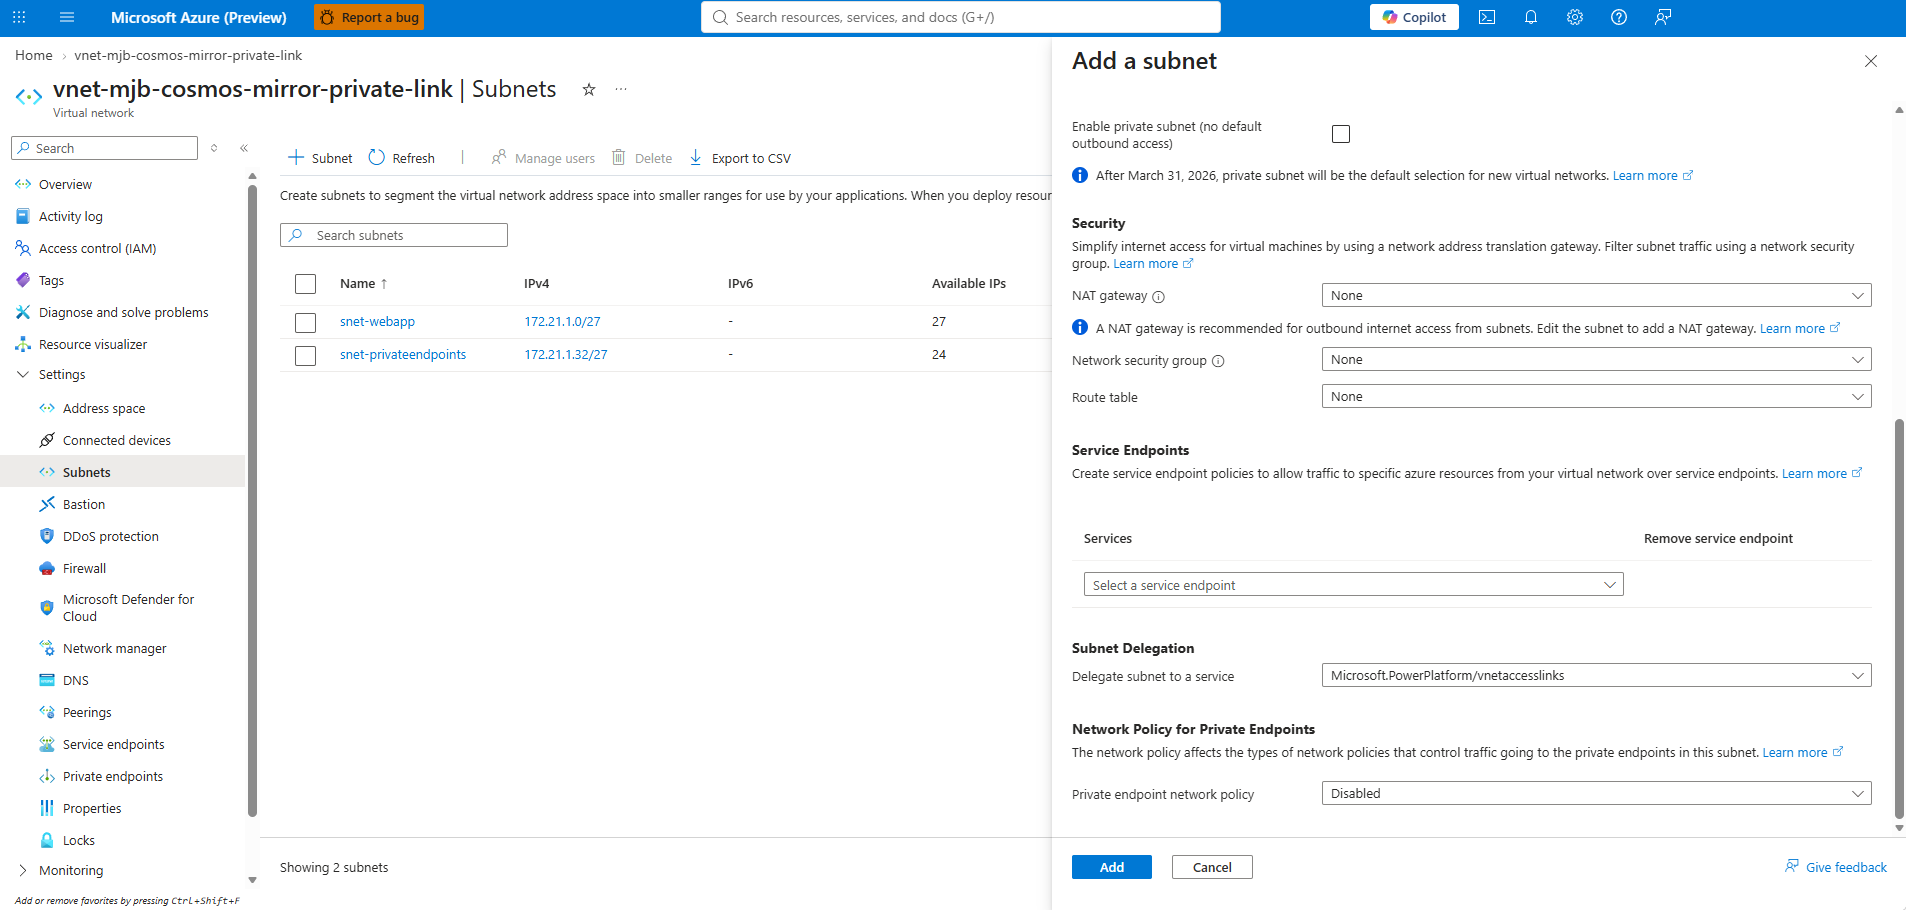
Select Add.
The subnet must be dedicated, with no other resources. It must have line of sight to Azure Cosmos DB, either in the same virtual network as the private endpoint or in a peered virtual network with routing, and it must resolve the account's private DNS zone, privatelink.documents.azure.com.
Note
The virtual network data gateway must reach Microsoft Entra ID (login.microsoftonline.com) to complete the OAuth sign-in in Step 7. Leaving Enable private subnet (no default outbound access) cleared keeps the default outbound access that the gateway needs. After March 31, 2026, default outbound access is retired, so attach a NAT gateway to the subnet. For more information, see Gateway OAuth invalid token error.
Step 3: Grant Azure Cosmos DB data-plane permissions
Grant the identity that creates the Fabric connection, which is typically you, the metadata and analytics read actions that Fabric mirroring needs, plus the built-in Data Contributor role. Azure Cosmos DB data-plane role-based access control (RBAC) doesn't have a portal control, so use the Azure CLI or Azure PowerShell.
az cosmosdb sql role definition create -a "$COSMOS_ACCOUNT" -g "$RESOURCE_GROUP" --body '{
  "RoleName": "Fabric Mirroring Metadata Reader",
  "Type": "CustomRole",
  "AssignableScopes": ["/"],
  "Permissions": [{ "DataActions": [
    "Microsoft.DocumentDB/databaseAccounts/readMetadata",
    "Microsoft.DocumentDB/databaseAccounts/readAnalytics"
  ]}]
}'
ROLE_ID=$(az cosmosdb sql role definition list -a "$COSMOS_ACCOUNT" -g "$RESOURCE_GROUP" \
  --query "[?roleName=='Fabric Mirroring Metadata Reader'].id | [0]" -o tsv)
az cosmosdb sql role assignment create -a "$COSMOS_ACCOUNT" -g "$RESOURCE_GROUP" --scope "/" \
  --principal-id "$PRINCIPAL_ID" --role-definition-id "$ROLE_ID"
az cosmosdb sql role assignment create -a "$COSMOS_ACCOUNT" -g "$RESOURCE_GROUP" --scope "/" \
  --principal-id "$PRINCIPAL_ID" --role-definition-id 00000000-0000-0000-0000-000000000002
To learn more about applying custom RBAC policies, see Grant data plane role-based access.
Step 4: Add the Fabric network ACL bypass capability
The EnableFabricNetworkAclBypass capability lets an authorized Fabric workspace bypass the account's network ACLs. This capability doesn't have a portal control, so add it by using the Azure CLI or Azure PowerShell.
az cosmosdb update -g "$RESOURCE_GROUP" -n "$COSMOS_ACCOUNT" --capabilities EnableFabricNetworkAclBypass

# Verify.
az cosmosdb show -g "$RESOURCE_GROUP" -n "$COSMOS_ACCOUNT" --query "capabilities[].name" -o tsv
Important
The --capabilities flag replaces the entire capability set. If the account already has other capabilities, list all of them in the same command.
Step 5: Authorize the trusted Fabric workspace
Authorize your Fabric workspace ID as a trusted resource so that it can reach the account through the network ACL bypass. This setting doesn't have a portal control, so use the Azure CLI or Azure PowerShell.
az cosmosdb update -g "$RESOURCE_GROUP" -n "$COSMOS_ACCOUNT" --network-acl-bypass AzureServices \
  --network-acl-bypass-resource-ids \
  "/tenants/$TENANT_ID/subscriptions/00000000-0000-0000-0000-000000000000/resourceGroups/Fabric/providers/Microsoft.Fabric/workspaces/$FABRIC_WORKSPACE_ID"
Note
Azure also surfaces steps 3 through 5 in the account's Mirroring in Fabric page, under Apply RBAC policies and Configure private networks, as the same commands.
Configure the gateway, connection, and mirror
Complete the following steps in the Fabric portal to create the gateway and connection, and then create the mirrored database by using the Fabric REST API.
Step 6: Create the virtual network data gateway
In the Fabric portal, select the Settings gear, and then select Manage connections and gateways.
Select the Virtual network data gateways tab, and then select + New.
Select the following information:
- License capacity: your active Fabric capacity.
- Azure subscription: your subscription.
- Resource group: your resource group.
- Virtual network: your virtual network.
- Subnet:
snet-fabricfrom Step 2. - Name: a name for the gateway.
- Inactivity time before hibernation: an inactivity timeout, under Advanced options.
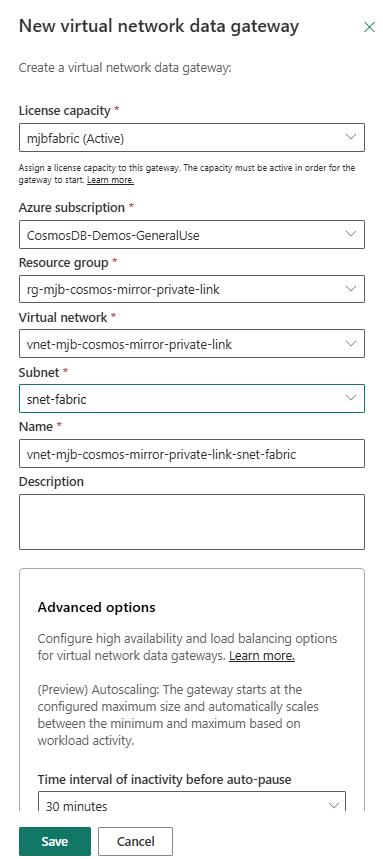
Select Save. Fabric provisions the gateway inside your virtual network, in the same region.
Step 7: Create the Azure Cosmos DB v2 connection
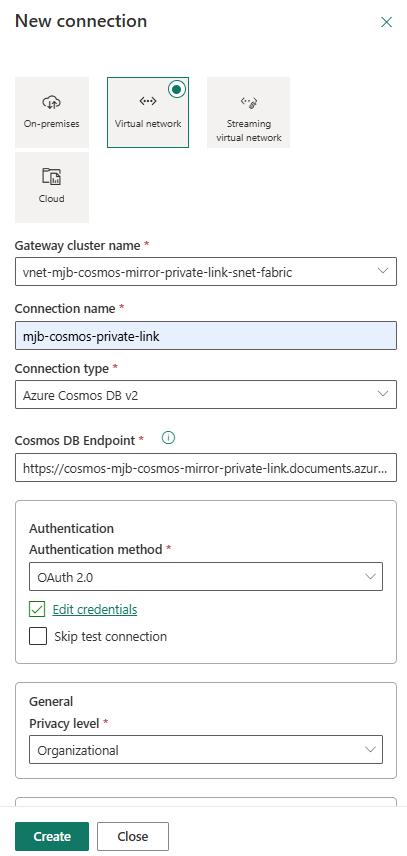
In Manage connections and gateways, select Connections > + New.
For the connectivity type, select Virtual network.
For Gateway cluster name, select the virtual network data gateway that you created in Step 6.
For Connection name, enter a name.
For Connection type, select Azure Cosmos DB v2.
For Cosmos DB Endpoint, enter
https://<account-name>.documents.azure.com:443/.For Authentication method, select OAuth 2.0, select Edit credentials, and then sign in. Leave Skip test connection cleared so that Fabric validates the connection.
For Privacy level, select Organizational.
Select Create.
Note
Private-network mirroring supports OAuth-based authentication only. Selecting Virtual network connectivity and a Gateway cluster name routes the connection through your virtual network data gateway to the private endpoint.
Warning
If you get the error OAuth login through the data gateway was unsuccessful. The service returned an invalid token., the gateway subnet is missing outbound access to Microsoft Entra ID. For the fix, see Gateway OAuth invalid token error.
Step 8: Create the mirrored database with the Fabric REST API
Because the mirroring interface can't use a virtual network data gateway connection, create the mirrored database with the Fabric REST API and reference the connection from Step 7. Creating the mirrored database is a three-part sequence:
- Resolve the connection ID. The API rejects the display name, and the Fabric portal doesn't surface the connection GUID, so the script resolves it from the
COSMOS_ENDPOINTvalue that Step 1 builds from your account name. - Create the item with a definition. The mirrored database must be created with a
definitionthat contains two Base64-encoded parts:mirroring.json, which holds the source and target properties, and.platform, which holds the item metadata. Posting top-levelpropertiesinstead creates an empty shell whose source and source connection are blank in Fabric and that never starts. - Start mirroring. Call
startMirroringon the new item to begin replication.
Run the whole block in the terminal that you kept open, which already has the variables from Step 1.
FABRIC_TOKEN=$(az account get-access-token --resource https://api.fabric.microsoft.com --query accessToken -o tsv)

# 1. Resolve the connection ID (GUID) by the Azure Cosmos DB host (the virtual network gateway connection).
CONNECTION_ID=$(curl -sS "https://api.fabric.microsoft.com/v1/connections" -H "Authorization: Bearer $FABRIC_TOKEN" | jq -r --arg e "$COSMOS_ENDPOINT" 'first(.value[] | select(.connectionDetails.type=="CosmosDB" and .connectivityType=="VirtualNetworkGateway" and (.connectionDetails.path|contains($e))) | .id)')

# 2. Build the definition parts (Base64): mirroring.json (source and target) plus .platform (metadata).
MIRRORING_B64=$(jq -cn --arg c "$CONNECTION_ID" --arg d "$COSMOS_DATABASE" '{properties:{source:{type:"CosmosDb",typeProperties:{connection:$c,database:$d}},target:{type:"MountedRelationalDatabase",typeProperties:{defaultSchema:"dbo",format:"Delta"}}}}' | base64 -w0)
PLATFORM_B64=$(jq -cn --arg n "$MIRROR_NAME" '{"$schema":"https://developer.microsoft.com/json-schemas/fabric/gitIntegration/platformProperties/2.0.0/schema.json",metadata:{type:"MirroredDatabase",displayName:$n},config:{version:"2.0",logicalId:"00000000-0000-0000-0000-000000000000"}}' | base64 -w0)
REQUEST_BODY=$(jq -cn --arg n "$MIRROR_NAME" --arg m "$MIRRORING_B64" --arg p "$PLATFORM_B64" '{displayName:$n,definition:{parts:[{path:"mirroring.json",payload:$m,payloadType:"InlineBase64"},{path:".platform",payload:$p,payloadType:"InlineBase64"}]}}')

# 3. Create the mirrored database, and then start replication.
curl -sS -X POST "https://api.fabric.microsoft.com/v1/workspaces/$FABRIC_WORKSPACE_ID/mirroredDatabases" -H "Authorization: Bearer $FABRIC_TOKEN" -H "Content-Type: application/json" -d "$REQUEST_BODY"
sleep 5
MIRROR_ID=$(curl -sS "https://api.fabric.microsoft.com/v1/workspaces/$FABRIC_WORKSPACE_ID/mirroredDatabases" -H "Authorization: Bearer $FABRIC_TOKEN" | jq -r --arg n "$MIRROR_NAME" 'first(.value[] | select(.displayName==$n) | .id)')
curl -sS -X POST "https://api.fabric.microsoft.com/v1/workspaces/$FABRIC_WORKSPACE_ID/mirroredDatabases/$MIRROR_ID/startMirroring" -H "Authorization: Bearer $FABRIC_TOKEN"
Verify replication
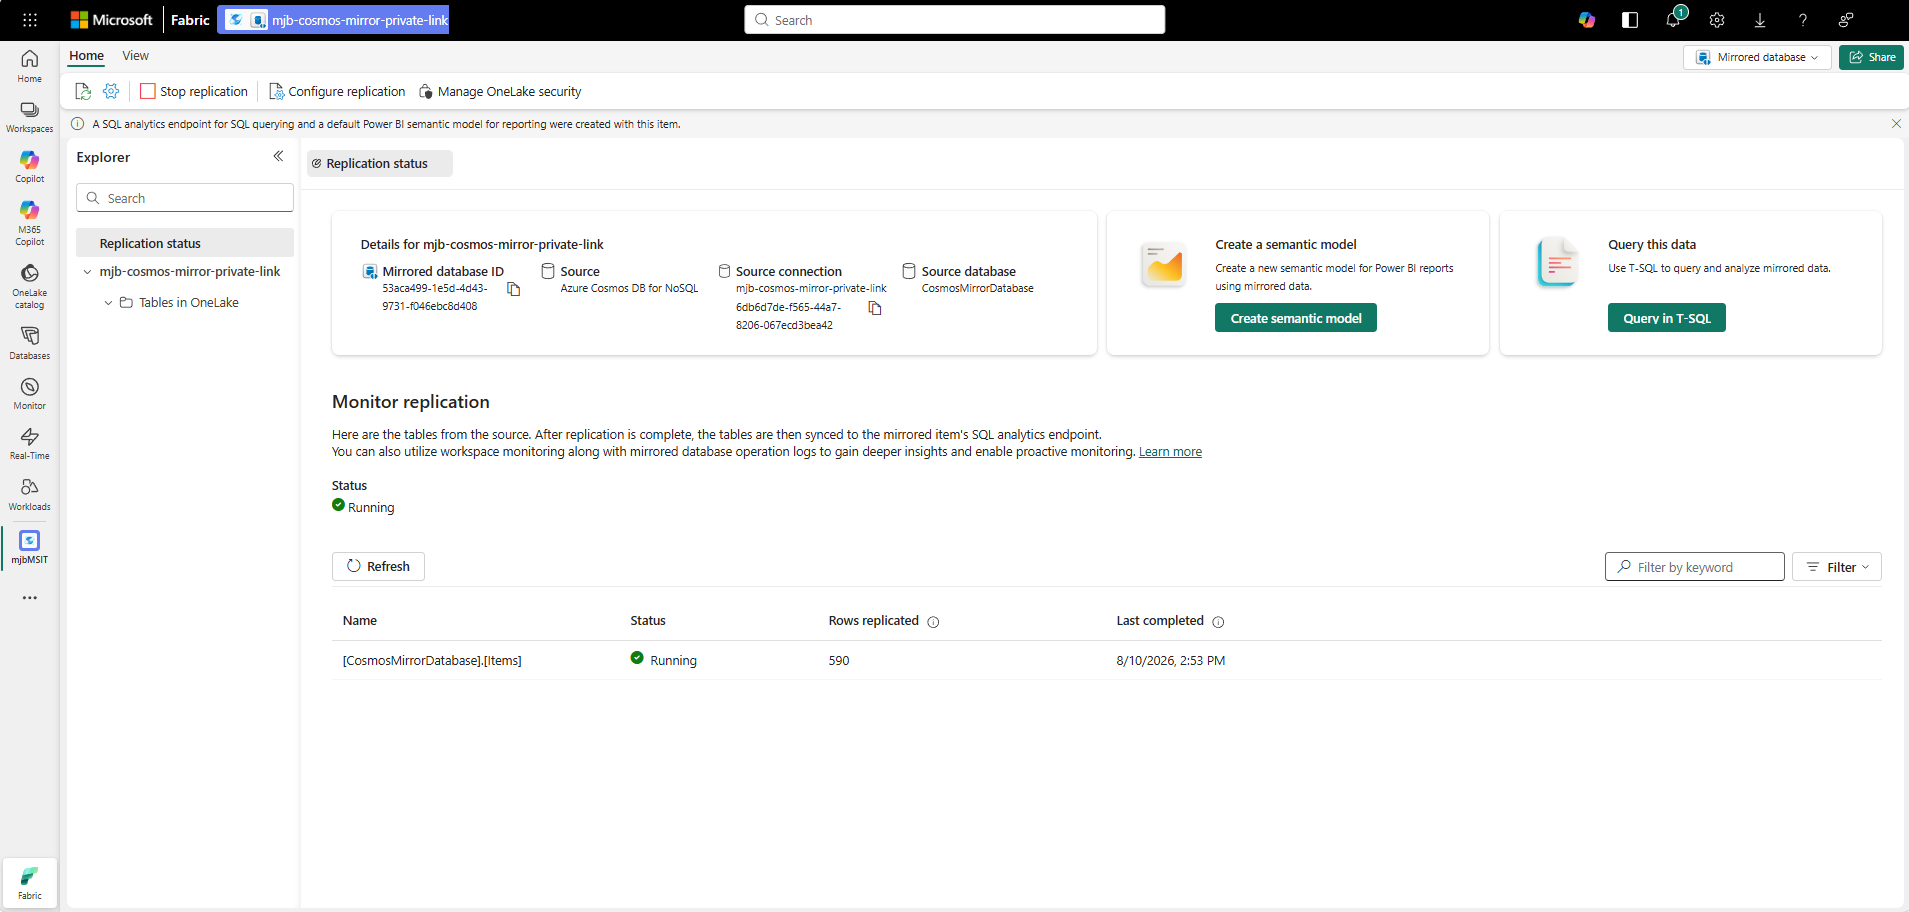
After you create the mirrored database, verify that replication works:
In your Fabric workspace, open the new mirrored database.
Confirm that the Details card shows your source connection GUID and source database. These values are blank if you create the item without a definition, as described in Step 8.
Under Monitor replication, confirm that the status is Running.
Select Refresh about once a minute, and watch the Rows replicated column climb for each table until it matches your source containers. Initial replication can take a few minutes to begin, depending on data volume.
Because Azure Cosmos DB public network access stays disabled throughout, replicating rows proves that Fabric reaches the account through the trusted-workspace bypass over the private gateway.
Limitations and considerations
When you use a virtual network data gateway with Azure Cosmos DB mirroring, be aware of these limitations:
- The target Fabric workspace region must be the same as the source Azure Cosmos DB account region.
- Private-network mirroring supports OAuth-based authentication only.
- You must create the mirrored database with the Fabric REST API, because the mirroring interface can't use a virtual network data gateway connection.
- The gateway subnet must be a dedicated
/27or larger subnet that's delegated toMicrosoft.PowerPlatform/vnetaccesslinks, with line of sight to the account and private DNS resolution. - The gateway subnet needs outbound access to Microsoft Entra ID for the OAuth sign-in. After March 31, 2026, attach a NAT gateway, because default outbound access is retired.
- The
EnableFabricNetworkAclBypasscapability must be enabled before you configure the network ACL bypass. - Network ACL configuration is workspace-specific. Authorize each workspace that needs to access the account separately.
- When you use Microsoft Entra ID authentication, ensure that the required RBAC permissions are configured. For more information, see security limitations.
Troubleshooting
If you have trouble connecting to your Azure Cosmos DB account, use the following checks. These commands reuse the variables from Step 1.
Verify the network ACL bypass capability
Confirm that the account has the capability by using the Azure CLI or Azure PowerShell.
az cosmosdb show -g "$RESOURCE_GROUP" -n "$COSMOS_ACCOUNT" --query "capabilities[].name" -o tsv
Confirm that EnableFabricNetworkAclBypass appears in the output. If the output is empty, the capability isn't enabled.
Verify the trusted workspace configuration
Confirm that the workspace resource ID is authorized on the account by using the Azure CLI or Azure PowerShell.
az cosmosdb show -g "$RESOURCE_GROUP" -n "$COSMOS_ACCOUNT" --query "networkAclBypassResourceIds" -o tsv
Verify that the resource ID has the correct tenant ID and workspace ID. If the output is empty, the Fabric workspace isn't configured.
Gateway OAuth invalid token error
If Step 7 fails with the error OAuth login through the data gateway was unsuccessful. The service returned an invalid token., the gateway subnet has no outbound path to Microsoft Entra ID (login.microsoftonline.com), so the gateway can't complete the OAuth token exchange. This error usually happens when Enable private subnet (no default outbound access) was left selected on the subnet in Step 2.
To fix the error, give the subnet outbound internet access by attaching a NAT gateway. A NAT gateway also becomes required after March 31, 2026, when default outbound access is retired. In the portal, go to Virtual network > Subnets > snet-fabric > NAT gateway. Alternatively, use the Azure CLI or Azure PowerShell. Set VNET_NAME and LOCATION to match your environment.
VNET_NAME="vnet-<env>"; LOCATION="<region>"
az network public-ip create -g "$RESOURCE_GROUP" -n pip-nat-fabric --sku Standard --allocation-method Static -l "$LOCATION"
az network nat gateway create  -g "$RESOURCE_GROUP" -n nat-fabric --public-ip-addresses pip-nat-fabric -l "$LOCATION"
az network vnet subnet update   -g "$RESOURCE_GROUP" --vnet-name "$VNET_NAME" -n snet-fabric --nat-gateway nat-fabric
After you attach the NAT gateway, retry Step 7.
For more troubleshooting guidance, see Troubleshooting: Microsoft Fabric mirrored databases from Azure Cosmos DB.