Unboxing your HoloLens 2
The following procedures help you set up a HoloLens 2 for the first time:
Charge your HoloLens
Connect the power supply to the charging port by using the USB-C cable (included). Plug the power supply into a power outlet. The power supply and USB-C-to-C cable that come with the device are the best way to charge your HoloLens 2. The charger supplies 18W of power (9V at 2A). With the wall charger supplied, HoloLens 2 devices can charge the battery to full in less than 65 minutes when the device is in standby.
Charging rate and speed may vary depending on the environment in which the device is running.
- When the device is charging, the battery indicator lights up to indicate the current level of charge. The last light fades in and out to indicate active charging.
- When your HoloLens is on, the battery indicator displays the battery level in increments.
- When only one of the five lights is on, the battery level is below 20 percent.
- If the battery level is critically low and you try to turn on the device, one light blinks briefly, then goes out.
Full details on device charging can be read here if more information is needed.
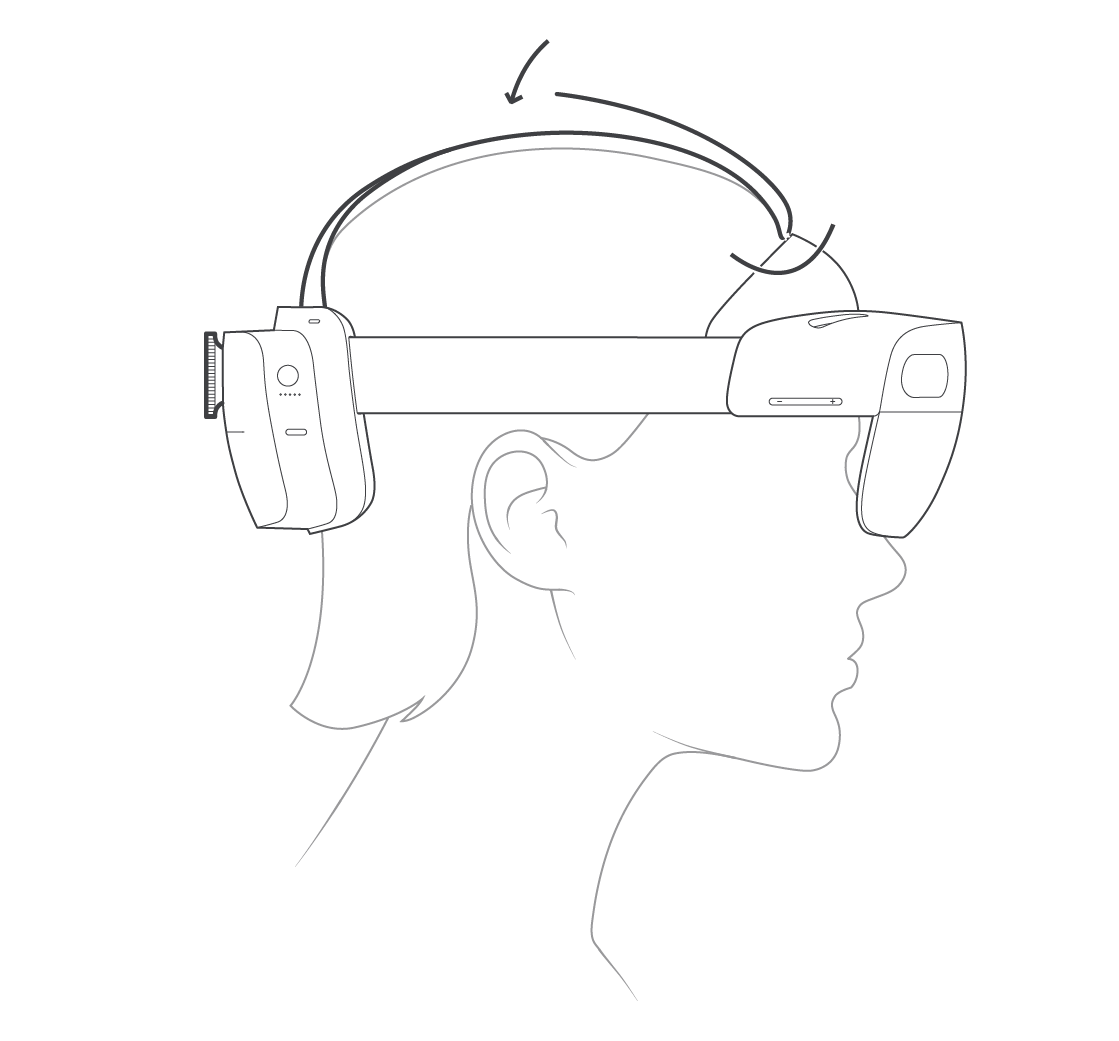
Adjust fit
Place the HoloLens 2 on your head. If you wear eyeglasses, leave them on. The brow pad should sit comfortably on your forehead and the back band should sit in the middle-back of your head.
If necessary, extend the headband by turning the adjustment wheel, and then loosen the overhead strap.
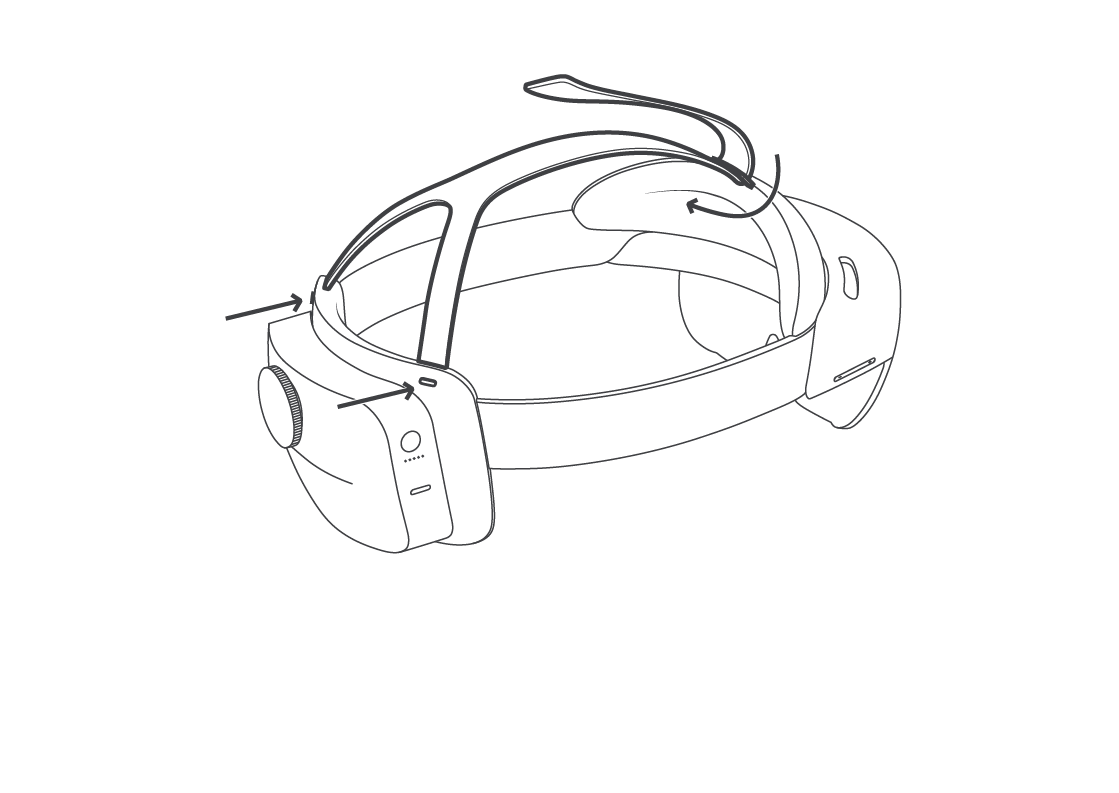
Attach and detach the overhead strap
The overhead strap isn't required, but it can make wearing HoloLens 2 more comfortable during long periods of use.
To detach the front of the overhead strap, unhook the strap and slide it through the retractable loop on the brow pad. To reattach it, pull out the loop and slide the strap back through.
To detach the back of the overhead strap, press the button below each connection tab and pull gently. To reattach it, push the connection tabs back into the slots until they click.
Turn on the HoloLens 2
To turn on your HoloLens 2, press the Power button. The LEDs below the Power button display the battery level.
Note
To power on HoloLens 2 for the very first time, after unboxing, press and hold the power button for at least 4 seconds to turn it on. Next time you power on HoloLens 2, it’ll start after a short power button press.
Power button actions for different power transitions
| To do this | Perform this action | The HoloLens 2 does this |
|---|---|---|
| To turn on | Single button press. | All five lights turn on, then change to indicate the battery level. After four seconds, a sound plays. |
| To sleep | Single button press. | All five lights turn on, then fade off one at a time. After the lights turn off, a sound plays and the screen displays "Goodbye." |
| To wake from sleep | Single button press. | All five lights turn on, then change to indicate the battery level. A sound immediately plays. |
| To turn off | Press and hold for 5s. | All five lights turn on, then fade off one at a time. After the lights turn off, a sound plays and the screen displays "Goodbye." |
| To force the HoloLens to restart if it's unresponsive | Press and hold for 10s. | All five lights turn on, then fade off one at a time. After the lights turn off. |
HoloLens behavior reference
Not sure what the indicator lights on your HoloLens mean? Want to know how HoloLens should behave while charging? Here's some help!
Charging behavior
| State of the Device | Action | HoloLens 2 does this |
|---|---|---|
| OFF | Plug in USB Cable | Device transitions to ON with indicator lights showing battery level and device starts charging. |
| ON | Remove USB Cable | Device stops charging |
| ON | Plug in USB Cable | Device starts charging |
| SLEEP | Plug in USB Cable | Device starts charging |
| SLEEP | Remove USB Cable | Device stops charging |
| ON with USB cable plugged in | Press power button once | Device transitions to SLEEP with indicator lights showing battery level and device starts charging |
Lights that indicate the battery level
| Number of lights | Battery level |
|---|---|
| Four solid lights, one light fading in and out | Between 100% and 81% (fully charged) |
| Three solid lights, one light fading in and out | Between 80% and 61% |
| Two solid lights, one light fading in and out | Between 60% and 41% |
| One solid light, one light fading in and out | Between 40% and 21% |
| One light fading in and out | Between 20% and 5% or lower (critical battery) |
Sleep Behavior
| State of the Device | Action | HoloLens 2 does this |
|---|---|---|
| ON | Single Power button press | Device transitions to SLEEP and turns off all indicator lights |
| ON | No movement for 3 minutes | Device transition to SLEEP and turns off all indicator lights |
| SLEEP | Single Power button Press | Device transitions to ON and turns on indicator lights |
Lights to indicate problems
| When you do this | The lights do this | It means this |
|---|---|---|
| You press the Power button. | One light flashes five times, then turns off. | The HoloLens battery is critically low. Charge your HoloLens. |
| You press the Power button. | All five lights flash five times, then turn off. | HoloLens can't start correctly and is in an error state. Reinstall the operating system to recover your device. |
| You press the Power button. | The 1st, 3rd, and 5th lights flash together continually. | HoloLens may have a hardware failure. Contact support. |
Safety and comfort
Use HoloLens in safe surroundings
Use your HoloLens in a safe space, free of obstructions and tripping hazards. Don’t use it when you need a clear field of view or can't commit your full attention, such as while you’re operating a vehicle, or doing other potentially hazardous activities.
Stay comfortable
Keep your first few sessions with HoloLens brief and be sure to take breaks. If you experience discomfort, stop and rest until you feel better. Discomfort might include temporary feelings of nausea, motion sickness, dizziness, disorientation, headache, fatigue, eye strain, or dry eyes.
See product safety warnings and instructions.
Next: Two key user setup scenarios
There are two key setup scenarios to consider:
- Add the first user on the device. Your device is brand-new and no users are logged into the device. The device needs to go through first-time setup, also known as the Out-of-Box-Experience (OOBE). Through this setup process, the first user is added to the device.
- Add more users on the device. The device has gone through OOBE, but now more users need to be added to the device. Through this setup process, more users are added to the device.