Deploy Microsoft Defender for Endpoint on macOS with Microsoft Intune
Applies to:
- Microsoft Defender for Endpoint on macOS
- Microsoft Defender for Endpoint Plan 1
- Microsoft Defender for Endpoint Plan 2
- Microsoft Defender for business
This article describes how to deploy Microsoft Defender for Endpoint on macOS through Microsoft Intune.
Prerequisites and system requirements
Before you get started, see the main Microsoft Defender for Endpoint on macOS page for a description of prerequisites and system requirements for the current software version.
Overview
The following table summarizes the steps you would need to take to deploy and manage Microsoft Defender for Endpoint on Macs, via Microsoft Intune. See the following table for more detailed steps.
| Step | Sample file name | Bundle identifier |
|---|---|---|
| Approve system extension | sysext.mobileconfig |
N/A |
| Network extension policy | netfilter.mobileconfig |
N/A |
| Full Disk Access | fulldisk.mobileconfig |
com.microsoft.wdav.epsext |
| Microsoft Defender for Endpoint configuration settings If you're planning to run non-Microsoft antivirus on Mac, set passiveMode to true. |
MDE_MDAV_and_exclusion_settings_Preferences.xml |
com.microsoft.wdav |
| Background services | background_services.mobileconfig |
N/A |
| Configure Microsoft Defender for Endpoint notifications | notif.mobileconfig |
com.microsoft.wdav.tray |
| Accessibility settings | accessibility.mobileconfig |
com.microsoft.dlp.daemon |
| Bluetooth | bluetooth.mobileconfig |
com.microsoft.dlp.agent |
| Configure Microsoft AutoUpdate (MAU) | com.microsoft.autoupdate2.mobileconfig |
com.microsoft.autoupdate2 |
| Device Control | DeviceControl.mobileconfig |
N/A |
| Data Loss Prevention | DataLossPrevention.mobileconfig |
N/A |
| Download the onboarding package | WindowsDefenderATPOnboarding__MDATP_wdav.atp.xml |
com.microsoft.wdav.atp |
| Deploy the Microsoft Defender for Endpoint on macOS application | Wdav.pkg |
N/A |
Create system configuration profiles
The next step is to create system configuration profiles that Microsoft Defender for Endpoint needs. In the Microsoft Intune admin center, open Devices > Configuration profiles.
Step 1: Approve system extensions
In the Intune admin center, go to Devices, and under Manage Devices, select Configuration.
Under Configuration profiles, select Create Profile.
This profile is needed for Big Sur (11) or later. It is ignored on older versions of macOS, because they use the kernel extension.
On the Policies tab, select Create > New Policy.
Under Platform, select macOS.
Under Profile type, select Templates.
Under Template name, select Extensions, and then select Create.
On the Basics tab, Name the profile. For example,
SysExt-prod-macOS-Default-MDE. Then, select Next.Select Next.
On the Configuration settings tab, expand System Extensions and add the following entries in the Allowed system extensions section:
Bundle identifier Team identifier com.microsoft.wdav.epsextUBF8T346G9com.microsoft.wdav.netextUBF8T346G9
Then select Next.
On the Assignments tab, assign the profile to a group where the macOS devices and/or users are located, or select the Add all users and Add all devices options. Then select Next.
Review the configuration profile. Select Create.

Step 2: Network filter
As part of the Endpoint Detection and Response capabilities, Microsoft Defender for Endpoint on macOS inspects socket traffic and reports this information to the Microsoft 365 Defender portal. The following policy allows the network extension to perform this functionality.
Download netfilter.mobileconfig from GitHub repository.
To configure network filter:
Under Configuration profiles, select Create Profile.
Under Platform, select macOS.
Under Profile type, select Templates.
Under Template name, select Custom.
Select Create.
On the Basics tab, Name the profile. For example,
NetFilter-prod-macOS-Default-MDE. Then, select Next.On the Configuration settings tab, enter a Custom configuration profile name. For example,
NetFilter-prod-macOS-Default-MDE.Choose a Deployment channel and then select Next.
Select Next.
On the Assignments tab, assign the profile to a group where the macOS devices and/or users are located, or All Users and All devices.
Review the configuration profile. Select Create.
Step 3: Full Disk Access
Note
Starting with macOS Catalina (10.15) or newer, in order to provide privacy for the end-users, it created the FDA (Full Disk Access). Enabling TCC (Transparency, Consent & Control) through a Mobile Device Management solution such as Intune, will eliminate the risk of Defender for Endpoint losing Full Disk Access Authorization to function properly.
This configuration profile grants Full Disk Access to Microsoft Defender for Endpoint. If you previously configured Microsoft Defender for Endpoint through Intune, we recommend you update the deployment with this configuration profile.
Download fulldisk.mobileconfig from GitHub repository.
To configure Full Disk Access:
In the Intune admin center, under Configuration profiles, select Create Profile.
Under Platform, select macOS.
Under Profile type, select Templates.
Under Template name, select Custom. Then select Create
Select Create.
On the Basics tab, Name the profile. For example,
Background_Services-prod-macOS-Default-MDE.Select Next.
On the Configuration settings tab, enter a Custom configuration profile name. For example,
background_services.mobileconfig.Choose a Deployment channel and then select Next.
Select a Configuration profile file.
On the Assignments tab, assign the profile to a group where the macOS devices and/or users are located, or All Users and All devices.
Review the configuration profile. Select Create.
Note
Full Disk Access granted through Apple MDM Configuration Profile is not reflected in System Settings => Privacy & Security => Full Disk Access.
Step 4: Background services
Caution
macOS 13 (Ventura) contains new privacy enhancements. Beginning with this version, by default, applications cannot run in background without explicit consent. Microsoft Defender for Endpoint must run its daemon process in background. This configuration profile grants Background Service permissions to Microsoft Defender for Endpoint. If you previously configured Microsoft Defender for Endpoint through Microsoft Intune, we recommend you update the deployment with this configuration profile.
Download background_services.mobileconfig from GitHub repository.
To configure background services:
Under Configuration profiles, select Create Profile.
Under Platform, select macOS.
Under Profile type, select Templates.
Under Template name, select Custom, and then select Create.
On the Basics tab, Name the profile. For example,
BackgroundServices-prod-macOS-Default-MDE.Select Next.
On the Configuration settings tab, enter a Custom configuration profile name. For example,
background_services.mobileconfig.Choose a Deployment channel.
Select Next.
Select a Configuration profile file.
On the Assignments tab, assign the profile to a group where the macOS devices and/or users are located, or All Users and All devices.
Review the configuration profile. Select Create.
Step 5: Notifications
This profile is used to allow Microsoft Defender for Endpoint on macOS and Microsoft AutoUpdate to display notifications in UI.
Download notif.mobileconfig from GitHub repository.
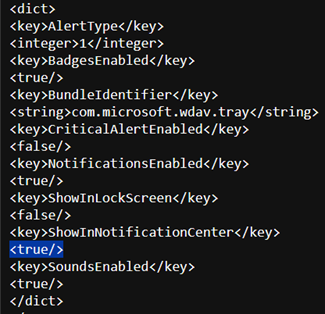
To turn off notifications for the end users, you can change Show NotificationCenter from true to false in
notif.mobileconfig.
To configure notifications:
Under Configuration profiles, select Create Profile.
Under Platform, select macOS.
Under Profile type, select Templates.
Under Template name, select Custom.
Select Create.
On the Basics tab, Name the profile. For example,
BackgroundServices-prod-macOS-Default-MDE.Select Next.
On the Configuration settings tab, enter a Custom configuration profile name. For example,
Notif.mobileconfig.Choose a Deployment channel and then select Next.
Select a Configuration profile file.
On the Assignments tab, assign the profile to a group where the macOS devices and/or users are located, or All Users and All devices.
Review the configuration profile. Select Create.
Step 6: Accessibility settings
This profile is used to allow Microsoft Defender for Endpoint on macOS to access the accessibility settings on Apple macOS High Sierra (10.13.6) and newer.
Download accessibility.mobileconfig from GitHub repository.
Under Configuration profiles, select Create Profile.
Under Platform, select macOS.
Under Profile type, select Templates.
Under Template name, select Custom.
Select Create.
On the Basics tab, Name the profile. For example,
Accessibility-prod-macOS-Default-MDE.Select Next.
On the Configuration settings tab, enter a Custom configuration profile name. For example,
Accessibility.mobileconfig.Choose a Deployment channel.
Select Next.
Select a Configuration profile file.
On the Assignments tab, assign the profile to a group where the macOS devices and/or users are located, or All Users and All devices.
Review the configuration profile. Select Create.
Step 7: Bluetooth permissions
Caution
macOS 14 (Sonoma) contains new privacy enhancements. Beginning with this version, by default, applications cannot access Bluetooth without explicit consent. Microsoft Defender for Endpoint uses it if you configure Bluetooth policies for Device Control.
Download bluetooth.mobileconfig from GitHub repository and use the same workflow as for the Accessibility settings above to enable Bluetooth access.
Note
Bluetooth granted through Apple MDM Configuration Profile is not reflected in System Settings => Privacy & Security => Bluetooth.
Step 8: Microsoft AutoUpdate
This profile is used to update the Microsoft Defender for Endpoint on macOS via Microsoft AutoUpdate (MAU). If you're deploying Microsoft Defender for Endpoint on macOS, you have the options to get an updated version of the application (Platform Update) that are in the different channels mentioned here:
- Beta (Insiders-Fast)
- Current channel (Preview, Insiders-Slow)
- Current channel (Production)
For more information, see Deploy updates for Microsoft Defender for Endpoint on macOS.
Download AutoUpdate2.mobileconfig from GitHub repository.
Note
The sample AutoUpdate2.mobileconfig from the GitHub repository has it set to Current Channel (Production).
Under Configuration profiles, select Create Profile.
Under Platform, select macOS.
Under Profile type, select Templates.
Under Template name, select Custom.
Select Create.
On the Basics tab, Name the profile. For example,
MDATP onboarding for MacOSand then select Next.On the Configuration settings tab, enter a Custom configuration profile name. For example,
com.microsoft.autoupdate2.mobileconfig.Choose a Deployment channel.
Select Next.
Select a Configuration profile file.
On the Assignments tab, assign the profile to a group where the macOS devices and/or users are located, or All Users and All devices.
Review the configuration profile. Select Create.
Step 9: Microsoft Defender for Endpoint configuration settings
In this step, we go over Preferences that enables you to configure anti-malware and EDR policies using Microsoft Defender XDR portal (https://security.microsoft.com) or Microsoft Intune (https://intune.microsoft.com).
9a. Set policies using Microsoft Defender portal
Go through Configure Microsoft Defender for Endpoint in Intune before setting the security policies using Microsoft Defender for Endpoint Security Settings Management.
In the Microsoft Defender portal, go to Configuration management > Endpoint security policies > Mac policies > Create new policy.
Under Select Platform, select macOS.
Under Select Template, choose a template and select Create Policy.
Specify a name and description for the policy, and then select Next.
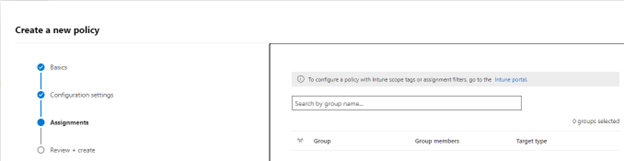
On the Assignments tab, assign the profile to a group where the macOS devices and/or users are located, or All Users and All devices.
For more information about managing security settings, see:
- Manage Microsoft Defender for Endpoint on devices with Microsoft Intune
- Manage security settings for Windows, macOS, and Linux natively in Defender for Endpoint
Important
The policies set via Intune will take precedence over the Microsoft Defender for Endpoint Security Settings Management.
Set policies using Microsoft Intune
You can manage the security settings for Microsoft Defender for Endpoint on macOS under Setting Preferences in Microsoft Intune.
For more information, see Set preferences for Microsoft Defender for Endpoint on Mac.
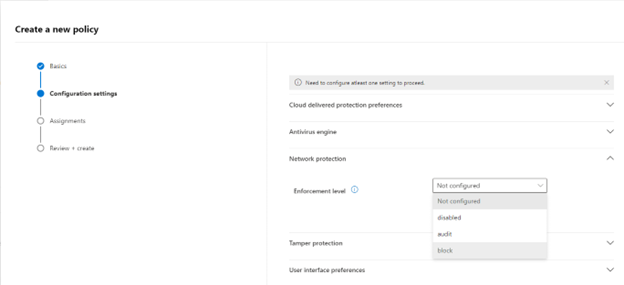
Step 10: Network protection for Microsoft Defender for Endpoint on macOS
In the Microsoft Defender portal:
Go to Configuration management > Endpoint security policies > Mac policies > Create new policy.
Under Select Platform, select macOS.
Under Select Template, select Microsoft Defender Antivirus and select Create Policy.

On the Basics tab, enter the Name and Description of the policy. Select Next.
On the Configuration Settings tab, under Network Protection, select an Enforcement level. Select Next.
On the Assignments tab, assign the profile to a group where the macOS devices and/or users are located, or All Users and All devices.
Review the policy in Review+Create and select Save.

Tip
You can also configure network protection by appending the information from Network protection to help prevent macOS connections to bad sites to the .mobileconig from step 8.
Step 11: Device Control for Microsoft Defender for Endpoint on macOS
To set Device Control for Microsoft Defender for Endpoint on macOS, follow the steps in:
Step 12: Data Loss Prevention (DLP) for Endpoint
To set Purview's Data Loss Prevention (DLP) for endpoint on macOS, follow the steps in Onboard and offboard macOS devices into Compliance solutions using Microsoft Intune.
Step 13: Check status of PList (.mobileconfig)
After completing the profile configuration, you'll be able to review the status of the policies.
View Status
Once the Intune changes are propagated to the enrolled devices, you can see them listed under Monitor > Device status:

Client device setup
A standard Company Portal installation is sufficient for a mac device.
Confirm device management.

Select Open System Preferences, locate Management Profile on the list, and select Approve.... Your Management Profile would be displayed as Verified:

Select Continue and complete the enrollment.
You may now enroll more devices. You can also enroll them later, after finishing the provisioning system configuration and application packages.
In Intune, open Manage > Devices > All devices. Here you can see your device among the listed:


Verify client device state
After the configuration profiles are deployed to your devices, open System Preferences > Profiles on your Mac device.


Verify that the following configuration profiles are present and installed. The Management Profile should be the Intune system profile. Wdav-config and wdav-kext are system configuration profiles that were added in Intune:

You should also see the Microsoft Defender for Endpoint icon in the top-right corner.


Step 14: Publish application
This step enables deploying Microsoft Defender for Endpoint to enrolled machines.
In the Microsoft Intune admin center, open Apps.

Select By platform > macOS > Add.
Under App type, select macOS. Select Select.

On the App information, keep the default values and select Next.

On the Assignments tab, select Next.

Review and Create. You can visit Apps > By platform > macOS to see it on the list of all applications.


For more information, see Add Microsoft Defender for Endpoint to macOS devices using Microsoft Intune.
Important
You should create and deploy the configuration profiles in the above order (step 1-13) for a successful system configuration.
Step 15: Download the onboarding package
To download the onboarding packages from Microsoft 365 Defender portal:
In the Microsoft 365 Defender portal, go to Settings > Endpoints > Device management > Onboarding.
Set the operating system to macOS and the deployment method to Mobile Device Management / Microsoft Intune.

Select Download onboarding package. Save it as WindowsDefenderATPOnboardingPackage.zip to the same directory.
Extract the contents of the .zip file:

unzip WindowsDefenderATPOnboardingPackage.zip
Archive:  WindowsDefenderATPOnboardingPackage.zip
warning:  WindowsDefenderATPOnboardingPackage.zip appears to use backslashes as path separators
  inflating: intune/kext.xml
  inflating: intune/WindowsDefenderATPOnboarding.xml
  inflating: jamf/WindowsDefenderATPOnboarding.plist

Step 16: Deploy the onboarding package
This profile contains license information for Microsoft Defender for Endpoint.
To deploy the onboarding package:
Under Configuration profiles, select Create Profile.
Under Platform, select macOS.
Under Profile type, select Templates.
Under Template name, select Custom.
Select Create.

On the Basics tab, Name the profile. For example,
Autoupdate-prod-macOS-Default-MDE. Select Next.
On the Configuration settings tab, enter a Custom configuration profile name. For example,
Autoupdate.mobileconfig.Choose a Deployment channel.
Select Next.
Select a Configuration profile file.

On the Assignments tab, assign the profile to a group where the macOS devices and/or users are located, or All Users and All devices.

Review the configuration profile. Select Create.
Open Devices > Configuration profiles to see the created profile.


Step 17: Verify anti-malware detection
See the following article to test for an anti-malware detection review: Antivirus detection test for verifying device's onboarding and reporting services
Step 18: Verifying EDR detection
See the following article to test for an EDR detection review: EDR detection test for verifying device onboarding and reporting services
Troubleshooting
Issue: No license found.
Solution: Follow the steps in this article to create a device profile using WindowsDefenderATPOnboarding.xml.
Logging installation issues
See Logging installation issues for information on how to find the automatically generated log created by the installer, when an error occurs.
For information on troubleshooting procedures, see:
- Troubleshoot system extension issues in Microsoft Defender for Endpoint on macOS
- Troubleshoot installation issues for Microsoft Defender for Endpoint on macOS
- Troubleshoot license issues for Microsoft Defender for Endpoint on macOS
- Troubleshoot cloud connectivity issues for Microsoft Defender for Endpoint on macOS
- Troubleshoot performance issues for Microsoft Defender for Endpoint on macOS
Uninstallation
See Uninstalling for details on how to remove Microsoft Defender for Endpoint on macOS from client devices.
Recommended content
Add Microsoft Defender for Endpoint to macOS devices using Microsoft Intune
Learn about adding Microsoft Defender for Endpoint to macOS devices using Microsoft Intune.
Examples of device control policies for Intune
Learn how to use device control policies using examples that can be used with Intune.
Configure Microsoft Defender for Endpoint on iOS features
Describes how to deploy Microsoft Defender for Endpoint on iOS features.
Deploy Microsoft Defender for Endpoint on iOS with Microsoft Intune
Describes how to deploy Microsoft Defender for Endpoint on iOS using an app.
Configure Microsoft Defender for Endpoint in Microsoft Intune
Describes connecting to Defender for Endpoint, onboarding devices, assigning compliance for risk levels, and conditional access policies.
Troubleshoot issues and find answers on FAQs related to Microsoft Defender for Endpoint on iOS
Troubleshooting and FAQ - Microsoft Defender for Endpoint on iOS.
Configure Microsoft Defender for Endpoint on Android features
Describes how to configure Microsoft Defender for Endpoint on Android.
Manage Defender for Endpoint on Android devices in Intune - Azure
Configure Microsoft Defender for Endpoint web protection on Android devices managed by Microsoft Intune.
Tip
Do you want to learn more? Engage with the Microsoft Security community in our Tech Community: Microsoft Defender for Endpoint Tech Community.
Feedback
Coming soon: Throughout 2024 we will be phasing out GitHub Issues as the feedback mechanism for content and replacing it with a new feedback system. For more information see: https://aka.ms/ContentUserFeedback.
Submit and view feedback for