Note
Access to this page requires authorization. You can try signing in or changing directories.
Access to this page requires authorization. You can try changing directories.
Power Shield helps organizations manage Power Platform connector access through a structured, approval-based workflow for data policies. Makers request connector access through a self-service wizard; admins review, approve, and manage those requests. Every data policy change is traceable to a Power Shield request to support governance compliance and auditability.
Architecture
Power Shield is delivered as an embedded feature in two dedicated code apps and is also accessible from the model-driven app:
- Copilot Agent Kit (model-driven app): Launches Power Shield and routes to the appropriate code app based on the user's security role.
- Copilot Agent Kit for Makers (code app): Submit and manage connector access requests.
- Copilot Agent Kit for Admins (code app): Review, approve, and configure Power Shield.
Key concepts
The following table describes the terminology used by Power Shield:
| Concept | Description |
|---|---|
| Policy request | A maker's formal request to access specific connectors in one or more environments. Each request follows a lifecycle from Draft through Implemented (or Rejected/Withdrawn). |
| Service tree | An organizational grouping (department, team, or project) that scopes policy requests. Only members can submit requests under a service tree. |
| Environment container | A named group of Power Platform environments within a service tree that defines the data policy scope. |
| Data policy | A data policy in the Power Platform admin center. Power Shield maintains one data policy per service tree + environment container pair, refreshed on each approval. Learn more in What approval does to your data policies. |
| Connector actions | Individual operations within a connector (for example, Send Email). Makers can allow or block specific actions per connector. |
| Custom connector patterns | URL patterns for custom connectors classified into Data Loss Prevention (DLP) data groups (Business, Non-business, Blocked). |
| Compliance questionnaire | An optional, admin-configurable set of questions makers answer when submitting a request. Responses serve as decision points during approval. |
| Connector governance (default-blocked model) | All non-Microsoft-published connectors are blocked after the initial sync. Only Microsoft-published connectors are available by default. Admins selectively unblock connectors through Connector Configurations. |
Prerequisites
Before you use Power Shield:
- Install and configure all prerequisites for Copilot Agent Kit for both code apps.
- Assign users one of the following Dataverse security roles:
- CSK - Maker or System Administrator for the maker experience in Copilot Agent Kit for Makers.
- CSK - Administrator or System Administrator for the admin experience in Copilot Agent Kit for Admins.
- Assign admins who approve requests and create data policies the Power Platform Administrator role in the Microsoft 365 admin center. This Microsoft Entra ID role grants permission to create, update, and delete data policies by using the Power Platform for Admins connector. Without it, data policy creation fails after approval.
Warning
Power Shield doesn't work until the PowerShield | Sync Connectors cloud flow runs at least once. This flow populates the connector catalog used in the connector selection step of the request wizard. For setup steps, see Connector and connector actions sync, or use Connection Health in the admin app to configure everything in one place.
Note
Power Shield automatically excludes developer environments. Only Production, Sandbox, Trial, Default, and Teams environments are available.
Connection references
Power Shield uses four connection references. Two require HTTP with Microsoft Entra ID (preauthorized) connections that you must create manually. The other two (Dataverse and Power Apps for Makers) use standard connectors that are mapped during setup.
Note
Endpoint values in this section default to the commercial cloud. If your environment is in the US Government cloud, use the row for your cloud in each connection table, and substitute the corresponding maker portal for every https://make.powerapps.com link in this article:
| Cloud | Maker portal |
|---|---|
| Commercial | https://make.powerapps.com |
| GCC | https://make.gov.powerapps.us |
| GCC High | https://make.high.powerapps.us |
| DoD | https://make.apps.appsplatform.us |
For the full list of cloud-specific service URLs, see Power Apps US Government service URLs.
Important
Cloud flows included in the solution remain in an off state until you complete the connection reference configuration and manually turn them on.
Create connections
Create two HTTP with Microsoft Entra ID (preauthorized) connections in your environment. Each connection requires a specific base resource URL and Microsoft Entra ID resource URI.
Sign in to Power Apps and select your environment.
In the left navigation pane, select Connections.
Select + New connection.
Search for HTTP with Microsoft Entra ID and select the (preauthorized) variant.
Enter the values for the first connection (used by the PowerShield APIFlow connection reference), using the row for your cloud:
Cloud Base resource URL Microsoft Entra ID resource URI Commercial https://api.flow.microsoft.comhttps://service.powerapps.com/GCC https://gov.api.flow.microsoft.ushttps://gov.service.powerapps.us/GCC High https://high.api.flow.microsoft.ushttps://high.service.powerapps.us/DoD https://api.flow.appsplatform.ushttps://service.apps.appsplatform.us/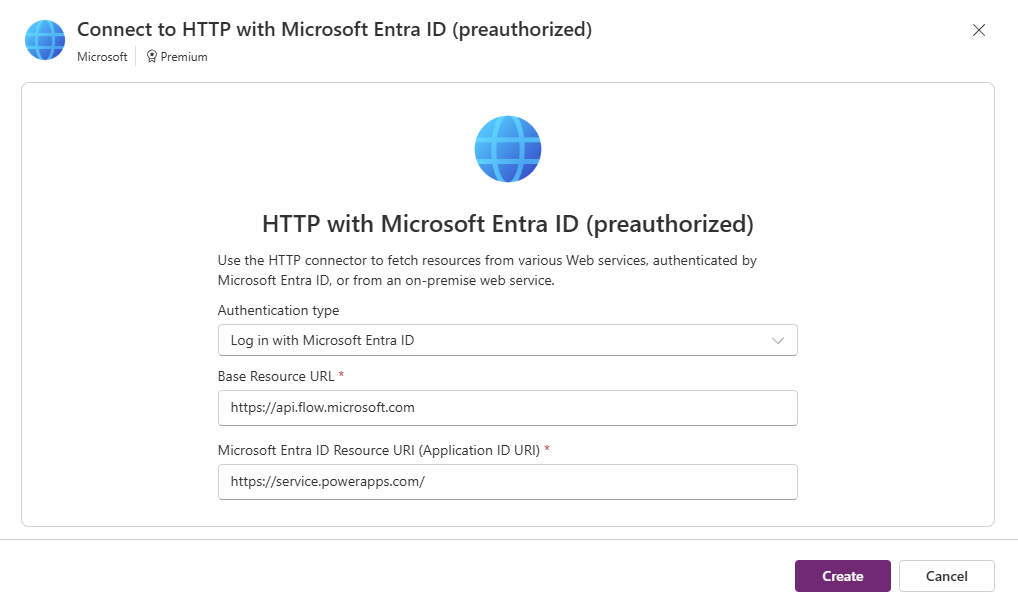
Select Create and complete the sign-in prompt.
Repeat the previous steps to create the second connection (used by the PowerShield BAPAPI connection reference), using the row for your cloud:
Cloud Base resource URL Microsoft Entra ID resource URI Commercial https://api.bap.microsoft.comhttps://api.bap.microsoft.comGCC https://gov.api.bap.microsoft.ushttps://gov.api.bap.microsoft.usGCC High https://high.api.bap.microsoft.ushttps://high.api.bap.microsoft.usDoD https://api.bap.appsplatform.ushttps://api.bap.appsplatform.us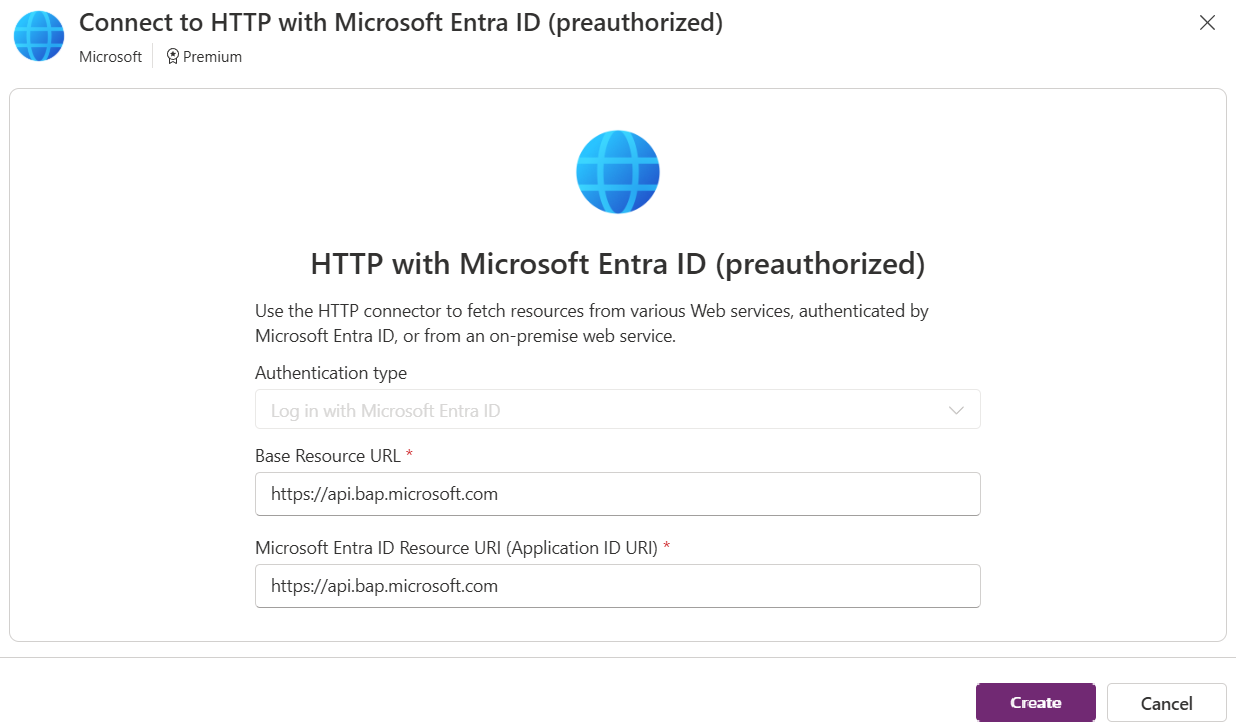
Map connections and activate flows
After you create the connections, complete setup from Connection Health in the admin app. It maps all four connection references, activates the cloud flows, and verifies data sync from a single page. Sign in as a user with the Power Platform Administrator role so the BAPAPI connection can manage data policies.
Note
Activating a flow doesn't trigger an immediate run. The Sync Connectors flow runs on a daily schedule. To populate the connector catalog immediately, open the flow in Power Automate and select Run, then return to Connection Health and select Refresh.
Connector and connector actions sync
Power Shield relies on two Dataverse tables, Connectors (cat_connector) and Connector Actions (cat_connectoraction), that you must populate before using the feature. A single scheduled cloud flow keeps these tables current.
| Cloud flow | Purpose | Target tables |
|---|---|---|
| PowerShield | Sync Connectors | Discovers all tenant connectors and fetches available actions per connector. Applies the default-blocked model: new non-Microsoft connectors are blocked by default; admin overrides are preserved. | cat_connector, cat_connectoraction |
After you turn on the cloud flows:
- Go to Solutions > Copilot Studio Accelerator > Cloud flows.
- Open the PowerShield | Sync Connectors flow and select Run from the command bar. Wait for completion.
- Open the Connectors (
cat_connector) table to verify that it contains records. - Open the Connector Actions (
cat_connectoraction) table to verify that it contains action records.
The flow then runs on a daily schedule. The connector sync preserves admin overrides (block or unblock) and uses cat_UpsertConnectorActions to efficiently create, update, and deactivate action records.
Roles and responsibilities
This section describes the capabilities and access levels for different users interacting with Power Shield. It outlines what Makers and Admins can do within the system.
Maker
Requires the CSK - Maker or System Administrator security role. Makers access Power Shield through the Copilot Agent Kit for Makers app, where a [Maker] badge appears in the header.
Makers can:
- Create and submit connector access requests by using the five-step wizard.
- Create and manage service trees and environment containers.
- View their own requests and requests where they're a co-owner.
- Save drafts and resume later.
- Withdraw, clone, or revise and resubmit requests.
- Post comments with file attachments on submitted requests.
Admin
Requires the CSK - Administrator or System Administrator security role. Admins access Power Shield through the Copilot Agent Kit for Admins app, where an [Admin] badge appears in the header. Approving requests also requires the Power Platform Administrator role; learn more in Prerequisites. The Dataverse security role controls app access; the Power Platform Administrator role controls data policy operations.
Admins can:
- View all requests across the tenant.
- Assign requests to themselves (Assign to Me).
- Approve or reject requests. Rejection requires a comment.
- View fulfillment logs and notification history.
- Manage connector configuration, question configuration, and notification settings.
- Post comments with file attachments on any request.
Users with the System Administrator role have access to both apps.
Launch Power Shield
You can access Power Shield from three apps in the Copilot Agent Kit solution. Choose the launch option that matches your role and workflow.
| App | Type | Audience | Internal name |
|---|---|---|---|
| Copilot Agent Kit | Model-driven app | All users (auto-routes by role) | cat_CopilotStudioAccelerator |
| Copilot Agent Kit for Admins | Code app | Admins | cat_copilotstudiokitforadmins |
| Copilot Agent Kit for Makers | Code app | Makers | cat_copilotstudiokitformakers |
To launch from the Copilot Agent Kit model-driven app:
- Open the Copilot Agent Kit model-driven app.
- In the left navigation pane, expand the Governance area.
- Select Power Shield. The unified launcher detects your security role and routes you to the appropriate code app. The admin app takes precedence if you have both roles.
To launch from a code app:
- Open the Copilot Agent Kit for Admins or Copilot Agent Kit for Makers code app.
- In the left navigation pane, go to Governance > Power Shield.
Maker workflow
The following sections describe the experience for users with the CSK - Maker role.
Home screen (maker view)
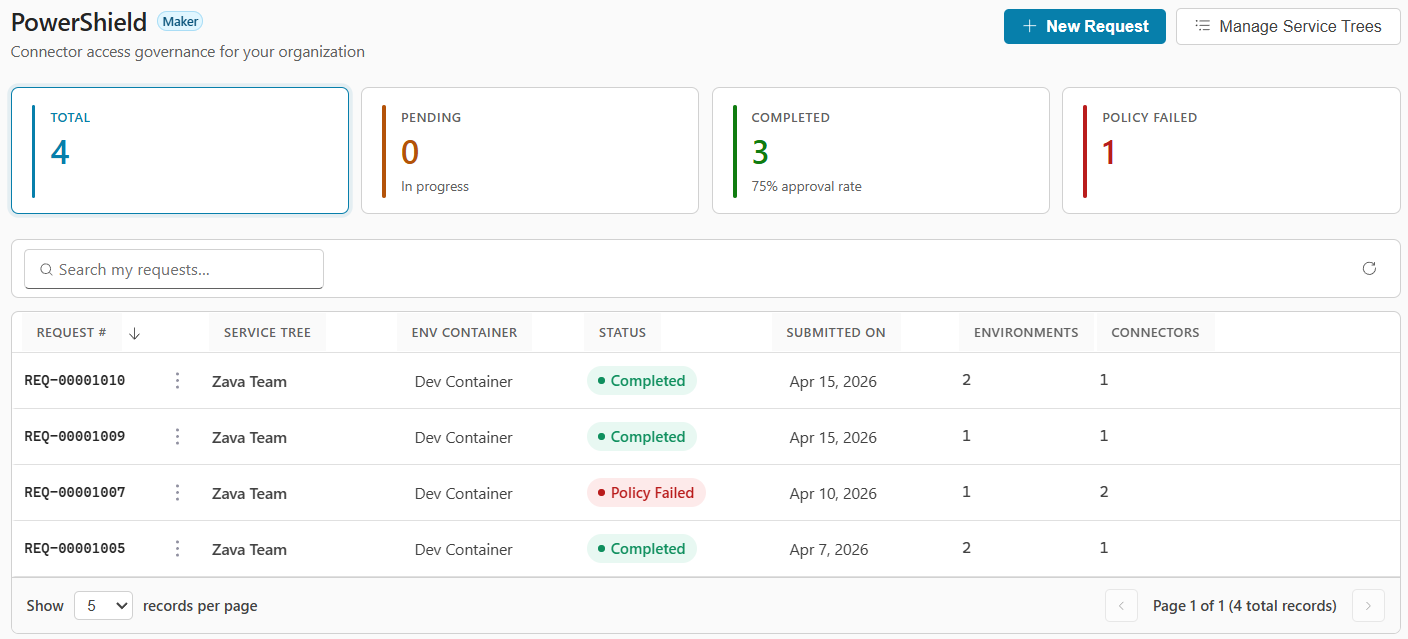
The home screen provides an overview of your connector access requests:
- Header actions: + New Request (launch the wizard) and Manage Service Trees.
- Stat cards: Four cards summarize your request portfolio: Total, Pending, Completed (with approval rate), and Policy Failed. Select a card to filter the grid.
- Request grid: Lists your requests with status, service tree, environment container, connector counts, and submission date. Select a row for details. Use the row action menu for quick Clone and Withdraw actions.
Manage service trees
Each request must be associated with a service tree.
Go to Manage Service Trees from the home screen header. Select Take a tour for a guided walkthrough.
The page uses a two-level drilldown:
- Service Trees list: View all trees where you're a member. Search by name. Select a tree to drill in.
- Service Tree detail: View and edit details across the Details and Environment Containers tabs.

Create a service tree
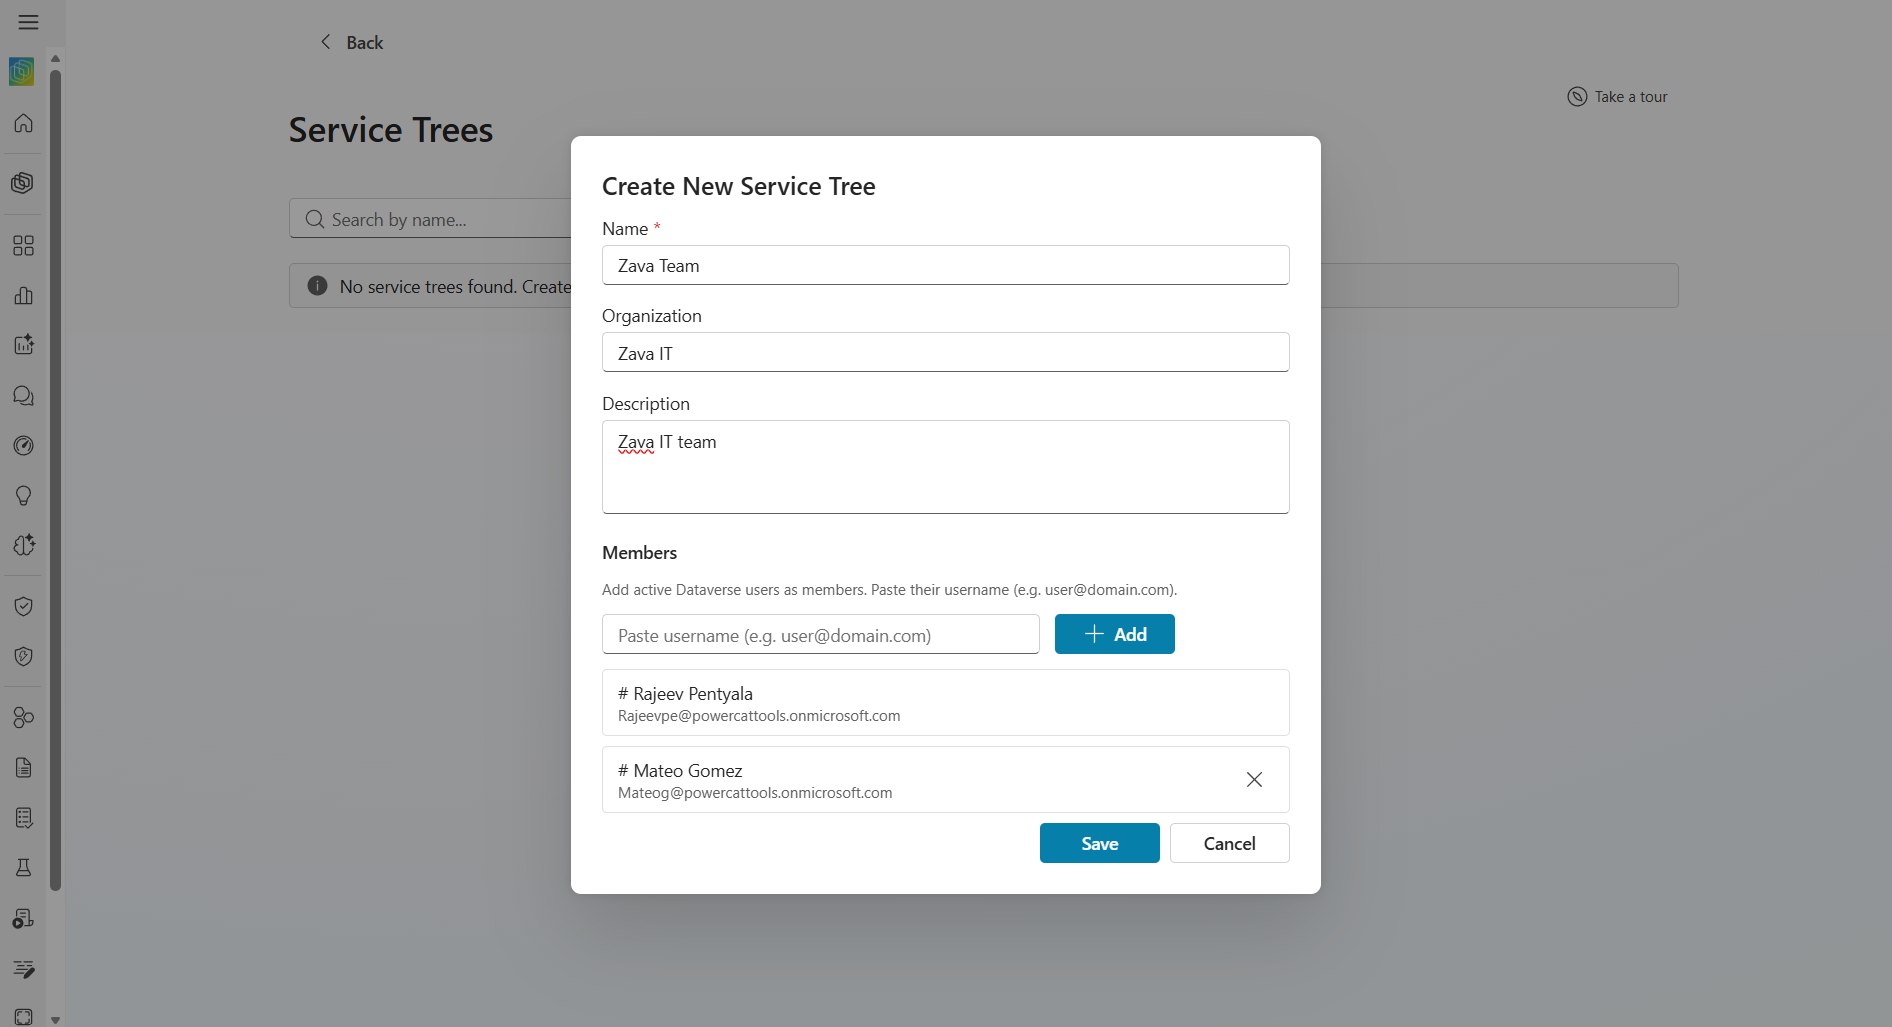
To create a new service tree:
Select + New Service Tree on the list page or during the wizard (Step 1).
Enter the following information:
- Name: A name for the service tree.
- Organization: The organization associated with the service tree (optional).
- Description: A description for the service tree (optional).
- Members: Paste a username (for example,
user@domain.com) and select + Add. You're automatically the first member.
Only members of a service tree can see it and submit requests under it.
Manage environment containers
Environment containers group Power Platform environments within a service tree. Go to a service tree's Environment Containers tab.
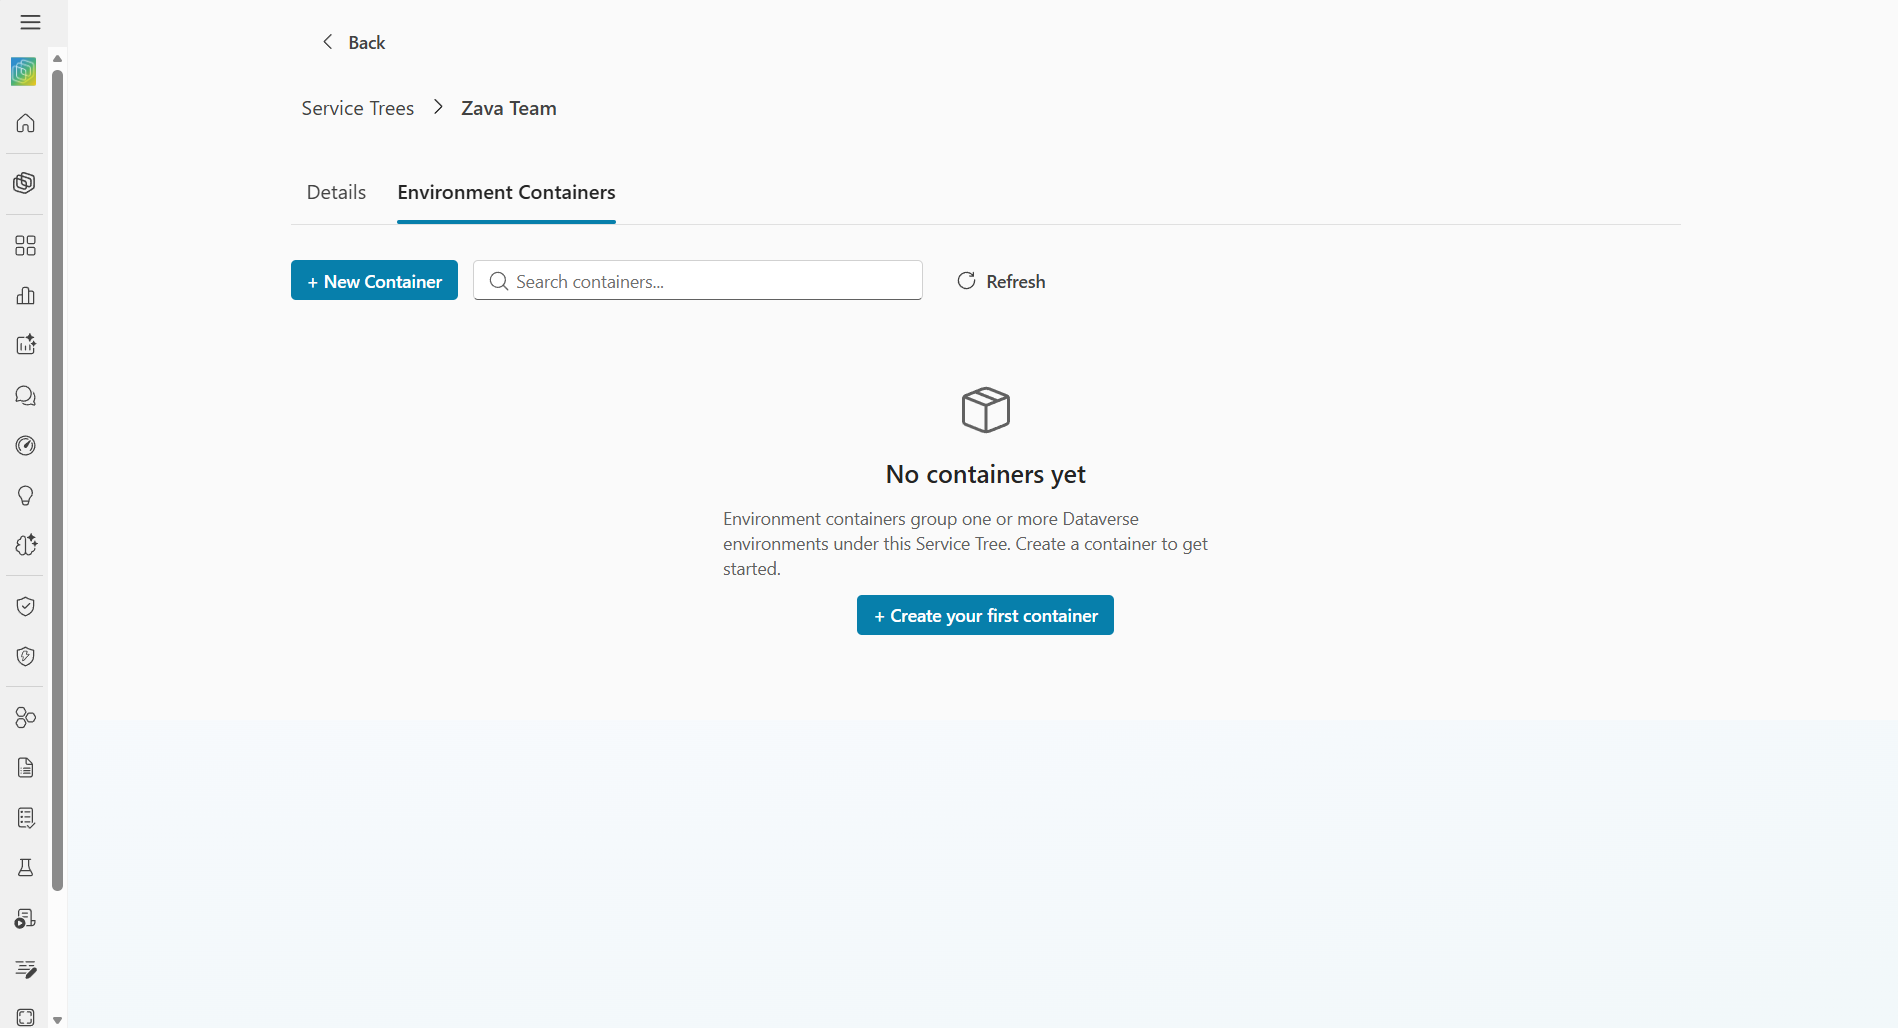
Create an environment container
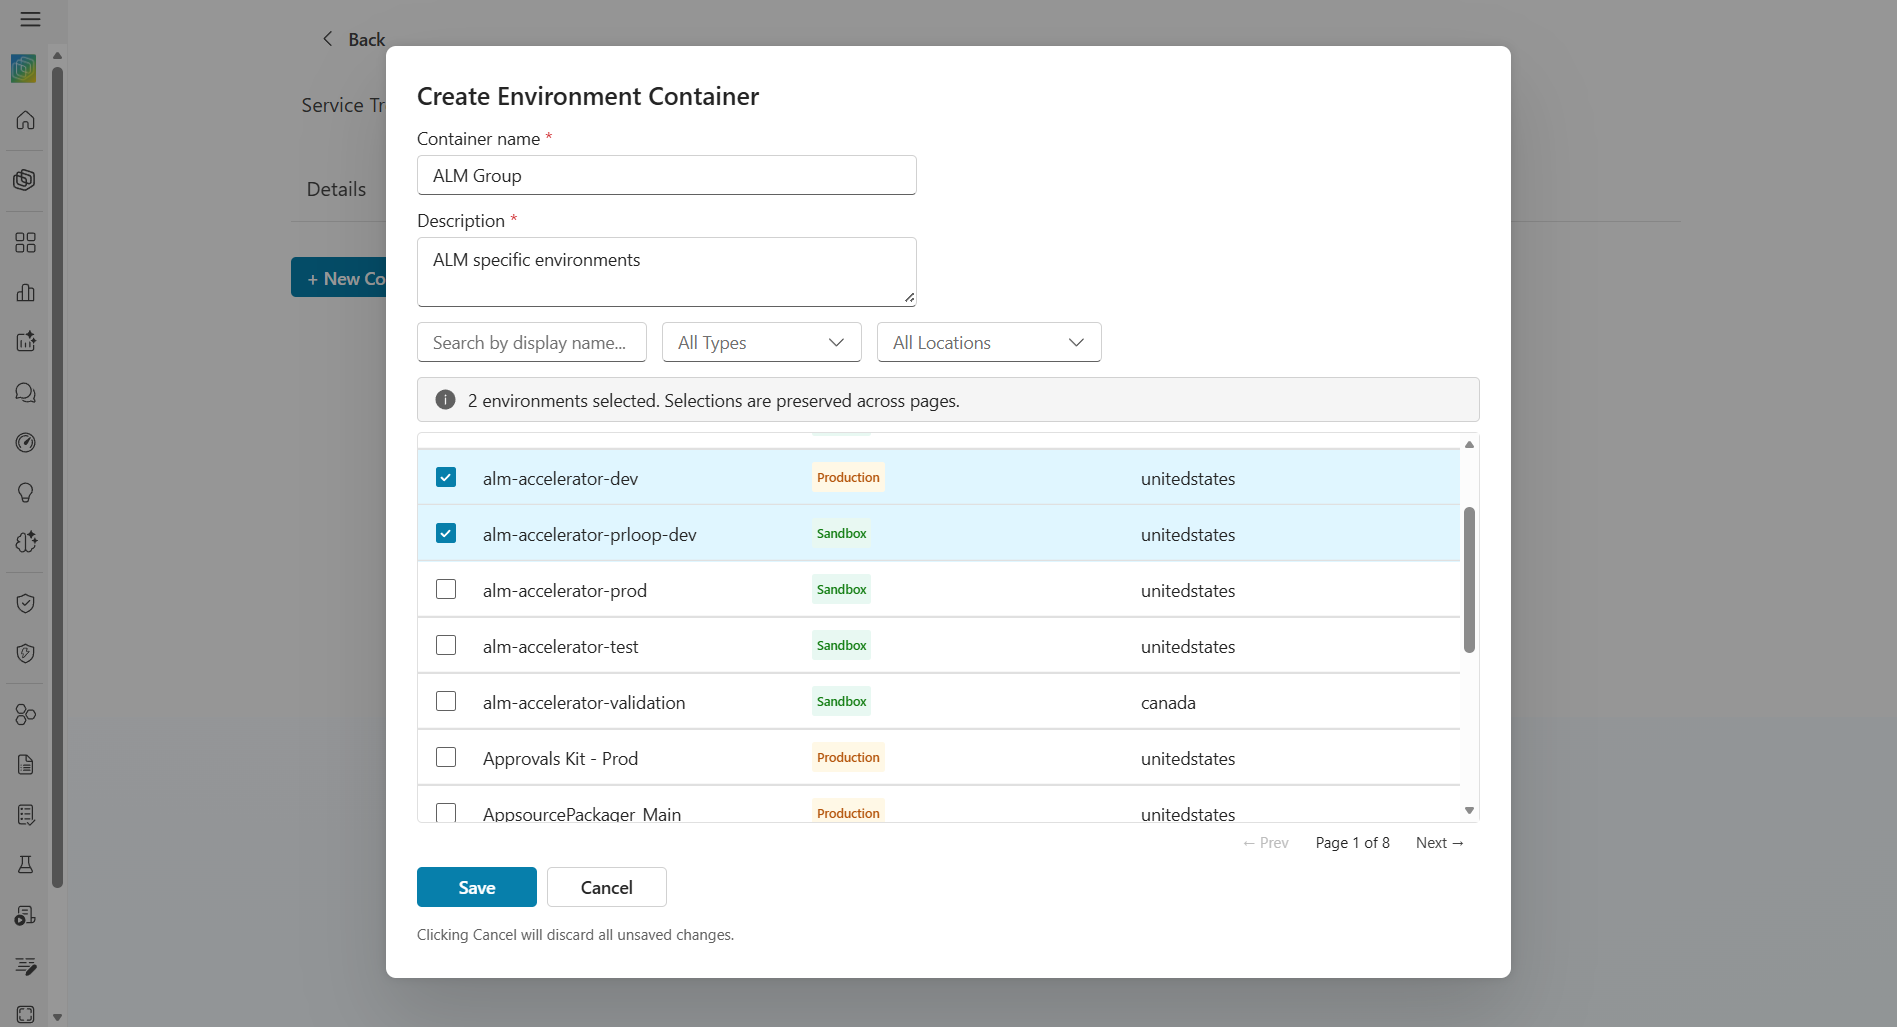
To create an environment container:
- Select + New Container.
- Enter a Container name and Description.
- Filter environments by display name, Type (Production, Sandbox, and so on), and Location.
- Select one or more environments by using the check boxes.
- Select Save.
Create a new request
Select + New Request on the home screen. The wizard guides you through five steps. If no compliance questionnaire is configured, Step 2 is automatically skipped.
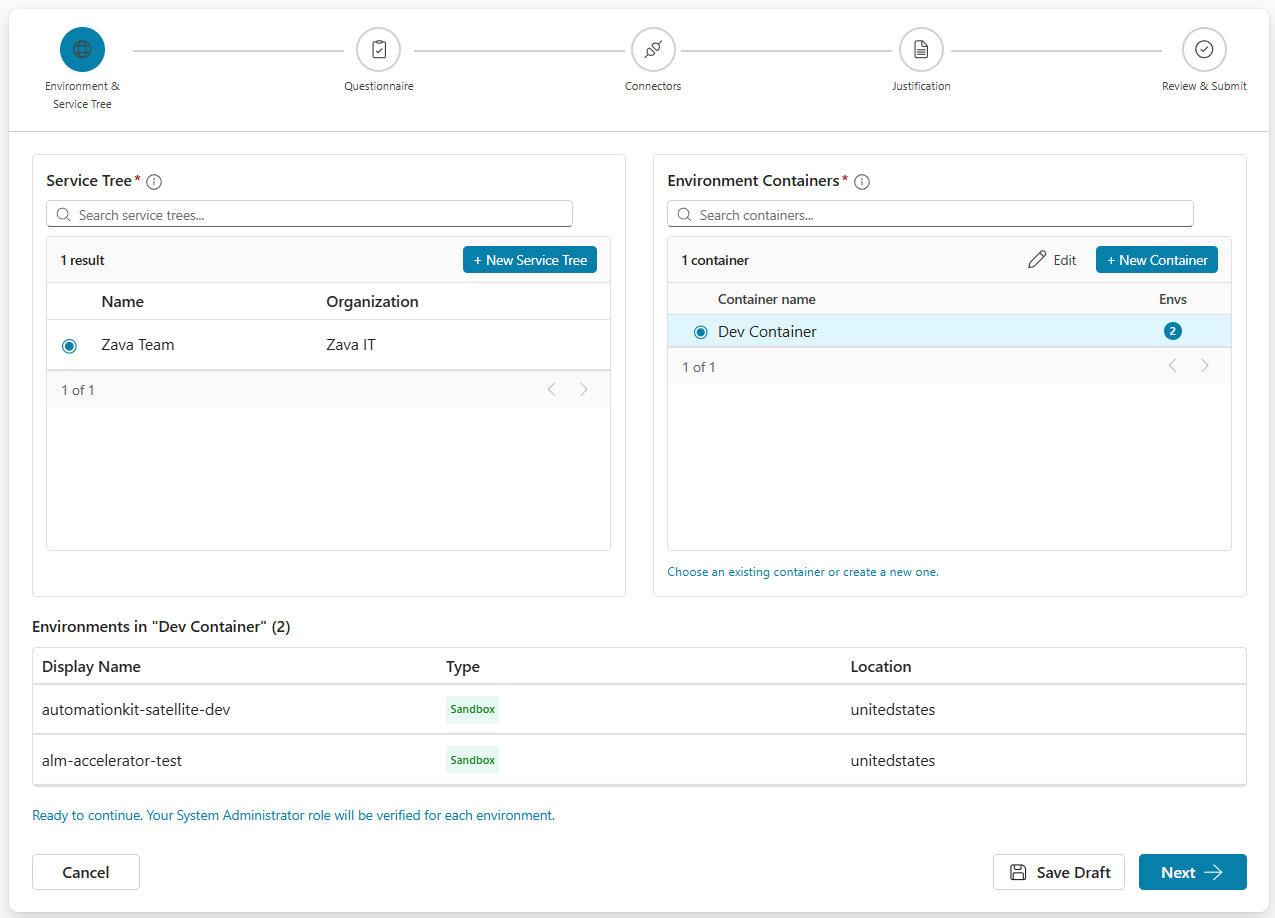
Step 1: Environment and service tree
Select the service tree and environment container for your request.
- Left panel: Select a service tree. Only trees where you're a member are listed. Create new ones inline with + New Service Tree.
- Right panel: Select an environment container. Edit existing containers or create new ones inline. The environments in the selected container are displayed in a read-only table.
Validation requirements:
- A service tree and an environment container must be selected.
- No in-progress conflict. Only one active request per service tree at a time.
- You must have the System Administrator role in each environment. Selecting Next validates this. Unauthorized environments are flagged in a dialog.
Step 2: Compliance questionnaire
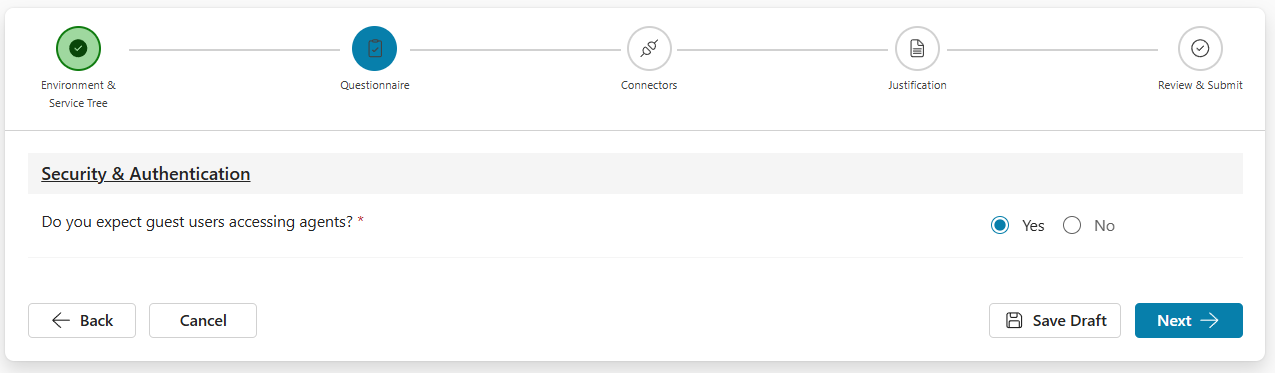
Answer the compliance questions grouped by category. This step is skipped automatically if no questionnaire is configured. Supported types are Yes/No, Text, Single-select, Multi-select, and Date. Some questions might be conditional. Required questions are marked with an asterisk (*).
Step 3: Connector selection
Select the connectors for your data policy. Filter by publisher, tier, release, and risk level.
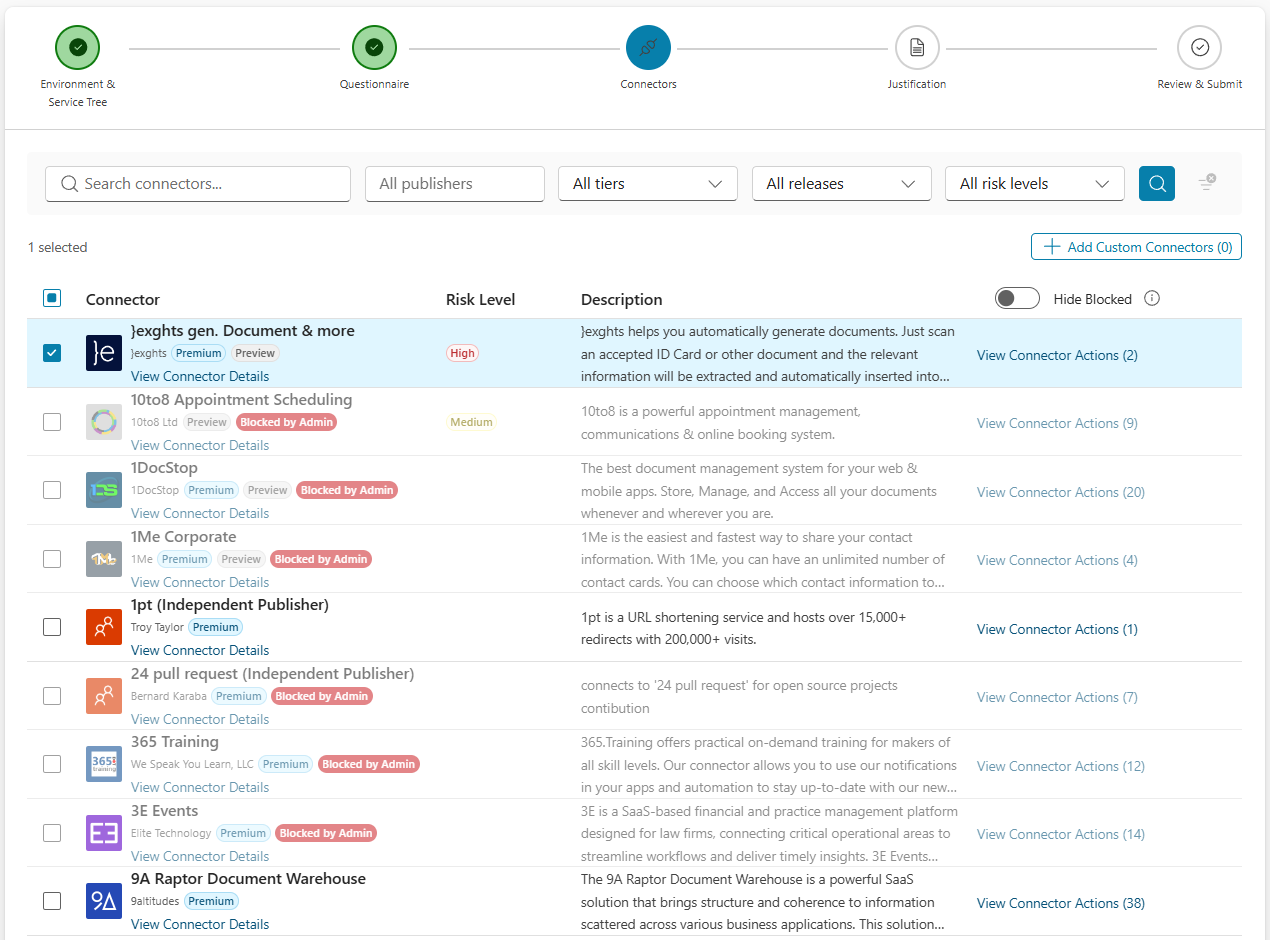
Use the Hide Blocked toggle to show or hide connectors blocked by an admin. Blocked connectors display a Blocked by Admin badge and can't be selected. Learn more in Key concepts.
Other options on this step:
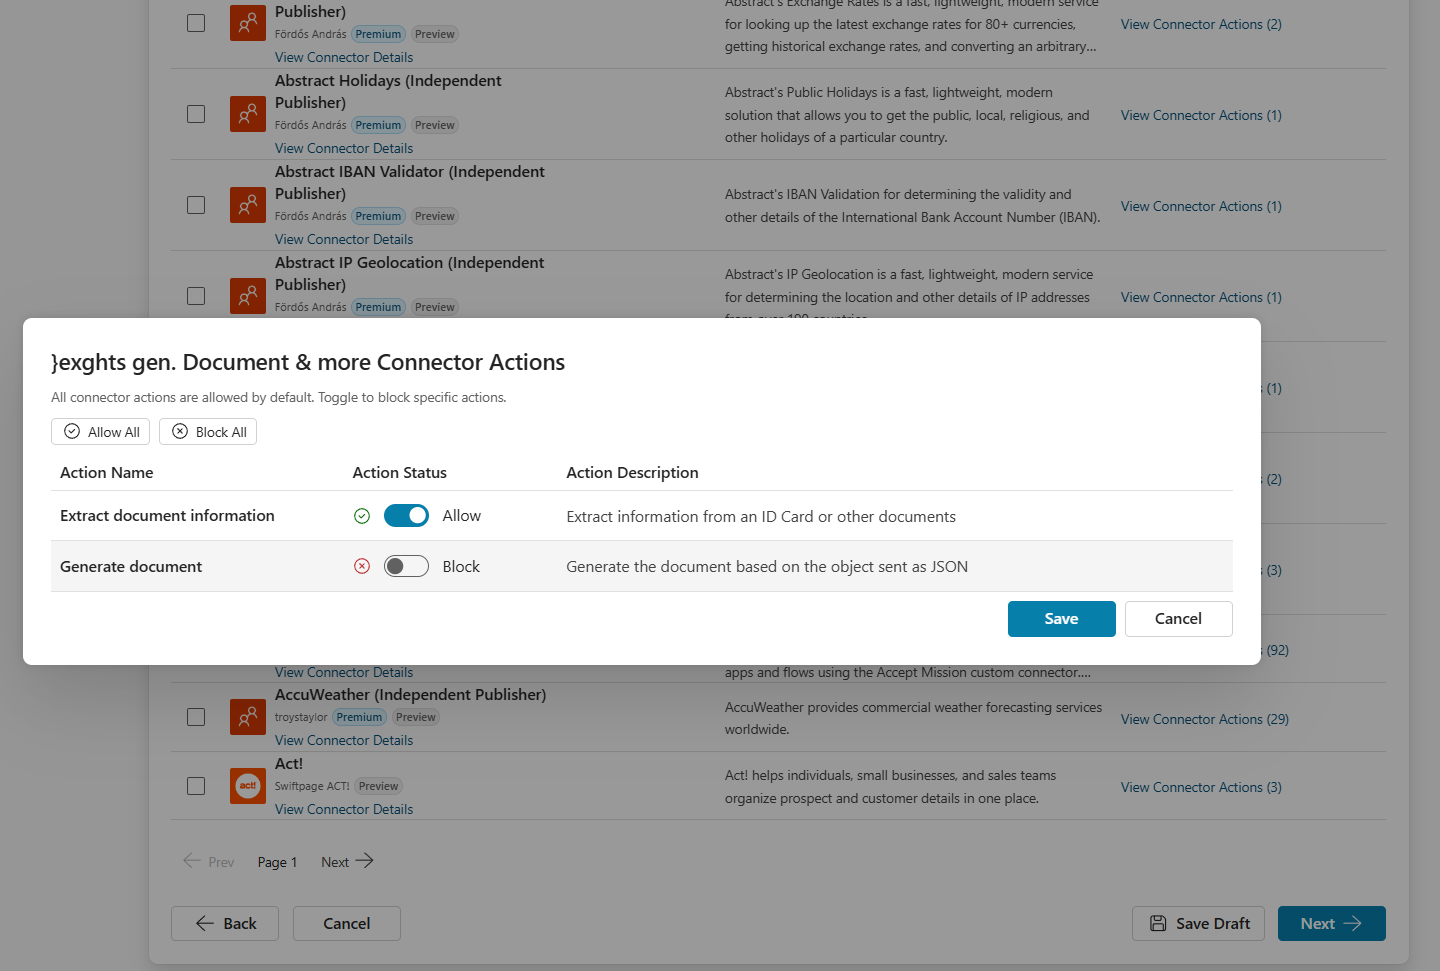
Connector actions: Select View Connector Actions on any connector to configure per-action Allow/Block rules. Use Allow All or Block All for bulk changes.
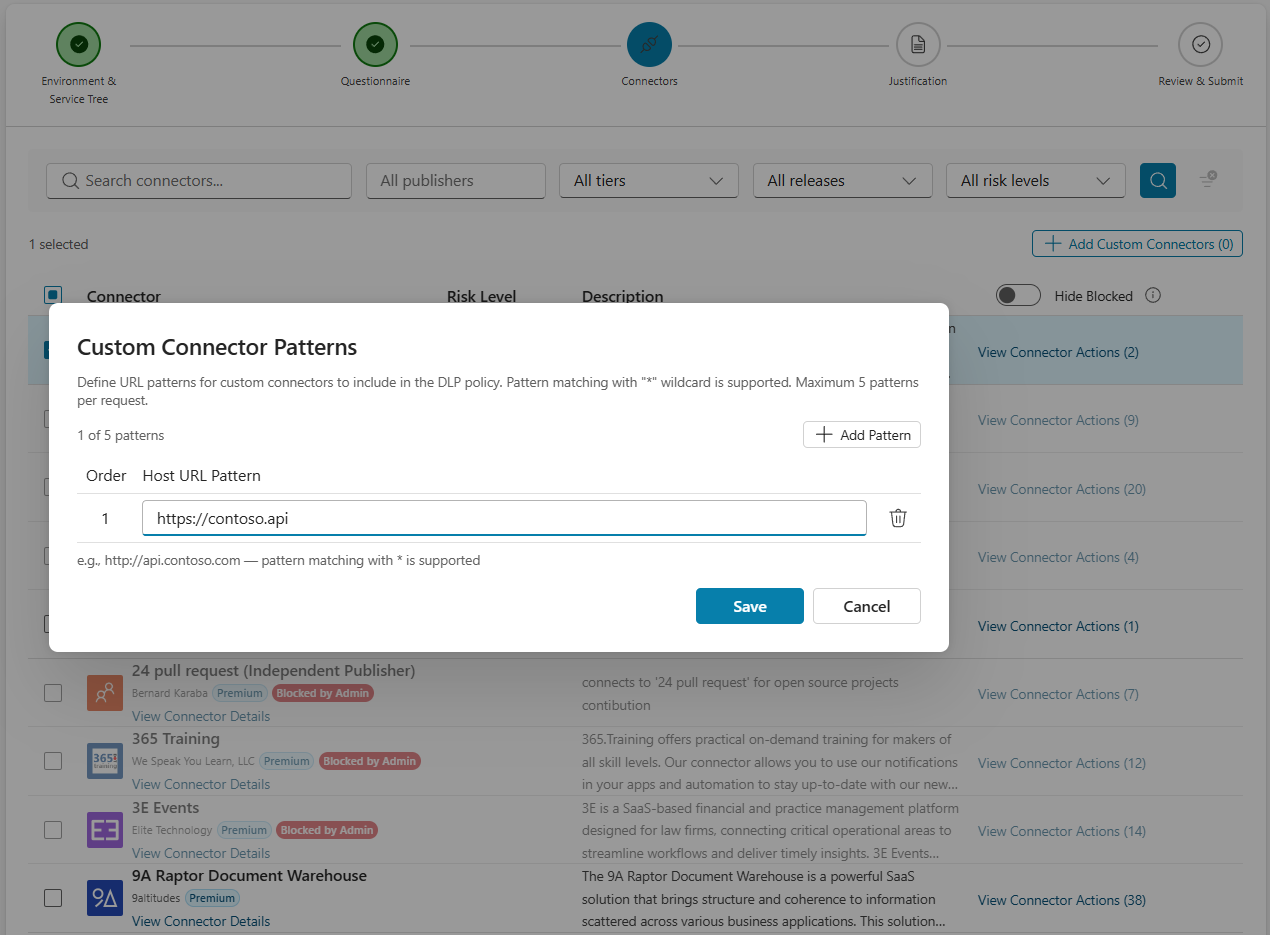
Custom connector patterns: Select + Add Custom Connectors to define URL patterns (maximum five per request).
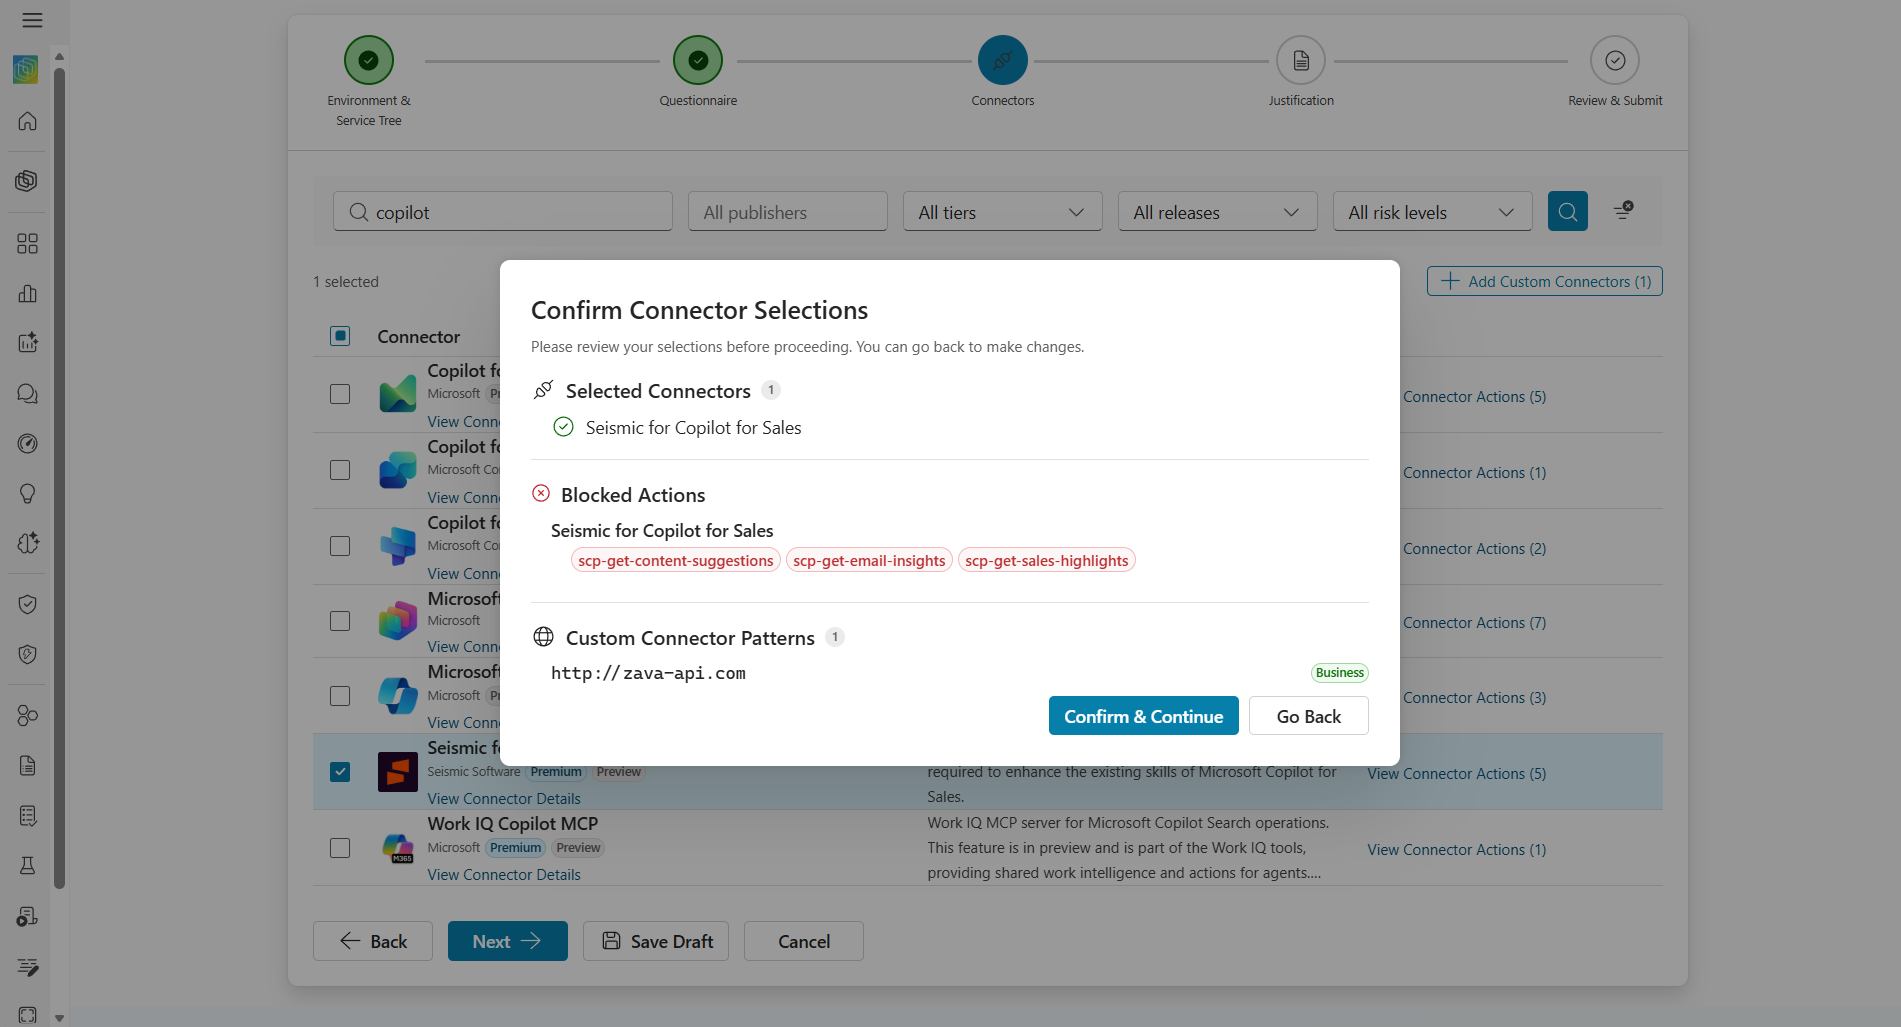
Confirm selections: Selecting Next opens a confirmation dialog that summarizes selected connectors, blocked actions, and custom patterns.
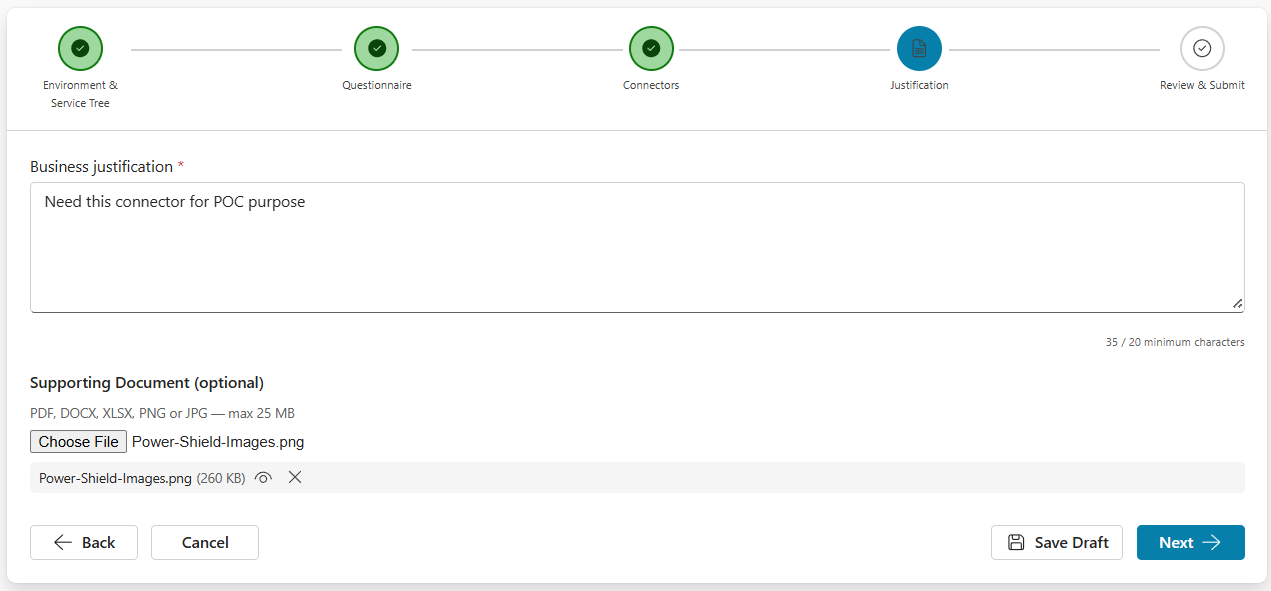
Step 4: Business justification
Enter the following information:
- Business justification (required): 20-character minimum
- Supporting Document (optional): Single file (PDF, DOCX, XLSX, PNG, or JPG, maximum 25 MB)
Step 5: Review and submit
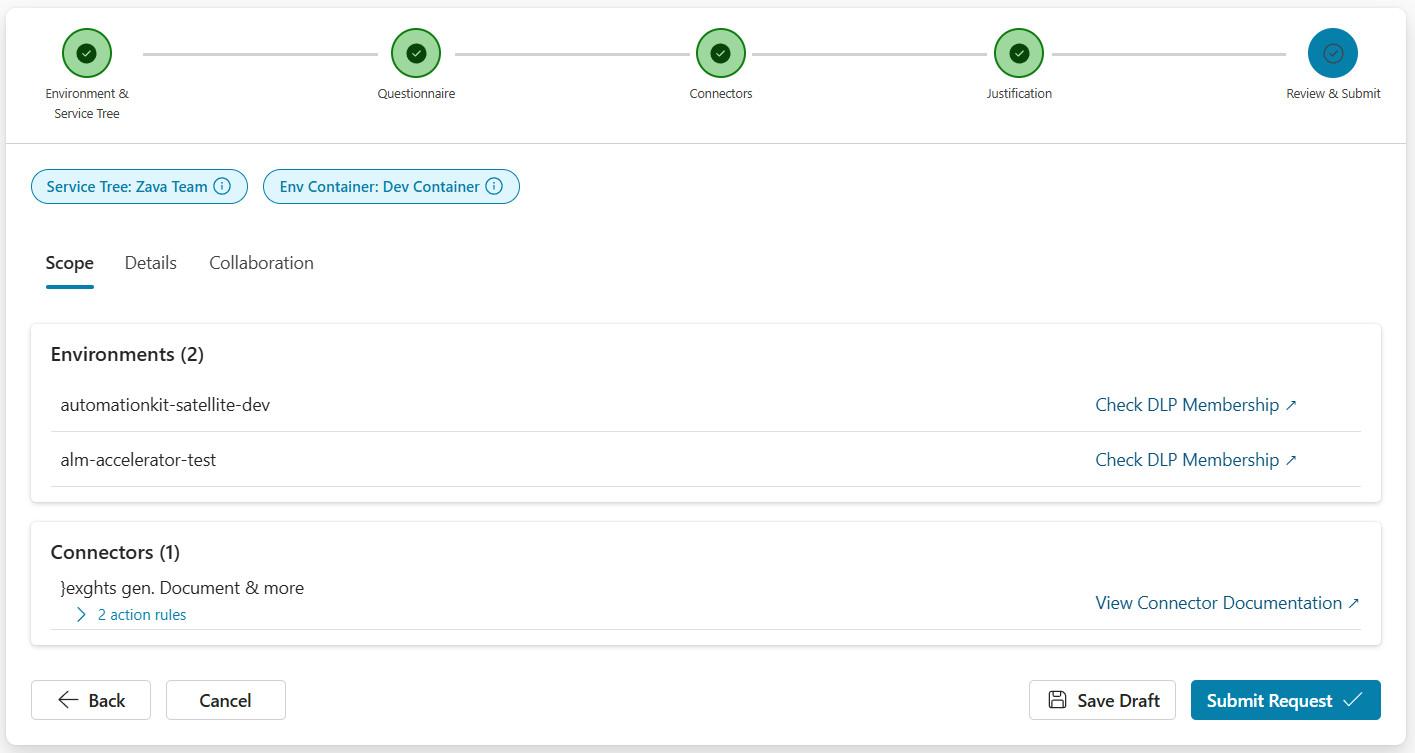
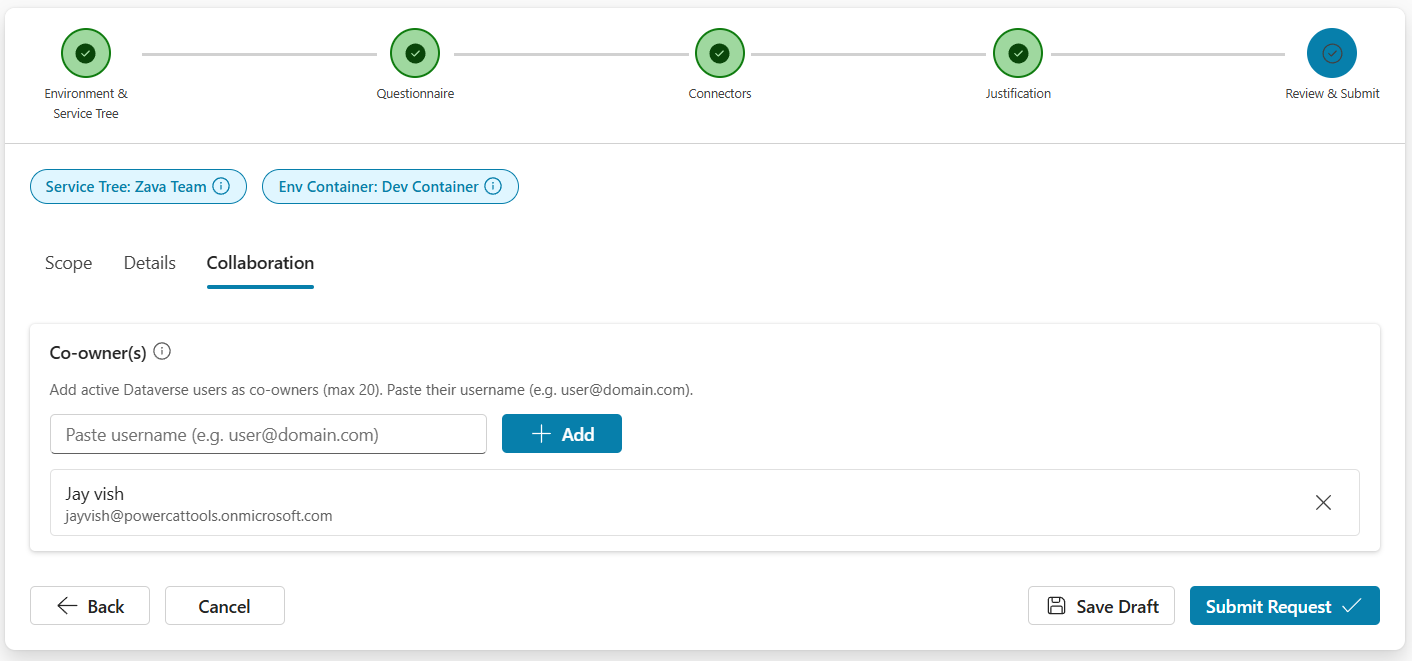
Review your request across three tabs before submission:
Scope: Environments (with Check DLP Membership links), connectors (with expandable action rules), and custom patterns.
Details: Questionnaire answers, justification, and supporting document.
Collaboration: Add co-owners (maximum 20) who receive read/write access to the request.
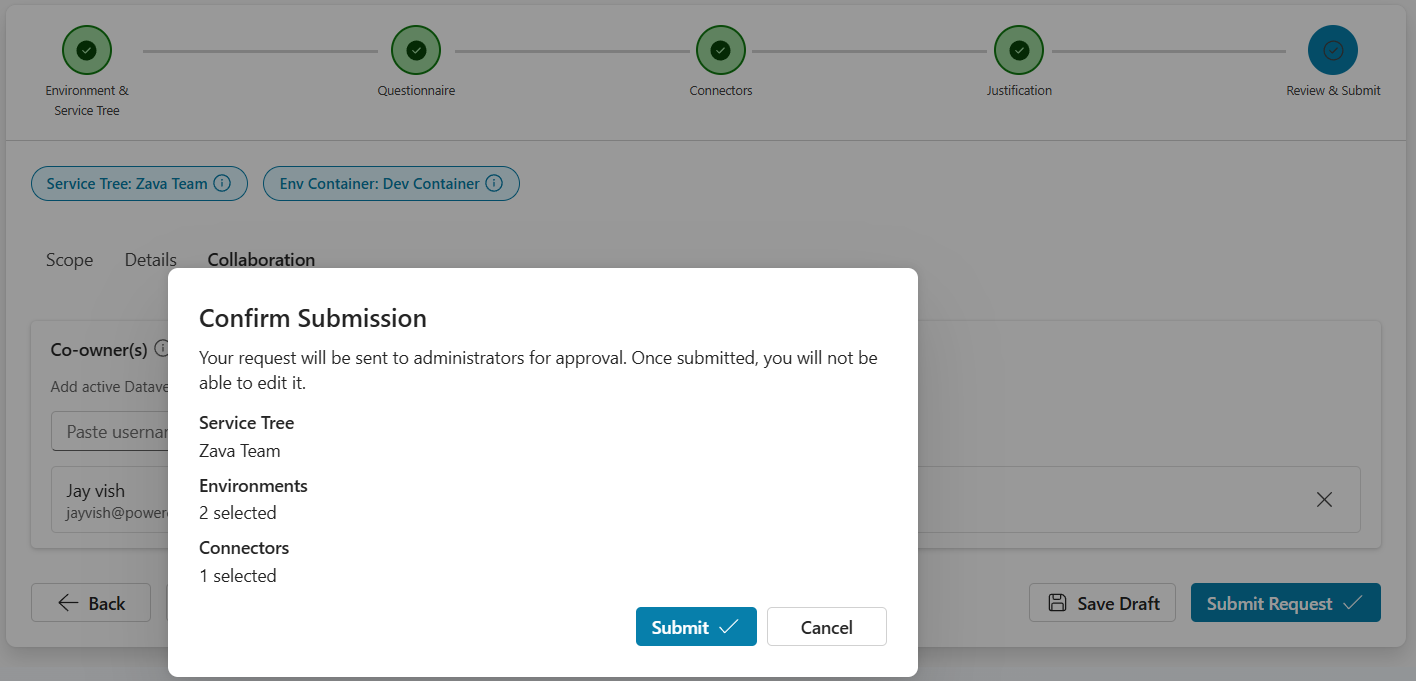
Select Submit Request to open the confirmation dialog, and then select Submit to finalize. You can't edit submitted requests.
Note
The admin comment (formal decision record on the Summary tab) is distinct from the Comments thread (ongoing discussion on the Comments tab).
Save a draft and resume
You can save your request as a draft at any wizard step and return later.
- Select Save Draft. The option is available after Step 1 requirements are met.
- To resume, open the draft and select Resume Draft, or select the draft row on the home screen. The wizard reopens at the step where you left off, with all data restored.
Drafts don't enforce full validation. You can save without completing required fields.
Withdraw a request
You can withdraw a request in Draft or Submitted status.
- Open the request detail view or select the three dots (⋮) of the request you want to withdraw.
- Select Withdraw and confirm. The request moves to Withdrawn status (read-only).
Revise and resubmit a request
To revise a withdrawn request:
- Open the withdrawn request and select Revise & Resubmit.
- Confirm that a new request is created with the previous data.
- The wizard opens at Step 1 with prepopulated data. Reattach the supporting document.
- Make changes and submit.
The original withdrawn request remains unchanged for audit purposes.
Clone a request
You can clone any request to create a new draft with the same configuration.
- Select the three dots (⋮) for the request you want to clone.
- Select Clone and confirm. A new draft request is created.
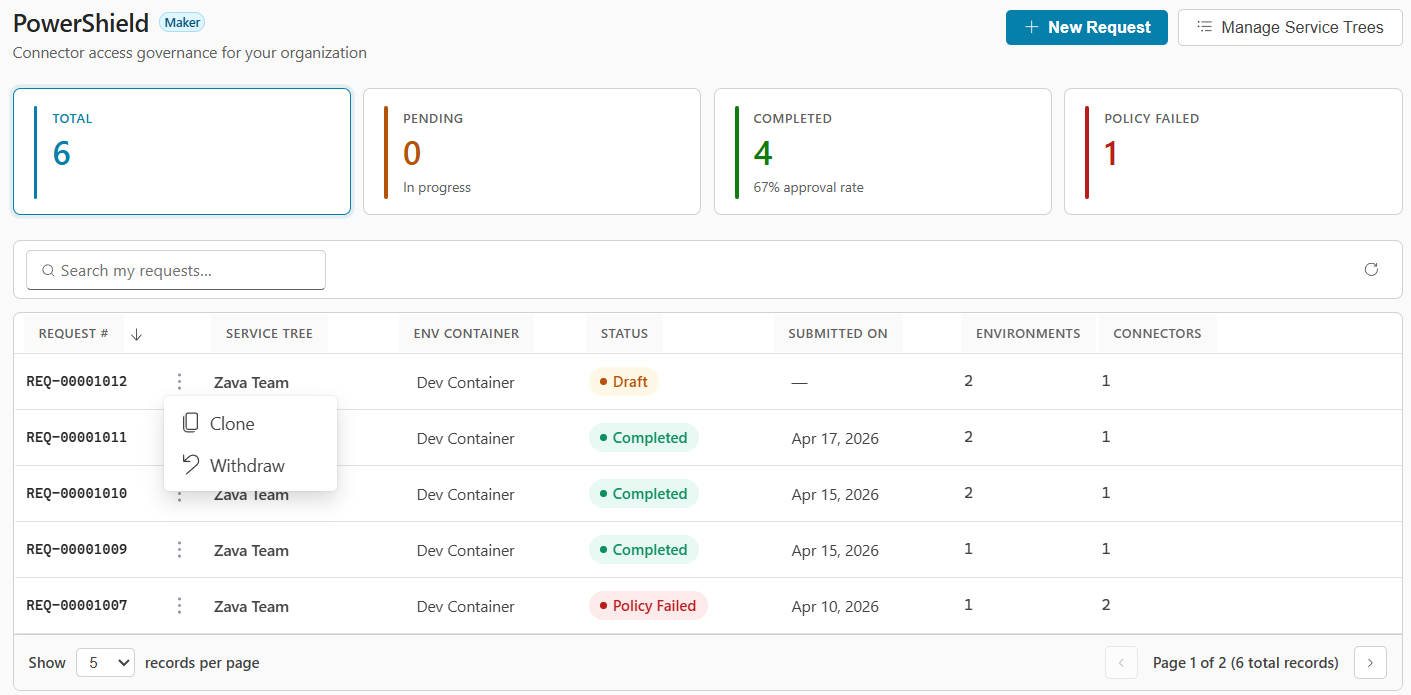
The following data is copied: Service tree, environment container, environments, connectors (with action overrides), custom patterns, questionnaire answers, and justification. The process doesn't copy co-owners or supporting documents.
Request detail view (maker)
Select any request row to view its details across two tabs:
- Summary: Full request details, co-owners, and admin comment.
- Comments: Discussion thread with admins. Available after submission.
The actions available on the detail view depend on the request status:
| Status | Available actions |
|---|---|
| Draft | Resume Draft, Withdraw |
| Submitted | Withdraw |
| Withdrawn | Revise & Resubmit |
| All other statuses | Read-only |
Comments and discussion
After submission, use the Comments tab to exchange messages with admins.
- Comments display in a vertical timeline (oldest first). Admin comments have a blue accent.
- Attach files (PDF, DOCX, XLSX, PNG, or JPG, maximum 25 MB each) and preview them in-app.
- Comments are immutable. You can't edit or delete them, which ensures a reliable audit trail.
Admin workflow
The following sections describe the experience for users with the CSK - Administrator role.
Home screen (admin view)
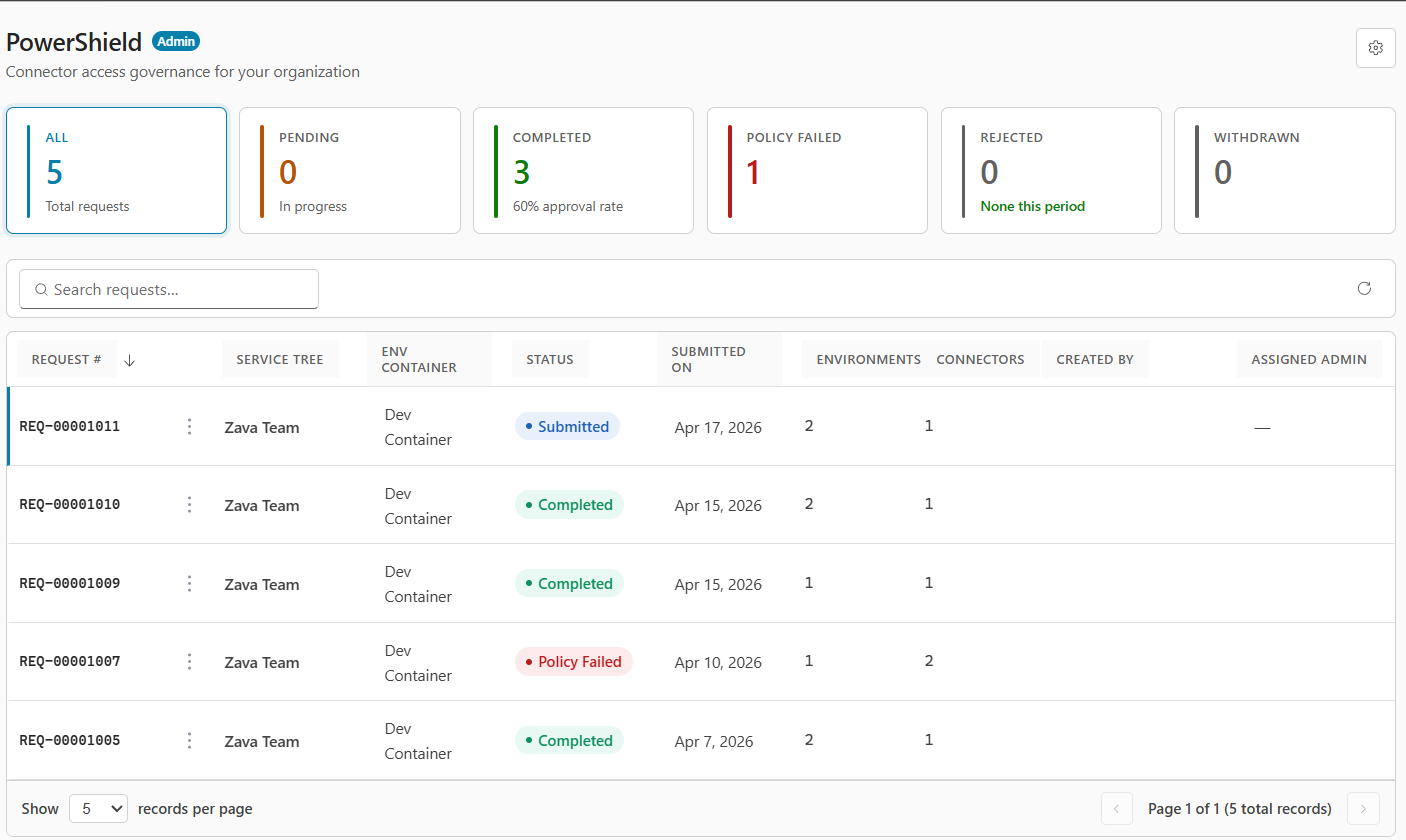
The admin home screen provides a tenant-wide view of all policy requests:
- Stat cards: Six cards: All, Pending, Completed (with approval rate), Policy Failed, Rejected, and Withdrawn. Select a card to filter the grid.
- Settings: Select the gear icon to access the Settings hub.
- Admin grid: Displays all tenant requests with the same columns as the maker grid, plus Created By and Assigned Admin.
Settings hub
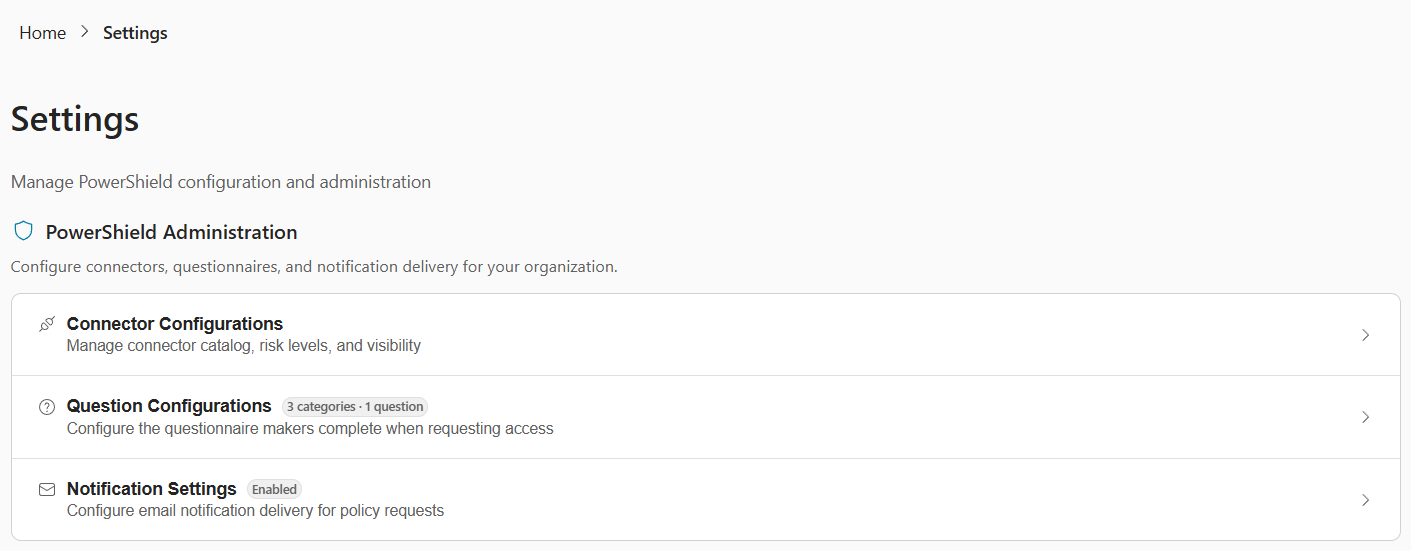
Select the Settings
 icon on the admin home screen to configure Power Shield before processing requests. The hub provides four configuration areas:
| Card | Description |
|---|---|
| Connection Health | Manage connection references and cloud flows for data sync. |
| Connector Configurations | Manage the connector catalog, risk levels, and blocked status. |
| Question Configurations | Configure the compliance questionnaire. |
| Notification Settings | Configure email notification delivery. |
Connection Health
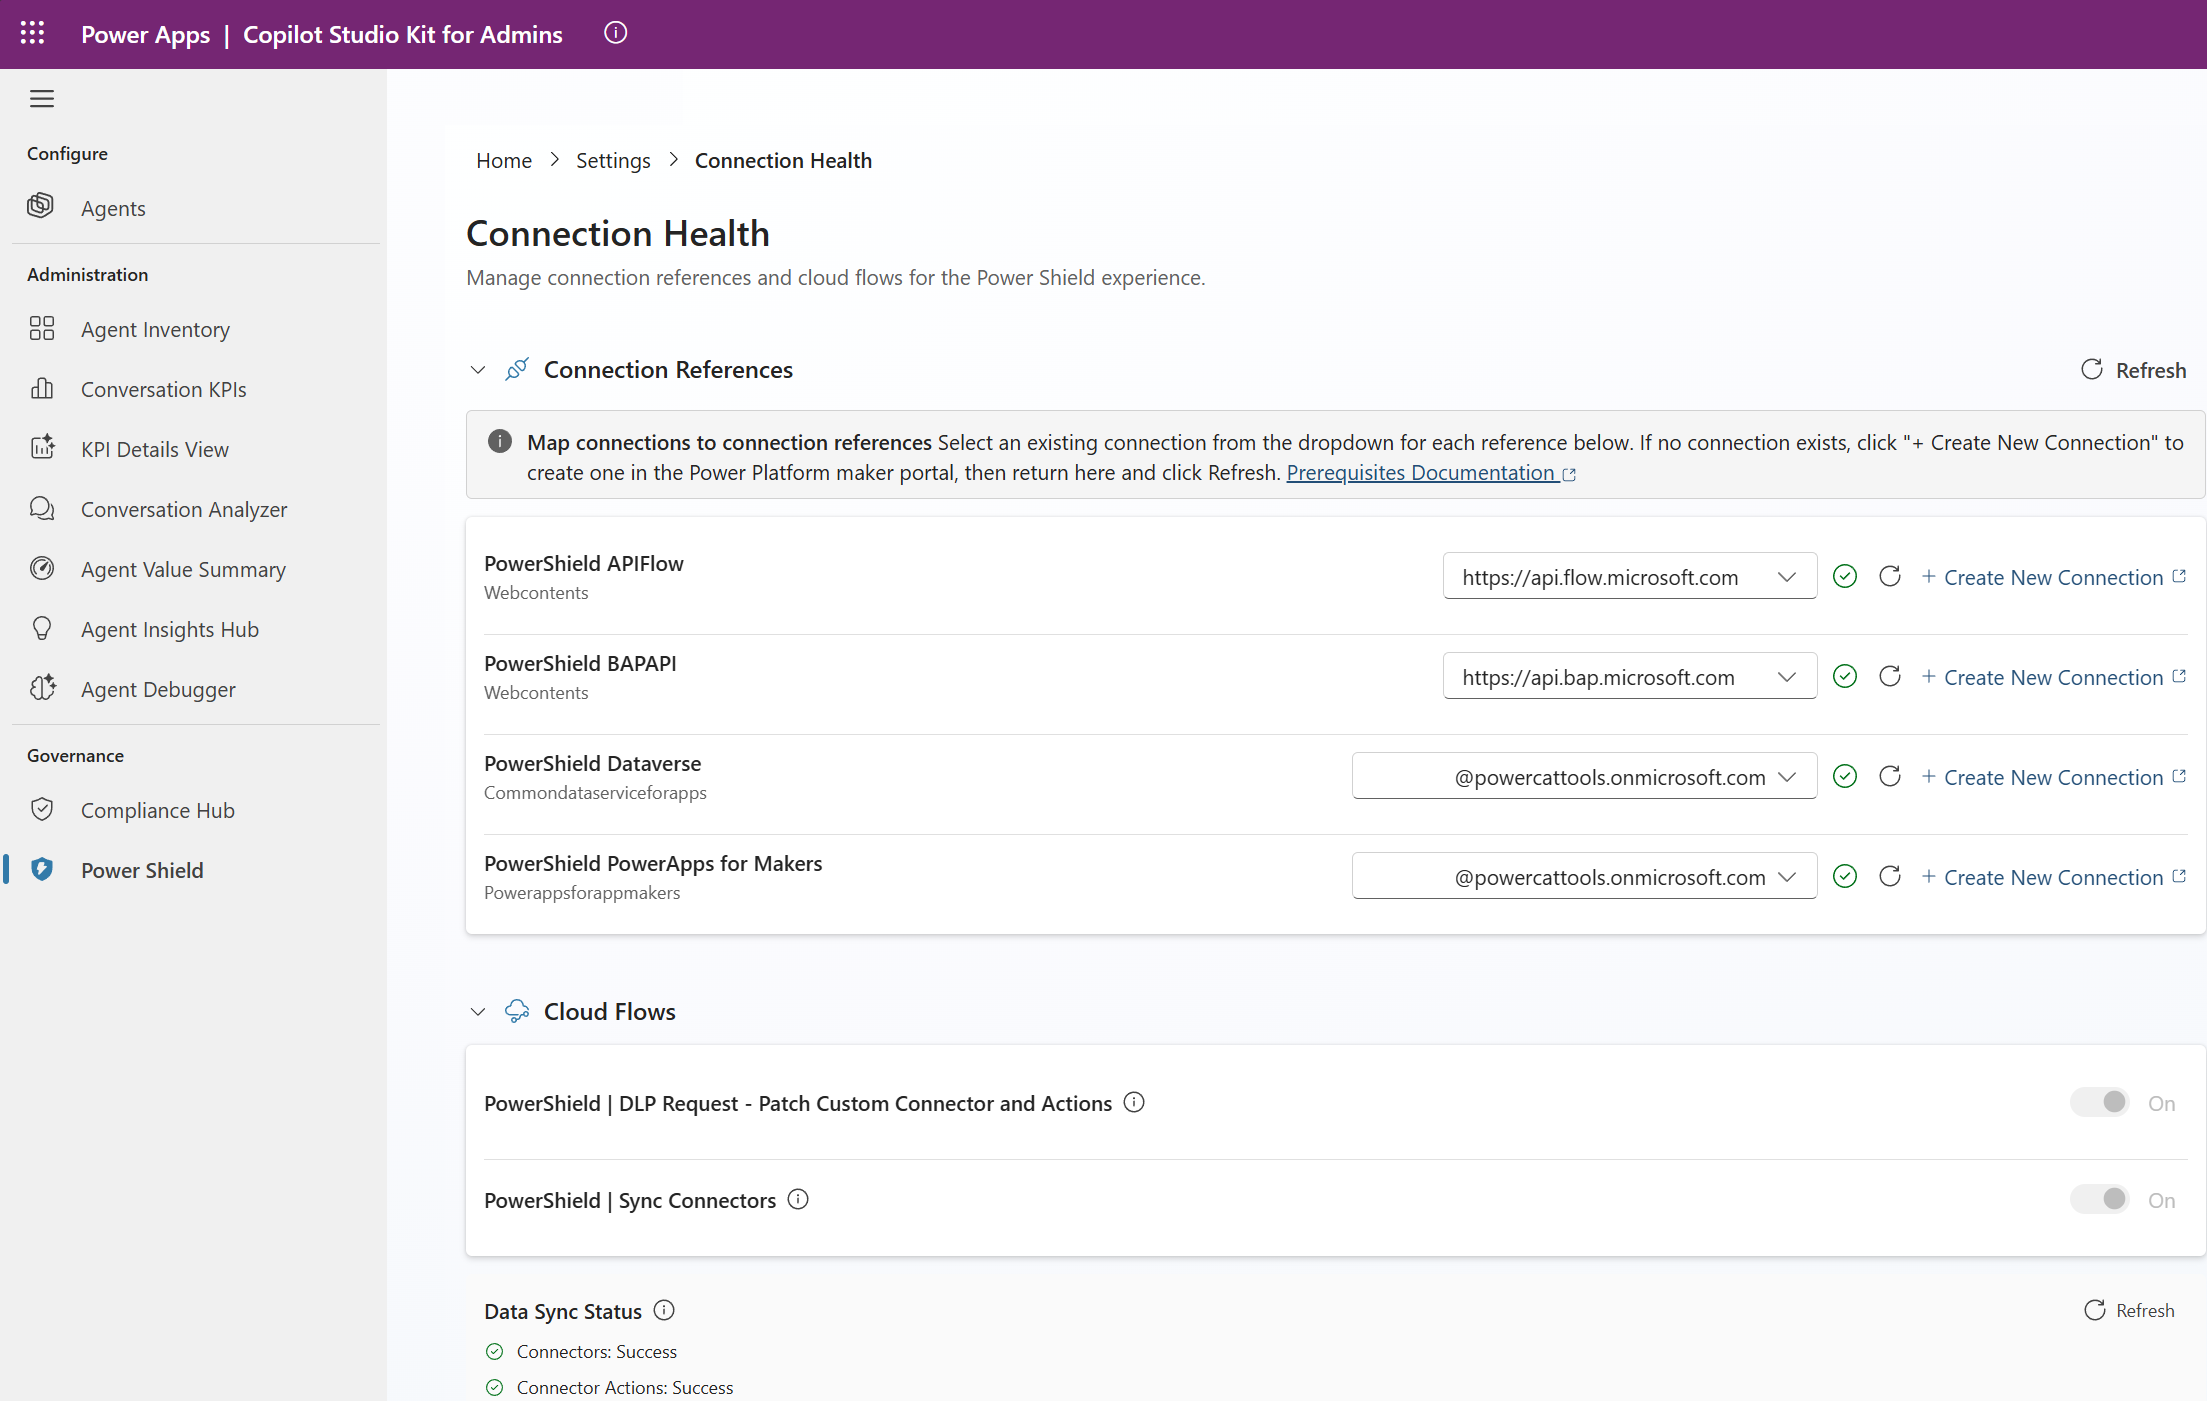
Connection Health is the single place to manage Power Shield connection references and cloud flow activation. Use it for initial setup and ongoing monitoring. Connections can break and flows can be turned off at any time. Only users with the CSK - Administrator or System Administrator security role can access Connection Health.
Open the Connection Health page from either:
- Settings Hub > Connection Health (first card).
- Admin home screen > Check Health on the sync flow prerequisites banner (shown when setup is incomplete).
The Connection Health page has two collapsible sections and a status indicator.
Map connection references
Map existing connections to the four Power Shield connection references. Select a connection from the dropdown for each reference. If no connection exists, select + Create New Connection to open the Power Platform maker portal, create the connection, and then return and select Refresh.
| Connection reference | Connector type |
|---|---|
| PowerShield APIFlow | Web Contents |
| PowerShield BAPAPI | Web Contents |
| PowerShield Dataverse | Common Data Service |
| PowerShield PowerApps for Makers | Power Apps for Makers |
A green check mark appears next to each reference after a connection is successfully mapped.
Cloud flows
After you map all connection references, activate the Power Shield cloud flows by turning on each flow:
| Flow | Purpose |
|---|---|
| PowerShield | Sync Connectors | Populates the connector and connector actions catalog. |
| PowerShield | DLP Request - Patch Custom Connector and Actions | Applies URL patterns and action overrides on DLP approval. |
You can activate cloud flows only after you map all connection references. If connections are missing, a warning appears in this section.
Data sync status
After the Sync Connectors flow runs, the data sync status section confirms whether the connector catalog is populated:
- Connectors: Success - The
cat_connectortable contains data. - Connector Actions: Success - The
cat_connectoractiontable contains data. - Pending - Data isn't synced yet. Wait for the flow to complete, or run it manually from Power Automate.
Select Refresh to recheck data sync status at any time.
Connector configurations
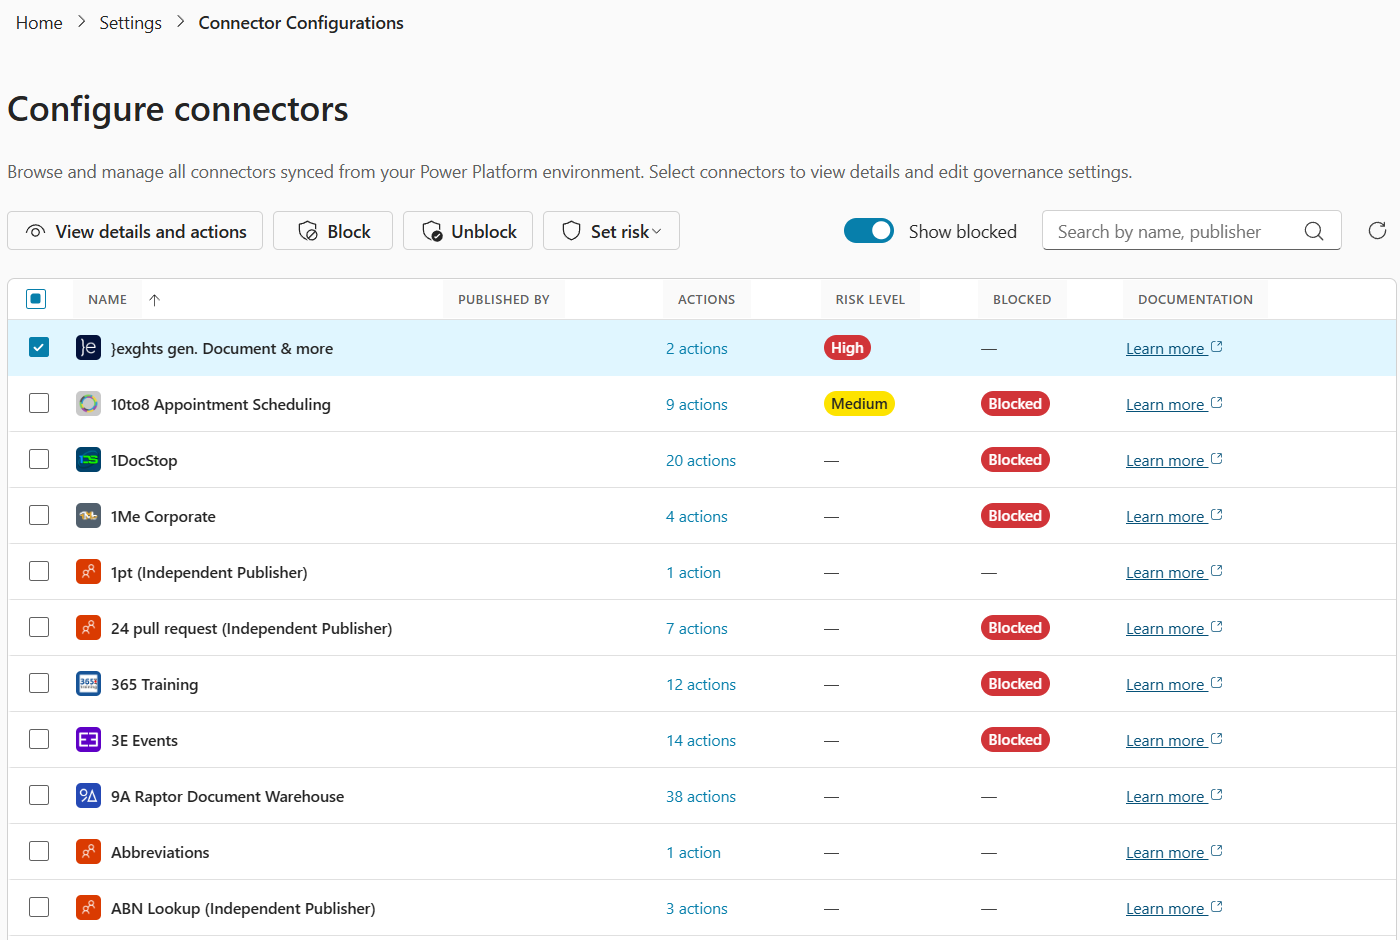
Browse and manage all connectors synced from your Power Platform environment. By default, non-Microsoft connectors are blocked (learn more in Key concepts). Use the Connector Configurations page to selectively unblock them. Blocking and unblocking changes apply immediately. No sync is required.
The toolbar provides options for viewing details and actions, blocking, unblocking, setting risk level, showing blocked items, and searching.
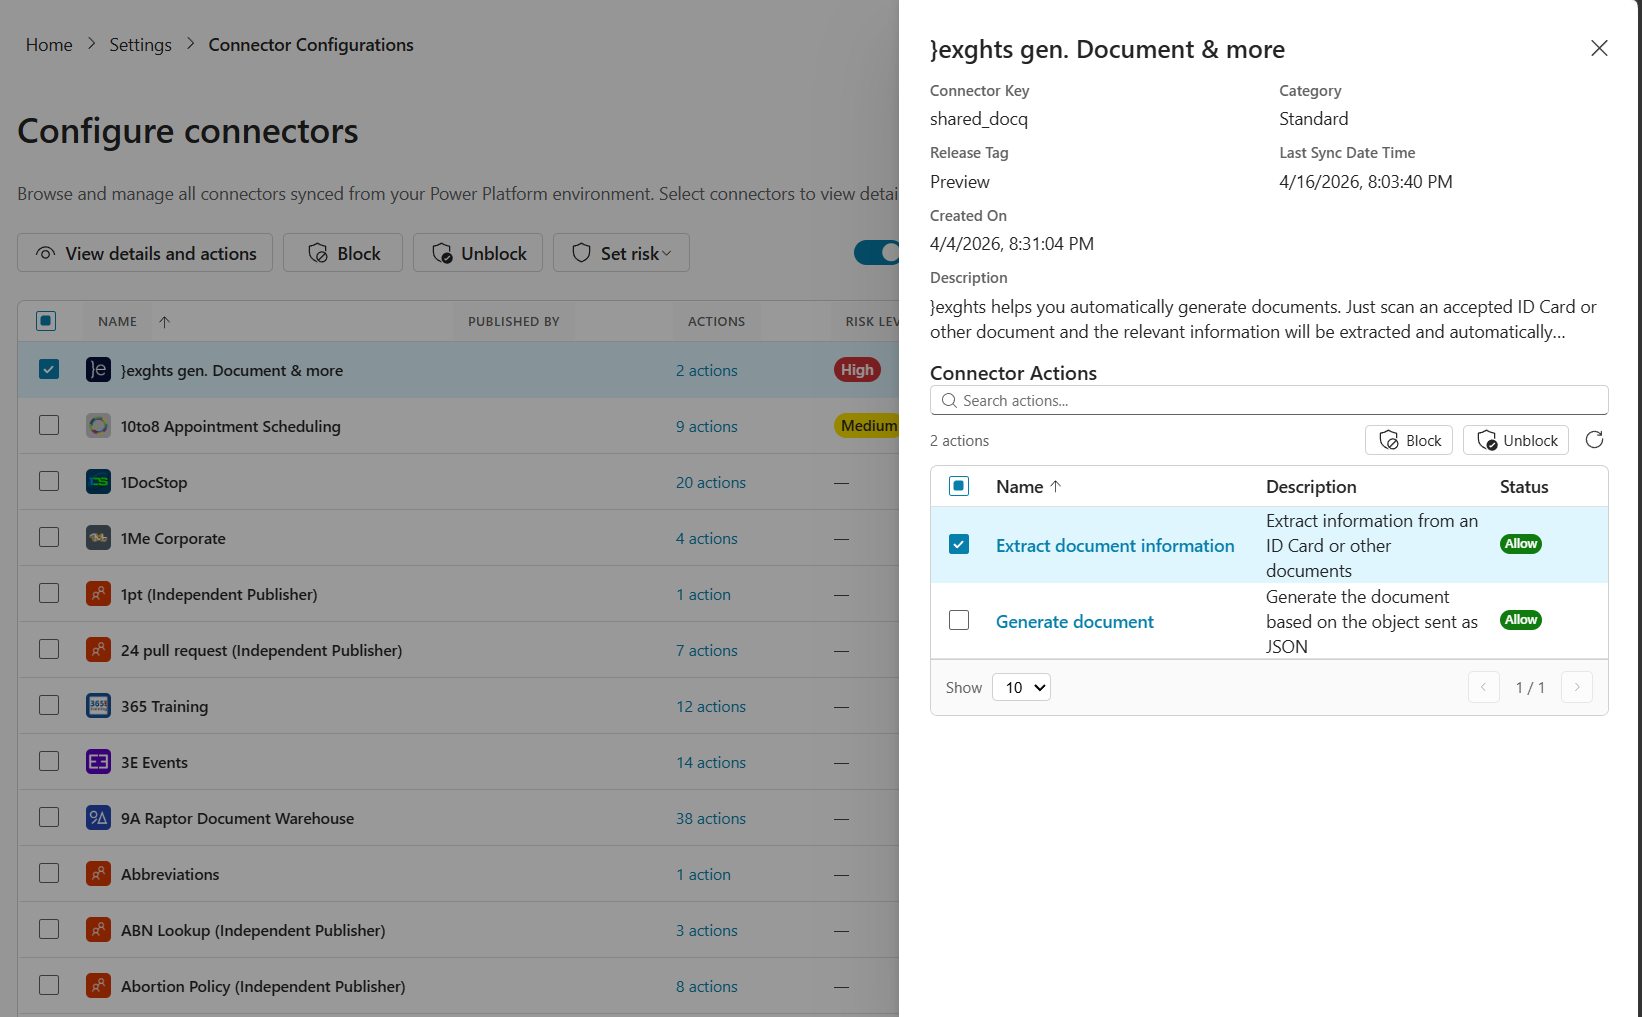
Select a connector to view metadata (key, category, release tag, sync date, description) and manage individual Connector Actions with per-action Block and Unblock controls.
Question configurations
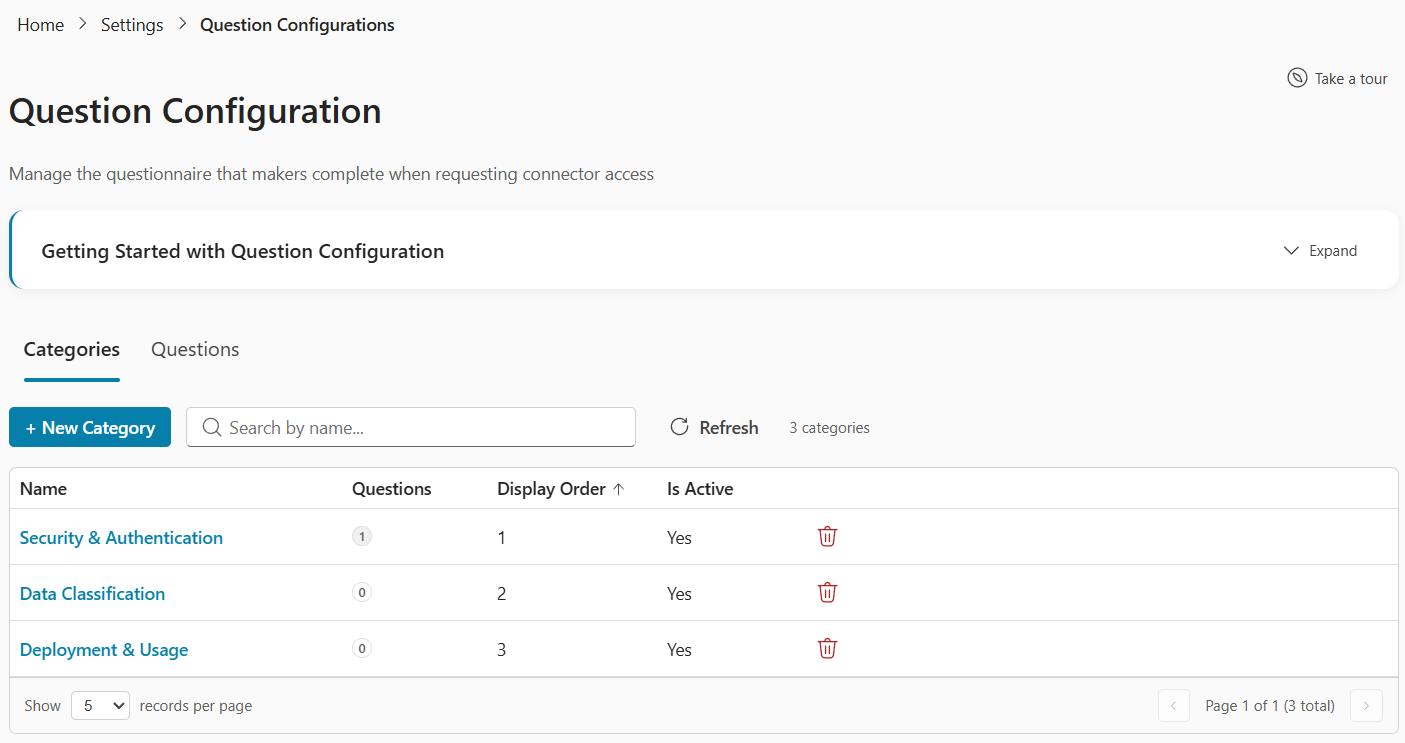
Manage the compliance questionnaire that appears in the maker's wizard (Step 2). The kit ships without question data. Select Take a tour for a guided walkthrough.
The interface has two tabs:
- Categories: Section headers that group questions. Create them with + New Category (name, display order, active status).
- Questions: Individual prompts. Configure answer type (Boolean, Text, Choice, MultiselectChoice, Date), display order, required flag, tooltip, and conditional logic (parent question and trigger value).
For Choice and MultiselectChoice questions, define answer options with + New Option.
Notification settings
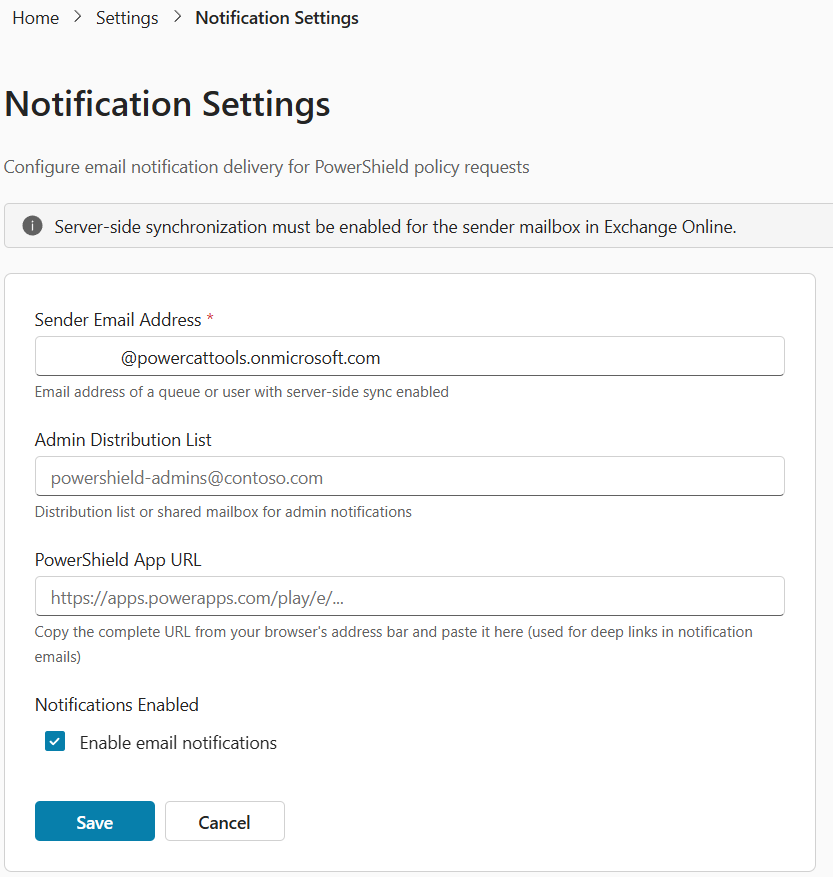
Configure email notification delivery.
| Setting | Description | Required |
|---|---|---|
| Sender Email Address | Queue or user mailbox with server-side sync enabled. | Yes |
| Admin Distribution List | Distribution list or shared mailbox for admin notifications. | No |
| PowerShield App URL | Full app URL for deep links in emails. | No |
| Notifications Enabled | Enable or disable all email notifications. | No |
Important
If you don't configure the sender email address, all email notifications fail silently. Make sure server-side synchronization is enabled for the sender mailbox in Exchange Online.
Review a request
The admin detail view has the following tabs:
- Summary: Full request details (same as the maker view).
- Fulfillment: Data policy details and per-environment fulfillment status.
- Comments: Discussion thread with the maker.
- Activity: Fulfillment audit log.
- Notifications: Email notification history.
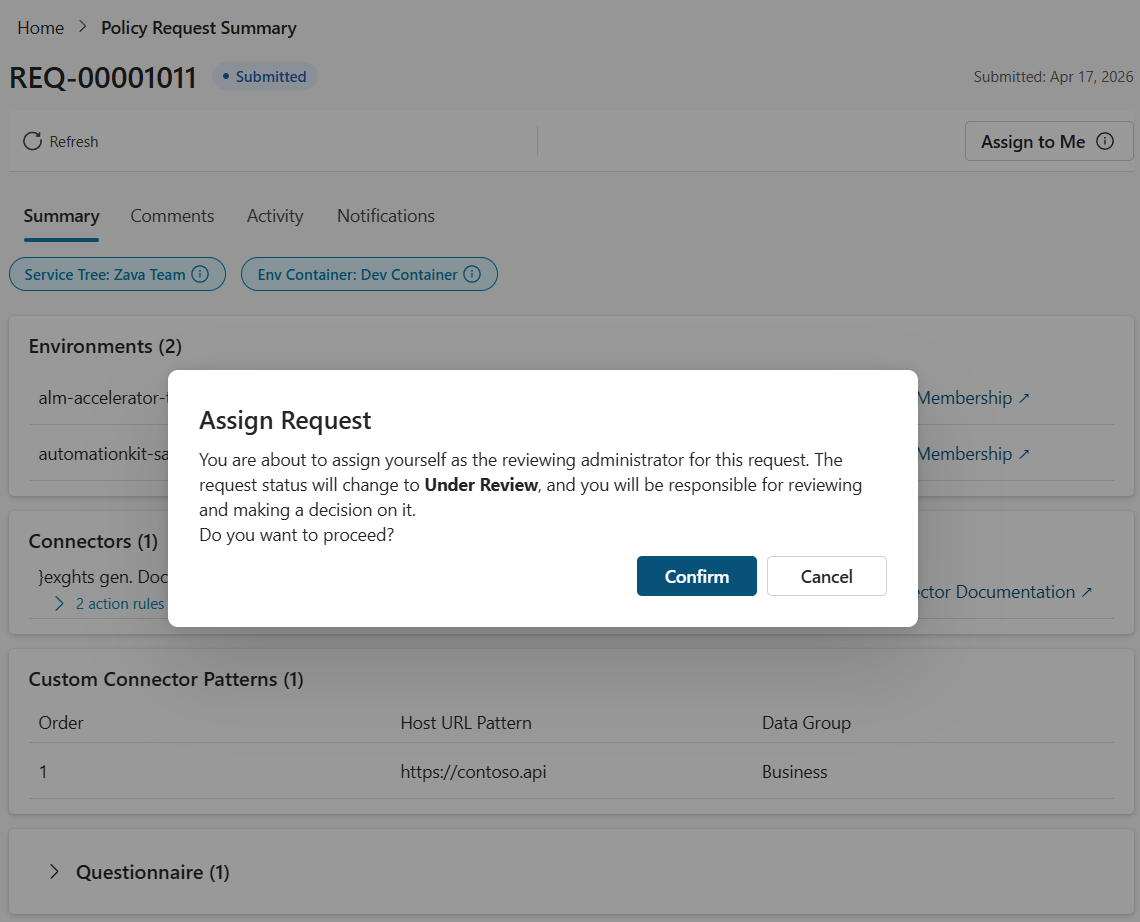
Assign to me
Select Assign to Me on a Submitted request to move it to Under Review. This action signals to other admins that you're reviewing it.
Approve a request
Approval uses a two-step wizard for requests in Submitted or Under Review status.
Step 1 reviews the data policy impact:
Select Approve.
The dialog shows a pre-flight check:
- No conflicts: Green success message with environment and connector counts.
- Existing policies affected: Warning listing affected policies and environments.
- Zero-environment conflict: Approval is blocked until the admin resolves the conflict in the Power Platform admin center.
- Post-submission blocked connectors: Warning that these connectors are excluded.
Select Next to proceed.

Step 2 confirms the approval:
- Review the warning. Approving creates an immediate, irreversible data policy. It's reversible only through the Power Platform admin center.
- Enter a required Admin comment.
- Select Confirm Approve.
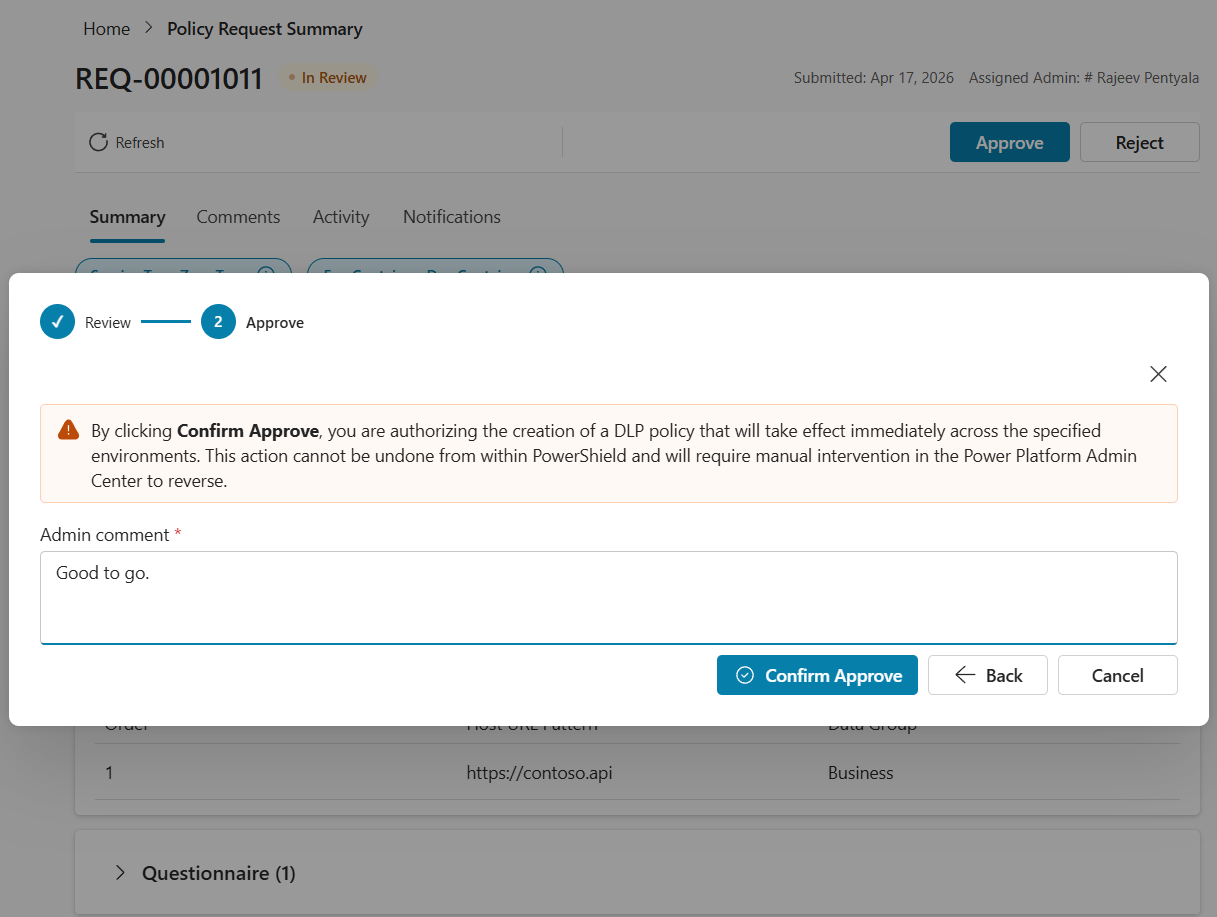
After approval, Power Shield automatically sets the status to Implementing, resolves DLP conflicts, creates the scoped policy, and updates to Implemented (or Policy Failed on error). Approval requires the Power Platform Administrator role. If approval fails with a permission error, see Troubleshooting.
What approval does to your data policies
Power Shield maintains one data policy for each Service Tree + Environment Container pair: one policy for your team's environments. When you approve a request, Power Shield refreshes that single policy to match the latest approved connectors and actions.
For example, consider a Marketing team Service Tree with a Marketing Production Environment Container. When the first request (REQ-00001) is approved with SharePoint and Outlook as allowed connectors, Power Shield creates the policy with both. Later, if a second request (REQ-00002) is approved for the same Service Tree and Environment Container with SharePoint and Teams as allowed connectors, Power Shield refreshes the same policy: SharePoint stays, Teams is added, and Outlook is removed because REQ-00002 didn't include it.
If any other data policy in your tenant (managed by Power Shield or created elsewhere) already includes one of the environments in the new request, Power Shield removes those environments from that other policy as part of approval, so coverage of an environment doesn't overlap between two policies. The pre-flight check on the Approve dialog (Step 1) shows you this impact before you confirm.
Reject a request
- Select Reject on a Submitted or Under Review request.
- Enter a required comment explaining the rejection.
- Select Confirm Reject. The maker is notified.
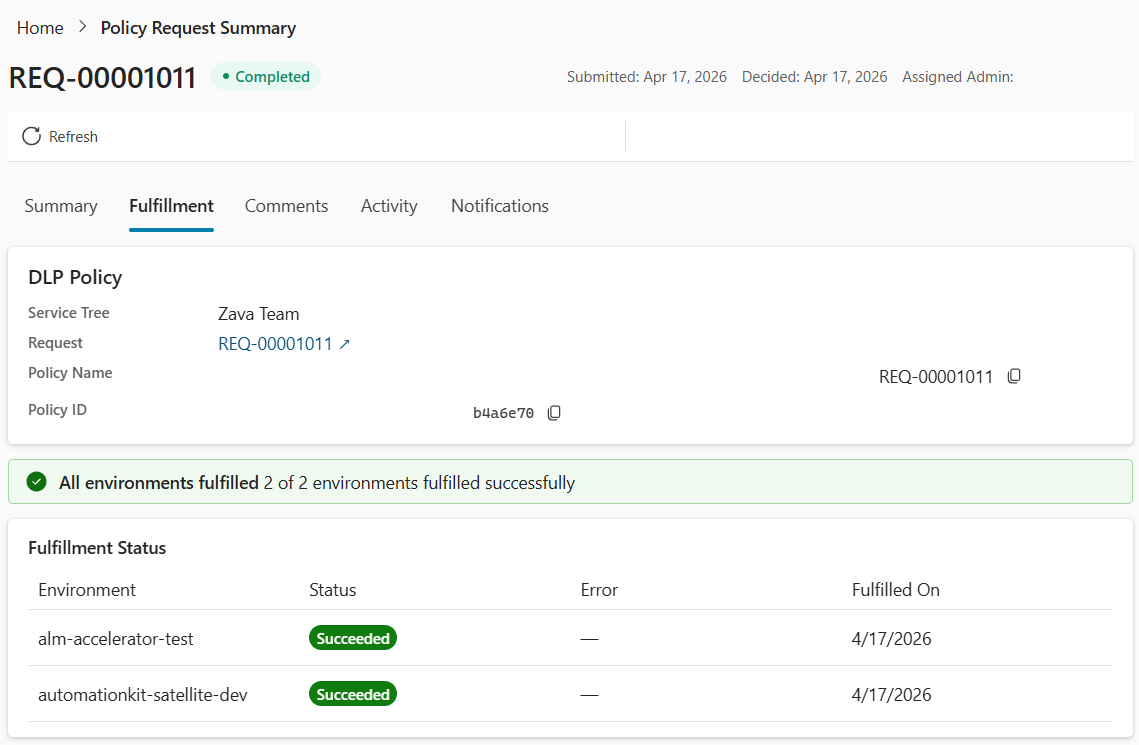
Fulfillment tab
After approval, this tab shows the data policy name, policy ID (with copy buttons), and per-environment fulfillment status.
Request status lifecycle
A request transitions through the following statuses:
| Status | Display label | Description | Set by |
|---|---|---|---|
| Draft | Draft | Saved but not submitted. | Maker |
| Submitted | Submitted | Awaiting admin review. | Maker |
| UnderReview | In Review | Admin takes ownership. | Admin |
| Approved | Approved | Data policy creation initiated. | Admin |
| Implementing | In Progress | Data policy being created. | System |
| Implemented | Completed | Data policy successfully created. | System |
| ImplementedWithErrors | Policy Failed | Data policy creation encountered errors. View details on the Activity tab. | System |
| Rejected | Rejected | Admin rejected with a comment. | Admin |
| AutoRejected | Auto Rejected | Rejected by an external flow. | System |
| Withdrawn | Withdrawn | Maker withdrew the request. | Maker |
In-progress constraint
Only one active request per service tree is allowed at a time. A new request is blocked if an existing request has the status Draft, Submitted, UnderReview, Approved, Implementing, or AutoRejected. Terminal statuses (Withdrawn, Rejected, Implemented, ImplementedWithErrors) don't block new requests.
Reference: Key Dataverse tables
All tables use the cat_ publisher prefix.
Master tables
| Table | Purpose |
|---|---|
cat_servicetree |
Organizational groupings for scoping requests. |
cat_connector |
Connector catalog (sync flow maintained). |
cat_connectoraction |
Individual actions per connector (sync flow maintained). |
cat_questioncategory |
Questionnaire section headers. |
cat_question |
Compliance questions. |
cat_questionoption |
Answer options for Choice and MultiselectChoice questions. |
Transaction tables
| Table | Purpose |
|---|---|
cat_policyrequest |
Request header with status, justification, and admin comment. |
cat_policyrequestenvironment |
Environments per request with fulfillment tracking. |
cat_policyrequestconnector |
Connectors per request with action overrides. |
cat_policyrequestanswer |
Questionnaire answers (immutable question text snapshot). |
cat_policyrequestparticipant |
Co-owners associated with a request. |
cat_powershieldcustomconnectorpattern |
Custom connector URL patterns per request. |
cat_powershieldpolicyrequestcomment |
Discussion thread comments. |
cat_powershieldpolicyrequestlog |
Append-only fulfillment audit log. |
Supporting tables
| Table | Purpose |
|---|---|
cat_powershieldenvironmentgroups |
Environment Containers scoped to a Service Tree. |
cat_powershieldenvironmentgroupmembers |
Environments within a container. |
cat_powershieldservicetreemembers |
Service Tree membership. |
cat_powershieldsettings |
Key-value notification configuration. |
Troubleshooting
The following sections describe common issues and how to resolve them.
"No environments available" in the wizard
- Make sure you have access to at least one non-Developer Power Platform environment.
- Verify the Power Shield APIFlow connection is active. Check Settings > Connection Health.
- Make sure that the connection user has the required permissions.
"In-progress conflict" error when creating a request
- Another active request (Draft, Submitted, Under Review, Approved, or Implementing) exists for the same Service Tree.
- Wait for the request to reach a terminal status (Implemented, Rejected, Withdrawn), or withdraw it first.
Request stuck in "Implementing" status
- Check the Activity tab (admin only) for error details.
- Verify the Power Shield BAPAPI connection is active. Check Settings > Connection Health.
- Make sure the approving admin has the Power Platform Administrator role assigned in the Microsoft 365 admin center. Data policy write operations (create, update, delete) require this Microsoft Entra ID role.
- If fulfillment failed, the status might transition to Policy Failed. Review error details and retry.
Data policy creation failed: permission error
- The approving admin doesn't have the Power Platform Administrator role.
- This Microsoft Entra ID role is required for data policy write operations (create, update, delete). Read operations (listing existing policies during the approval pre-flight check) succeed without it.
- Ask your IT admin to assign the Power Platform Administrator role in the Microsoft 365 admin center.
- After the role is assigned, open the failed request and select Retry DLP Creation to rerun fulfillment.
Can't see the Settings hub or admin configuration pages
- Requires the CSK - Administrator security role. Contact your Dataverse administrator.
Connector icons not loading
- Icons load from external URLs. The Power Apps content security policy might block some sources. A fallback icon is shown. Functionality is unaffected.
No connectors available in wizard Step 3
- Non-Microsoft connectors are blocked by default. Ask your admin to unblock connectors using Settings Hub > Connector Configurations.
- Make sure the PowerShield | Sync Connectors flow has run at least once. Check Settings > Connection Health for data sync status.