Note
Access to this page requires authorization. You can try signing in or changing directories.
Access to this page requires authorization. You can try changing directories.
This article is to learn to write your own WebView2 code. If you want to run a sample first, see Win32 sample app or another sample app article, such as WinForms sample app.
This tutorial helps you:
- Set up your development tools.
- Use the C# Windows Forms App (.NET Framework) Visual Studio project template to create a WinForms project.
- Install the Microsoft.Web.WebView2 SDK package for the WinForms project.
- Learn about WebView2 concepts along the way.
Step 1 - Optionally clone or download the WebView2Samples repo
Do either of the following:
Create a new project in Visual Studio starting from a project template, using the steps in the sections below. This will give you the latest code and project structure.
Clone or download the
WebView2Samplesrepo, open the completed project in Visual Studio, and follow the steps in this article to understand creating the WinForms project and understand the added WebView2 code. See Download the WebView2Samples repo in Set up your Dev environment for WebView2. A completed version of this tutorial project is available in the WebView2Samples repo directory WinForms_GettingStarted.- Sample name: Win32_GettingStarted
- Repo directory: Win32_GettingStarted
- Solution file: WebView2GettingStarted.sln
The sample in the repo might not be as up-to-date as a project that you create by using the latest Visual Studio project templates.
Step 2 - Install Visual Studio
Microsoft Visual Studio is required. Microsoft Visual Studio Code is not supported for this tutorial.
If Visual Studio isn't installed already, open the page Microsoft Visual Studio in a new window or tab, and install Visual Studio 2017 or later, such as Visual Studio 2022 Professional.
Then return here and continue below.
Step 3 - Create a single-window app
Start with a basic desktop project that contains a single main window.
Open Visual Studio.
Select File > New > Project.
The Visual Studio Open recent window appears:
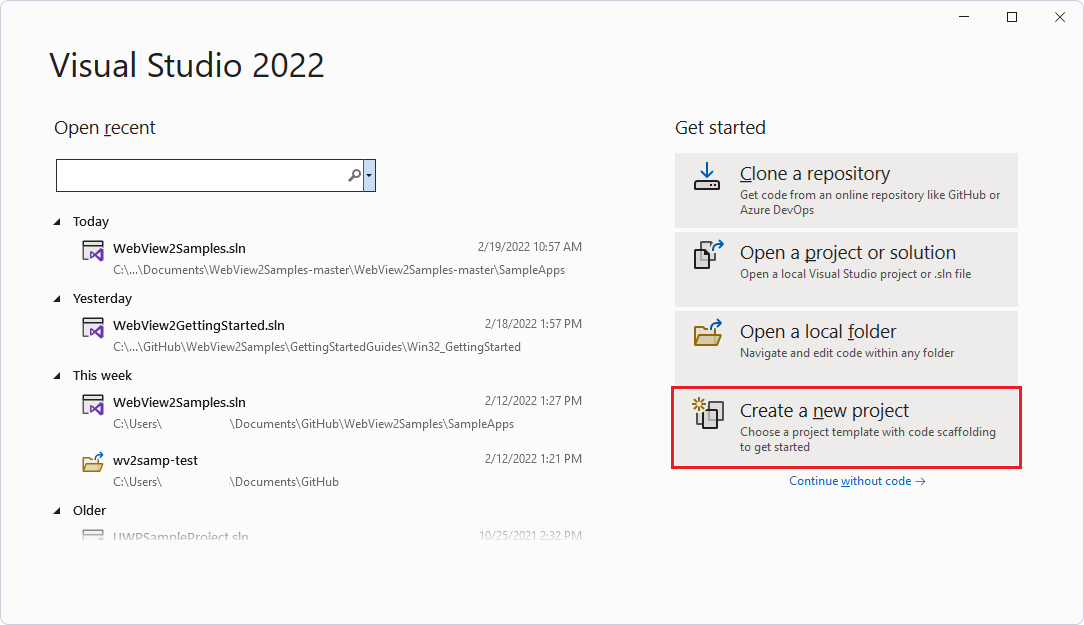
On the right, click the Create a new project card. The Visual Studio Create a new project window opens.
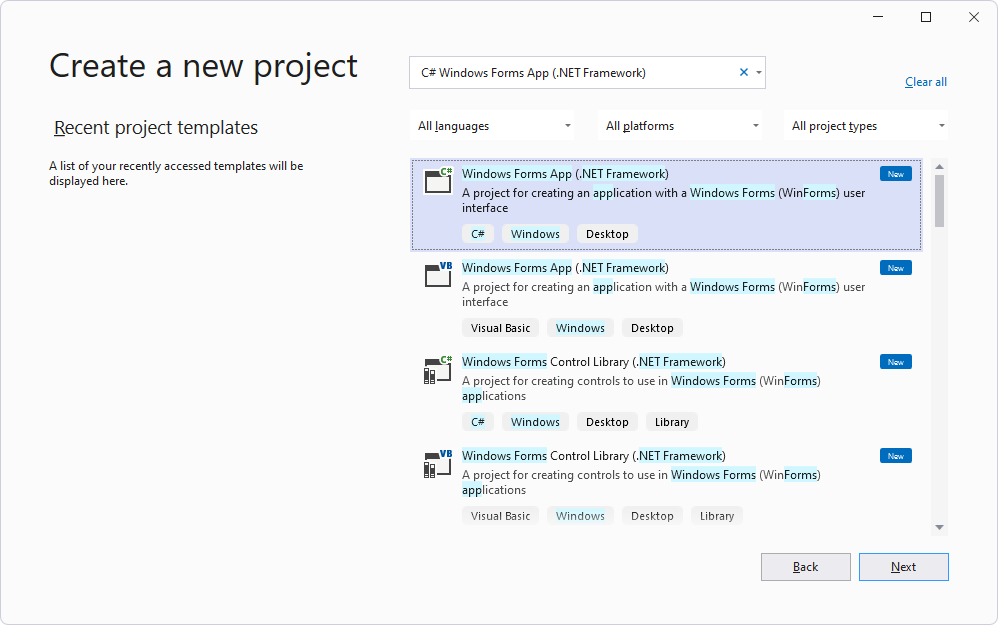
In the Search text box, paste or start typing the following:
C# Windows Forms App (.NET Framework)Search results appear, listing project types.
Select the C# Windows Forms App (.NET Framework) card. Make sure the name matches, with a C# icon and then the name Windows Forms App (.NET Framework). Then click the Next button:
In the Project name text box, enter a project name. This tutorial article uses the name WinForms_GettingStarted, like the repo's directory name for the completed project.
In the Location text box, enter a path, such as "C:\Users\username\Documents\MyWebView2Projects".
In the Framework dropdown list, select .NET Framework 4.7.2 or later, such as .NET Framework 4.8:
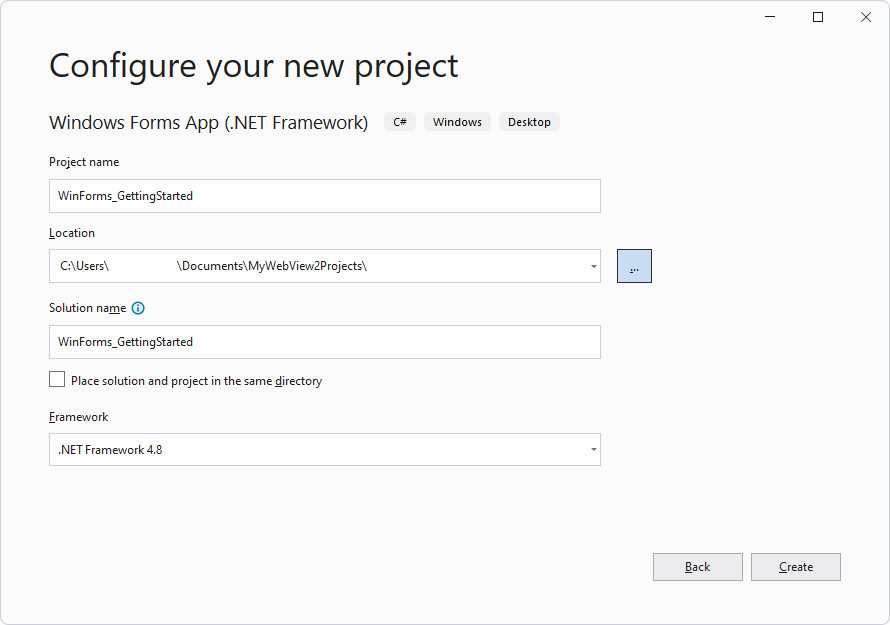
Click the Create button.
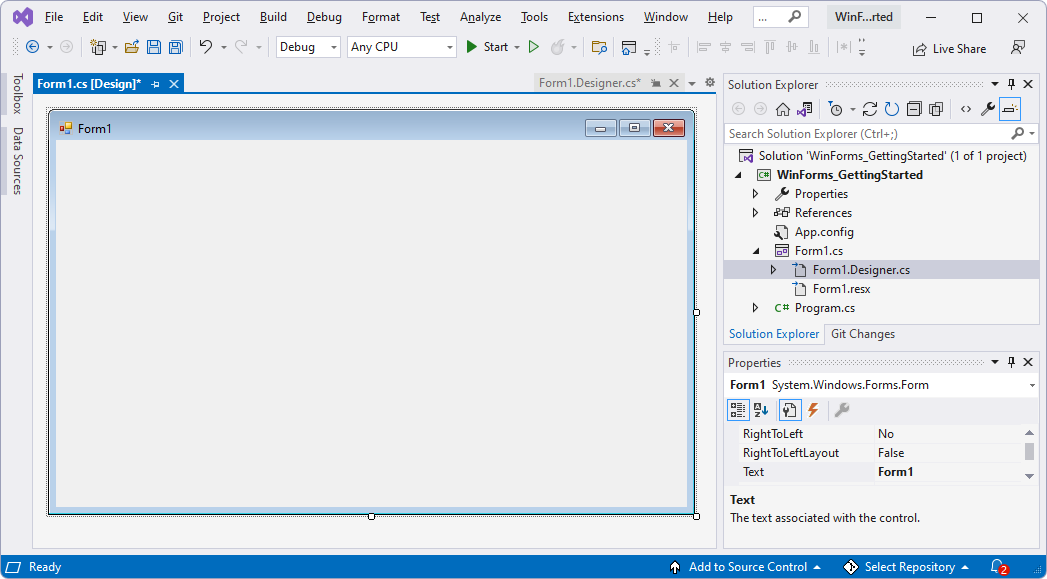
The Visual Studio window opens, showing the baseline WinForms project in the Solution Explorer, and showing a Form Designer window:
Select File > Save All (Ctrl+Shift+S).
Select Debug > Start Debugging (F5).
An empty Form1 window opens, from the fresh WinForms project:
Close the Form1 window.
You now have an empty WinForms project that runs. Next, set up the project to add WebView2 content.
Step 4 - Install the WebView2 SDK
For every WebView2 project, you use the NuGet package manager within Visual Studio to add the WebView2 SDK to the project. You install the Microsoft.Web.WebView2 SDK NuGet package for use by the current project.
Use NuGet to add the WebView2 SDK to the project, as follows:
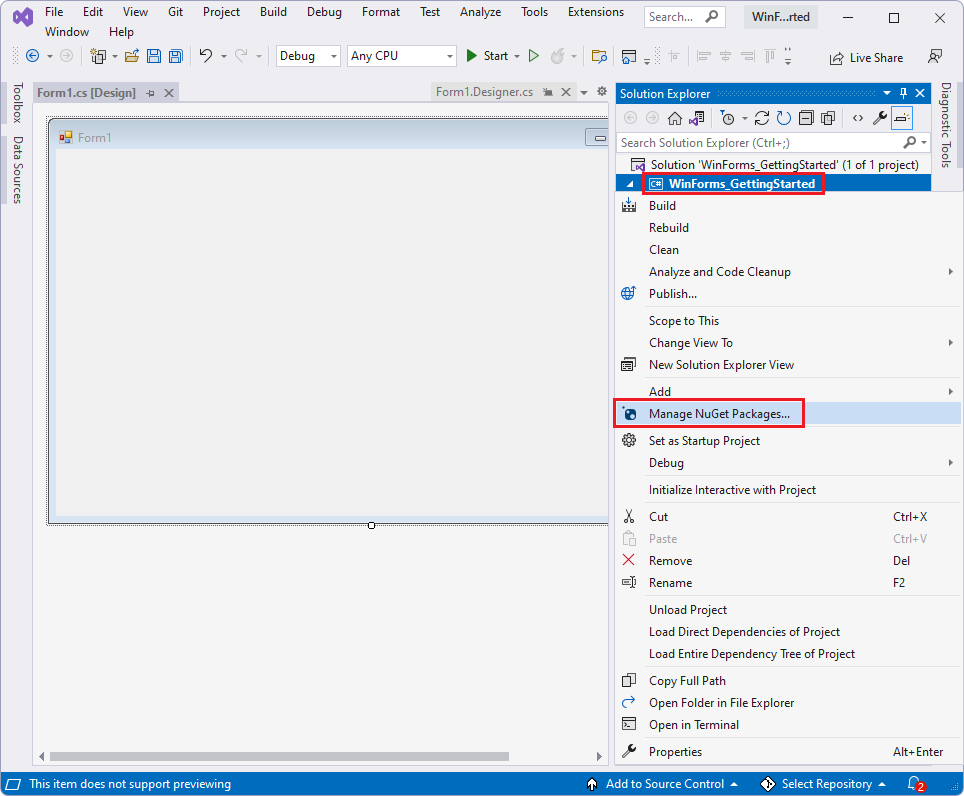
In Solution Explorer, right-click the project name (not the solution name above it), and then select Manage NuGet Packages:
The NuGet Package Manager opens in Visual Studio.
Click the Browse tab in the upper left.
Clear the Include prerelease checkbox.
In the search bar, type WebView2, and then below the search bar, click Microsoft.Web.WebView2 to select it:

To zoom, right-click > Open image in new tab.
Click the Install (or Update) button. The Preview Changes dialog opens:

Click the OK button.
Select File > Save All (Ctrl+Shift+S) to save the project.
Close the NuGet Package Manager window.
Select Debug > Start Debugging (F5) to build and run the project.
The running project displays the same empty window as before:
Close the Form1 window.
You've added the WebView2 SDK to the project, but haven't added any WebView2 code to the project yet.
Step 5 - Create a single WebView2 control
Now that the WebView2 SDK is installed for the WinForms project, add a WebView2 control to the app, as follows:
The starter project has a Form1.cs form already, but we'll add another, as Form2.cs, to see how to do that.
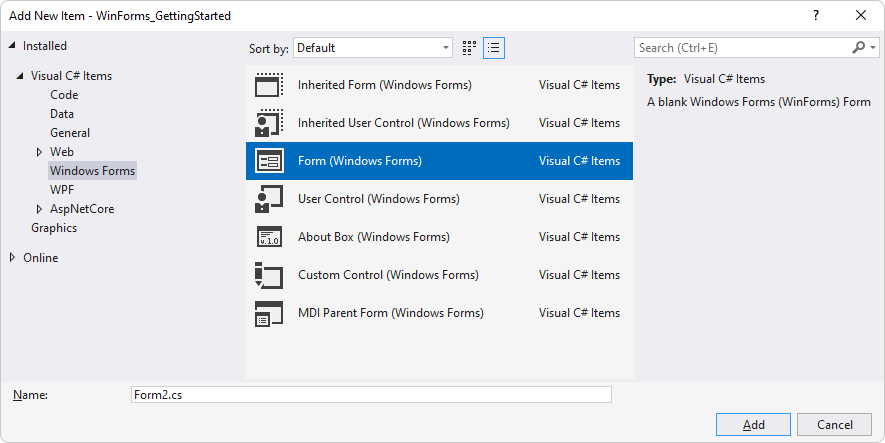
Select Project > Add Form (Windows Forms).
In the Add New Item window, on the left, select Visual C# Items > Windows Forms.
On the right, select Form (Windows Forms), and then click the Add button:
The project now has an additional form, with file name
Form2.cs, shown in the Form Designer and in Solution Explorer: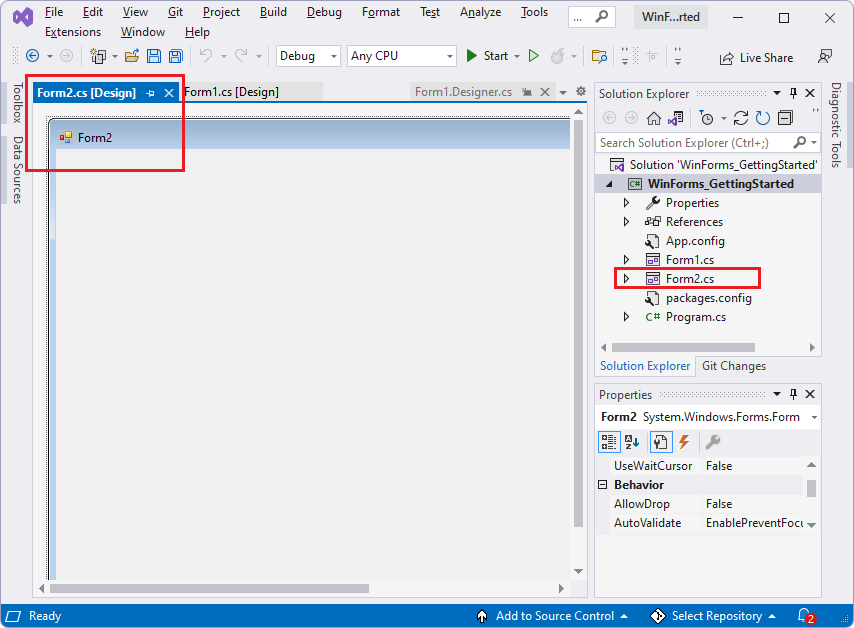
Click the Form1 canvas. We won't use Form2.
Select View > Toolbox.
Here's where you add WebView2-specific content to the app:
In the Toolbox, click WebView2 Windows Forms Control to expand the options.
In Visual Studio 2017, by default, WebView2 isn't displayed in the Toolbox. To enable WebView2 to be displayed in the Toolbox, select Tools > Options > General > and set the Automatically Populate Toolbox setting to True.
In the Toolbox, click or drag the WebView2 control onto the Forms Designer canvas of the control you added, such as
Form2.cs: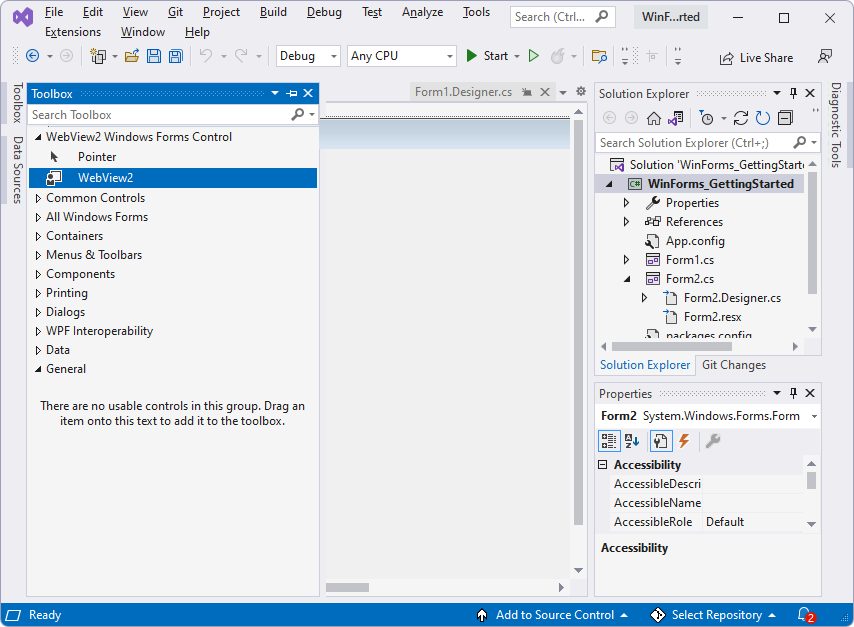
Drag the sides of the WebView2 control to make it fill almost all of the canvas.
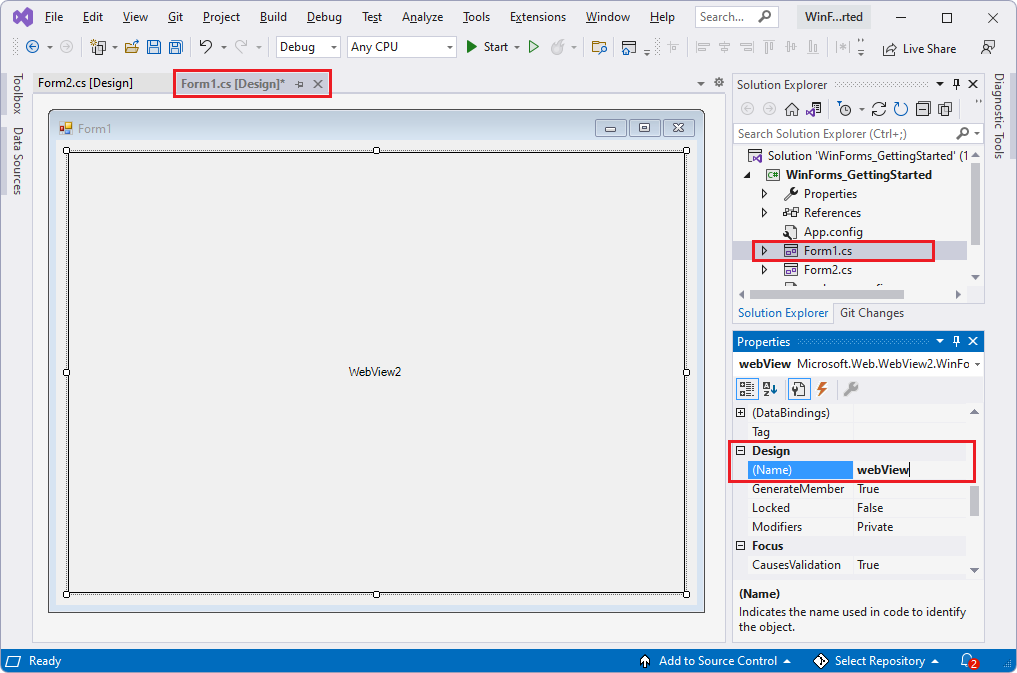
Make sure the new WebView2 control on the form is selected. In the Properties panel, in the Design section, set the (Name) property to webView (lowercase 'w', capital 'V', no numeric suffix). The control might initially be named something else, such as webView21. Use the Categorized and Alphabetical sort option buttons as needed to find properties:
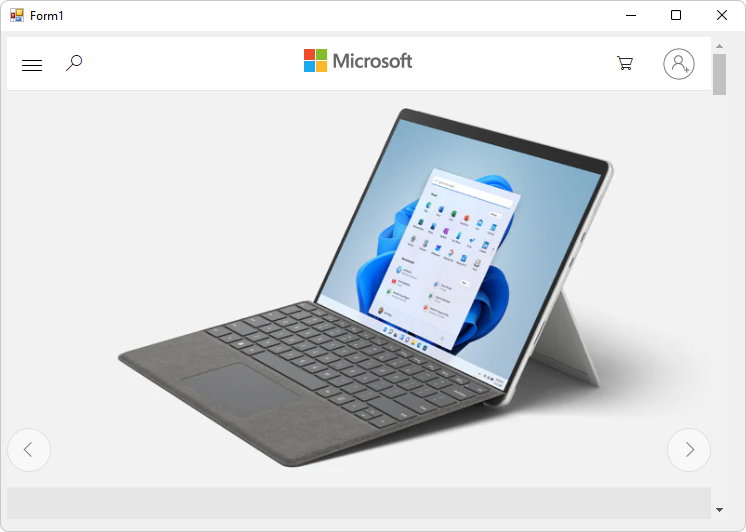
In the Properties panel, in the Misc section, set the Source property to
https://www.microsoft.com. The Source property sets the initial URL that will be displayed in the WebView2 control.Select File > Save All (Ctrl+Shift+S) to save the project.
Press F5 to build and run the project.
The WebView2 control displays content from https://www.microsoft.com, in a WebView2 control in the Windows Forms form, with a Skip to main content link if you pressed Alt+Tab to switch to the window:

If needed, click the Skip to main content link.
The WebView2 control displays content from https://www.microsoft.com, in a WebView2 control in the Windows Forms form:
Close the Form1 window.
If you're working on a high-resolution monitor, you may need to configure your Windows Forms app for high DPI support.
Step 6 - Add controls and process window resize events
Add more controls to your Windows Forms form from the toolbox, and then process window resize events, as follows.
Select View > Toolbox, or click the Toolbox tab on the left.
In the Toolbox, click Common Controls.
Add a text box control, as follows:
Drag the TextBox control onto the Form1.cs Form Designer canvas.
Make sure the TextBox control has focus.
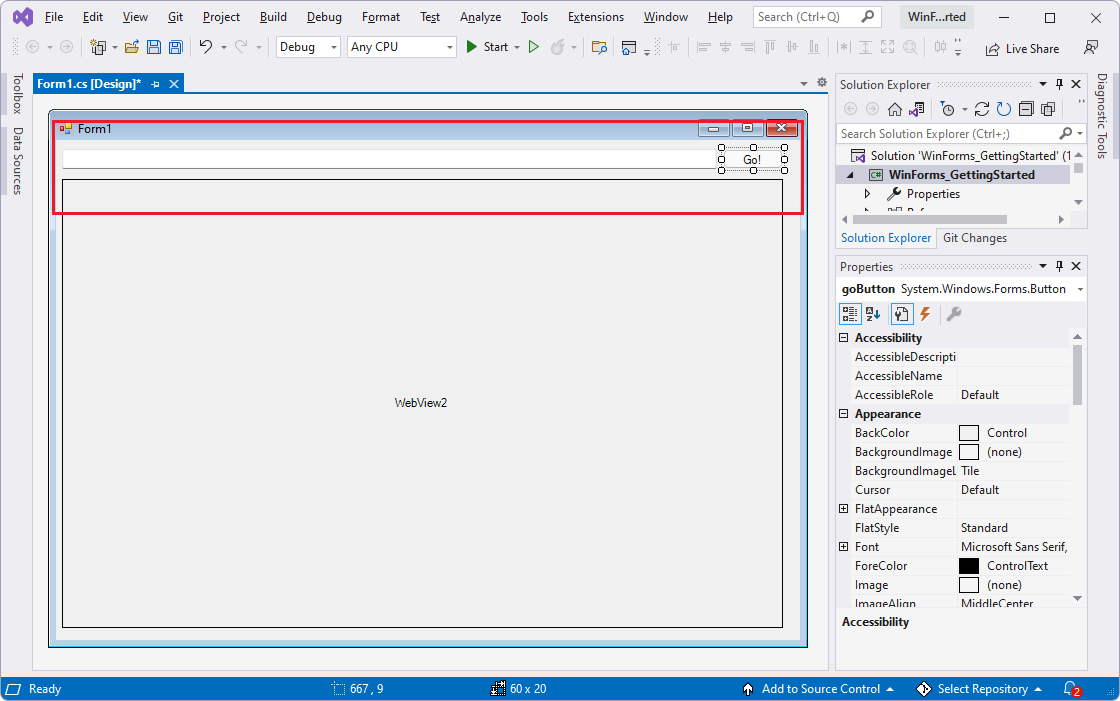
In the Properties panel, in the Design section, change the (Name) (probably from textBox1) to addressBar.
Add a button control, as follows:
Drag a Button control onto the Form1.cs Form Designer canvas.
Make sure the button control has focus.
In the Properties panel, in the bolded Appearance section (about 15 properties down), change the Text property (probably from button1) to Go!
Align the text box and the existing button, as follows:
Position the text box on the left side of the form, vertically aligned with the button, as shown below:
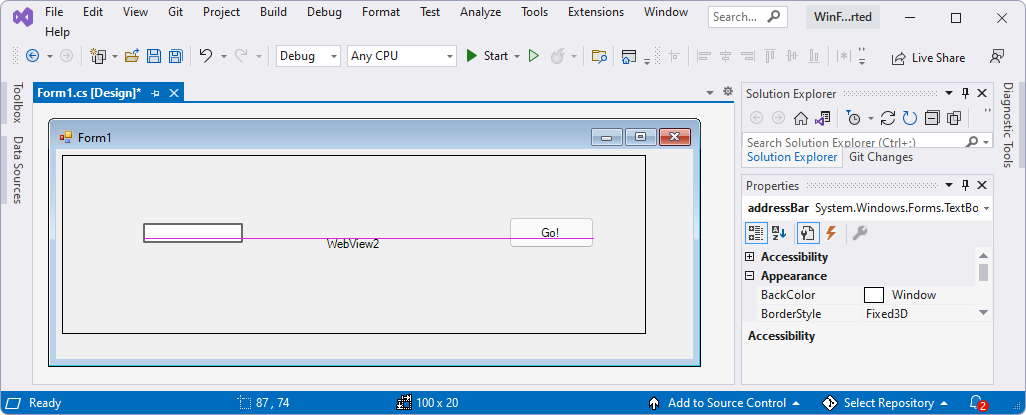
Resize the text box as shown:
Click View > Code to open
Form1.cs.Define
Form_Resizeto keep the controls in place when the app window is resized, as follows.Delete the following code:
   public Form1()
{
   InitializeComponent();
}
Paste this code in the same location:
public Form1()
{
   InitializeComponent();
   this.Resize += new System.EventHandler(this.Form_Resize);
}

private void Form_Resize(object sender, EventArgs e)
{
   webView.Size = this.ClientSize - new System.Drawing.Size(webView.Location);
   goButton.Left = this.ClientSize.Width - goButton.Width;
   addressBar.Width = goButton.Left - addressBar.Left;
}
Select File > Save All (Ctrl+Shift+S) to save the project.
Press F5 to build and run the project.
A Form1 window appears, displaying webpage content from https://www.microsoft.com:
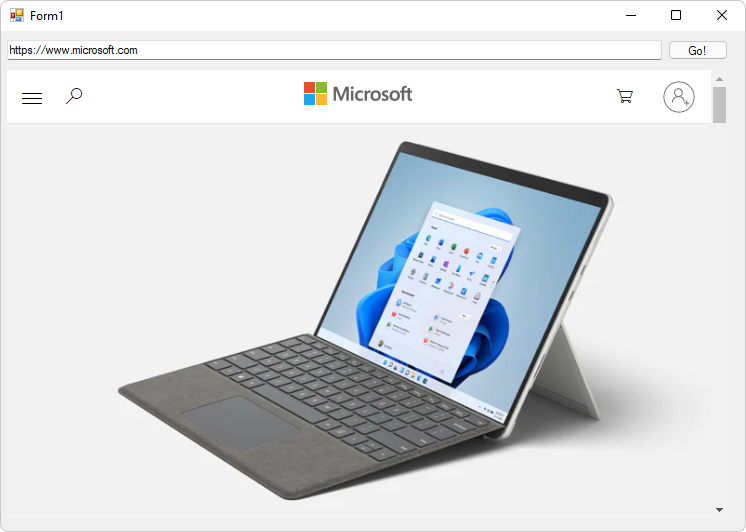
If you press Alt+Tab to switch to the Form1 window, you may need to click the Skip to main content link that's added.
Scroll the window up and down with the mouse wheel. The input controls remain in place.
Drag the corner of the window to resize it. The text box changes width.
Close the Form1 window.
Step 7 - Navigation
Enable users to change the URL that the WebView2 control displays, by reading the text entered in the text box, to serve as an Address bar.
Select View > Code so that
Form1.csis open in the code editor.In
Form1.cs, add theCoreWebView2namespace by inserting the following code at the top of the file as line 1:using Microsoft.Web.WebView2.Core;Select the Form1.cs [Design] tab, then double-click the
Go!button. ThegoButton_Clickmethod is added in theForm1.csfile.Paste the following code into the file to replace the empty
goButton_Clickmethod, so that the method body is as follows:private void goButton_Click(object sender, EventArgs e) { if (webView != null && webView.CoreWebView2 != null) { webView.CoreWebView2.Navigate(addressBar.Text); } }Now the
goButton_Clickfunction will navigate the WebView2 control to the URL that's entered in the Address bar text box.Select File > Save All (Ctrl+Shift+S) to save the project.
Press F5 to build and run the project.
In the Address bar, enter a URL that starts with
https, such ashttps://www.bing.com, and then click the Go! button:
The WebView2 control shows the webpage content for the URL.
In the Address bar, enter a string that doesn't start with
http, such aswww.bing.com, and then click the Go! button.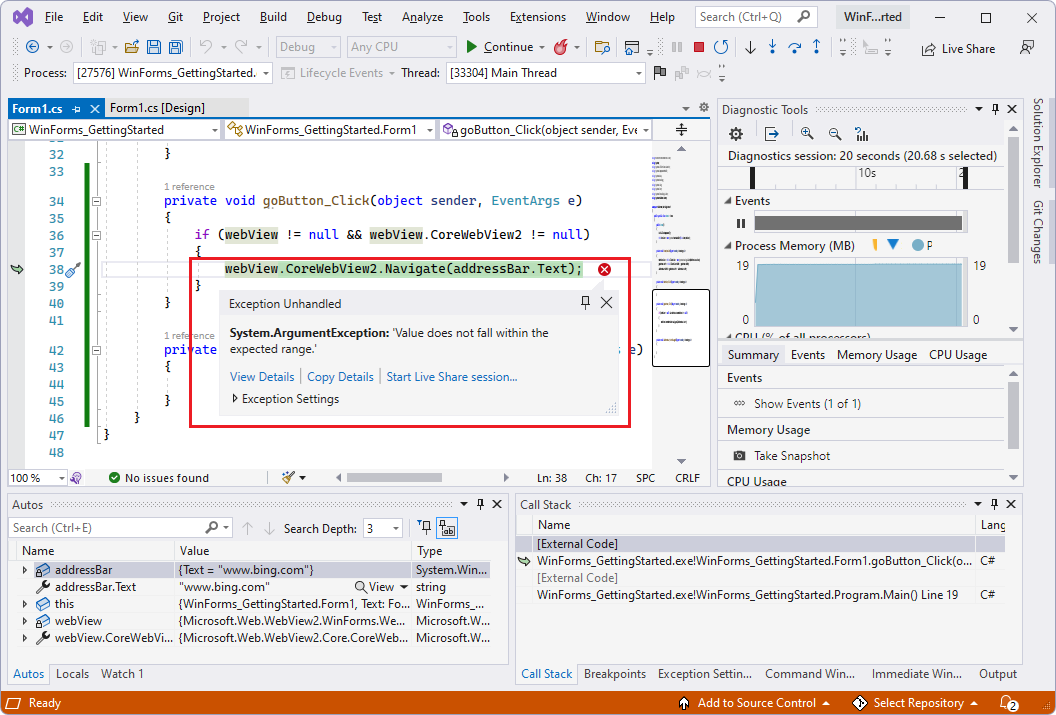
An
ArgumentExceptionis thrown if the URL doesn't start withhttp://orhttps://.Select Debug > Stop Debugging, or click Continue. The Form1 window closes.
Step 8 - Navigation events
During webpage navigation, the WebView2 control raises events. The app that hosts WebView2 controls listens for the following events:
NavigationStartingSourceChangedContentLoadingHistoryChangedNavigationCompleted
For more information, see Navigation events for WebView2 apps.
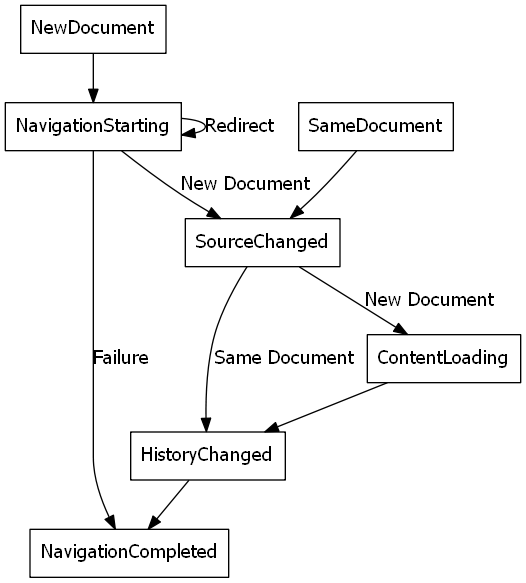
When an error occurs, the following events are raised and may depend on navigation to an error webpage:
SourceChangedContentLoadingHistoryChanged
Note
If an HTTP redirect occurs, there are multiple NavigationStarting events in a row.
To demonstrate how to use the events, start by registering a handler for NavigationStarting that cancels any requests not using HTTPS.
In
Form1.cs, update theForm1()constructor to match the following code, and also add theEnsureHttps(sender, args)function below the constructor, as follows:public Form1() { InitializeComponent(); this.Resize += new System.EventHandler(this.Form_Resize); webView.NavigationStarting += EnsureHttps; } void EnsureHttps(object sender, CoreWebView2NavigationStartingEventArgs args) { String uri = args.Uri; if (!uri.StartsWith("https://")) { args.Cancel = true; } }In the constructor,
EnsureHttpsis registered as the event handler on theNavigationStartingevent on the WebView2 control.Select File > Save All (Ctrl+Shift+S) to save the project.
Press F5 to build and run the project.
In the Address bar, enter a URL that starts with
https, such ashttps://www.bing.com, and then click the Go! button.The https URL loads; the web content changes from the default, Microsoft.com, to Bing.com.
In the Address bar, enter a URL that starts with
http, such ashttp://www.microsoft.com, and then click the Go! button.The http URL doesn't load; the Bing.com webpage remains displayed. In contrast, entering
http://www.microsoft.cominto Microsoft Edge works; it redirects to the https site for Microsoft.com.In the Address bar, enter a URL that starts with
https, such ashttps://www.microsoft.com, and then click the Go! button.The https URL loads; the Microsoft.com webpage now appears, since you added the 's' after 'http'.
Step 9 - Scripting
You can use host apps to inject JavaScript code into WebView2 controls at runtime. You can task WebView2 to run arbitrary JavaScript or add initialization scripts. The injected JavaScript applies to all new top-level documents and any child frames until the JavaScript is removed. The injected JavaScript runs with specific timing.
Run the injected JavaScript after the creation of the global object.
Run the injected JavaScript before any other script included in the HTML document is run.
For example, add a script that sends an alert when a user navigates to a non-HTTPS site, as follows:
Modify the
EnsureHttpsfunction to add the following line that containsExecuteScriptAsync:void EnsureHttps(object sender, CoreWebView2NavigationStartingEventArgs args) { String uri = args.Uri; if (!uri.StartsWith("https://")) { webView.CoreWebView2.ExecuteScriptAsync($"alert('{uri} is not safe, try an https link')"); args.Cancel = true; } }The added line injects a script into the web content that uses the ExecuteScriptAsync method. The added script is:
alert('{uri} is not safe, try an https link')Select File > Save All (Ctrl+Shift+S) to save the project.
Press F5 to build and run the project.
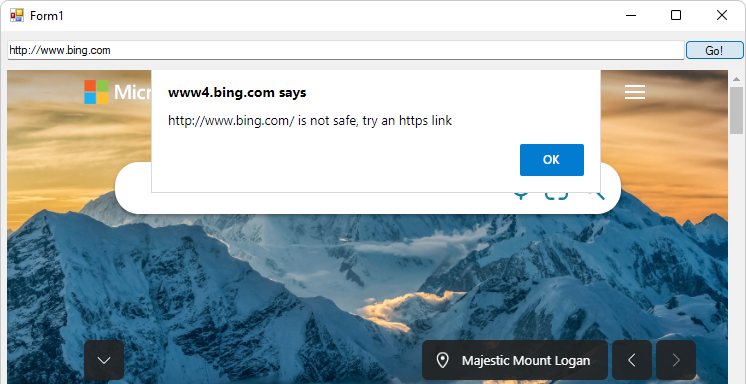
Try to go to
http://www.bing.com(withhttpinstead ofhttpsprefix).The app displays an alert:
Step 10 - Communication between host and web content
The host and web content can use postMessage to communicate with each other as follows:
Web content in a WebView2 control can use
window.chrome.webview.postMessageto post a message to the host. The host handles the message using any registeredWebMessageReceivedon the host.Hosts post messages to web content in a WebView2 control using
CoreWebView2.PostWebMessageAsStringorCoreWebView2.PostWebMessageAsJSON. These messages are caught by handlers added towindow.chrome.webview.addEventListener.
The communication mechanism passes messages from web content to the host using native capabilities.
In your project, when the WebView2 control navigates to a URL, it displays the URL in the Address bar and alerts the user of the URL displayed in the WebView2 control.
In
Form1.cs, update theForm1()constructor and create anInitializeAsync()function below it, matching the following code:public Form1() { InitializeComponent(); this.Resize += new System.EventHandler(this.Form_Resize); webView.NavigationStarting += EnsureHttps; InitializeAsync(); } async void InitializeAsync() { await webView.EnsureCoreWebView2Async(null); }The
InitializeAsyncfunction awaits EnsureCoreWebView2Async, because the initialization ofCoreWebView2is asynchronous.Next, register an event handler to respond to
WebMessageReceived. This event handler will be registered afterCoreWebView2is initialized.In
Form1.cs, updateInitializeAsync, and addUpdateAddressBarbelow it, as follows:async void InitializeAsync() { await webView.EnsureCoreWebView2Async(null); webView.CoreWebView2.WebMessageReceived += UpdateAddressBar; } void UpdateAddressBar(object sender, CoreWebView2WebMessageReceivedEventArgs args) { String uri = args.TryGetWebMessageAsString(); addressBar.Text = uri; webView.CoreWebView2.PostWebMessageAsString(uri); }Next, for WebView2 to send and respond to the web message, after
CoreWebView2is initialized, the host will inject a script in the web content to:Send the URL to the host using
postMessage.Register an event handler to display a message sent from the host, in an alert box, before displaying webpage content.
In
Form1.cs, updateInitializeAsyncto match the following code:async void InitializeAsync() { await webView.EnsureCoreWebView2Async(null); webView.CoreWebView2.WebMessageReceived += UpdateAddressBar; await webView.CoreWebView2.AddScriptToExecuteOnDocumentCreatedAsync("window.chrome.webview.postMessage(window.document.URL);"); await webView.CoreWebView2.AddScriptToExecuteOnDocumentCreatedAsync("window.chrome.webview.addEventListener(\'message\', event => alert(event.data));"); }Select File > Save All (Ctrl+Shift+S) to save changes.
Press F5 to build and run the project.
Enter a URL, such as
https://www.bing.com: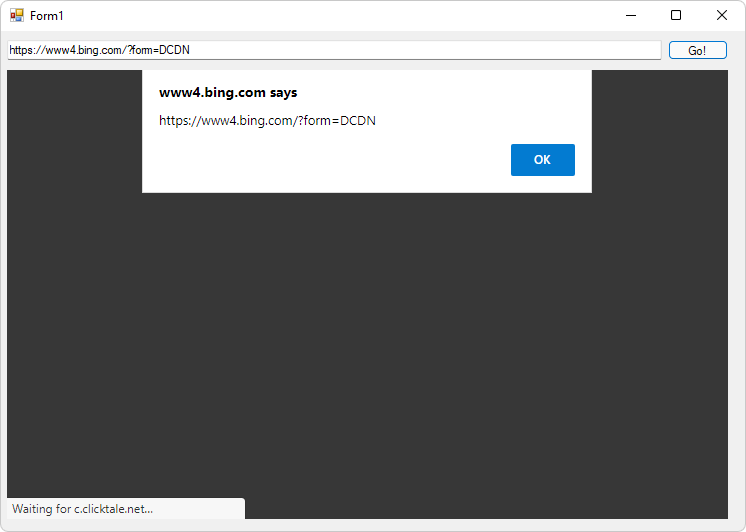
An alert initially appears, showing the resulting URL that's sent from the host website.
Click the OK button.
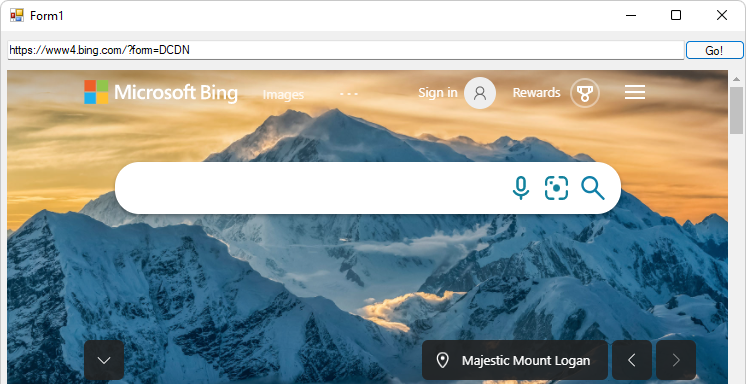
The WebView2 control now displays the new URL in the Address bar, and webpage content from the URL is displayed in the WebView2 control in the WinForms window:
When the app starts, the default URL is
https://www.microsoft.com, and the resulting displayed address shows the locale, such ashttps://www.microsoft.com/en-us/.If you enter
https://www.bing.com, the resulting address is a variant, such ashttps://www4.bing.com/?form=DCDN.
Congratulations, you built your first WebView2 app!
Distributing a WebView2 app
If you were to distribute the app that results from this tutorial, you would need to distribute the WebView2 Runtime along with your app. The WebView2 Runtime would then be automatically installed onto user machines. For more information, see Distribute your app and the WebView2 Runtime.
See also
- Distribute your app and the WebView2 Runtime
- WinForms sample app - Demonstrates more WebView2 APIs than the present tutorial.
- WebView2 API Reference