Troubleshooting Word templates
This article helps you troubleshoot and resolve issues related to Word templates.
I'm unable to see an entity image in a Word template for certain out-of-the-box and custom entities
Reason
By default, only a few out-of-the-box entities—such as Account, Contact, Opportunity, Order, Invoice, Product, Lead, Goal, and Territory—include an EntityImage value for the Primary Image field, which you can use to upload the image to a Word template. However, for other out-of-the-box (such as Quote, Business Unit, Appointment, and Email) and custom entities, EntityImage isn't available.
Resolution
To show an image for entities that don't have an EntityImage by default, you create an image field for the entity, upload the entity image to a record, and then add the entity image to the Word template. In the following example, we add an EntityImage for a Discuss contract renewal appointment.
To create an image field for the entity
Go to Settings > Customizations > Customize the System.
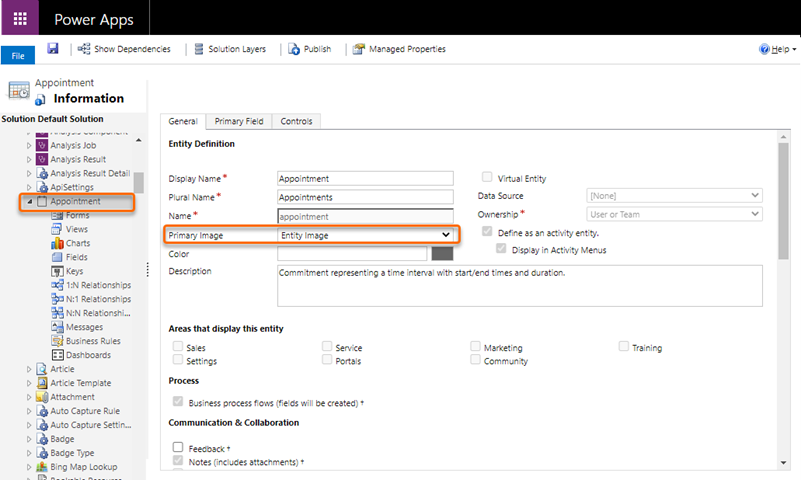
In the solution explorer, under Components, expand Entities, and then select the entity. In this example, we're selecting the Appointment entity.

- In the Appointment entity, select Fields, and then select New.

- In the new field form, enter Entity Image for the Display Name, enter EntityImage for the Name, and for Data Type, select Image.

Save and close the form.
Verify that the new field has been added by selecting the entity name. In this example, we've added Entity Image as a value for the Primary Image field for the Appointment entity.

- Publish the customizations.
To upload the entity image to the record
Open the entity record. In this example, we're opening a Discuss contract renewal appointment.

Select the image, and in the Choose Image dialog box, select Upload Image.

Select the image, and then select Change.

The image appears beside the entity.

To add the entity image to the Word template
Download and open the word template.
The downloaded template is saved in the following format:
recordType organizationDateFormat time localDateFormat time.docx
For example, the downloaded template name for the appointment is: Appointment 2020-7-15 15-39-27 17-7-2020 12-28-00 PM.docx.In the Developer tab, open XML Mapping Pane, right-click to select new_entityimage, and then select Insert Content Control > Picture.

The entity image field with the image is added to the Word template.
Save and upload the Word template to your Dynamics 365 Sales Hub app.
Now, when you download and open a document based on this template, it will contain the image you added.
Note
Similarly, if you add an image to an entity form, follow this process to upload the image to the Word template.
Some characters don't export correctly in documents
Certain characters and sets of characters aren't supported in document export. When these characters are in a document, the document exports successfully but the fields and text that contains the characters between the unsupported character(s) are removed. This behavior is by design to support compatibility across products between Dynamics, Excel, Word, and Adobe PDF.
This table describes the characters not supported for document export.
| Character(s) | Description |
|---|---|
| < | Less than symbol also used to indicate the start of an HTML element |
| > | Greater than symbol also used to indicate the end of an HTML element |
| | Non-breaking space HTML string |
Here's an example of what happens when you export a document that contains unsupported characters.
- There's this text in the Word document: Enter the user <account> number
- The document is exported from an app in Power Apps or a Dynamics 365 app.
- After the export: The <account> text in the example above is removed leaving the exported text as Enter the user number instead of Enter the user <account> number.