Note
Access to this page requires authorization. You can try signing in or changing directories.
Access to this page requires authorization. You can try changing directories.
If you haven't installed Visual Studio and the Microsoft C and C++ tools yet, here's how to get started.
Visual Studio installation
Welcome to Visual Studio! It's easy to choose and install just the features you need. Because of its reduced minimum footprint, Visual Studio installs quickly and with less system impact.
Note
This article applies to installation of Visual Studio on Windows. Visual Studio Code is a lightweight, cross-platform development environment that runs on Windows, Mac, and Linux systems. The Microsoft C/C++ for Visual Studio Code extension supports IntelliSense, debugging, code formatting, autocompletion. Visual Studio for Mac doesn't support Microsoft C++, but does support .NET languages and cross-platform development. For installation instructions, see Install Visual Studio for Mac.
To learn what's new in this version, see Visual Studio 2026 release notes.
Ready to install? Use the following step-by-step guide.
Step 1 - Prepare your computer for Visual Studio
Before you begin installing Visual Studio:
Check the system requirements for Visual Studio. These requirements help you know whether your computer supports Visual Studio.
Apply the latest Windows updates. These updates ensure that your computer has both the latest security updates and the required system components for Visual Studio.
Reboot your computer. The reboot ensures that any pending installs or updates don't hinder the Visual Studio install.
Free up disk space. Remove unneeded files and applications from your %SystemDrive% by, for example, running the Disk Cleanup app.
For questions about running previous versions of Visual Studio side by side, see Visual Studio Platform Targeting and Compatibility.
Step 2 - Download Visual Studio
Select the following button to go to the Visual Studio download page, and download the Visual Studio bootstrapper file. Select the edition of Visual Studio that you want and choose the Free trial or Free download button.
Tip
The Community edition is for individual developers, classroom learning, academic research, and open source development. For other uses, install Visual Studio Professional or Visual Studio Enterprise.
Step 3 - Install the Visual Studio Installer
Run the bootstrapper file you downloaded to install the Visual Studio Installer. This new lightweight installer includes everything you need to both install and customize Visual Studio.
From your Downloads folder, double-click the bootstrapper file named
VisualStudioSetup.exe.If you receive a User Account Control notice, select Yes to allow the bootstrapper to run.
Agree to the Microsoft License Terms and the Microsoft Privacy Statement. Select Continue.
Step 4 - Choose workloads
Use the installer to customize your installation by selecting the workloads, or feature sets, that you want.
Find the workload you want in the Installing Visual Studio screen.
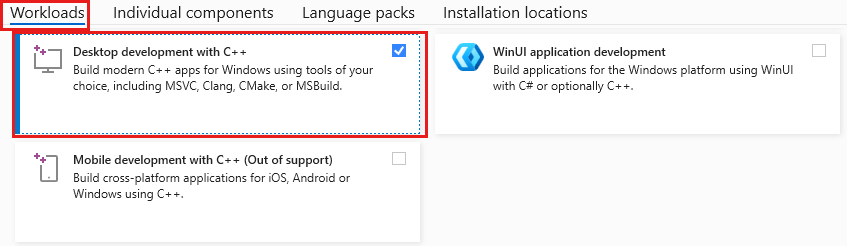
For core C and C++ support, choose the Desktop development with C++ workload. It comes with the default core editor, which includes basic code editing support for more than 20 languages, the ability to open and edit code from any folder without requiring a project, and integrated source code control.
The Installation details pane lists the included and optional components that each workload installs. You can select or deselect optional components in this list. For example, to support development by using the Visual Studio 2017 or 2015 compiler toolsets, choose the MSVC v141 or MSVC v140 optional components. You can add support for MFC, the experimental Modules language extension, IncrediBuild, and more.
Tip
To install a specific MSVC Build Tools version (Preview, latest release, or an older in-support release), see Install the Microsoft C++ (MSVC) Build Tools.
Other workloads support more kinds of development. For example, choose the Universal Windows Platform development workload to create apps that use the Windows Runtime for the Microsoft Store. Choose Game development with C++ to create games that use DirectX, Unreal, or Cocos2d. Choose Linux development with C++ to target Linux platforms, including IoT development.
After you choose the workloads and optional components you want, choose Install.
Next, status screens appear that show the progress of your Visual Studio installation.
Tip
At any time after installation, you can install workloads or components that you didn't install initially. If you have Visual Studio open, go to Tools > Get Tools and Features... which opens the Visual Studio Installer. Or, open Visual Studio Installer from the Start menu. From there, you can choose the workloads or components that you wish to install. Then, choose Modify.
Step 5 - Choose individual components (optional)
If you don't want to use the Workloads feature to customize your Visual Studio installation, or you want to add more components than a workload installs, you can install or add individual components from the Individual components tab. Choose what you want, and then follow the prompts.
Step 6 - Install language packs (optional)
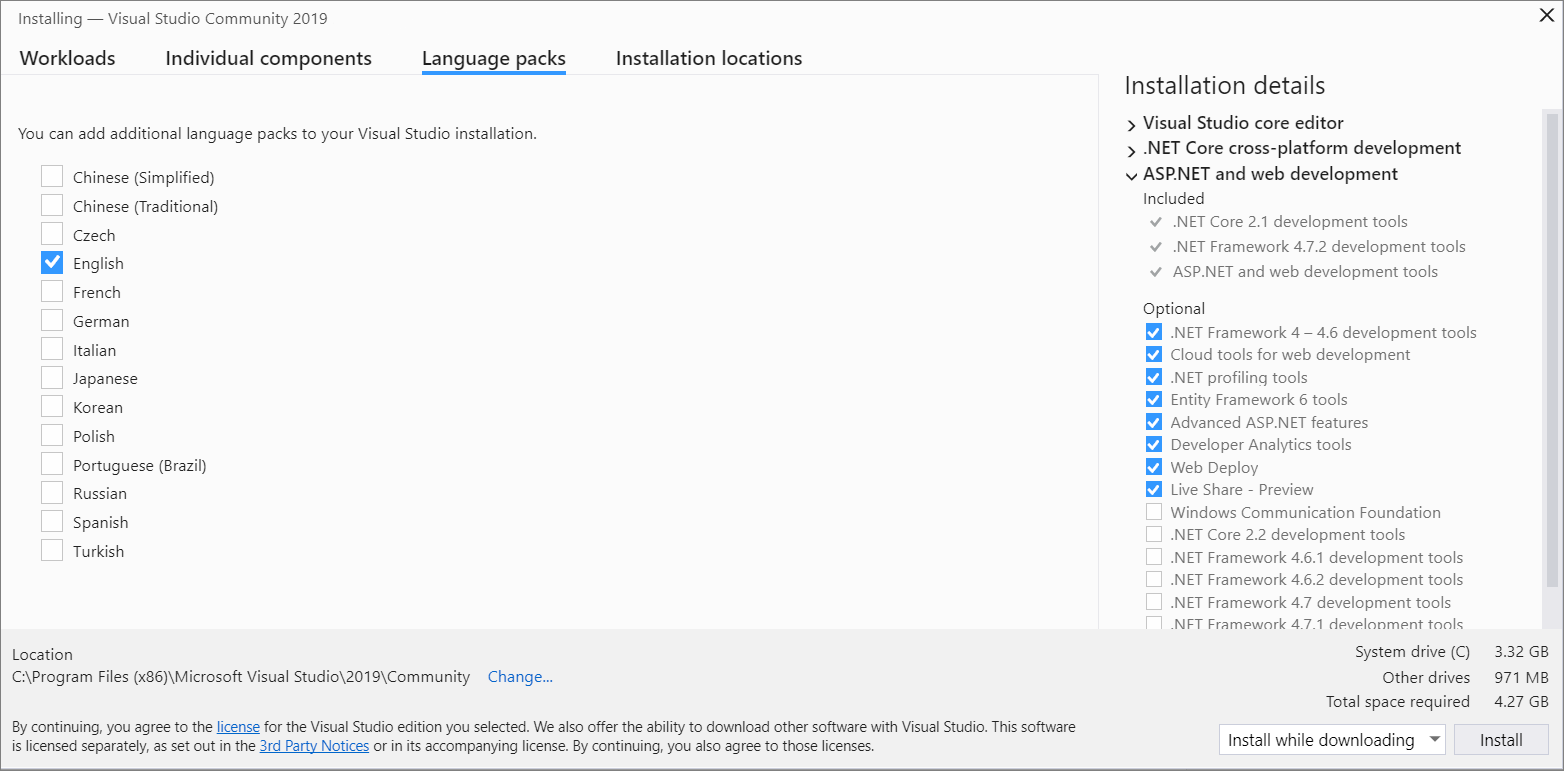
By default, the Visual Studio Installer tries to match the language of the operating system when it runs for the first time. To install Visual Studio in a language that you choose, select the Language packs tab from the Visual Studio Installer, and then follow the prompts.
Change the installer language from the command line
You can change the default language by running the installer from the command line. For example, you can force the installer to run in English by using the following command: vs_installer.exe --locale en-US. The installer remembers this setting the next time it runs. The installer supports the following language tokens: zh-cn, zh-tw, cs-cz, en-us, es-es, fr-fr, de-de, it-it, ja-jp, ko-kr, pl-pl, pt-br, ru-ru, and tr-tr.
Step 7 - Change the installation location (optional)
You can reduce the installation footprint of Visual Studio on your system drive. Move the download cache, shared components, SDKs, and tools to different drives, and keep Visual Studio on the drive that runs it the fastest.
Important
You can select a different drive only when you first install Visual Studio. If you already installed it and want to change drives, you must uninstall Visual Studio and then reinstall it.
Step 8 - Start developing
After Visual Studio installation is complete, select the Launch button to get started developing with Visual Studio.
On the start window, select Create a new project.
In the search box, enter the type of app you want to create to see a list of available templates. The list of templates depends on the workloads that you chose during installation. To see different templates, choose different workloads.
You can also filter your search for a specific programming language by using the Language dropdown list. You can filter by using the Platform list and the Project type list, too.
Visual Studio opens your new project, and you're ready to code!
Step 9 - Install GitHub Copilot
You can use GitHub Copilot in Visual Studio to help with your C++ development. Copilot is an AI-powered coding assistant that helps you write code faster, reduce errors, and explore new solutions.
Some benefits of using Copilot for your C++ coding scenarios:
- Generate entire C++ functions or classes as you type.
- Suggest code completions based on plain-language comments or prompts.
- Get help with complex algorithms, data structures, and standard library usage.
- Learn new APIs and modern C++ patterns through in-context examples.
- Receive context-aware suggestions based on your comments or code.
- Debug errors in your code.
- Simplify and refactor existing code.
To try GitHub copilot to create a C++ app, follow the instructions in Use AI to create a C++ console application in Visual Studio.
When Visual Studio is running, you're ready to continue to the next step.