Note
Access to this page requires authorization. You can try signing in or changing directories.
Access to this page requires authorization. You can try changing directories.
In this tutorial, you build a complete, repeatable release flow for Microsoft Fabric using infrastructure as code. You provision two workspaces (dev and test) with Terraform, connect the dev workspace to Git, author an item in dev, and then promote it to test with the fabric-cicd Python library. Everything runs under a single service principal, so the same flow works on your laptop today and in a CI/CD pipeline tomorrow.
In this tutorial, you:
- Provision dev and test workspaces, a Git connection, and role assignments with Terraform.
- Connect the dev workspace to an Azure DevOps Git repository.
- Author a notebook and a lakehouse in dev and commit them to Git.
- Promote the content from dev to test with fabric-cicd.
- Verify that the deployed notebook is rebound to the test lakehouse.
Two planes, two tools
Automating a Fabric release has two distinct concerns, and it helps to keep them separate: the stable control plane (the infrastructure your content lives in) and the volatile data plane (the content you edit every day). Match the deployment tool to how often each thing changes.
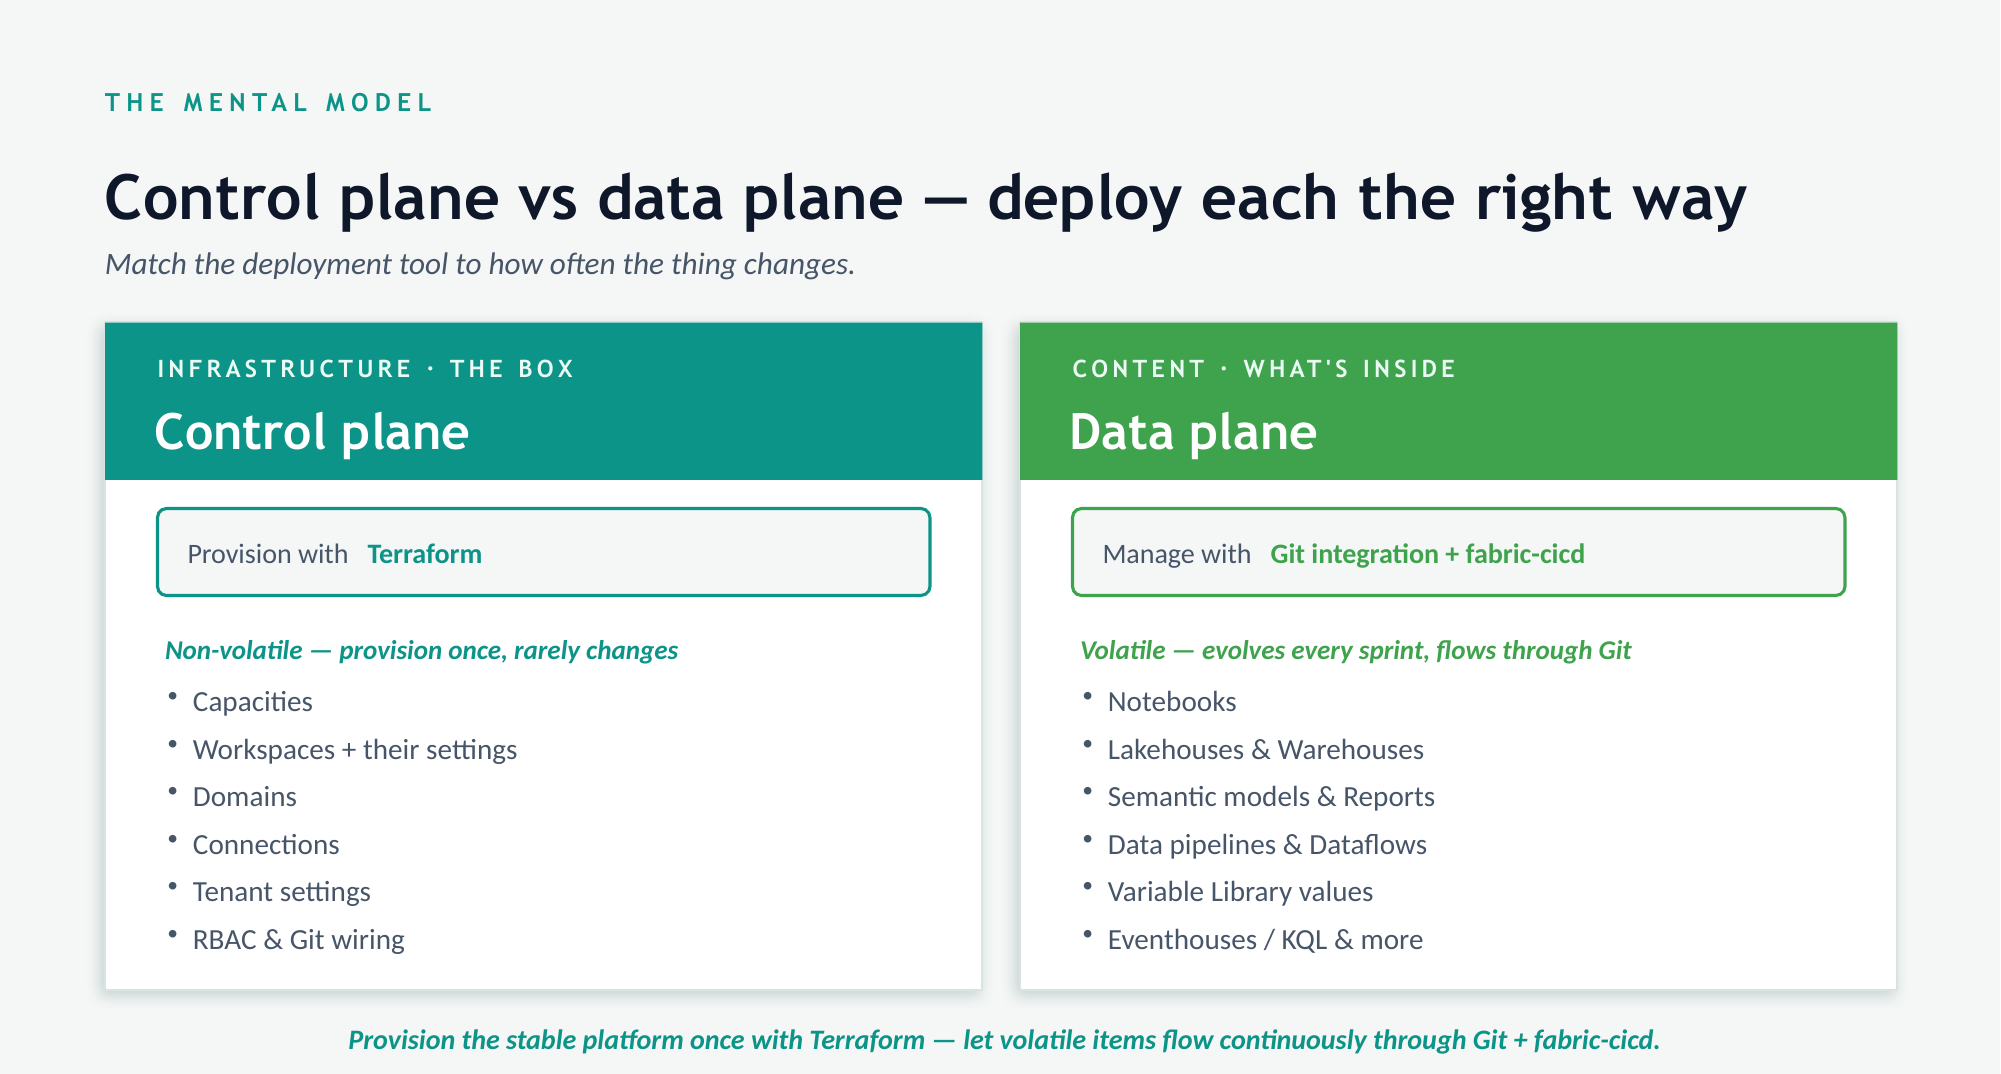
- The control plane holds non-volatile infrastructure that you provision once and rarely change: capacities, workspaces and their settings, domains, connections, tenant settings, and RBAC and Git wiring. This tutorial provisions it with Terraform.
- The data plane holds volatile content that evolves every sprint and flows through Git: notebooks, lakehouses and warehouses, semantic models and reports, pipelines and dataflows, and Variable Library values. This tutorial moves it with fabric-cicd.
The guiding idea: provision the stable platform once with Terraform, then let volatile items flow continuously through Git and fabric-cicd.
This is one approach to automating Fabric, and it favors teams that already treat infrastructure as code and want a scriptable, source-controlled setup. Fabric also offers portal-based deployment pipelines and Git integration, which you can drive from the UI without writing Terraform or Python. For a comparison of the options, see CI/CD workflow options in Fabric.
For the data-plane deployment specifically, fabric-cicd is one option. You can also call the Fabric bulk (CRUD) REST APIs directly if you want full control over the create, update, and delete calls without taking a dependency on the library. This tutorial uses fabric-cicd because it handles the environment-specific rebinding for you.
Why Terraform for the control plane
- Declarative and idempotent. You describe the desired state of your workspaces once; Terraform creates what's missing and leaves the rest alone.
- Drift detection.
terraform planshows exactly how the live tenant differs from your source of truth, so an out-of-band change in the portal becomes visible and reversible. - One provider for many resources. The Microsoft Fabric provider manages workspaces, capacities, connections, Git links, and RBAC through the Fabric REST APIs.
Why fabric-cicd for the data plane
- Deploys the way Fabric expects. fabric-cicd reads the Git representation of your items and publishes them with the correct create-or-update semantics, so you don't hand-roll REST calls.
- Parameterization. A
parameter.ymlfile rebinds environment-specific values, such as pointing a notebook's default lakehouse or a semantic model's connection at the right target per environment. - Cleanup. It can unpublish items that were removed from Git, keeping every environment a faithful mirror of the branch it tracks.
The end-to-end flow
The two planes come together as a single, continuous automation. You provision the platform once, and from then on every content change follows the same repeatable loop—from your editor, through Git, into the test environment—with no manual portal steps in between.
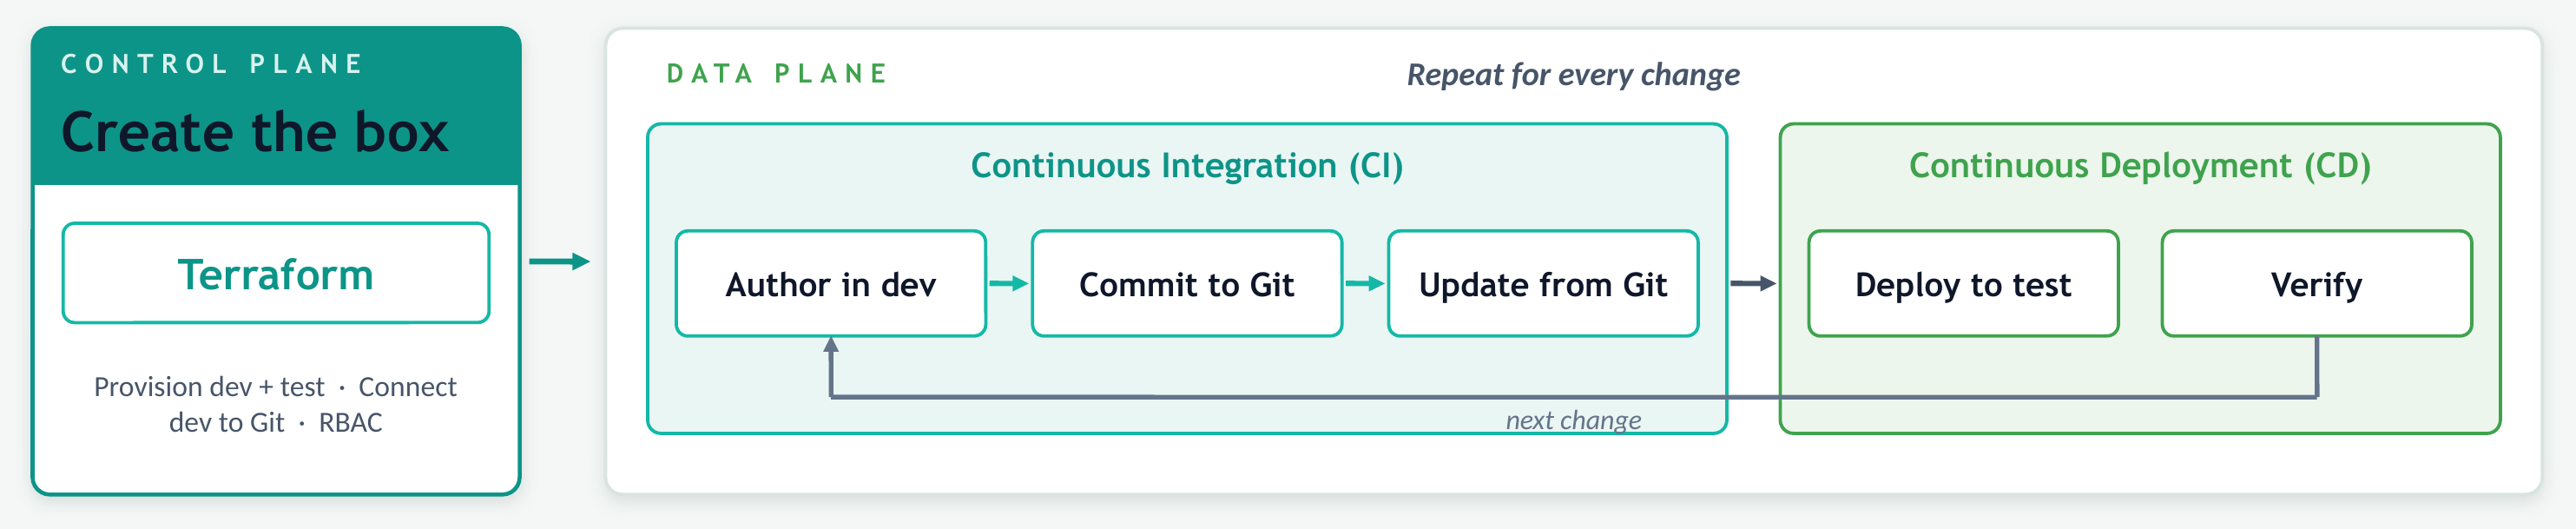
The same service principal authenticates every stage, so the flow you run by hand in this tutorial is exactly what a CI/CD pipeline runs on your behalf: a provision stage (Terraform), then a deploy stage (fabric-cicd) that runs whenever the tracked branch changes. Each stage maps to a step below:
| Stage | Tool | Tutorial step |
|---|---|---|
| Provision the platform (once) | Terraform | Step 1 |
| Author a change and commit it (CI) | Fabric + Git | Step 2–Step 3 |
| Deploy dev to test (CD) | fabric-cicd | Step 4 |
| Verify the result | — | Step 5 |
Important
This end-to-end automation connects the dev workspace to Git non-interactively with a service principal. The same service principal must also have access to the related Azure DevOps organization, project, and repository, so it can establish the connection and sync on your behalf. Using a service principal to connect a workspace to GitHub isn't currently supported, so use Azure DevOps for this flow. You can still use GitHub through the portal-based Git integration, but the automated connection step in this tutorial won't apply.
Prerequisites
- A Fabric capacity. Both workspaces in this tutorial are assigned to the same capacity. A trial capacity works.
- A service principal (Microsoft Entra app registration) with a client secret. This single identity provisions the workspaces and runs the deployment.
- The tenant setting Service principals can use Fabric APIs enabled for a security group that contains the service principal. For more information, see Enable service principal authentication for Fabric APIs.
- An Azure DevOps organization, project, and Git repository that the service principal can access. The repository must already contain the branch (for example,
main) and the folder that you set inado_directory_name(for example,/workspace). The Git connection usesPreferRemote, which reads that folder on the branch when it connects, so both must exist beforehand. If the folder is missing,terraform applyfails withGitProviderResourceNotFound. To create it, commit an empty placeholder file (such as.gitkeep) to that path on the branch before you run Terraform. - The following tools installed locally:
Important
The service principal needs enough permission to create workspaces on the capacity and to be added as a workspace admin. Grant it capacity contributor (or admin) rights, and make sure it belongs to the security group named in the tenant setting above.
Set up authentication
Both Terraform and fabric-cicd authenticate as the service principal. Export its credentials as environment variables so both tools can pick them up:
export FABRIC_TENANT_ID="<tenant-id>"
export FABRIC_CLIENT_ID="<app-client-id>"
export FABRIC_CLIENT_SECRET="<client-secret>"

# fabric-cicd (via DefaultAzureCredential) reads the AZURE_* names:
export AZURE_TENANT_ID="$FABRIC_TENANT_ID"
export AZURE_CLIENT_ID="$FABRIC_CLIENT_ID"
export AZURE_CLIENT_SECRET="$FABRIC_CLIENT_SECRET"
Tip
In a pipeline, source these values from a service connection or a secret store such as Azure Key Vault instead of typing them in a shell. Never commit secrets to Git.
Step 1: Provision the workspaces with Terraform
In this step, you define the control plane as code and apply it. Create a folder for your Terraform configuration and add the following files.
Configure the provider
Create provider.tf. Pinning the provider version keeps every engineer on identical behavior.
# We strongly recommend using the required_providers block to set the Fabric Provider source and version being used
terraform {
  required_version = ">= 1.8, < 2.0"
  required_providers {
    fabric = {
      source  = "microsoft/fabric"
      version = "1.12.0"
    }
  }
}

# Configure the Microsoft Fabric Terraform Provider.
# Auth is via the service principal exported as FABRIC_TENANT_ID /
# FABRIC_CLIENT_ID / FABRIC_CLIENT_SECRET. Never hard-code secrets here.
provider "fabric" {
  # Configuration options
}
Declare the inputs
Create variables.tf:
variable "capacity_name" {
  description = "Name of an existing Fabric capacity that backs both workspaces."
  type        = string
}

variable "workspace_prefix" {
  description = "Prefix for the workspace display names."
  type        = string
  default     = "releaseflow"
}

# Azure DevOps Git settings for the DEV workspace.
variable "ado_organization_name" {
  type = string
}
variable "ado_project_name" {
  type = string
}
variable "ado_repository_name" {
  type = string
}
variable "ado_branch_name" {
  type    = string
  default = "main"
}
variable "ado_repo_url" {
  type = string
}
variable "ado_directory_name" {
  type    = string
  default = "/workspace"
}

# Service principal used by the source-control connection.
variable "tenant_id" {
  type = string
}
variable "client_id" {
  type = string
}
variable "client_secret" {
  type      = string
  sensitive = true
}

# Object id of the developer or group to grant Contributor on DEV.
variable "contributor_principal_id" {
  type = string
}
Define the resources
Create main.tf. This configuration creates two workspaces, a source-control connection, the Git link on dev, and role assignments.
data "fabric_capacity" "capacity" {
  display_name = var.capacity_name
}

# DEV workspace — authored here, committed to Git.
resource "fabric_workspace" "dev" {
  display_name = "${var.workspace_prefix}-dev"
  description  = "Development workspace."
  capacity_id  = data.fabric_capacity.capacity.id
}

# TEST workspace — populated by fabric-cicd from the Git repo.
resource "fabric_workspace" "test" {
  display_name = "${var.workspace_prefix}-test"
  description  = "Test workspace."
  capacity_id  = data.fabric_capacity.capacity.id
}

# Source-control connection (service principal).
resource "fabric_connection" "ado" {
  display_name      = "${var.workspace_prefix}-ado-conn"
  connectivity_type = "ShareableCloud"
  privacy_level     = "Organizational"

  connection_details = {
    type            = "AzureDevOpsSourceControl"
    creation_method = "AzureDevOpsSourceControl.Contents"
    parameters = [{ name = "url", value = var.ado_repo_url }]
  }

  credential_details = {
    credential_type      = "ServicePrincipal"
    skip_test_connection = false
    service_principal_credentials = {
      client_id                = var.client_id
      client_secret_wo         = var.client_secret
      client_secret_wo_version = 1
      tenant_id                = var.tenant_id
    }
  }
}

# Connect the DEV workspace to Git.
resource "fabric_workspace_git" "dev" {
  workspace_id            = fabric_workspace.dev.id
  initialization_strategy = "PreferRemote"

  git_provider_details = {
    git_provider_type = "AzureDevOps"
    organization_name = var.ado_organization_name
    # The Fabric API returns project/repository names lowercased. Pass them
    # lowercased so Terraform's post-apply consistency check matches.
    project_name    = lower(var.ado_project_name)
    repository_name = lower(var.ado_repository_name)
    branch_name     = var.ado_branch_name
    directory_name  = var.ado_directory_name
  }

  git_credentials = {
    source        = "ConfiguredConnection"
    connection_id = fabric_connection.ado.id
  }
}

# RBAC: grant the dev team Contributor on DEV.
# If contributor_principal_id is a security group rather than a user, change
# type to "Group".
resource "fabric_workspace_role_assignment" "dev_contributor" {
  workspace_id = fabric_workspace.dev.id
  role         = "Contributor"
  principal = {
    id   = var.contributor_principal_id
    type = "User"
  }
}
Declare the outputs
Create outputs.tf. The test workspace name feeds the deployment step.
output "dev_workspace_id"   { value = fabric_workspace.dev.id }
output "test_workspace_id"  { value = fabric_workspace.test.id }
output "test_workspace_name" {
  description = "Pass this as --workspace_name to the fabric-cicd deploy step."
  value       = fabric_workspace.test.display_name
}
Apply the configuration
Provide values for the variables (for example, in a terraform.tfvars file that you keep out of Git), then run:
terraform init
terraform plan
terraform apply
Terraform reports the resources it created and prints the outputs.
Note
Checkpoint. In the Fabric portal, confirm that the releaseflow-dev and releaseflow-test workspaces exist and are assigned to your capacity.
Provisioning challenges to know about
The Fabric provider is powerful, but a few behaviors trip people up. Keep these in mind before you run this in production:
- The Git connection can't be imported. The
fabric_workspace_gitresource doesn't supportterraform import. Treat it as a one-time bootstrap and persist it in remote state so later runs don't try to recreate it. Store your state in a shared backend such as Azure Storage rather than on a single laptop. - Case-sensitive Git names. The Fabric API returns Azure DevOps project and repository names lowercased. If you pass them in mixed case, Terraform reports "provider produced inconsistent result after apply." Wrap them in
lower(), as shown above. - Service principal scope. The same identity must be able to create workspaces on the capacity and be added as a workspace member. If provisioning fails with an authorization error, recheck the tenant setting and the capacity role assignment from the prerequisites.
- Secrets stay out of state where possible. The connection secret uses the write-only
client_secret_woargument so it isn't stored in plaintext state. Still, protect your state file as sensitive.
Step 2: Verify the Git connection
Terraform already connected the dev workspace to Git in Step 1. Confirm it:
- In the Fabric portal, open the
releaseflow-devworkspace. - Select Workspace settings > Git integration.
- Confirm the workspace is connected to your Azure DevOps organization, project, repository, branch, and the folder you set in
ado_directory_name.
Note
Checkpoint. The dev workspace shows a Source control status and is synced with the branch you specified.
Step 3: Author content in dev and commit it
Now add content to the dev workspace and push it to Git. In this tutorial you create two items: a lakehouse and a notebook that reads from it.
- In
releaseflow-dev, create a lakehouse named demoLakehouse. - Create a notebook named demoNotebook. Attach
demoLakehouseas its default lakehouse and add a cell that reads a table or writes a small sample DataFrame. - Run the notebook once to confirm it works against the dev lakehouse.
- Open Source control in the workspace, select both items, and Commit them to your branch.
After the commit, your repository contains a demoLakehouse.Lakehouse folder and a demoNotebook.Notebook folder under the directory you configured.
Note
Checkpoint. The Source control panel shows 0 pending changes after the commit, and the item folders appear in Azure DevOps.
Step 4: Deploy from dev to test with fabric-cicd
The test workspace is still empty. Use fabric-cicd to publish the items from Git into test, rebinding the notebook to the test lakehouse along the way.
Tip
fabric-cicd is one way to deploy the data plane. If you prefer to script the REST calls yourself, see Tutorial: CI/CD using the Fabric bulk API.
Install fabric-cicd
Create requirements.txt:
fabric-cicd>=0.1.20
azure-identity>=1.17.0
Install it:
pip install -r requirements.txt
Note
fabric-cicd supports Python 3.9 through 3.13. Install it in a virtual environment to keep it isolated from other projects.
Add a parameter file
The notebook stored in Git points at the dev lakehouse and dev workspace. When you deploy to test, those references must change so the notebook reads and writes test data. fabric-cicd does this with a parameter.yml file.
Create parameter.yml next to your deployment script. Replace the two placeholder GUIDs with the actual dev lakehouse ID and dev workspace ID that appear in your committed notebook content:
find_replace:
  # DEV lakehouse id -> the deployed demoLakehouse id in the target workspace.
  - find_value: "<dev-lakehouse-guid>"
    replace_value:
      test: "$items.Lakehouse.demoLakehouse.$id"
    item_type: "Notebook"
    item_name: "demoNotebook"
    file_path: "/demoNotebook.Notebook/notebook-content.py"

  # DEV workspace id -> the target workspace id.
  - find_value: "<dev-workspace-guid>"
    replace_value:
      test: "$workspace.$id"
    item_type: "Notebook"
    item_name: "demoNotebook"
    file_path: "/demoNotebook.Notebook/notebook-content.py"
The $items.Lakehouse.demoLakehouse.$id and $workspace.$id tokens are resolved by fabric-cicd at deploy time to the GUIDs in the target workspace.
Write the deployment script
Create deploy.py:
import argparse
from azure.identity import DefaultAzureCredential
from fabric_cicd import (
    FabricWorkspace,
    publish_all_items,
    unpublish_all_orphan_items,
)

ITEM_TYPES = ["Lakehouse", "Notebook"]


def main() -> None:
    p = argparse.ArgumentParser()
    p.add_argument("--workspace_name", required=True)
    p.add_argument("--environment", required=True)
    p.add_argument("--repository_directory", default="./workspace")
    p.add_argument("--parameter_file", default="./parameter.yml")
    args = p.parse_args()

    target = FabricWorkspace(
        workspace_name=args.workspace_name,
        environment=args.environment,
        repository_directory=args.repository_directory,
        item_type_in_scope=ITEM_TYPES,
        parameter_file_path=args.parameter_file,
        token_credential=DefaultAzureCredential(),
    )

    # Create or update every item, applying parameter.yml.
    publish_all_items(target)
    # Remove items deleted from the repo so test mirrors the branch.
    unpublish_all_orphan_items(target)

    print(f"Deployment to '{args.workspace_name}' complete.")


if __name__ == "__main__":
    main()
Run the deployment
Point the script at the test workspace name that Terraform printed as test_workspace_name. Clone your repo (or reuse the local copy that dev committed) so the item folders are available locally, then run:
python deploy.py \
  --workspace_name releaseflow-test \
  --environment test \
  --repository_directory ./workspace \
  --parameter_file ./parameter.yml
fabric-cicd creates the lakehouse and notebook in test, applies the find_replace rules, and reports each published item.
Note
Checkpoint. The command prints Deployment to 'releaseflow-test' complete. with no errors.
Step 5: Verify the promotion
Confirm that test received a correctly rebound copy of the content:
- In the Fabric portal, open the
releaseflow-testworkspace. - Confirm that demoLakehouse and demoNotebook now exist.
- Open demoNotebook and confirm its default lakehouse is the test
demoLakehouse, not the dev one. - Run the notebook. It should read and write the test lakehouse.
Note
Checkpoint. The notebook runs in test against the test lakehouse, proving that fabric-cicd rebound the environment-specific references.
You now have a repeatable lifecycle: change items in dev, commit to Git, and rerun deploy.py to promote to test.
Automate in Azure DevOps
Everything you ran locally uses the same service principal a pipeline uses, so moving to CI/CD is mostly a matter of putting these commands in pipeline stages: one stage runs terraform apply (control plane), a later stage runs deploy.py (data plane). For a full, gated Azure Pipelines walkthrough of the fabric-cicd deployment stage, including variable groups and approvals, see Tutorial: CI/CD using Azure DevOps and the fabric-cicd library.
Extend this tutorial
This tutorial deploys a notebook and a lakehouse. The same pattern scales to more of the data plane:
- Add
SemanticModelandReporttoITEM_TYPESand add asemantic_model_bindingrule inparameter.ymlto point models at each environment's connection. - Add a
VariableLibraryand let fabric-cicd activate the value set that matches the--environmentyou pass. - Add a post-deploy step (for example, refresh a semantic model or run a smoke-test notebook) after
publish_all_items.
Clean up resources
To avoid consuming capacity, remove the workspaces you created. From your Terraform folder:
terraform destroy
Alternatively, delete the releaseflow-dev and releaseflow-test workspaces from the Fabric portal.