Note
Access to this page requires authorization. You can try signing in or changing directories.
Access to this page requires authorization. You can try changing directories.
OneLake security roles let you control who can access specific tables and folders in your Fabric data items. This article shows you how to create, edit, and delete security roles, and how to assign members to those roles. For an overview of OneLake security concepts and permissions, see Data security in OneLake.
Create OneLake security roles to control access to data for the following item types:
| Fabric item | Supported permissions |
|---|---|
| Lakehouse | Read, ReadWrite |
| Azure Databricks mirrored catalog | Read |
| Mirrored databases | Read |
| Mirrored catalogs | Read |
Role creation and membership assignment take effect as soon as you save a role, so make sure you want to grant access before adding someone to a role.
Prerequisites
- Fabric Write or Reshare permissions (generally included for Admin or Member workspace users)
Create a role
Use the following steps to create a OneLake security role.
Open the Fabric item where you want to control data access.
Select Manage OneLake security from the item menu.
On the OneLake security pane, select New.
Provide the following information for the new role:
Parameter Value Role name Provide a name that meets the following guidelines:
* The role name only contains alphanumeric characters.
* The role name starts with a letter.
* Names are case insensitive and must be unique.
* The maximum name length is 128 characters.Type of role OneLake security only supports Grant role types. Select Grant permissions Choose the permissions you want to grant. Read is selected at a minimum, and you can add ReadWrite for some item types. Select Next.
Add data to your role. Define the scope of the role by selecting the data to include.
- All data: this role grants access to all the tables and files in this item. This selection also provides access to any folders added in the future.
- Selected data: this role grants access to a selected group of tables and folders. Then, use the following steps to define the approved data for this role.
If you chose Selected data in the previous step, configure that selection:
Select Edit.

Expand the Tables and Files directories to view data in your item.
Check the boxes next to the tables and files that you want the role to apply to.
To apply row-level or column-level security to a table, select the table name, select Data access, and choose the appropriate option. For more information, see apply row-level security and apply column-level security.

Select Add data to add the selected items to your role.
Select Next.
Add members to your role. Manually enter the names or email addresses of the users that you want to include in the role. Or, select Advanced configuration and follow the steps in Assign virtual members.
Select Create.
View and edit a role
Use the following steps to edit an existing OneLake security role.
Open the item where you want to define security.
Select Manage OneLake security from the item menu.
On the OneLake security pane, select the role that you want to edit.
This action opens the role details page. The top of the role details page shows the role name, permissions, and type. The bottom of the role details page includes two tabs: Data in role and Members in role.
Select Edit to Update role name or Edit role permissions.
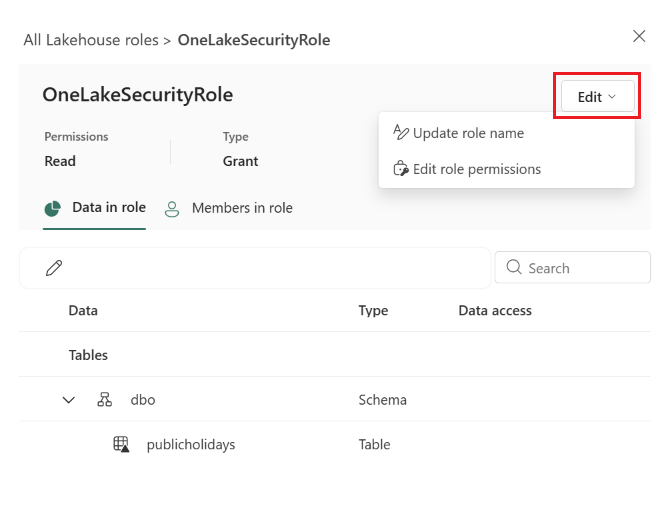
Select the Data in role tab to view all the data that the members of the role can access.

Column What it shows Data The tables or folders the role grants access to. Expand and collapse schemas to view the items underneath, hover over an entry to view its full path, or hover over more options (...) to configure row-level or column-level security. For more information, see Table, column, and row-level security in OneLake. Type The item type: Schema, Table, or Folder. Data access Whether the item has row-level or column-level restrictions. A lock icon with horizontal lines indicates row-level security; a lock icon with vertical lines indicates column-level security. Make any of the following changes to the data in the role:
- Add or remove tables and folders: Select Edit data to open the table and folder selection dialog. Check and uncheck tables or folders to add or remove them from the role, then select Add data to confirm your selections.
- Add or edit row-level security: For more information, see Apply row-level security to a table.
- Add or edit column-level security: For more information, see Apply column-level security to a table.
Select the Members in role tab to view the members of the role.
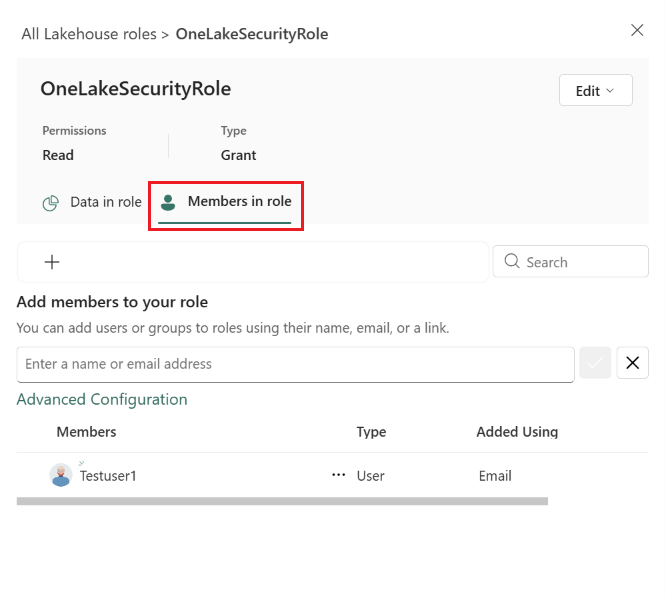
Column What it shows Members The profile picture and name of the member. Type Whether the member is a User or Group. Added using How a user became a member of the role: directly through their email address, or as part of a group. For more information about adding users by using permissions groups, see Assign virtual members. To edit the members of the role, select Add members.
To add members manually, enter a name or email in the Add members to your role textbox. Select the correct name from the suggested list. Then, select the check icon to confirm your selection, or select the X icon to clear the selection.
To add members based on their Fabric item permissions, select Advanced configuration and create a virtual membership group. For more information, see Assign virtual members.
To remove users from the role, select more options (...) next to their name and select Remove from role.
When you make any changes to role membership, the role updates immediately. A notification shows the success or failure of any changes.
Apply row-level security to a table
Define row-level security (RLS) rules as part of any OneLake security role that grants access to table data in Delta Parquet format. Rows are relevant only to tabular data, so you can't define RLS for non-table folders or unstructured data. As a best practice, avoid vague or overly complex RLS expressions. For the full rule syntax, see Row-level security syntax reference.
Go to your item and select Manage OneLake security.
Select an existing role, or select New to create a new role.
On the role details page, select more options (...) next to the table you want to secure, and then select Row security.

In the code editor, type the SQL statement that defines which rows users can see. For syntax guidance, see Row-level security syntax reference.
Select Save to confirm the row security rules.
Apply column-level security to a table
Define column-level security (CLS) as part of a OneLake security role for any Delta Parquet table. By default, users have access to all columns. Create CLS rules that hide columns to revoke access.
Important
Removing access to a column doesn't deny access to that column if another role grants access to it.
Go to your data item and select Manage OneLake security.
Select an existing role, or select New to create a new role.
On the role details page, select more options (...) next to the table you want to secure, and then select Column security.
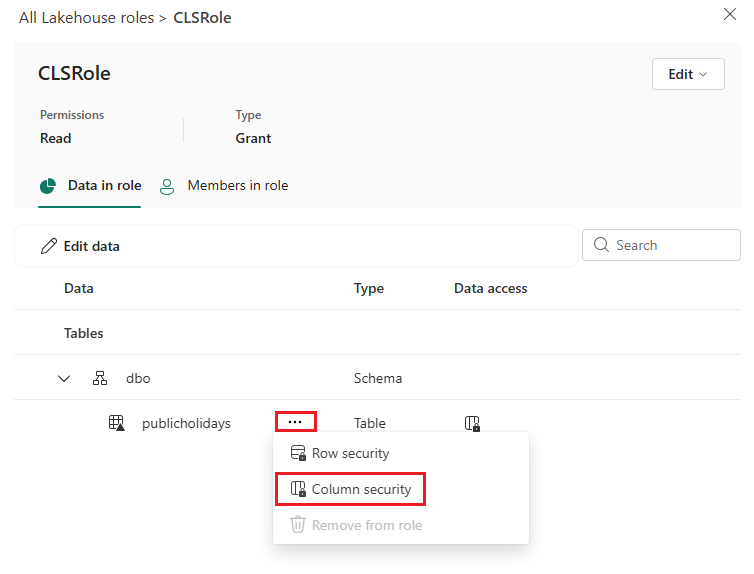
To remove access to a column, set the column Permission to Hide. Use the checkboxes to select multiple columns and set permissions in bulk. Use the Filter to view columns by permission. At least one column must remain in the list of allowed columns.
Select Save.
Assign a member or group to a role
OneLake security roles support adding individual users, Microsoft Entra groups, and security principals.
You can add users or groups directly to a role by using the Add members to your role box on the New role > Member page. You can also create virtual memberships with permission groups by using the Advanced configuration control.
When you add users directly to a role, you make them explicit members of the role. These users appear with their name and picture in the Members list.
Important
When you add a user to a OneLake security role, remove them from the DefaultReader role. Otherwise, they keep full access to the data.
The role's virtual membership adjusts dynamically based on the users' Fabric item permissions. When you select Advanced configuration and a permission, you add any user in the Fabric workspace who has all the selected permissions as an implicit member of the role. For example, if you choose ReadAll, Write, any user of the Fabric workspace who has ReadAll and Write permissions to the item becomes a member of the role. To see which users a permission group includes, look at the Added using column in the Members in role tab. You can't manually remove these members. To remove a member you added through a permission group, remove the permission group from the role.
Assign virtual members
Use the following permissions to identify virtual members:
- Read
- Write
- Reshare
- Execute
- ReadAll
To assign users to permission groups, use the following steps:
Select the name of the role you want to assign members to.
On the role details page, select the Members in role tab.
Select Add members.
Select Advanced configuration.
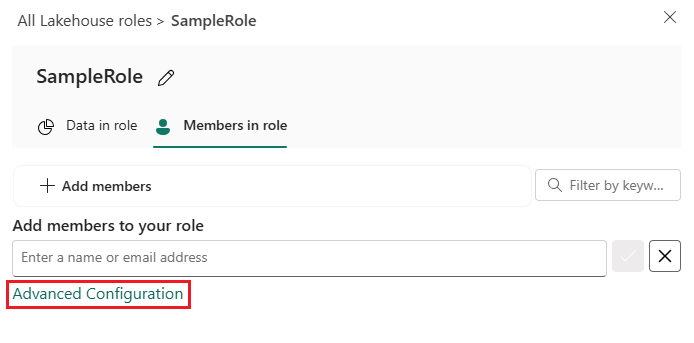
In the Permission groups box, select the check box next to each permission that you want to include users for.
Each permission group shows how many users are in that group.
Selecting multiple permission groups includes users with all of the selected required permissions.
Select Add to include the groups and save the role.
Delete a role
Use the following steps to delete a OneLake security role.
Open the item where you want to define security.
Select Manage OneLake security from the item menu.
On the OneLake security pane, check the box next to the roles you want to delete.
Select Delete and wait for the notification that the roles are successfully deleted.