Note
Access to this page requires authorization. You can try signing in or changing directories.
Access to this page requires authorization. You can try changing directories.
In this tutorial, you use approvals to control a realistic workflow: onboarding a new enclave for an application team, then enabling and refining external connectivity through a community endpoint and enclave connection.
This tutorial mirrors the core resources from the Tutorial 1-1 path (community, enclave, endpoint, and connection) but focuses on the approvals experience to improve governance and oversight of critical changes.
Scenario
A fictional customer, Fabrikam, runs a shared Azure Enclave community for regulated workloads. A platform engineer needs to:
- Create a new enclave for a data workload.
- Allow the workload to reach a partner API over HTTPS.
- Update connectivity settings after security review.
Fabrikam requires approvals for:
Enclave creationCommunity endpoint updatesEnclave connection updates
Prerequisites
Before you start, make sure you have:
- An Azure subscription with access to Azure Enclave.
- A user account that can create community and enclave resources.
- At least one approver assigned the Enclave Approver Role at the correct scope.
- Familiarity with the base deployment flow from these tutorials:
For approval concepts and roles, see Understand approvals and Configure approvals.
Step 1: Create the community with approvals enabled
- In the Azure portal, open
Azure Enclaveand selectCommunities. - Select
Createand enter your basic settings, such ascmt-fabrikam,East US, and your address space. - Go to the
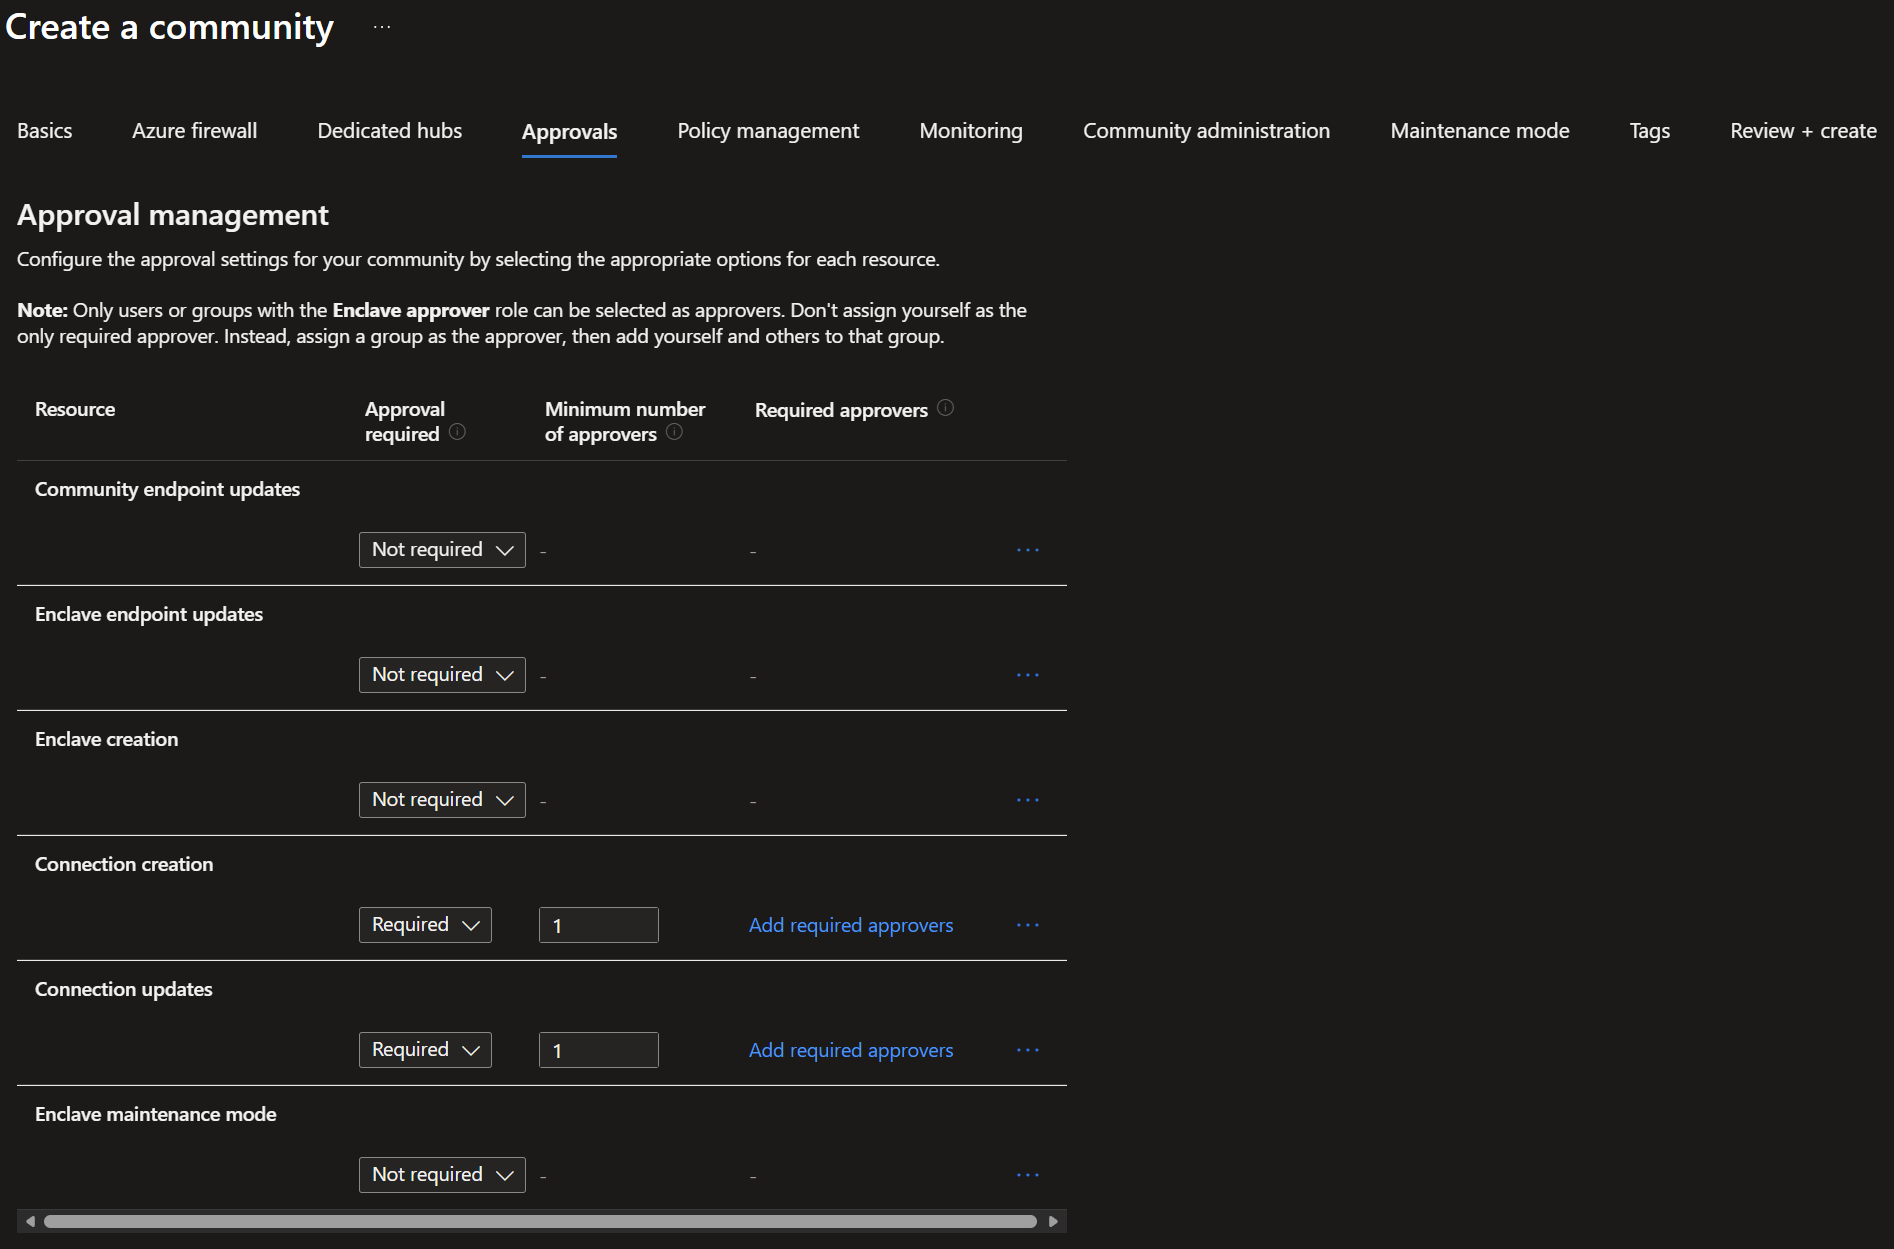
Approvalstab. - Configure only these approval requirements:
Enclave creation:Required,Minimum number of approvers = 1Community endpoint updates:Required,Minimum number of approvers = 1Enclave connection updates:Required,Minimum number of approvers = 1
- Complete
Review + create, and then selectCreate.
Note
In production, define approvers as security groups and use a minimum approver count that matches your governance policy. You can also add the security group as a required approver if that meets your requirements.
Step 2: Submit and approve enclave creation
These steps require a person that requests the resource creation or change and another person to approve the request. The approver must have the Enclave Approver Role at the correct scope. This tutorial requires one minimum number of approvers but you would need multiple people to approve a request if your configuration requires that.
- As the requestor, go to
Enclavesand selectCreate. - Enter enclave details for the new workload enclave (for example,
ve-Enclave-Data) and submit the request. - Ask your approver to open
Approvalsfrom the Azure Enclave service, community, or enclave view. - Ask your approver to find the pending
Enclavecreation request and review the requested details. - Ask your approver to select
Approveto allow deployment to continue. - Return to
Enclavesand confirm the enclave provisioning state isSucceeded.

Step 3: Create a community endpoint for partner egress
- Open your community and select
Community Endpoints>Create. - Enter endpoint basics (for example,
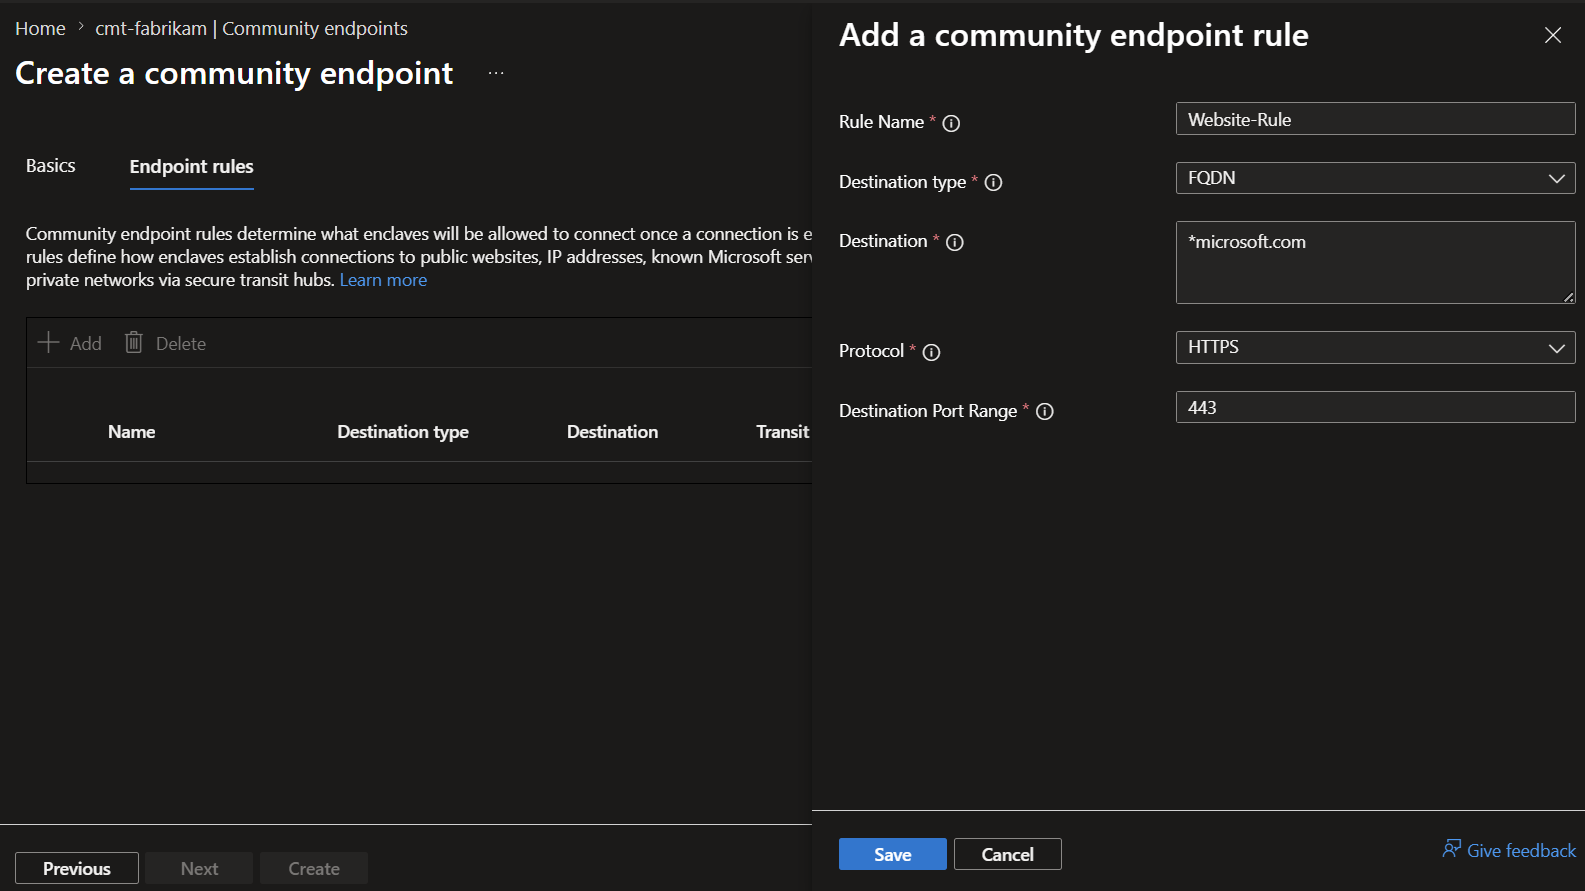
ce-fabrikam-partner-api). - Add a rule for partner API egress:
Destination Type:FQDNDestination: Enter the destination in the format*.microsoft.com,*.azure.com.Protocol:HTTPSPort:443
- Select
Review + create, and then selectCreate.
Step 4: Update the community endpoint and complete approval
After the security review, Fabrikam narrows the destination from a broad test value to a production-specific value. This update requires approval.
- Open Community Endpoints, select
ce-fabrikam-partner-api, and select Edit. - Update one rule value (for example, a stricter FQDN) and save. For this tutorial, you can add or remove your FQDNs.
- Ask your approver to open Approvals and review the pending Community endpoint update request.
- Ask your approver to approve the request.
- Confirm the endpoint reflects the approved update.
For the approval review process, see Manage approval requests.
Step 5: Create an enclave connection and then update it with approval
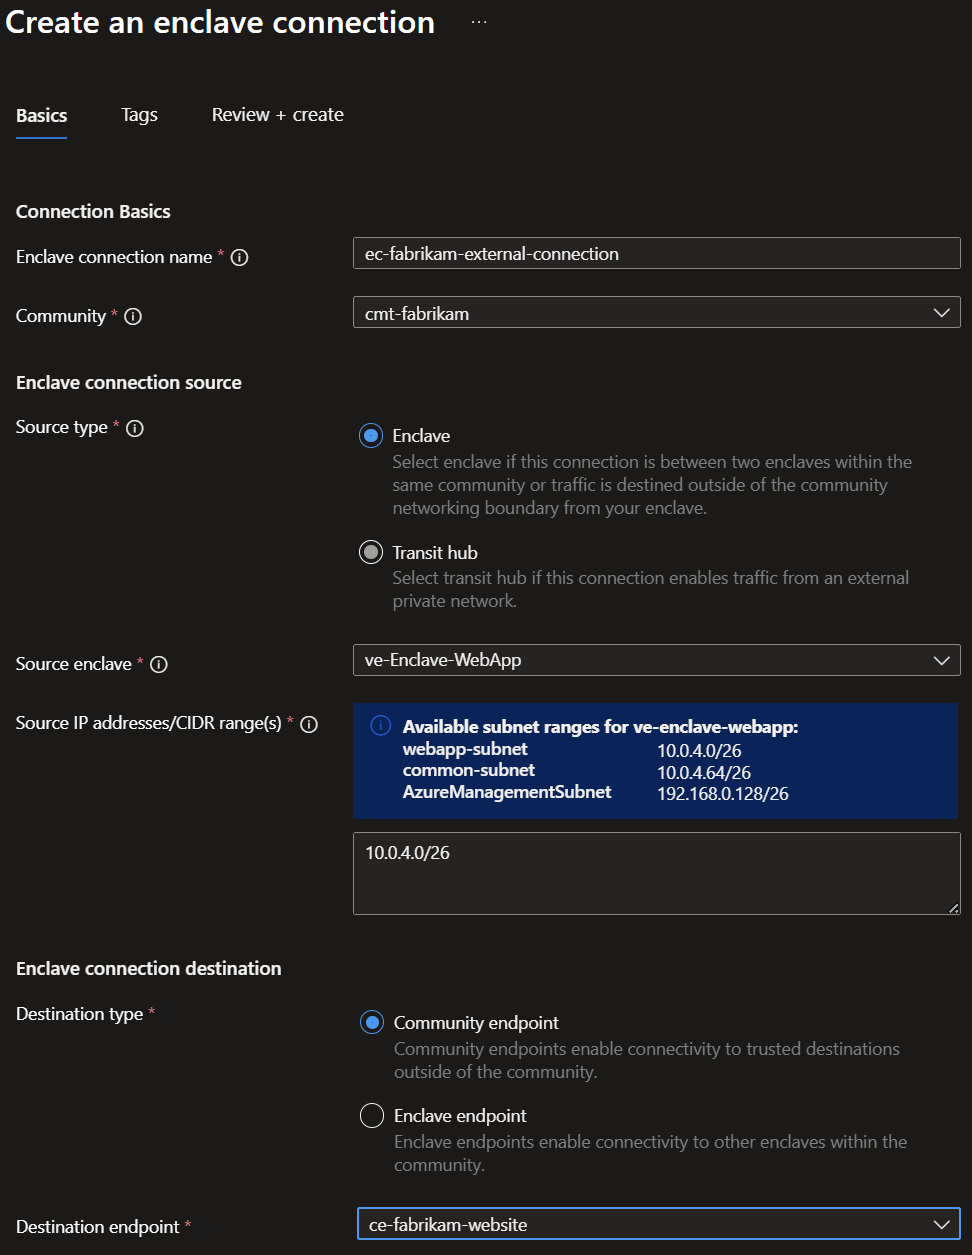
- In the community, select Enclave Connections > Create.
- Create a connection from your source enclave (for example,
ve-Enclave-Data) to the community endpoint (ce-fabrikam-partner-api). - After creation succeeds, open the connection and change one setting that triggers an update request (for example, source CIDR range).
- Ask your approver to open Approvals, review the pending Enclave connection update request, and approve it.
- Confirm the connection state is healthy after the approved update.
Validate results
At the end of this tutorial, verify:
- The enclave creation request required approval and completed successfully.
- Community endpoint update required approval before the change took effect.
- Enclave connection update required approval before the change took effect.
- Approval history shows who approved each request and when.
Clean up resources
If you no longer need this environment, delete the tutorial resources:
- Delete the enclave connection.
- Delete the community endpoint.
- Delete the enclave.
- Delete the community.
Note
If all of these resources are in the same resource group and you no longer need the contents of the resource group, you can delete the whole resource group to clean up the tutorial resources.
For full cleanup guidance, see:
- Tutorial 1-1: Deploy an Azure Enclave community
- Tutorial 1-2: Create enclaves in an Azure Enclave community
- Tutorial 1-5: Create enclave or community endpoint resources in Azure Enclave