Note
Access to this page requires authorization. You can try signing in or changing directories.
Access to this page requires authorization. You can try changing directories.
This article describes how to get events from an Azure Event Grid namespace into Fabric Real-Time hub.
Prerequisites
Create or have an Event Grid namespace with managed identity enabled.
A workspace that's not My workspace, operating in a Fabric capacity or trial license mode, is required.
If you have Member (or higher) permissions, no extra setup is needed. If you don't have Member permissions, ask a colleague with Member access to assign Contributor access to the Event Grid service principal before you add the source:
- In the workspace, open the Manage access pane.
- Select Add people or groups.
- Enter the Event Grid namespace name and choose the matching service principal.
- Assign the Contributor role and select Add.
Configure portal settings
To ensure that the managed identity of the Event Grid namespace has the required permissions, configure settings in the admin portal:
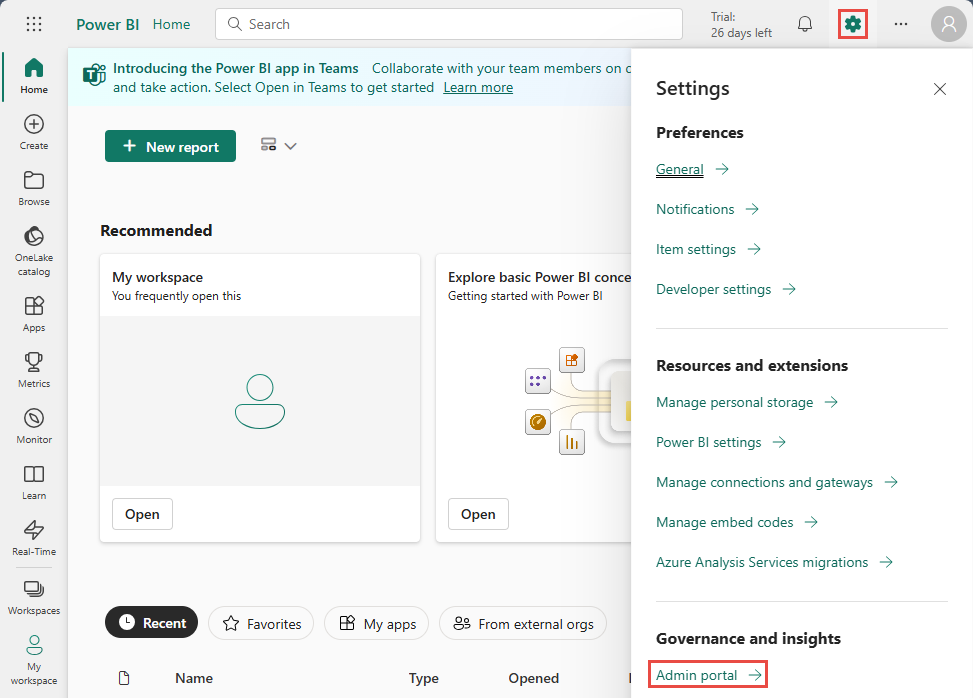
In the upper-right corner, select Settings (gear icon).
In the Governance and insights section, select Admin portal.
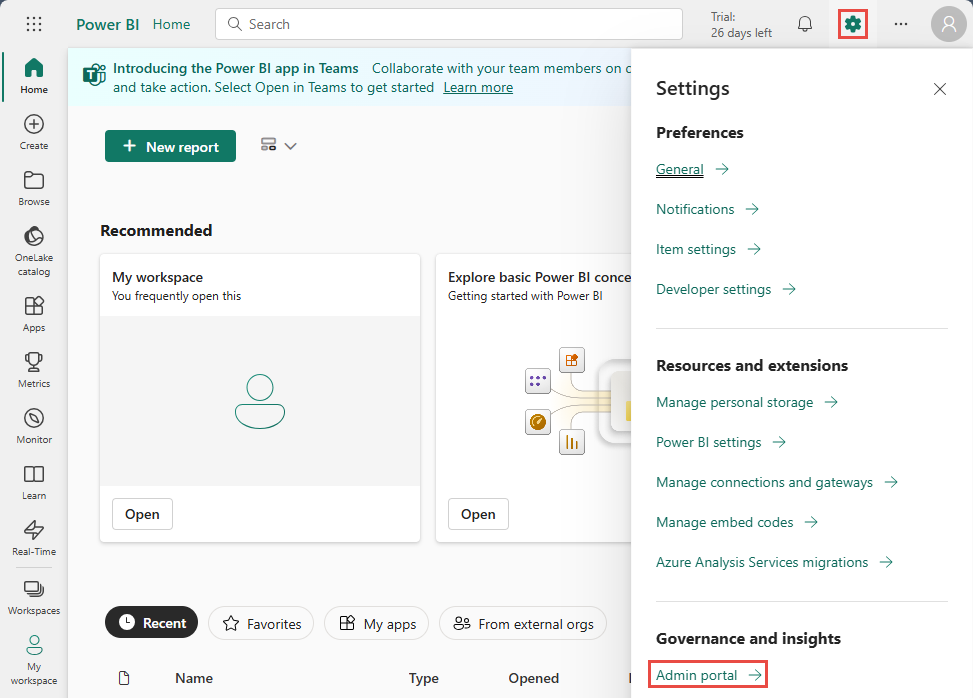
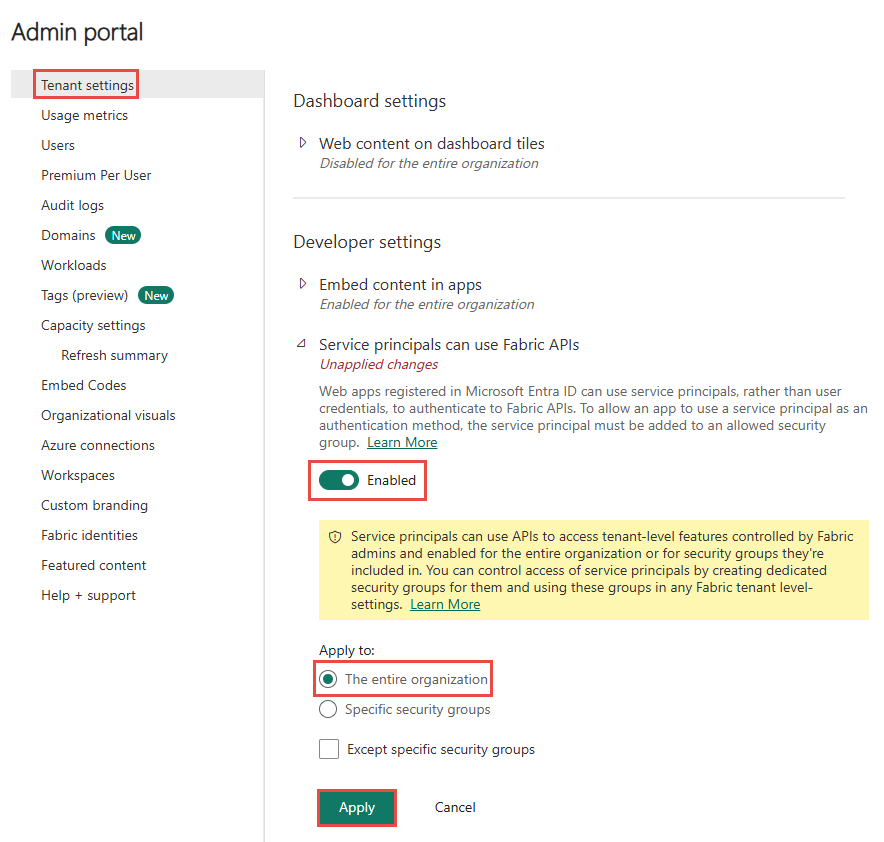
On the Tenant settings page, go to the Developer settings section.
To grant the service principal access to Fabric APIs for creating workspaces, connections, or deployment pipelines:
- Expand the Service principals can use Fabric APIs option.
- Set the toggle to Enabled.
- Under Apply to, select The entire organization.
- Select Apply.
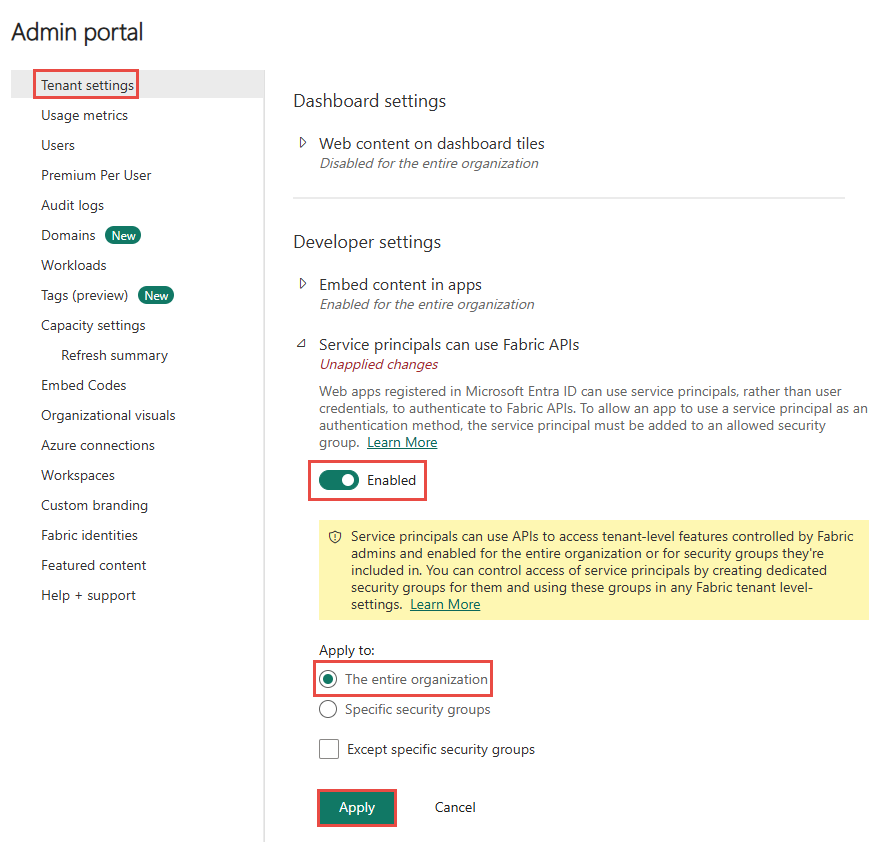
To access all other APIs (enabled by default for new tenants):
- Expand the Allow service principals to create and use profiles option.
- Set the toggle to Enabled.
- Under Apply to, select The entire organization.
- Select Apply.
Get events from an Azure Event Grid namespace
You can get events from an Azure Event Grid namespace into Real-Time hub in one of the following ways:
Azure sources page
In Real-Time hub, select Azure sources on the left navigation menu. You can use the search box to the type your resource name or use filters (Source, Subscription, Resource group, Region) to search for your resource.
For Source at the top, select Azure Event Grid Namespace from the drop-down list.
For Subscription, select an Azure subscription that has the resource group with your Event Grid namespace.
For Resource group, select a resource group that has your Event Grid namespace.
For Region, select a location where your Event Grid namespace is located.
Now, move the mouse over the name of the Event Grid namespace that you want to connect to Real-Time hub in the list of namespaces, and select the Connect button, or select ... (ellipsis), and then select Connect data source.
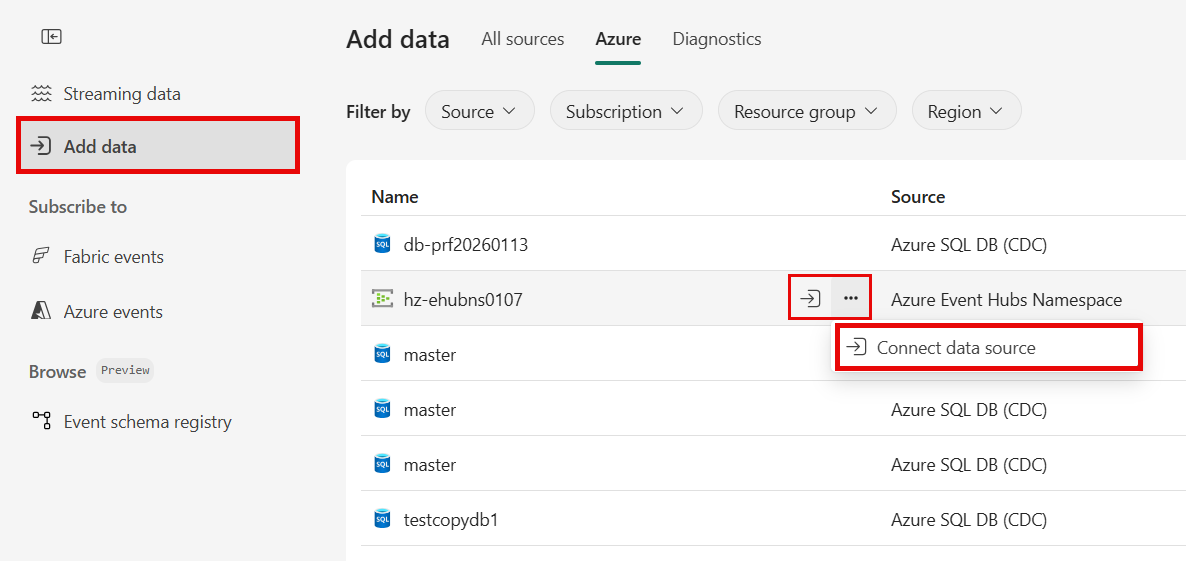
Now, move on to the Configure and connect to an Event Grid namespace section. Skip the selection of subscription and namespace as they're already selected for you.
Data sources page
Sign in to Microsoft Fabric.
If you see Power BI at the bottom-left of the page, switch to the Fabric workload by selecting Power BI and then by selecting Fabric.
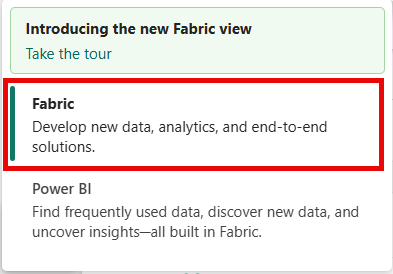
Select Real-Time on the left navigation bar.
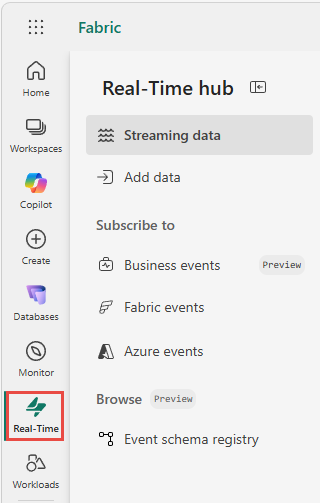
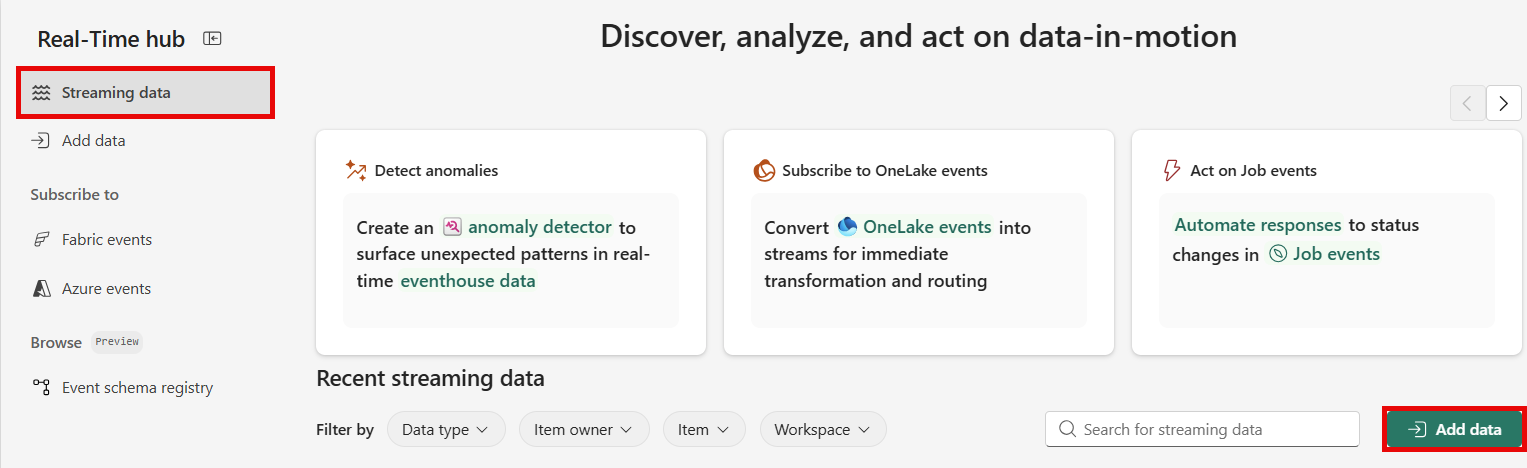
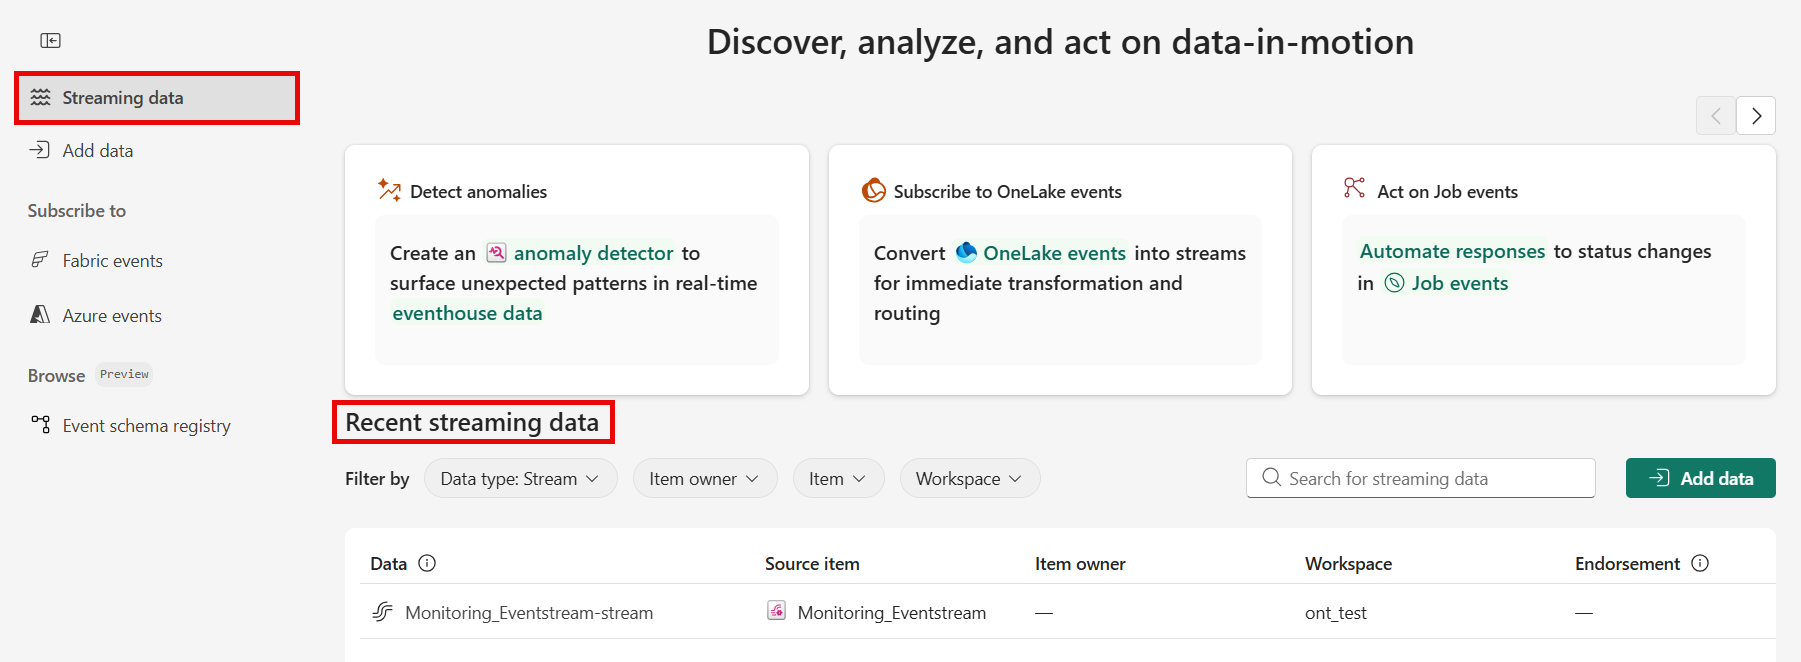
The Streaming data page opens by default. Click on the Add data button to get to the Add data page.
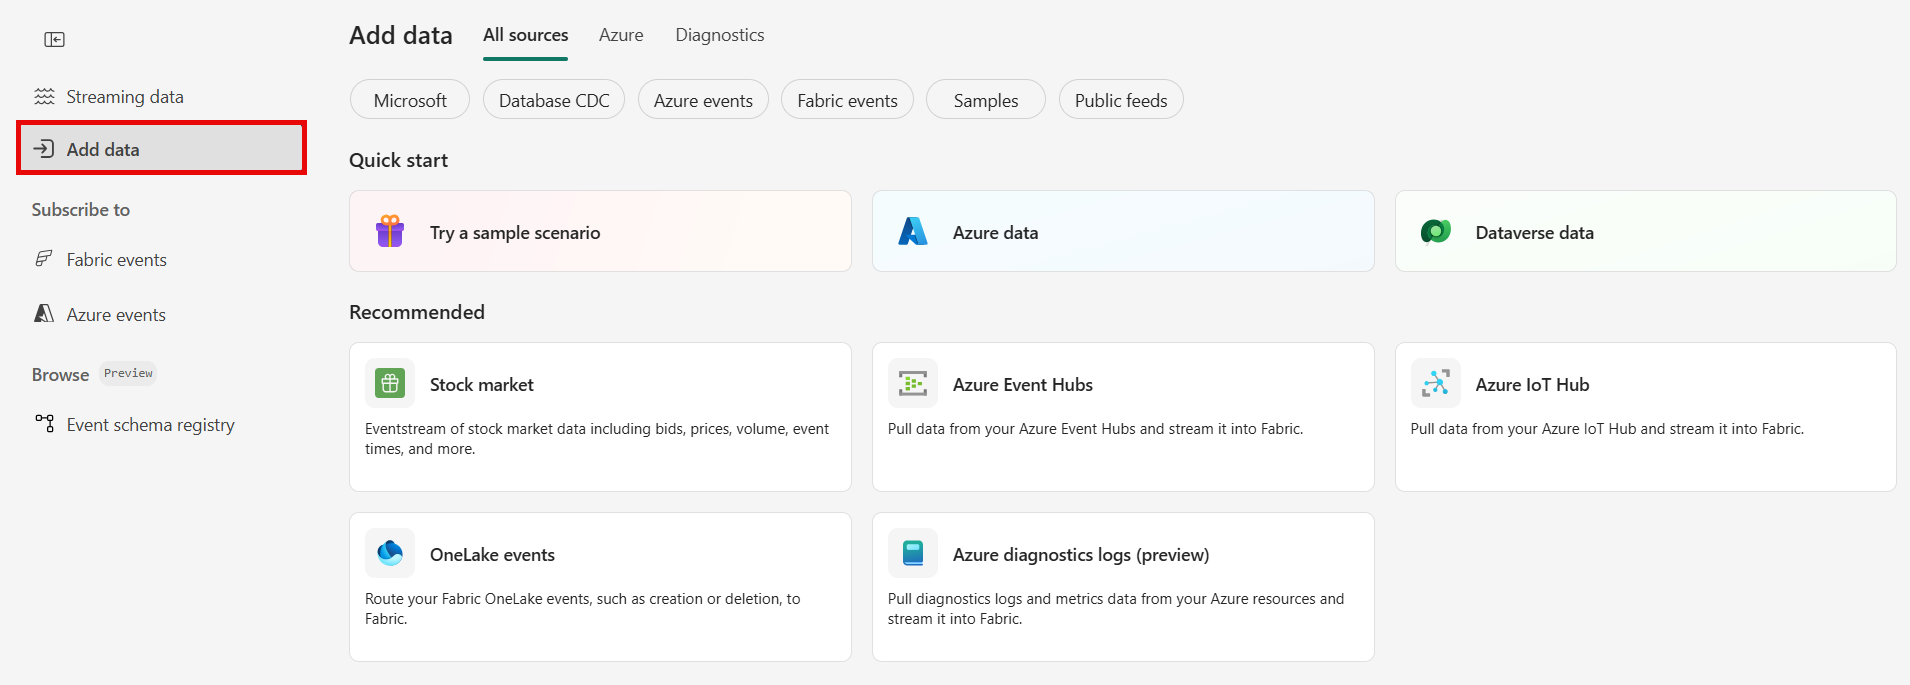
You can also get to the Add data page directly by selecting the Add data option in the left navigation bar.
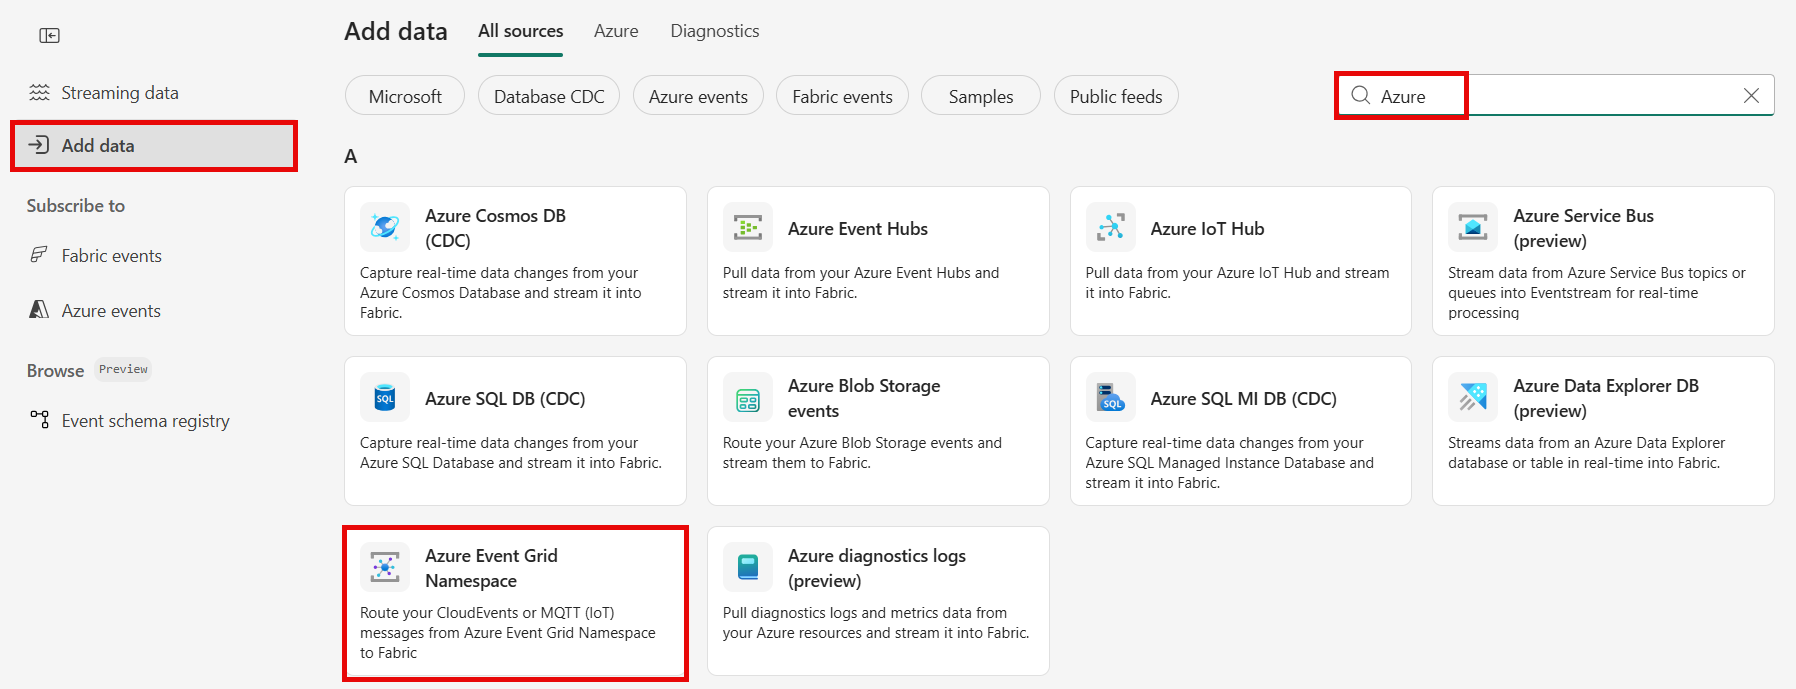
On the Data sources page, search for Azure Event Grid namespace, and then select Connect on the Azure Event Grid Namespace tile.
Configure and connect to the Event Grid namespace
On the Configure connection settings page, follow these steps:
For Subscription, select the Azure subscription that has the Event Grid namespace.
For Namespace name, select your Event Grid namespace from the dropdown list.
The contents of the Namespace topic section vary depending on whether Message Queuing Telemetry Transport (MQTT) is enabled:
If MQTT isn't enabled for the namespace topic, create a new topic or select an existing topic.
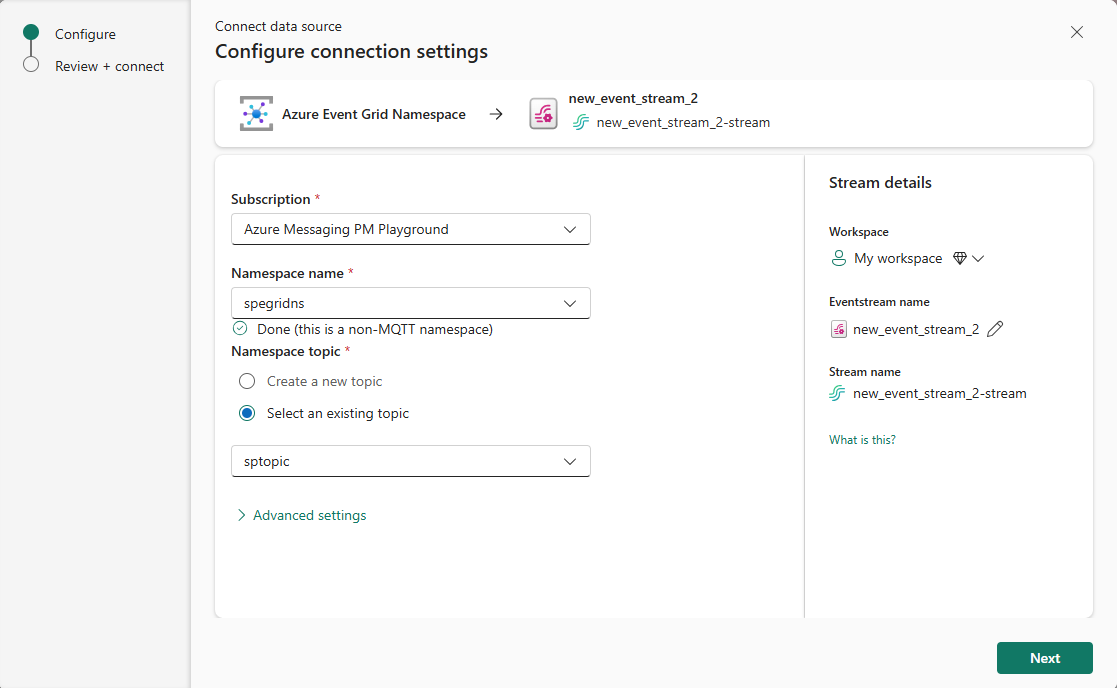
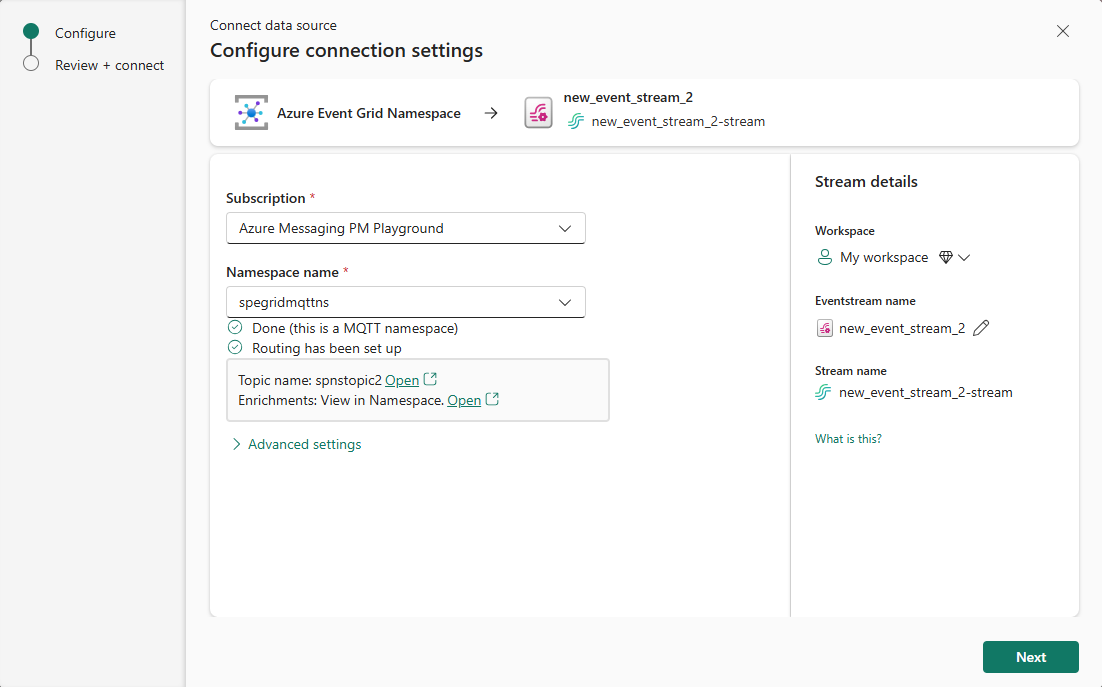
If the namespace has MQTT enabled, a topic, and routing enabled, select the subscription and the namespace name.
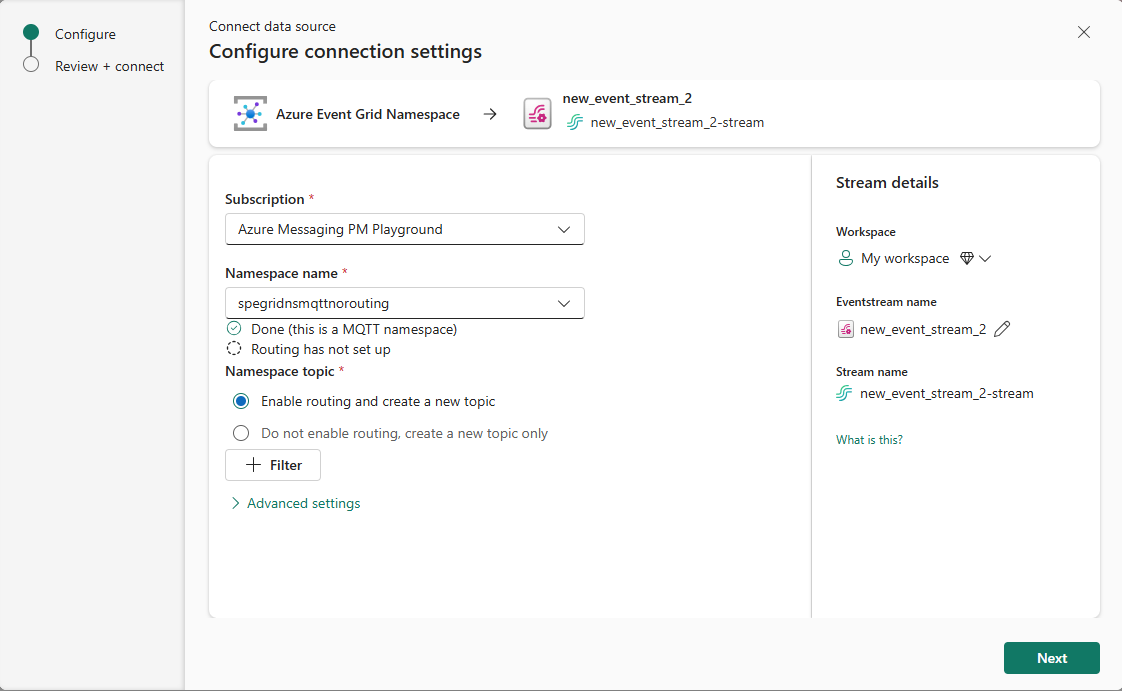
If the namespace has MQTT enabled but routing isn't enabled for the namespace, select the subscription, the namespace name, and namespace topic options.
Stream or source details
On the Connect page, follow one of these steps based on whether you're using Eventstream or Real-Time hub.
Eventstream:
In the Source details pane to the right, follow these steps:
For Source name, select the Pencil button to change the name.
Notice that Eventstream name and Stream name are read-only.
Real-Time hub:
In the Stream details section to the right, follow these steps:
Select the Fabric workspace where you want to create the eventstream.
For Eventstream name, select the Pencil button, and enter a name for the eventstream.
The Stream name value is automatically generated for you by appending -stream to the name of the eventstream. This stream appears on the real-time hub's All data streams page when the wizard finishes.
Select Next at the bottom of the Configure page.
Review and connect
On the Review + connect screen, review the summary, and select Add (Eventstream) or Connect (Real-Time hub).
View data stream details
On the Review + connect page, if you select Open eventstream, the wizard opens the eventstream that it created for you with the selected Event Grid namespace as a source. To close the wizard, select Finish at the bottom of the page.
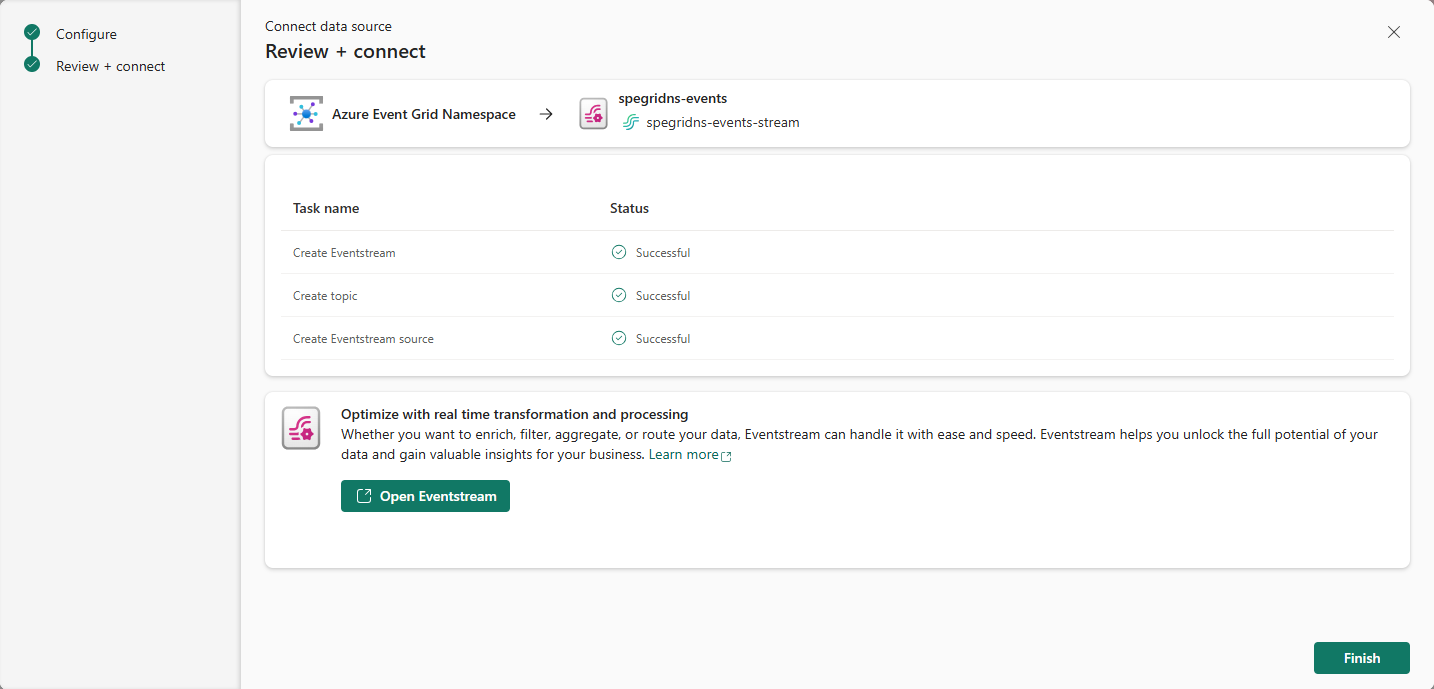
You should see the stream in the Recent streaming data section of the Real-Time hub page. For detailed steps, see View details of data streams in Fabric Real-Time hub.
Confidential and highly confidential sensitivity
If you mark the eventstream with either Confidential or Highly Confidential sensitivity labels, follow these steps so that the Event Grid namespace's managed identity has the appropriate access.
Select Settings (gear icon) in the top-right corner.
Select Admin portal in the Governance and insights section.
Activate the following tenant setting to grant the service principal access to Fabric APIs for creating workspaces, connections, or deployment pipelines.
On the Tenant settings page, in the Developer settings section, expand Service principal can use Fabric API option.
Toggle to Enabled.
Apply to the entire organization.
Select Apply.
Enable this option to access all other APIs (enabled by default for new tenants):
- On the Tenant settings page, in the Developer settings section, expand Allow Service principals to create and use profiles option.
- Toggle to Enabled.
- Apply to the entire organization.
- Select Apply.
Related content
To learn about consuming data streams, see the following articles: