Note
Access to this page requires authorization. You can try signing in or changing directories.
Access to this page requires authorization. You can try changing directories.
Important
Visual Studio App Center was retired on March 31, 2025, except for the Analytics and Diagnostics features, which will continue to be supported until June 30, 2026. Learn more.
On this page you can read about the steps to take when distributing an iOS application to specific testers. Learn what device registration, provisioning, and app re-signing are. You can also learn how to use App Center functionality to make this process as painless as possible. Finally there are solutions to some common problems you may come across.
App signing, re-signing, and device provisioning
Developers sign apps for security as required by Apple when distributing. The requirement is the same for distribution through Xcode, App Center, or the iTunes Store. Code signing is a precaution to ensure nobody has tampered with your app. You can read more in the Apple documentation on app signing.
The following diagram displays the entire app re-signing flow in App Center. Let's go over these steps in more detail.
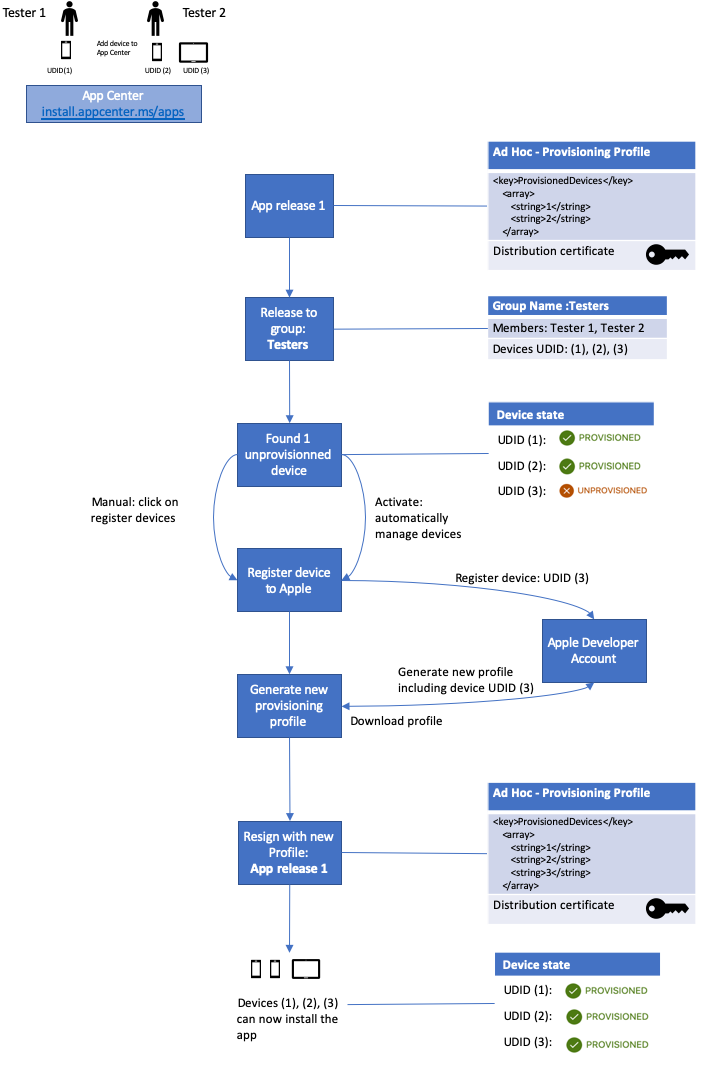
App re-signing only applies when you want to distribute an iOS app to specific test devices. In the diagram, you want to distribute an app release to the devices of Tester 1 and Tester 2. To do this, you sign your app with an ad hoc provisioning profile. This provisioning profile has a list of unique device identifiers (UDIDs). Only devices that are on that list are "provisioned," or able to install the .ipa. App Center can detect whether a device is provisioned, because we know the UDID of the device from when the tester first registered their device with App Center. If we detect that the device that the tester is using isn't on the list of provisioned devices for the .ipa they want to download, then we show the message "The developers are working on a version for your device."
Once you know which devices you want to use for testing:
- Register the devices in your Apple developer account.
- Add them to your provisioning profile.
- Generate a new provisioning profile.
- Download the provisioning profile.
- Build your app with this profile.
When another new device appears, such as the device with UDID 3 in the diagram, repeat these steps. This can be inconvenient, and you don't want to change your continuous integration system or ask the developer to always keep adding new devices to the profile and releasing new builds. This is where re-signing comes in. It means taking an existing application build and signing it again (re-signing) with a different provisioning profile, so you don't have to create a new build.
App Center helps you with this process and can also automate it. These are the manual and automatic steps shown in the diagram, provisioning the device with UDID 3. App Center helps you register tester device IDs into your Apple developer account, create a new provisioning profile, and re-sign the app with it all from within the App Center portal. App Center requires access to your Apple developer account for registering the devices.
To manually add devices to an existing release, you can use Register devices on the page for a distribution group. See Device registration.
To automatically add devices, turn on Automatically manage devices under the distribution group settings. This option can only be accessed through an app-level distribution group and isn't available through a global group. You can access an app-level distribution group by selecting the app in App Center, then clicking on Distribute. Under Distribute, click on Groups and then click the specific group that you want to manage. You can also opt in to automaticaly adding devices when you distribute a new release. This option is in the Devices step in the wizard for distributing a new release.
App Center adds the new device to the list in the provisioning profile and re-signs your app with this provisioning profile. Now the new device can also install the app. These are the bottom steps in the diagram.
Re-signing capabilities
Some things to note when you use re-signing in App Center:
- Automatically managing devices in groups works only for distributing to non-public and non-shared groups.
- If you're distributing to individual users, register their devices manually and re-sign the app. To use the tools mentioned in this article, you must first add the testers to a group.
- If you add multiple groups to your release, configure each group separately using Automatically manage devices under the group settings.
- Managing devices is only required for iOS apps signed with a developer or ad hoc profile.
Prerequisites
Before you can use the device capabilities of App Center, you should:
- Have the production certificate used for the original app signing.
- Have the credentials to your Apple developer account which holds the role of Account Holder, Admin, or App Manager.
- Use Manually manage signing instead of Automatically manage signing when distributing the app from Xcode.
Device registration
Registering a device means making it part of the list of devices on the Apple Developer portal that can then be included in a provisioning profile. To register a device, select a distribution group with at least one device that isn't yet provisioned and navigate to the Devices tab. You'll see a device here with the status "unprovisioned" and a message at the top saying there are unprovisioned devices. Follow these steps to register the devices:
- Select the Register devices button.
- A dialog prompts for your username and password used in the Apple Developer portal.
- Once you sign in with your Apple username and password, App Center adds the unprovisioned devices to both your Apple developer account and the releases provisioning profile.
- Optionally you can upload a .p12 file to re-sign the app and distribute it to the newly added devices. Read more on how to generate a .p12 file.
If you prefer to handle re-building your app with the updated provisioning profile separately, you can still use App Center to register your tester's devices automatically in the Apple developer portal without the re-signing step. To do this, leave Re-sign my app unchecked and download the updated provisioning profile with the button on the review screen. You can also download the provisioning profile through Xcode or the Apple Developer portal.
Distribute a new release
When you distribute a new release to a group that doesn't have automatic device management enabled, a Devices step is part of the wizard. The step checks if you have unprovisioned devices in the distribution group; if this happens, you can check the Register devices and re-sign app checkbox. App Center then runs three operations for you:
- Register new device IDs in the Apple Developer portal.
- Add the devices to the provisioning profile and download it.
- Re-sign the uploaded binary so that all testers can install it.
The flow requires the username and password for the Apple Developer portal and the certificate used to sign the app at build time. You provide the certificate as an exported .p12 file. Read more on how to generate a .p12 file. If you already have your Apple ID and certificate saved in App Center, you can choose it from the dropdown menus.
Privacy concerns on username and password
When you add your Apple credentials and a signing certificate to App Center, we use a secure connection. App Center stores the information in an encrypted vault. It isn't possible for any user to download or retrieve sensitive information from the vault.
If you provide this set of credentials and a certificate, it's automatically available to app collaborators but only for that specific service. As an example, say developer X adds credentials and certificates to distribution group "Tester." Then when developer Y distributes a new release to the "Tester" group, X's username, password, and certificate are by default selected. App Center will use them for developer Y. App Center only uses your Apple ID during the transaction and it doesn't use it for anything else.
Apple device registration limit
Each Apple developer account has a finite number of spots for devices per device type. Apple works with five device types: iPad, iPhone, iPod, Apple TV, and Apple Watch. Each of these has a limitation of 100 devices. Imagine you register six devices, all of which are iPhones. You then have 94 device IDs left for iPhones and still have 100 left for each of the four other device types. You can only unregister devices once per year to get those slots back.
How to generate a .p12 file
You can store an Apple distribution certificate and private key in a Private Information Exchange (.p12) file. To do this, you need an Apple production certificate stored on your local machine. If you don't, then you won't have the private key.
- Open the Keychain Access app on your Mac and select the My Certificates category on the left.
- Find the right distribution certificate and expand it to see the corresponding private key. a. If the private key isn't there, you must either create a new certificate or run these steps on the machine where you created the certificate.
- Select either the certificate or the private key or both. Then right-click on the selected item(s) to get the context menu and select the action that starts with Export.
- Select a location on disk to save the file as a .p12. Choose a strong password for the file.
How to remove certificates and Apple IDs from App Center
You can remove the certificates and Apple IDs from App Center in the developer accounts.
- Select Account Settings under your profile picture in the upper-right corner.
- Select Developer accounts.
- Remove the secret by using the three vertical dots on the right side of the table and then Delete certificate.
- Verify the name of the certificate and confirm your irreversible action by selecting Delete once more.
Read more about managing your Apple ID and certificates.
Manually register devices with Apple
If you're trying to distribute directly to users outside of App Center, you can follow the steps from the Apple Developer website on how to distribute to registered devices. The steps describe how to manually add devices to your account and re-sign your app.
Known errors
Profile not found
When signing in to Apple through App Center, we check the provisioning profile(s) included in your application against those in your developer account. If any profile used in a binary isn't found in your Apple developer account, App Center can't re-sign your application. To resolve this, ensure that your Apple developer account contains all of the provisioning profiles used in your application. You can check application profiles in the General tab of your Xcode project properties, or the iOS Bundle Signing options in Visual Studio for Mac.
Note
When attempting to auto-provision a binary via App Center, in some cases, provisioning profiles generated automatically by Xcode will result in the auto-provisioning to fail with the following error: Profile named 'iOS Team ...' was not found in the account. To resolve the issue, please create and use manually created provisioning profile.
Team not found
When signing in to Apple through App Center, the teams included in your applications are checked against those in your developer account. If any team used in the binary isn't found in your Apple developer account, App Center can't re-sign your application. To resolve this, ensure that your Apple developer account contains the team used in your application. You can check the applications team in the General tab of your Xcode project properties, or the iOS Bundle Signing options in Visual Studio for Mac.
Updated license agreement
Apple periodically updates its license agreement. To keep using the Apple Developer portal, you must read and agree with the updated license.
- Sign in to the Apple Developer portal.
- Follow the instructions given to accept the license agreement.
App Center can't help with content in the license or the flow for the license agreement.
Our tester didn't register their device ID
If a tester accidentally selected I already registered it, follow these steps to register a device manually:
- Go to https://install.appcenter.ms/register-device on your mobile device.
- Select Register and follow the on-screen instructions.