Note
Access to this page requires authorization. You can try signing in or changing directories.
Access to this page requires authorization. You can try changing directories.
This page describes how to use Supervisor Agent to create a multi-agent supervisor system that orchestrates AI agents and tools to work together on complex tasks. You can improve their coordination based on natural language feedback from your subject matter experts.
What is Supervisor Agent?
Use Supervisor Agent to create a supervisor system that coordinates Genie Spaces, agent endpoints, Unity Catalog functions, MCP servers, and custom agents to work together to complete complex tasks across different, specialized domains. Supervisor Agent uses advanced AI orchestration patterns to manage agent interactions, task delegation, and result synthesis to deliver comprehensive solutions.
Supervisor Agent builds the system for you and lets you improve it over time with human feedback. It is ideal for supporting the following use cases:
- Provide market analysis and insights by searching across research reports and usage data.
- Answer questions about internal processes and automate a ticket backlog for it.
- Speed up customer service by answering policy, FAQ, account, and other questions.
Supervisor Agent enables you to improve the supervisor's coordination quality and adjust agent behavior based on natural language feedback from your subject matter experts. Provide examples and guidelines to optimize the system's performance.
Supervisor Agent creates a comprehensive endpoint you can use downstream for your applications. For example, you can interact with the endpoint by submitting prompts in Playground or build a chat application using Databricks Apps. The supervisor has built-in access controls, so that its end users only access the subagents and data they have access to.
Supervisor Agent uses default storage to store temporary data transformations, model checkpoints, and internal metadata that power each agent. On agent deletion, all data associated with the agent is removed from default storage.
Requirements
- A workspace that includes the following:
- Serverless compute available (enabled by default in workspaces with Unity Catalog in a supported region).
- Unity Catalog enabled. See Enable a workspace for Unity Catalog.
- Access to Mosaic AI Model Serving.
- Access to a serverless usage policy with a nonzero budget.
- A workspace in one of the supported regions.
- The
databricks-gte-large-enembedding model endpoint must have AI Guardrails and rate limits disabled. See Configure Unity AI Gateway on model serving endpoints. - You must have agents or tools ready to use. You must provide at least one subagent.
- End users of the supervisor agent need explicit access to interact with each subagent. See Supported subagents and tools for required permissions.
- (Optional) Production monitoring for MLflow (Beta) enabled. This is required for tracing to work. See Manage Azure Databricks previews.
Supported subagents and tools
Warning
Executing arbitrary code in an agent tool can expose sensitive or private information that the agent has access to. Customers are responsible to run only trusted code, and implement guardrails and proper permissions to prevent unintended access to data.
When creating a supervisor, you must provide subagents for it to coordinate and grant end users explicit access to each one. The following table lists supported subagent types, how to create each, and the required end user permissions. The supervisor has built-in access controls, so that its end users only access the subagents and data they have access to. Without explicit access, the supervisor cannot return helpful responses from a subagent.
| Subagent type | How to create | Required end user permissions |
|---|---|---|
| Genie Space | Set up and manage a Genie Space | Access to the Genie Space and its underlying Unity Catalog objects. See Share a Genie Space. |
| Published dashboard | Create a dashboard, then Publish a dashboard | CAN VIEW on the published dashboard. See Manage dashboard permissions. |
| Knowledge Assistant agent endpoint | Use Knowledge Assistant to create a high-quality chatbot over your documents | CAN QUERY on the agent endpoint. See Manage permissions. |
| Model serving endpoint | Create custom model serving endpoints | CAN QUERY on the serving endpoint. See Manage permissions on a model serving endpoint. |
| Unity Catalog function | Create AI agent tools using Unity Catalog functions | EXECUTE on the Unity Catalog function. See EXECUTE. |
| External MCP server | Use external MCP servers, or install one from Databricks Marketplace. | USE CONNECTION on the Unity Catalog connection. See USE CONNECTION. |
| Custom MCP server | Host custom MCP servers using Databricks apps | CAN_USE on the Databricks app. See Authentication for AI agents. |
| Custom agent | Author an AI agent and deploy it on Databricks Apps | CAN_USE on the Databricks app. See Authentication for AI agents. |
Create a multi-agent supervisor system
Go to ![]() Agents in the left navigation pane of your workspace. Click Create Agent, and select Supervisor Agent.
Agents in the left navigation pane of your workspace. Click Create Agent, and select Supervisor Agent.
Step 1: Configure your supervisor
Configure your supervisor and add the agents it will coordinate.
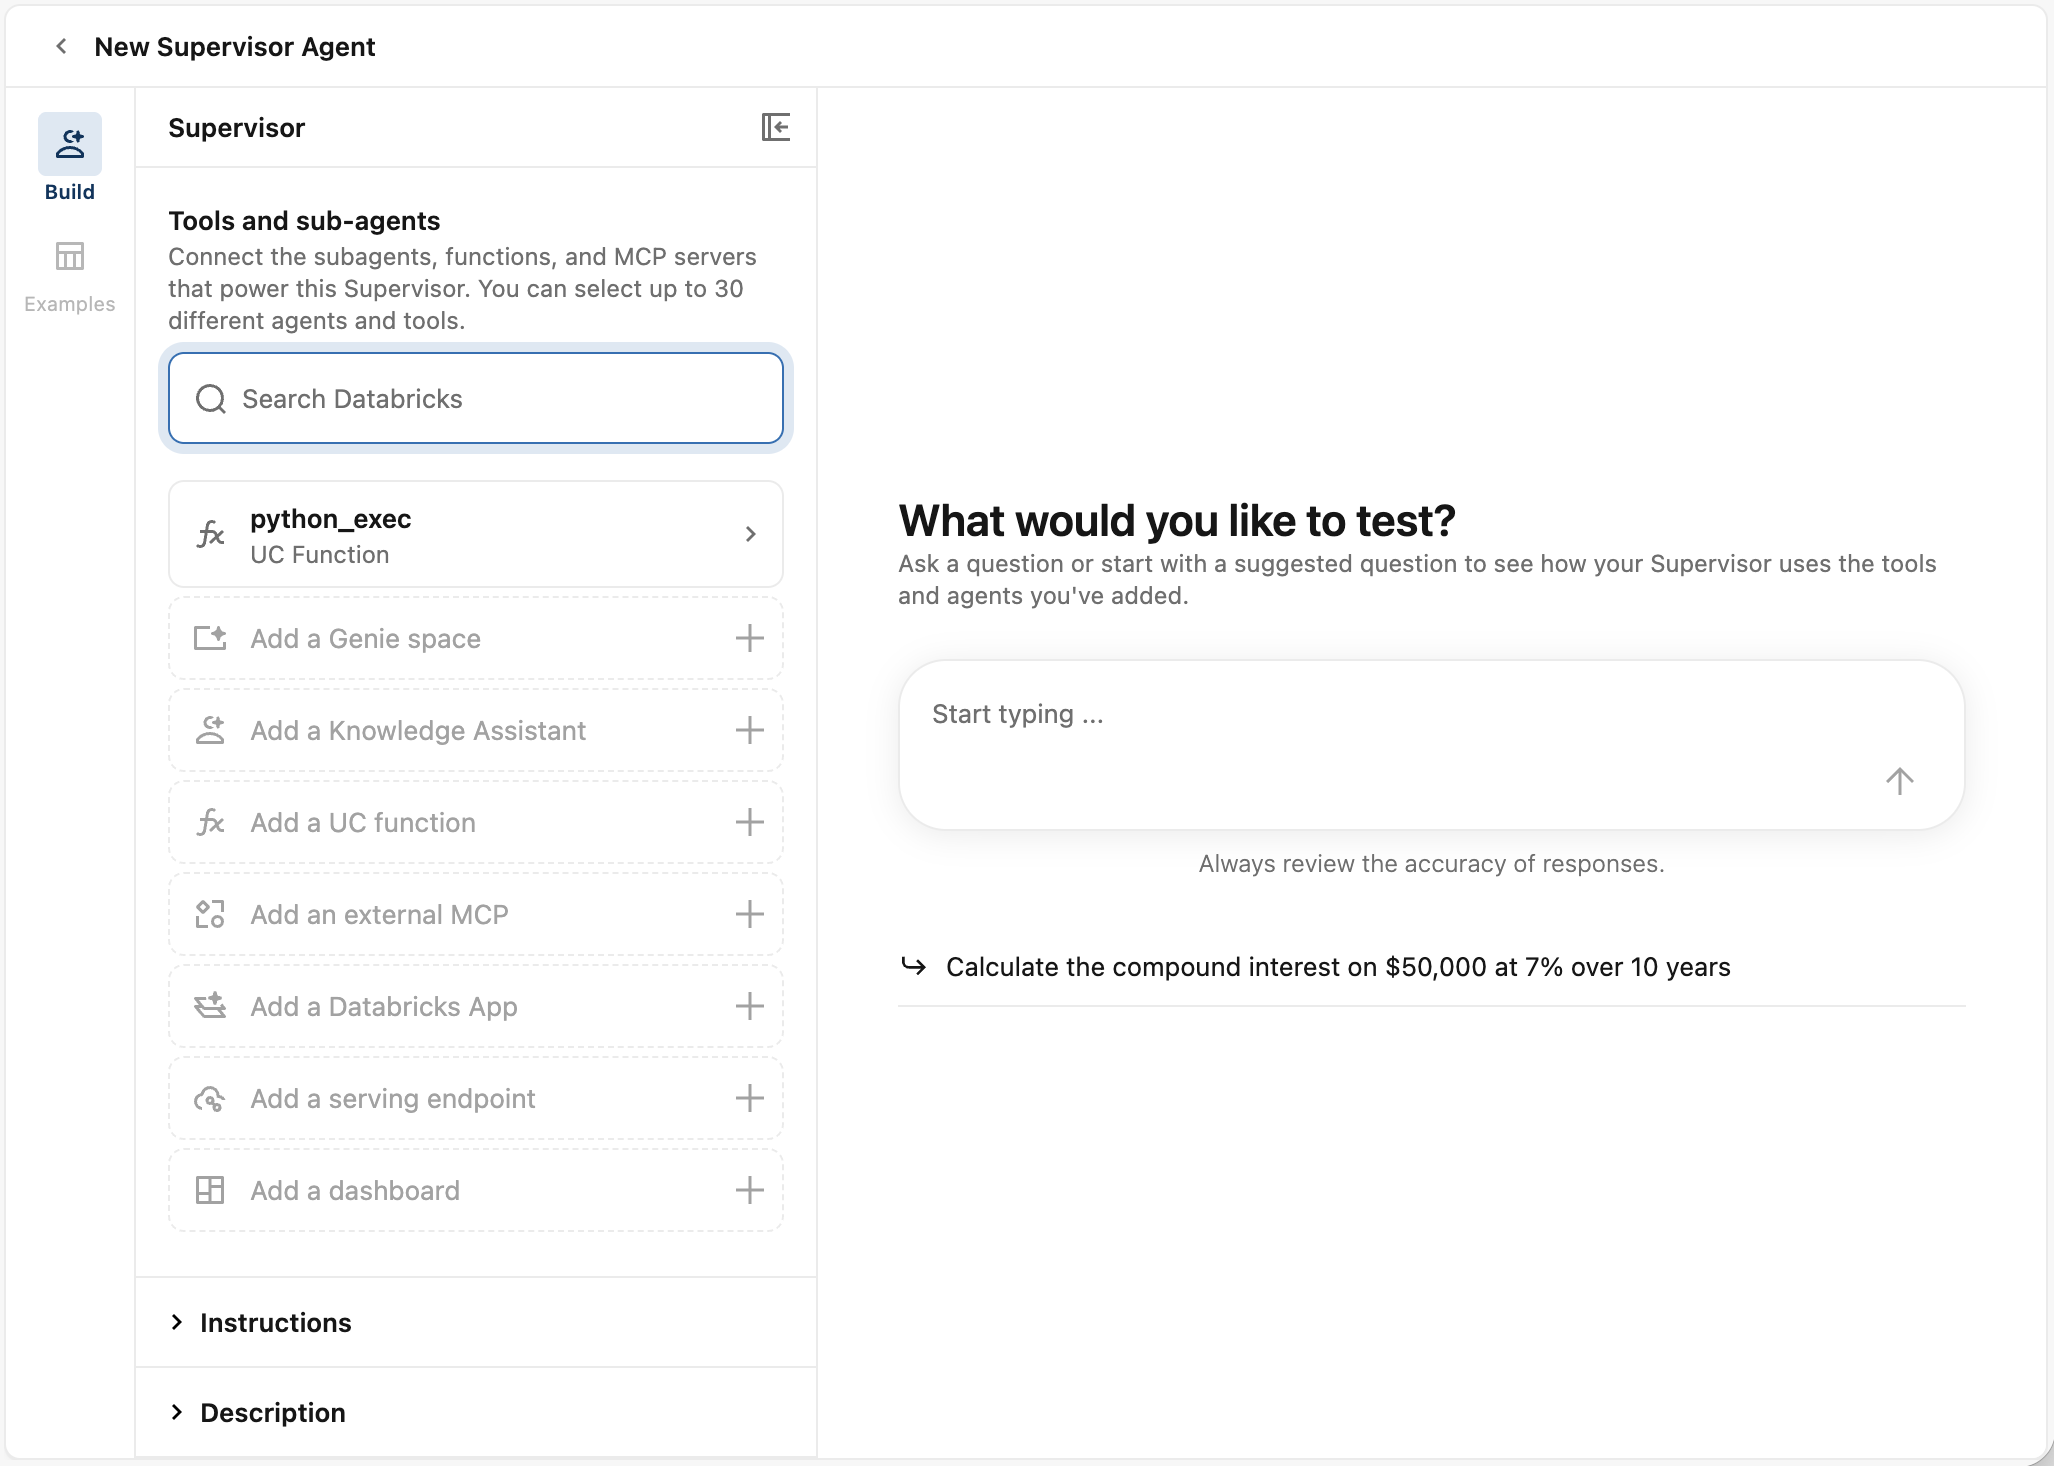
Under Tools and sub-agents in the left side pane, add your tools and subagents. Click on the type of tool/agent you'd like to add, then select from the dropdown that appears. Or, use the search bar to select tools/agents. You can select up to 30 different agents and tools.
For better results, provide a description for each tool/sub-agent. Click on the tool/subagent to adjust the description. The supervisor uses the information in the description to help it coordinate agents. Provide as much detail as possible to help improve its task delegation.
To manage permissions for each tool/agent, hover over the tool/agent tile and click
 . This opens that tool/agent in Azure Databricks, and you can configure permissions from there. See Supported subagents and tools for required end user permissions.
Note
If the end user does not have access to any subagents, the supervisor will end the conversation. If the end user has access to some but not all subagents, the supervisor will redirect the conversation away from subagents the user cannot access.
(Optional) In the Instructions field, specify guidelines for how the supervisor should respond.
(Optional) In the Description field, provide a summary of what this supervisor does. This description is shown to users and used for search.
Step 2: Test your supervisor agent
After your supervisor finishes initializing, test it to see how well the supervisor coordinates multiple agents to handle complex tasks. In the right side pane, chat with the agent to evaluate its responses.
- (Optional) You can also test the agent in AI Playground. Click Open in Playground. This opens up AI Playground with your supervisor endpoint connected. If you have AI assistive features enabled, you can enable AI Judge and Synthetic task generation to help you evaluate your supervisor.
- Enter a complex question or task for your supervisor.
- Evaluate its response. Ensure that the supervisor successfully delegates tasks to the right agents.
- While interacting with the supervisor, you may be prompted to Add guidelines to help improve its response. Provide response guidelines and regenerate the response.
- Based on your agent's responses, adjust the Description and Instructions fields on the left side panel to improve its configuration.
If you're satisfied with your supervisor's performance, continue using the supervisor as-is.
Step 3: Improve the supervisor
Supervisor Agent can adjust the supervisor's behavior based on natural language feedback. Gather feedback from experts through the configuration page to improve your supervisor's coordination quality. Collecting labeled data for your supervisor can improve its performance. Supervisor Agent will retrain and optimize the supervisor from the new data.
In the Examples tab, add questions and task scenarios for the supervisor.
Add questions to label:
- Click + Add to add a question.
- In the Add a question modal, enter your question.
- Click Add. The question should appear in the UI.
- Repeat until you’ve added all the questions you want to evaluate.
- To delete a question, click the kebab menu, then Delete.
After you've finished adding your questions, you can share the agent with others to review to help you build a high-quality labeled dataset. Share a link to your Supervisor Agent configuration page to gather feedback from experts.
Ensure the experts have access to the supervisor agent and the appropriate subagents:
- In the upper right-hand corner, click the kebab menu
 to manage permissions. Grant the experts CAN_MANAGE permissions so they can access the agent and provide feedback.
 - Ensure the SME has access to each subagent. See Supported subagents and tools for the required permissions per subagent type.
If the SME does not have access to any subagents, the supervisor will end the conversation. If the end user has access to some but not all subagents, the supervisor will redirect the conversation away from subagents the user cannot access.
- In the upper right-hand corner, click the kebab menu
To label data, click on a question and add Guidelines in the panel that appears. Guidelines apply right after they are saved.
Test the agent again in the configuration page or AI Playground to see its improved performance. If needed, add more questions and guidelines to continue improving the behavior.
Step 4: Manage permissions
By default, only agent authors and workspace admins have permissions to the agent. To allow other users to edit or query your agent, you need to explicitly grant them permission.
To manage permissions on your agent:
- Open your agent on the Agents page.
- At the top, click the kebab menu.
- Click Manage permissions.
- In the Permission Settings window, select the user, group, or service principal.
- Select the permission to grant:
- Can Manage: Allows managing the agent, including setting permissions, editing the agent configuration, and improving its quality.
- Can Query: Allows querying the agent endpoint in AI Playground and through the API. Users with only this permission cannot view or edit the agent on the Agents page.
- Click Add.
- Click Save.
Note
For agent endpoints created before September 16, 2025, you can grant Can Query permissions to the endpoint from the Serving endpoints page.
Step 5: Query the agent endpoint
On the agent page, click Endpoint to open the agent endpoint and see details.
There are multiple ways to query the created supervisor endpoint. Use the code examples provided in AI Playground as a starting point.
- Click Open in playground.
- From Playground, click Get code.
- Choose how you want to use the endpoint:
- Select Curl API for a code example to query the endpoint using curl.
- Select Python API for a code example to interact with the endpoint using Python.
Manage supervisor agents using the Databricks SDK
Important
This feature is in Beta. Account admins can control access to this feature from the Previews page. See Manage Azure Databricks previews.
You can use the Databricks SDK for Python to programmatically create and manage supervisor agents and their tools. For the full list of available operations, see the Supervisor Agents SDK reference.
Create a supervisor agent
The following example creates a new supervisor agent with a display name, description, and instructions.
from databricks.sdk import WorkspaceClient
from databricks.sdk.service.supervisoragents import SupervisorAgent

w = WorkspaceClient()

supervisor_agent = SupervisorAgent(
    display_name="<display-name>",
    description="<description>",
    instructions="<instructions>",
)
created = w.supervisor_agents.create_supervisor_agent(supervisor_agent=supervisor_agent)
print(created)
Replace <display-name>, <description>, and <instructions> with the values for your supervisor agent.
Manage tools (subagents)
You can add, update, and remove tools (subagents) on an existing supervisor agent using the SDK. Tools represent subagents such as knowledge assistants, Genie Spaces, Unity Catalog functions, and other agent endpoints.
Add a tool (subagent)
The following example adds a knowledge assistant as a tool on an existing supervisor agent.
from databricks.sdk import WorkspaceClient
from databricks.sdk.service.supervisoragents import Tool, KnowledgeAssistant

w = WorkspaceClient()

tool = Tool(
    tool_type="knowledge_assistant",
    description="<tool-description>",
    knowledge_assistant=KnowledgeAssistant(
        knowledge_assistant_id="<knowledge-assistant-id>",
    ),
)

created_tool = w.supervisor_agents.create_tool(
    parent="supervisor-agents/<supervisor-agent-id>",
    tool=tool,
    tool_id="<tool-id>",
)
print(created_tool)
Replace <supervisor-agent-id> with the ID of your supervisor agent, <knowledge-assistant-id> with the ID of the knowledge assistant to add as a tool, and <tool-id> with a unique identifier for the tool.
Update a tool (subagent)
The following example updates the description of an existing tool.
from databricks.sdk import WorkspaceClient
from databricks.sdk.service.supervisoragents import Tool
from databricks.sdk.common.types.fieldmask import FieldMask

w = WorkspaceClient()

updated_tool = w.supervisor_agents.update_tool(
    name="supervisor-agents/<supervisor-agent-id>/tools/<tool-id>",
    tool=Tool(
        tool_type="knowledge_assistant",
        description="<new-description>",
    ),
    update_mask=FieldMask(["description"]),
)
print(updated_tool)
Allowed fields in update_mask: description.
Remove a tool (subagent)
The following example deletes a tool from a supervisor agent.
from databricks.sdk import WorkspaceClient

w = WorkspaceClient()

w.supervisor_agents.delete_tool(
    name="supervisor-agents/<supervisor-agent-id>/tools/<tool-id>",
)
Limitations
- Only English is supported.
- Only agent endpoints created through Knowledge Assistant are supported.
- AI Guardrails and rate limits must be disabled on the
databricks-gte-large-enmodel endpoint. See Configure Unity AI Gateway on model serving endpoints. - You cannot use more than 20 agents in a single supervisor system.
- Workspaces that have Enhanced Security and Compliance enabled are not supported.
- In order for tracing to work, you need to have production monitoring for MLflow (Beta) enabled. If you don't need tracing, you do not need to enable this preview. See Manage Azure Databricks previews.