Quickstart: Deploy an application using the Dapr cluster extension for Azure Kubernetes Service (AKS) or Arc-enabled Kubernetes
In this quickstart, you use the Dapr cluster extension in an AKS or Arc-enabled Kubernetes cluster. You deploy a hello world example, which consists of a Python application that generates messages and a Node.js application that consumes and persists the messages.
Prerequisites
- An Azure subscription. If you don't have an Azure subscription, you can create a free account.
- Azure CLI or Azure PowerShell installed.
- An AKS Cluster with:
- Workload identity enabled
- Managed identity created in the same subscription
- A Kubernetes service account
- Federated identity credential
- Dapr cluster extension installed on the AKS cluster
- kubectl installed locally.
Clone the repository
Clone the Dapr quickstarts repository using the
git clonecommand.git clone https://github.com/Azure-Samples/dapr-aks-extension-quickstart.gitChange to the
dapr-aks-extension-quickstartdirectory.
Create and configure a Redis store
Open the Azure portal to start the Azure Cache for Redis creation flow.
- Fill out the recommended information according to the "Create an open-source Redis cache" quickstart instructions.
- Select Create to start the Redis instance deployment.
Verify resource information
- Once the Redis resource is deployed, navigate to its overview page.
- Take note of:
- The hostname, found in the Essentials section of the cache overview page. The hostname format looks similar to:
xxxxxx.redis.cache.windows.net. - The SSL port, found in the cache's Advanced Settings blade. The default value is
6380.
- The hostname, found in the Essentials section of the cache overview page. The hostname format looks similar to:
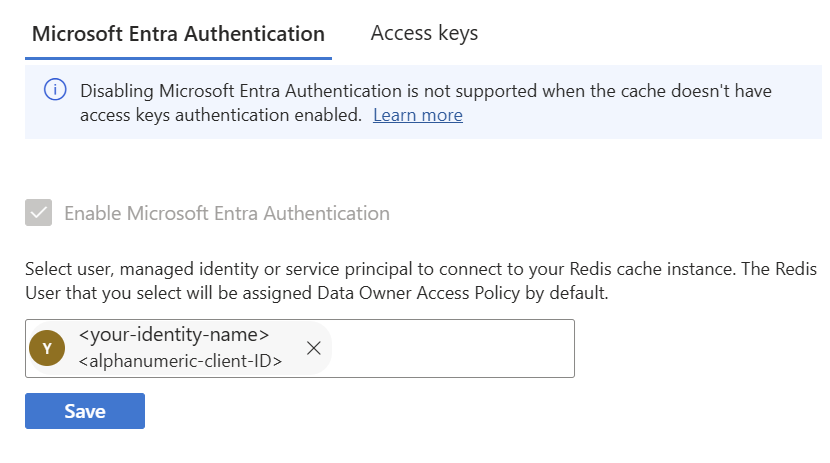
- Navigate to the Authentication blade and verify Microsoft Entra Authentication is enabled on your resource.
Add managed identity
In the Authentication blade, type the name of the Managed Identity you created as a prerequisite in the field under Enable Microsoft Entra Authentication checkbox.

Verify your managed identity is added as a Redis User assigned Data Owner Access Policy permissions.
Enable public network access
For this scenario, your Redis cache uses public network access. Be sure to clean up resources when you're finished with this quickstart.
- Navigate to the Private Endpoint blade.
- Click Enable public network access from the top menu.
Configure the Dapr components
In redis.yaml, the component is configured to use Entra ID Authentication using workload identity enabled for AKS cluster. No access keys are required.
- name: useEntraID
  value: "true"
- name: enableTLS
  value: true
In your preferred code editor, navigate to the
deploydirectory in the sample and openredis.yaml.For
redisHost, replace the placeholder<REDIS_HOST>:<REDIS_PORT>value with the Redis cache hostname and SSL port you saved earlier from Azure portal.- name: redisHost value: <your-cache-name>.redis.cache.windows.net:6380
Apply the configuration
Apply the
redis.yamlfile using thekubectl applycommand.kubectl apply -f ./deploy/redis.yamlVerify your state store was successfully configured using the
kubectl get components.rediscommand.kubectl get components.redis -o yamlExpected output
component.dapr.io/statestore created
Deploy the Node.js app with the Dapr sidecar
Configure the Node.js app
In node.yaml, the pod spec has the label added to use workload identity,:
labels:
  app: node
  azure.workload.identity/use: "true"
Navigate to the
deploydirectory and opennode.yaml.Replace the placeholder
<SERVICE_ACCOUNT_NAME>value forserviceAccountNamewith the service account name you created.- This value should be the same service account you used to create the federated identity credential.
Apply the configuration
Apply the Node.js app deployment to your cluster using the
kubectl applycommand.kubectl apply -f ./deploy/node.yamlKubernetes deployments are asynchronous, so before moving on to the next steps, verify the deployment is complete with the following command:
kubectl rollout status deploy/nodeappAccess your service using the
kubectl get svccommand.kubectl get svc nodeappMake note of the
EXTERNAL-IPin the output.
Verify the Node.js service
Using
curl, call the service with yourEXTERNAL-IP.curl $EXTERNAL_IP/portsExample output
{"DAPR_HTTP_PORT":"3500","DAPR_GRPC_PORT":"50001"}Submit an order to the application.
curl --request POST --data "@sample.json" --header Content-Type:application/json $EXTERNAL_IP/neworderConfirm the order.
curl $EXTERNAL_IP/orderExpected output
{ "orderId": "42" }
Deploy the Python app with the Dapr sidecar
Configure the Python app
In python.yaml, the pod spec has the label added to use workload identity,:
labels:
  app: node
  azure.workload.identity/use: "true"
Navigate to the
deploydirectory and openpython.yaml.Replace the placeholder
<SERVICE_ACCOUNT_NAME>value forserviceAccountNamewith the service account name you created.- This value should be the same service account you used to create the federated identity credential.
Apply the configuration
Deploy the Python app to your Kubernetes cluster using the
kubectl applycommand.kubectl apply -f ./deploy/python.yamlKubernetes deployments are asynchronous, so before moving on to the next steps, verify the deployment is complete with the following command:
kubectl rollout status deploy/pythonapp
Observe messages and confirm persistence
Now that both the Node.js and Python applications are deployed, you can watch messages come through.
Get the logs of the Node.js app using the
kubectl logscommand.kubectl logs --selector=app=node -c node --tail=-1Expected output
Got a new order! Order ID: 1
Successfully persisted state
Got a new order! Order ID: 2
Successfully persisted state
Got a new order! Order ID: 3
Successfully persisted state
Using
curl, call the Node.js app's order endpoint to get the latest order.curl $EXTERNAL_IP/orderYou should see the latest JSON output in the response.
Clean up resources
If you no longer plan to use the resources from this quickstart, you can delete all associated resources by removing the resource group.
Remove the resource group, cluster, namespace, and all related resources using the az group delete command.
az group delete --name MyResourceGroup
Next steps
Azure Kubernetes Service
