Note
Access to this page requires authorization. You can try signing in or changing directories.
Access to this page requires authorization. You can try changing directories.
Tip
Short answer: Use Kompose for quick scaffolding, Move2Kube for broader modernization, Docker Compose Bridge if you use Docker Desktop, and Podman to export from running containers or pods. Then package the results with Helm or Kustomize and iterate with Skaffold or Tilt.
Top tools: Kompose, Move2Kube, Docker Compose Bridge, Podman, Helm, Kustomize, Skaffold, Tilt, and AI-assisted conversion.
In this tutorial, you prepare a multi-container application to use in Kubernetes. You can use this tutorial whether you're starting with a new sample app or adapting Docker Compose concepts for an app you plan to migrate to Azure Kubernetes Service (AKS). You use existing development tools like Docker Compose to locally build and test the application. You learn how to:
- Clone a sample application source from GitHub.
- Create a container image from the sample application source.
- Test the multi-container application in a local Docker environment.
Important
Starting fresh? Use this tutorial to prepare and test a sample app for AKS. Already using Docker Compose? See the Kubernetes documentation for migrating Docker Compose to Kubernetes and the AKS migration overview for broader planning guidance.
Once completed, the following application runs in your local development environment:
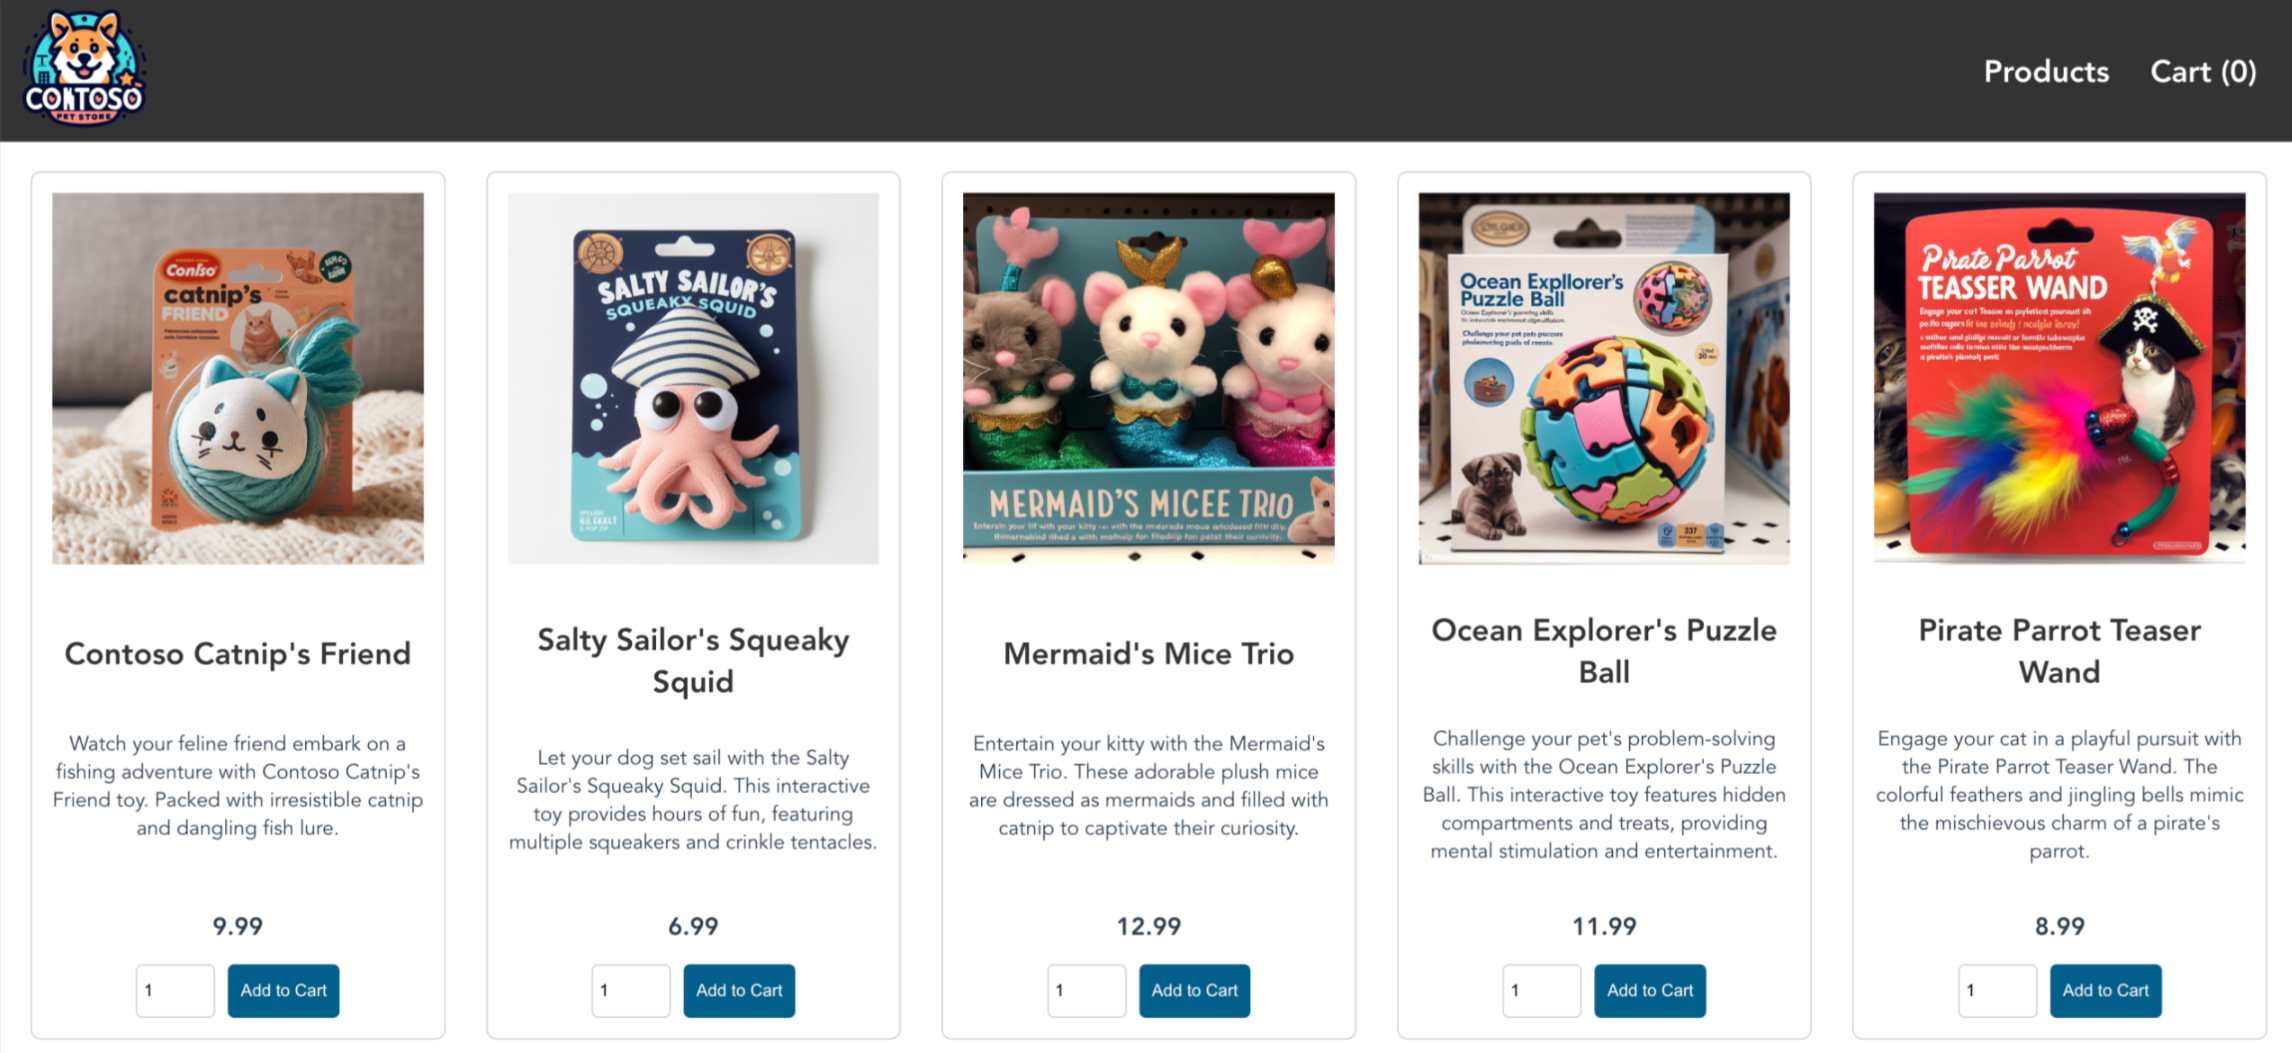
In later tutorials, you upload the container image to an Azure Container Registry (ACR), and then deploy it into an AKS cluster.
Before you begin
This tutorial assumes a basic understanding of core Docker concepts such as containers, container images, and docker commands. For a primer on container basics, see Get started with Docker.
To complete this tutorial, you need a local Docker development environment running Linux containers. Docker provides packages that configure Docker on a Mac, Windows, or Linux system.
Note
Azure Cloud Shell doesn't include the Docker components required to complete every step in these tutorials. Therefore, we recommend using a full Docker development environment.
Get application code
The sample application used in this tutorial is a basic store front app including the following Kubernetes deployments and services:
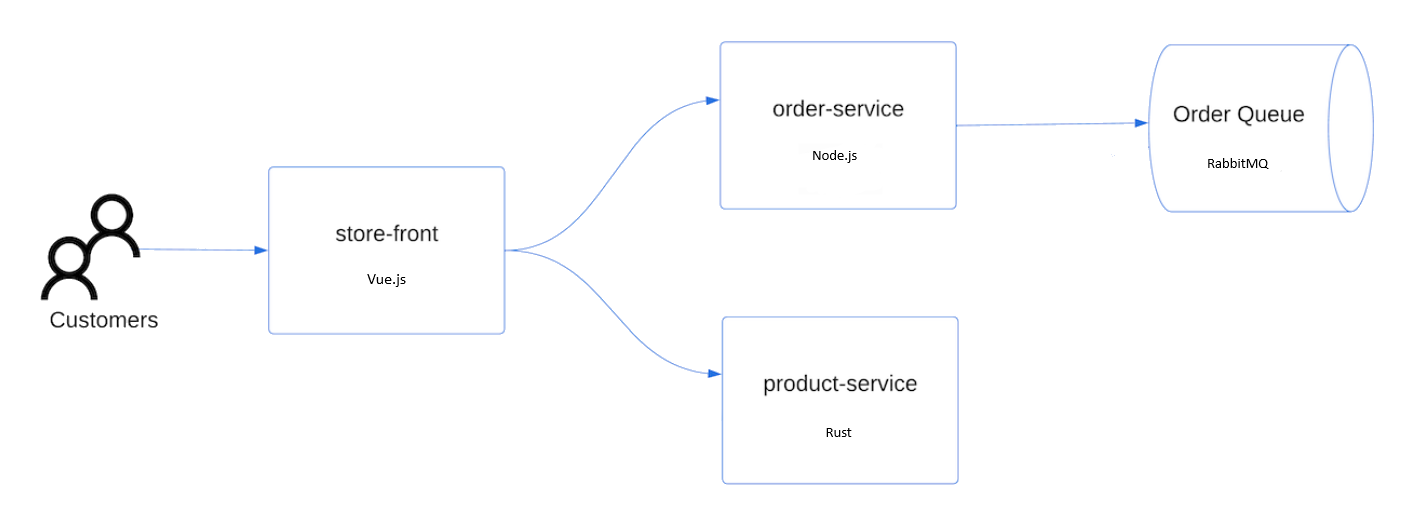
- Store front: Web application for customers to view products and place orders.
- Product service: Shows product information.
- Order service: Places orders.
- RabbitMQ: Message queue for an order queue.
Create a directory on your computer and switch to that directory in your terminal session, like Bash. This example uses a directory named demorepo but you can use any name you want.
mkdir demorepo
cd demorepo
Use git to clone the sample application to your development environment.
git clone https://github.com/Azure-Samples/aks-store-demo.gitChange into the cloned directory.
cd aks-store-demo
Review Docker Compose file
The sample application you create in this tutorial uses the docker-compose-quickstart YAML file from the repository you cloned.
The following table summarizes key defaults from the sample Compose file so you can quickly see which services, ports, and dependencies the tutorial uses:
| Service | Source | Exposed port | Key settings |
|---|---|---|---|
| RabbitMQ | rabbitmq:4.3.2-management-alpine image |
15672, 5672 |
Default username username, password password |
| Order service | src/order-service |
3000 |
Connects to RabbitMQ on port 5672 and uses queue orders |
| Product service | src/product-service |
3002 |
Uses AI_SERVICE_URL=http://ai-service:5001/ |
| Store front | src/store-front |
8080 |
Calls the product service on 3002 and order service on 3000 |
services:
  rabbitmq:
    image: rabbitmq:4.3.2-management-alpine
    container_name: 'rabbitmq'
    restart: always
    environment:
      - "RABBITMQ_DEFAULT_USER=username"
      - "RABBITMQ_DEFAULT_PASS=password"
    ports:
      - 15672:15672
      - 5672:5672
    healthcheck:
      test: ["CMD", "rabbitmqctl", "status"]
      interval: 30s
      timeout: 10s
      retries: 5
    networks:
      - backend_services
  order-service:
    build: src/order-service
    container_name: 'order-service'
    restart: always
    ports:
      - 3000:3000
    healthcheck:
      test: ["CMD", "wget", "-O", "/dev/null", "-q", "http://order-service:3000/health"]
      interval: 30s
      timeout: 10s
      retries: 5
    environment:
      - ORDER_QUEUE_HOSTNAME=rabbitmq
      - ORDER_QUEUE_PORT=5672
      - ORDER_QUEUE_USERNAME=username
      - ORDER_QUEUE_PASSWORD=password
      - ORDER_QUEUE_NAME=orders
    networks:
      - backend_services
    depends_on:
      rabbitmq:
        condition: service_healthy
  product-service:
    build: src/product-service
    container_name: 'product-service'
    restart: always
    ports:
      - 3002:3002
    healthcheck:
      test: ["CMD", "wget", "-O", "/dev/null", "-q", "http://product-service:3002/health"]
      interval: 30s
      timeout: 10s
      retries: 5
    environment:
      - AI_SERVICE_URL=http://ai-service:5001/
    networks:
      - backend_services
  store-front:
    build: src/store-front
    container_name: 'store-front'
    restart: always
    ports:
      - 8080:8080
    healthcheck:
      test: ["CMD", "wget", "-O", "/dev/null", "-q", "http://store-front:80/health"]
      interval: 30s
      timeout: 10s
      retries: 5
    environment:
      - VUE_APP_PRODUCT_SERVICE_URL=http://product-service:3002/
      - VUE_APP_ORDER_SERVICE_URL=http://order-service:3000/
    networks:
      - backend_services
    depends_on:
      - product-service
      - order-service
networks:
  backend_services:
    driver: bridge
Create container images and run application
You can use Docker Compose to automate building container images and the deployment of multi-container applications.
Make sure Docker is running in Linux container mode before you run the following commands.
From the root of the cloned
aks-store-demorepository, create the container image, download the RabbitMQ image, and start the application using thedocker composecommand:docker compose -f docker-compose-quickstart.yml up -dView the created images using the
docker imagescommand.docker imagesThe following condensed example output shows the created images:
REPOSITORY                        TAG                          IMAGE ID
aks-store-demo-product-service    latest                       72f5cd7e6b84
aks-store-demo-order-service      latest                       54ad5de546f9
aks-store-demo-store-front        latest                       1125f85632ae
...
View the running containers using the
docker pscommand.docker psThe following condensed example output shows four running containers:
CONTAINER ID        IMAGE
f27fe74cfd0a        aks-store-demo-product-service
df1eaa137885        aks-store-demo-order-service
b3ce9e496e96        aks-store-demo-store-front
31df28627ffa        rabbitmq:4.3.2-management-alpine
Test application locally
To see your running application, navigate to http://localhost:8080 in a local web browser. The sample application loads, as shown in the following example:
On this page, you can view products, add them to your cart, and then place an order.
Migrate your own Compose files
If you already have an application defined in a Docker Compose file, you can use this tutorial as a reference for local validation, then convert your existing Compose configuration into Kubernetes manifests. Use tools such as Kompose, Move2Kube, Docker Compose Bridge, or Podman to convert Docker Compose definitions into Kubernetes resources. For the full end-to-end conversion path, see the Kubernetes documentation for migrating Docker Compose to Kubernetes and the AKS migration overview if you're also moving from another orchestrator or modernization workflow.
Choose a conversion tool
Use this table when you need a fast comparison of the most common Compose-to-Kubernetes options.
| Tool | One-line summary |
|---|---|
| Kompose | Fast Compose-to-Kubernetes scaffold; run kompose convert; expect manual cleanup for storage and probes. |
| Move2Kube | Broader modernization workflow; run move2kube plan -s ./path && move2kube transform; heavier than one-file converters. |
| Docker Compose Bridge | Docker Desktop-oriented conversion path; run docker compose bridge convert -o ./k8s/; see Docker docs for current support details. |
| Podman | Export YAML from running containers or pods; run podman kube generate mypod > k8s.yaml; best for Podman-based workflows. |
| Helm | Template and package manifests for repeated deployments; run helm create mychart; best after conversion. |
| Kustomize | Overlay environment-specific changes; run kubectl apply -k .; best after conversion. |
| Skaffold | Build a Kubernetes inner dev loop; run skaffold init; not a direct converter. |
| Tilt | Live-update local Kubernetes development; run tilt up; requires a Kubernetes-focused workflow. |
| AI-assisted conversion | Draft or compare manifests with AI, then validate the output before deployment. |
Which tool should I pick?
- If you want a quick proof of concept or starter manifests, use Kompose.
- If you use Docker Desktop and want a Docker-native path, use Docker Compose Bridge.
- If you have a larger multi-service migration or modernization effort, use Move2Kube.
- If you want to export from running containers or pods, use Podman.
- If you already have manifests and need packaging or overlays, use Helm or Kustomize.
- If you need a local Kubernetes dev loop after conversion, use Skaffold or Tilt.
- If you want draft manifests or migration explanations, use AI assistance and validate the result against official Kubernetes and AKS guidance.
Other tools to consider:
- 8gwifi.org Kubernetes YAML Converter: Useful for quick online experiments with small Compose files.
- Okteto: Useful when you want a cloud or remote Kubernetes development loop for application teams.
- Devtron: Useful when you want a platform workflow around Kubernetes delivery after conversion.
- Portainer: Useful when you want a UI-driven container and Kubernetes management experience.
Convert your Compose files
Use the following copyable commands as a starting point:
kompose convert
move2kube plan -s ./path && move2kube transform
docker compose bridge convert -o ./k8s/
podman kube generate mypod > k8s.yaml
skaffold init
Kompose conversion example
The open-source Kompose tool converts common Docker Compose settings into Kubernetes objects such as Deployments and Services.
On Windows, install Kompose with the following command:
curl -L https://github.com/kubernetes/kompose/releases/latest/download/kompose-windows-amd64.exe -o kompose.exeFor other installation options, see the Kompose installation instructions.
Run Kompose from the directory that contains your
docker-compose.ymlfile.kompose convertReview the generated Kubernetes YAML files before you deploy them to AKS.
AI-assisted conversion
You can use an AI assistant to draft Kubernetes manifests, compare Compose settings to Kubernetes equivalents, or explain why a conversion needs manual changes.
Generic example prompt:
Convert this docker-compose.yml into production-ready Kubernetes manifests. Use Apps/v1, move secrets to Kubernetes Secret objects, map local volumes to PersistentVolumeClaims, and add readiness and liveness probes for the web service.
AKS-targeted example prompt:
Convert this docker-compose.yml into AKS-ready Kubernetes manifests. Target an AKS cluster, push images to Azure Container Registry, use Apps/v1 objects, move secrets to Kubernetes Secret objects, map local volumes to Azure Files or Azure Disks-backed PersistentVolumeClaims, and add readiness and liveness probes for the web service.
Always review AI output before you apply it. Validate apiVersion values, resource requests and limits, storage classes, service exposure, and health probes.
Handle common translation issues
How are volumes handled?
Compose volumes often need Kubernetes persistent volumes and a storage class. In AKS, replace local-only mounts with services such as Azure Disks or Azure Files.
What replaces depends_on?
Compose depends_on doesn't enforce runtime readiness in Kubernetes. Replace it with readiness probes, startup probes, or init container logic when needed.
How should I handle secrets and environment values?
Compose environment values often become Kubernetes ConfigMap or Secret resources, or Azure Key Vault integrations.
What happens to ports and ingress?
Compose ports map to Kubernetes Service objects and sometimes ingress or Gateway API resources, depending on how you publish the application.
How do health checks translate?
Compose healthcheck settings usually become Kubernetes liveness and readiness probes.
What happens to Compose networks?
Compose networks usually translate to Kubernetes service discovery through Services and cluster DNS instead of custom bridge networks.
How do I test locally with Kubernetes?
After conversion, deploy the generated manifests to a local Kubernetes environment such as kind or minikube, then use Skaffold or Tilt if you want a faster edit-build-deploy loop.
Apply AKS-specific adjustments after conversion
Kompose gives you a starting point, but you typically need to make manual changes for AKS:
- Update image references to point to your Azure Container Registry (ACR).
- Replace local-only storage and bind mounts with persistent storage such as Azure Disks or Azure Files, depending on your workload needs.
- Replace Compose secrets or environment-specific values with Kubernetes Secrets, ConfigMaps, or Azure Key Vault integrations.
- Review networking and exposure settings, such as
LoadBalancer, ingress, or gateway configuration, based on how you want to publish the app in AKS. - Check whether stateful components should stay as Deployments or move to patterns such as StatefulSets when you need stable identity or storage behavior.
- Validate resource requests, probes, and any startup ordering assumptions because Compose behaviors such as
depends_ondon't translate directly into Kubernetes runtime behavior.
Post-conversion workflow
- Convert the Compose file with a tool such as Kompose, Move2Kube, Docker Compose Bridge, Podman, or an AI-reviewed draft.
- Review and harden the manifests by fixing storage, secrets, service exposure, probes, and image references.
- Package the manifests with Helm or layer environment-specific changes with Kustomize.
- Push your images to a registry such as ACR, then deploy with GitOps, CI/CD, or direct
kubectlworkflows.
Example sequence: kompose convert -> review manifests -> push images to ACR -> update image references -> kubectl apply or helm install.
Clean up resources
If you followed the Docker Compose workflow, you can stop and remove the running containers. Don't delete the container images because you use them in the next tutorial. If you followed the Azure Developer CLI workflow, use azd down instead of docker compose down.
Stop and remove the container instances and resources using the docker compose down command.
docker compose down
Azure Developer CLI commands
When you use azd, there are no manual container image dependencies. azd handles the provisioning, deployment, and clean up of your applications and clusters with the azd up and azd down commands, similar to Docker.
You can customize the preparation steps to use either Terraform or Bicep before deploying the cluster within the infra section of your azure.yaml. By default, this project uses Terraform:
infra:
  provider: terraform
  path: infra/terraform
If you want to change the provider to Bicep, update the azure.yaml file as follows:
infra:
  provider: bicep
  path: infra/bicep
Next steps
Azure CLI
In this tutorial, you created a sample application, created container images for the application, and then tested the application. You learned how to:
- Clone a sample application source from GitHub.
- Create a container image from the sample application source.
- Test the multi-container application in a local Docker environment.
In the next tutorial, you learn how to store container images in an ACR.
Azure Developer CLI
In this tutorial, you cloned a sample application using azd. You learned how to:
- Clone a sample
azdtemplate from GitHub. - View where container images are used from the sample application source.
In the next tutorial, you learn how to create a cluster using the azd template you cloned.