Connect Azure Functions to Azure Cosmos DB using Visual Studio Code
Azure Functions lets you connect Azure services and other resources to functions without having to write your own integration code. These bindings, which represent both input and output, are declared within the function definition. Data from bindings is provided to the function as parameters. A trigger is a special type of input binding. Although a function has only one trigger, it can have multiple input and output bindings. To learn more, see Azure Functions triggers and bindings concepts.
This article shows you how to use Visual Studio Code to connect Azure Cosmos DB to the function you created in the previous quickstart article. The output binding that you add to this function writes data from the HTTP request to a JSON document stored in an Azure Cosmos DB container.
Before you begin, you must complete the quickstart: Create a C# function in Azure using Visual Studio Code. If you already cleaned up resources at the end of that article, go through the steps again to recreate the function app and related resources in Azure.
Before you begin, you must complete the quickstart: Create a JavaScript function in Azure using Visual Studio Code. If you already cleaned up resources at the end of that article, go through the steps again to recreate the function app and related resources in Azure.
Note
This article currently only supports Node.js v3 for Functions.
Before you begin, you must complete the quickstart: Create a Python function in Azure using Visual Studio Code. If you already cleaned up resources at the end of that article, go through the steps again to recreate the function app and related resources in Azure.
Configure your environment
Before you get started, make sure to install the Azure Databases extension for Visual Studio Code.
Create your Azure Cosmos DB account
Now, you create an Azure Cosmos DB account as a serverless account type. This consumption-based mode makes Azure Cosmos DB a strong option for serverless workloads.
In Visual Studio Code, select View > Command Palette... then in the command palette search for
Azure Databases: Create Server...Provide the following information at the prompts:
Prompt Selection Select an Azure Database Server Choose Core (NoSQL) to create a document database that you can query by using a SQL syntax or a Query Copilot (Preview) converting natural language prompts to queries. Learn more about the Azure Cosmos DB. Account name Enter a unique name to identify your Azure Cosmos DB account. The account name can use only lowercase letters, numbers, and hyphens (-), and must be between 3 and 31 characters long. Select a capacity model Select Serverless to create an account in serverless mode. Select a resource group for new resources Choose the resource group where you created your function app in the previous article. Select a location for new resources Select a geographic location to host your Azure Cosmos DB account. Use the location that's closest to you or your users to get the fastest access to your data. After your new account is provisioned, a message is displayed in notification area.
Create an Azure Cosmos DB database and container
Select the Azure icon in the Activity bar, expand Resources > Azure Cosmos DB, right-click (Ctrl+select on macOS) your account, and select Create database....
Provide the following information at the prompts:
Prompt Selection Database name Type my-database.Enter and ID for your collection Type my-container.Enter the partition key for the collection Type /idas the partition key.Select OK to create the container and database.
Update your function app settings
In the previous quickstart article, you created a function app in Azure. In this article, you update your app to write JSON documents to the Azure Cosmos DB container you've created. To connect to your Azure Cosmos DB account, you must add its connection string to your app settings. You then download the new setting to your local.settings.json file so you can connect to your Azure Cosmos DB account when running locally.
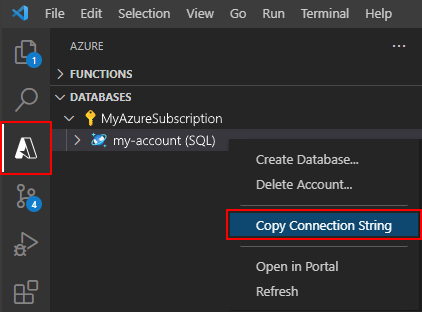
In Visual Studio Code, right-click (Ctrl+select on macOS) on your new Azure Cosmos DB account, and select Copy Connection String.
Press F1 to open the command palette, then search for and run the command
Azure Functions: Add New Setting....Choose the function app you created in the previous article. Provide the following information at the prompts:
Prompt Selection Enter new app setting name Type CosmosDbConnectionSetting.Enter value for "CosmosDbConnectionSetting" Paste the connection string of your Azure Cosmos DB account you copied. You can also configure Microsoft Entra identity as an alternative. This creates an application setting named connection
CosmosDbConnectionSettingin your function app in Azure. Now, you can download this setting to your local.settings.json file.Press F1 again to open the command palette, then search for and run the command
Azure Functions: Download Remote Settings....Choose the function app you created in the previous article. Select Yes to all to overwrite the existing local settings.
This downloads all of the setting from Azure to your local project, including the new connection string setting. Most of the downloaded settings aren't used when running locally.
Register binding extensions
Because you're using an Azure Cosmos DB output binding, you must have the corresponding bindings extension installed before you run the project.
Except for HTTP and timer triggers, bindings are implemented as extension packages. Run the following dotnet add package command in the Terminal window to add the Azure Cosmos DB extension package to your project.
dotnet add package Microsoft.Azure.Functions.Worker.Extensions.CosmosDB
Your project has been configured to use extension bundles, which automatically installs a predefined set of extension packages.
Extension bundles usage is enabled in the host.json file at the root of the project, which appears as follows:
{
  "version": "2.0",
  "logging": {
    "applicationInsights": {
      "samplingSettings": {
        "isEnabled": true,
        "excludedTypes": "Request"
      }
    }
  },
  "extensionBundle": {
    "id": "Microsoft.Azure.Functions.ExtensionBundle",
    "version": "[4.*, 5.0.0)"
  },
  "concurrency": {
    "dynamicConcurrencyEnabled": true,
    "snapshotPersistenceEnabled": true
  },
  "extensions": {
    "cosmosDB": {
      "connectionMode": "Gateway"
    }
  }
}
Your project has been configured to use extension bundles, which automatically installs a predefined set of extension packages.
Extension bundles usage is enabled in the host.json file at the root of the project, which appears as follows:
{
  "version": "2.0",
  "extensionBundle": {
    "id": "Microsoft.Azure.Functions.ExtensionBundle",
    "version": "[3.*, 4.0.0)"
  }
}
Now, you can add the Azure Cosmos DB output binding to your project.
Add an output binding
In a C# class library project, the bindings are defined as binding attributes on the function method.
Open the HttpExample.cs project file and add the following classes:
public class MultiResponse
{
    [CosmosDBOutput("my-database", "my-container",
        Connection = "CosmosDbConnectionSetting", CreateIfNotExists = true)]
    public MyDocument Document { get; set; }
    public HttpResponseData HttpResponse { get; set; }
}
public class MyDocument {
    public string id { get; set; }
    public string message { get; set; }
}
The MyDocument class defines an object that gets written to the database. The connection string for the Storage account is set by the Connection property. In this case, you could omit Connection because you're already using the default storage account.
The MultiResponse class allows you to both write to the specified collection in the Azure Cosmos DB and return an HTTP success message. Because you need to return a MultiResponse object, you need to also update the method signature.
Specific attributes specify the name of the container and the name of its parent database. The connection string for your Azure Cosmos DB account is set by the CosmosDbConnectionSetting.
Binding attributes are defined directly in your function code. The Azure Cosmos DB output configuration describes the fields required for an Azure Cosmos DB output binding.
For this MultiResponse scenario, you need to add an extraOutputs output binding to the function.
app.http('HttpExample', {
  methods: ['GET', 'POST'],
  extraOutputs: [sendToCosmosDb],
  handler: async (request, context) => {
Add the following properties to the binding configuration:
const sendToCosmosDb = output.cosmosDB({
  databaseName: 'my-database',
  containerName: 'my-container',
  createIfNotExists: false,
  connection: 'CosmosDBConnectionString',
});
Binding attributes are defined directly in the function_app.py file. You use the cosmos_db_output decorator to add an Azure Cosmos DB output binding:
@app.cosmos_db_output(arg_name="outputDocument", database_name="my-database",
    container_name="my-container", connection="CosmosDbConnectionSetting")
In this code, arg_name identifies the binding parameter referenced in your code, database_name and container_name are the database and collection names that the binding writes to, and connection is the name of an application setting that contains the connection string for the Azure Cosmos DB account, which is in the CosmosDbConnectionSetting setting in the local.settings.json file.
Add code that uses the output binding
Replace the existing Run method with the following code:
[Function("HttpExample")]
public static MultiResponse Run([HttpTrigger(AuthorizationLevel.Anonymous, "get", "post")] HttpRequestData req,
    FunctionContext executionContext)
{
    var logger = executionContext.GetLogger("HttpExample");
    logger.LogInformation("C# HTTP trigger function processed a request.");

    var message = "Welcome to Azure Functions!";

    var response = req.CreateResponse(HttpStatusCode.OK);
    response.Headers.Add("Content-Type", "text/plain; charset=utf-8");
    response.WriteString(message);

    // Return a response to both HTTP trigger and Azure Cosmos DB output binding.
    return new MultiResponse()
    {
         Document = new MyDocument
        {
            id = System.Guid.NewGuid().ToString(),
            message = message
        },
        HttpResponse = response
    };
}
Add code that uses the extraInputs output binding object on context to send a JSON document to the named output binding function, sendToCosmosDb. Add this code before the return statement.
context.extraOutputs.set(sendToCosmosDb, {
  // create a random ID
  id:
    new Date().toISOString() + Math.random().toString().substring(2, 10),
  name: name,
});
At this point, your function should look as follows:
const { app, output } = require('@azure/functions');

const sendToCosmosDb = output.cosmosDB({
  databaseName: 'my-database',
  containerName: 'my-container',
  createIfNotExists: false,
  connection: 'CosmosDBConnectionString',
});

app.http('HttpExampleToCosmosDB', {
  methods: ['GET', 'POST'],
  extraOutputs: [sendToCosmosDb],
  handler: async (request, context) => {
    try {
      context.log(`Http function processed request for url "${request.url}"`);

      const name = request.query.get('name') || (await request.text());

      if (!name) {
        return { status: 404, body: 'Missing required data' };
      }

      // Output to Database
      context.extraOutputs.set(sendToCosmosDb, {
        // create a random ID
        id:
          new Date().toISOString() + Math.random().toString().substring(2, 10),
        name: name,
      });

      const responseMessage = name
        ? 'Hello, ' +
          name +
          '. This HTTP triggered function executed successfully.'
        : 'This HTTP triggered function executed successfully. Pass a name in the query string or in the request body for a personalized response.';

      // Return to HTTP client
      return { body: responseMessage };
    } catch (error) {
      context.log(`Error: ${error}`);
      return { status: 500, body: 'Internal Server Error' };
    }
  },
});
This code now returns a MultiResponse object that contains both a document and an HTTP response.
Update HttpExample\function_app.py to match the following code. Add the outputDocument parameter to the function definition and outputDocument.set() under the if name: statement:
import azure.functions as func
import logging

app = func.FunctionApp()

@app.function_name(name="HttpTrigger1")
@app.route(route="hello", auth_level=func.AuthLevel.ANONYMOUS)
@app.queue_output(arg_name="msg", queue_name="outqueue", connection="AzureWebJobsStorage")
@app.cosmos_db_output(arg_name="outputDocument", database_name="my-database", container_name="my-container", connection="CosmosDbConnectionSetting")
def test_function(req: func.HttpRequest, msg: func.Out[func.QueueMessage],
    outputDocument: func.Out[func.Document]) -> func.HttpResponse:
     logging.info('Python HTTP trigger function processed a request.')
     logging.info('Python Cosmos DB trigger function processed a request.')
     name = req.params.get('name')
     if not name:
        try:
            req_body = req.get_json()
        except ValueError:
            pass
        else:
            name = req_body.get('name')

     if name:
        outputDocument.set(func.Document.from_dict({"id": name}))
        msg.set(name)
        return func.HttpResponse(f"Hello {name}!")
     else:
        return func.HttpResponse(
                    "Please pass a name on the query string or in the request body",
                    status_code=400
                )
The document {"id": "name"} is created in the database collection specified in the binding.
Run the function locally
Visual Studio Code integrates with Azure Functions Core tools to let you run this project on your local development computer before you publish to Azure. If you don't already have Core Tools installed locally, you are prompted to install it the first time you run your project.
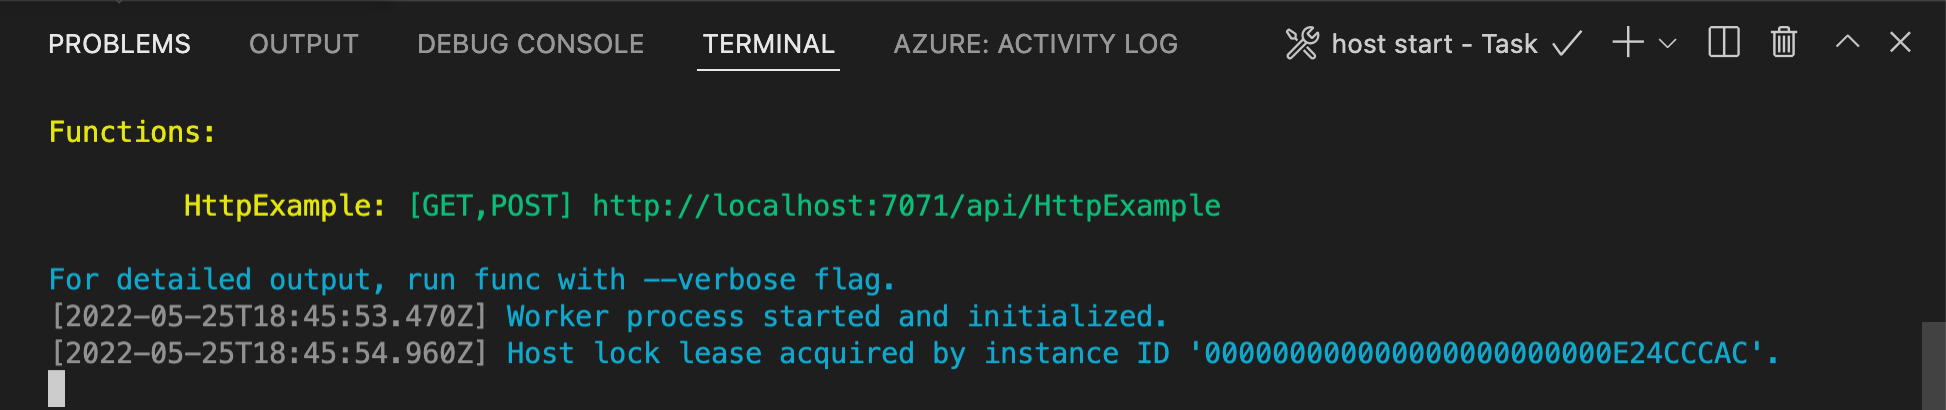
To call your function, press F5 to start the function app project. The Terminal panel displays the output from Core Tools. Your app starts in the Terminal panel. You can see the URL endpoint of your HTTP-triggered function running locally.
If you don't already have Core Tools installed, select Install to install Core Tools when prompted to do so.
If you have trouble running on Windows, make sure that the default terminal for Visual Studio Code isn't set to WSL Bash.With the Core Tools running, go to the Azure: Functions area. Under Functions, expand Local Project > Functions. Right-click (Windows) or Ctrl - click (macOS) the
HttpExamplefunction and choose Execute Function Now....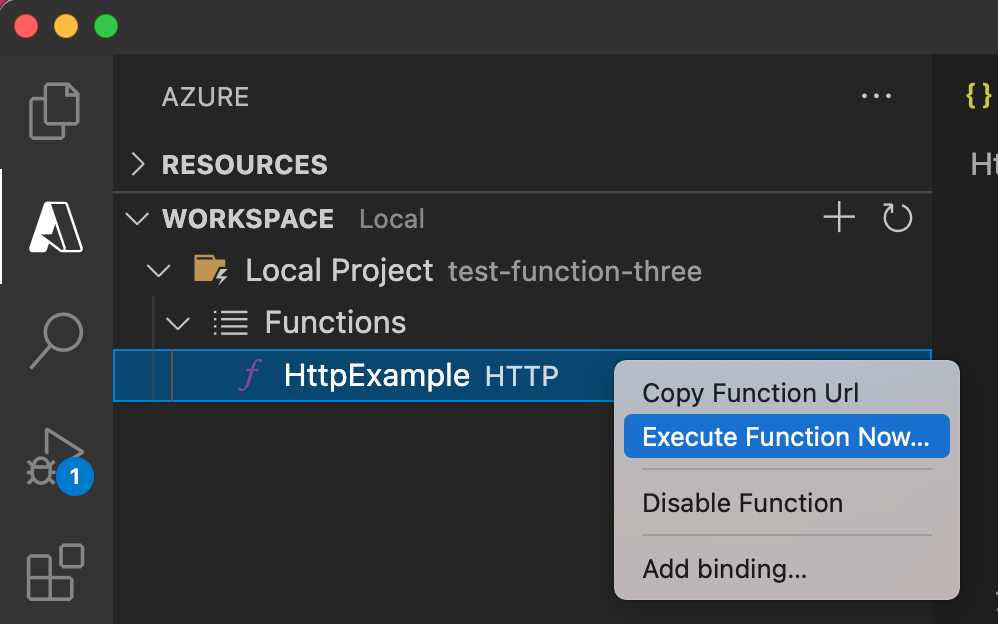
In the Enter request body, press Enter to send a request message to your function.
When the function executes locally and returns a response, a notification is raised in Visual Studio Code. Information about the function execution is shown in the Terminal panel.
Press Ctrl + C to stop Core Tools and disconnect the debugger.
Run the function locally
As in the previous article, press F5 to start the function app project and Core Tools.
With Core Tools running, go to the Azure: Functions area. Under Functions, expand Local Project > Functions. Right-click (Ctrl-click on Mac) the
HttpExamplefunction and choose Execute Function Now....
In Enter request body you see the request message body value of
{ "name": "Azure" }. Press Enter to send this request message to your function.After a response is returned, press Ctrl + C to stop Core Tools.
Verify that a JSON document has been created
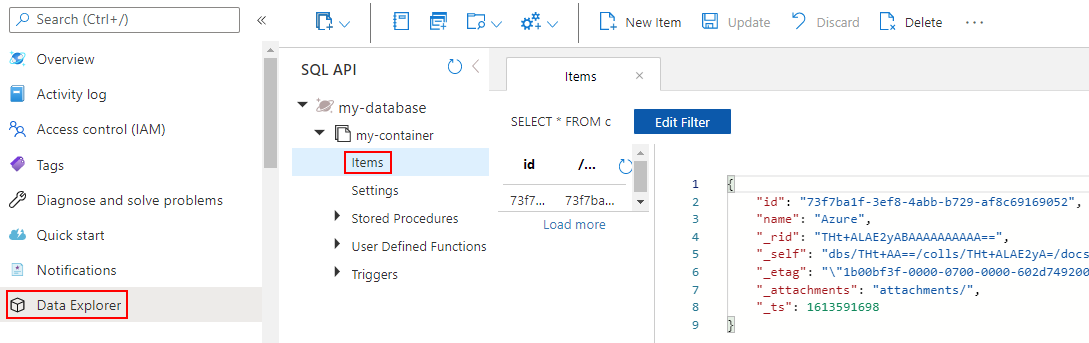
On the Azure portal, go back to your Azure Cosmos DB account and select Data Explorer.
Expand your database and container, and select Items to list the documents created in your container.
Verify that a new JSON document has been created by the output binding.
Redeploy and verify the updated app
In Visual Studio Code, press F1 to open the command palette. In the command palette, search for and select
Azure Functions: Deploy to function app....Choose the function app that you created in the first article. Because you're redeploying your project to the same app, select Deploy to dismiss the warning about overwriting files.
After deployment completes, you can again use the Execute Function Now... feature to trigger the function in Azure.
Again check the documents created in your Azure Cosmos DB container to verify that the output binding again generates a new JSON document.
Clean up resources
In Azure, resources refer to function apps, functions, storage accounts, and so forth. They're grouped into resource groups, and you can delete everything in a group by deleting the group.
You created resources to complete these quickstarts. You might be billed for these resources, depending on your account status and service pricing. If you don't need the resources anymore, here's how to delete them:
In Visual Studio Code, press F1 to open the command palette. In the command palette, search for and select
Azure: Open in portal.Choose your function app and press Enter. The function app page opens in the Azure portal.
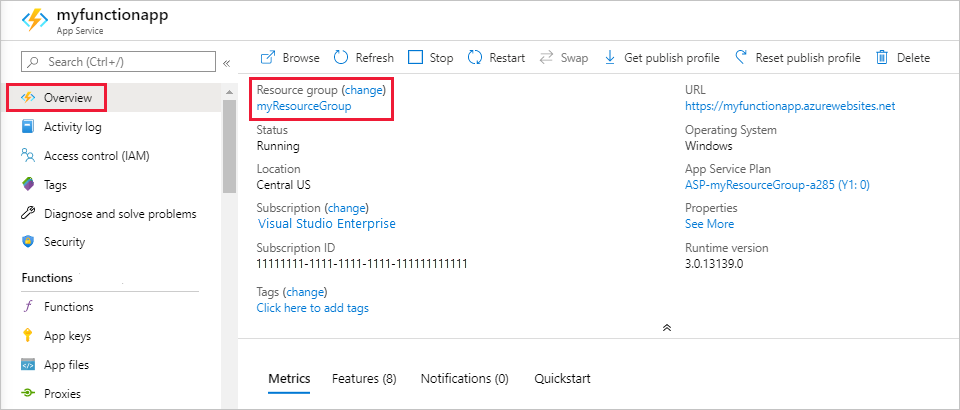
In the Overview tab, select the named link next to Resource group.
On the Resource group page, review the list of included resources, and verify that they're the ones you want to delete.
Select Delete resource group, and follow the instructions.
Deletion may take a couple of minutes. When it's done, a notification appears for a few seconds. You can also select the bell icon at the top of the page to view the notification.
Next steps
You've updated your HTTP triggered function to write JSON documents to an Azure Cosmos DB container. Now you can learn more about developing Functions using Visual Studio Code: