Connect functions to Azure Storage using Visual Studio
Azure Functions lets you connect Azure services and other resources to functions without having to write your own integration code. These bindings, which represent both input and output, are declared within the function definition. Data from bindings is provided to the function as parameters. A trigger is a special type of input binding. Although a function has only one trigger, it can have multiple input and output bindings. To learn more, see Azure Functions triggers and bindings concepts.
This article shows you how to use Visual Studio to connect the function you created in the previous quickstart article to Azure Storage. The output binding that you add to this function writes data from the HTTP request to a message in an Azure Queue storage queue.
Most bindings require a stored connection string that Functions uses to access the bound service. To make it easier, you use the Storage account that you created with your function app. The connection to this account is already stored in an app setting named AzureWebJobsStorage.
Prerequisites
Before you start this article, you must:
- Complete part 1 of the Visual Studio quickstart.
- Install Azure Storage Explorer. Storage Explorer is a tool that you'll use to examine queue messages generated by your output binding. Storage Explorer is supported on macOS, Windows, and Linux-based operating systems.
- Sign in to your Azure subscription from Visual Studio.
Download the function app settings
In the previous quickstart article, you created a function app in Azure along with the required Storage account. The connection string for this account is stored securely in app settings in Azure. In this article, you write messages to a Storage queue in the same account. To connect to your Storage account when running the function locally, you must download app settings to the local.settings.json file.
In Solution Explorer, right-click the project and select Publish.
In the Publish tab under Hosting, expand the three dots (...) and select Manage Azure App Service settings.
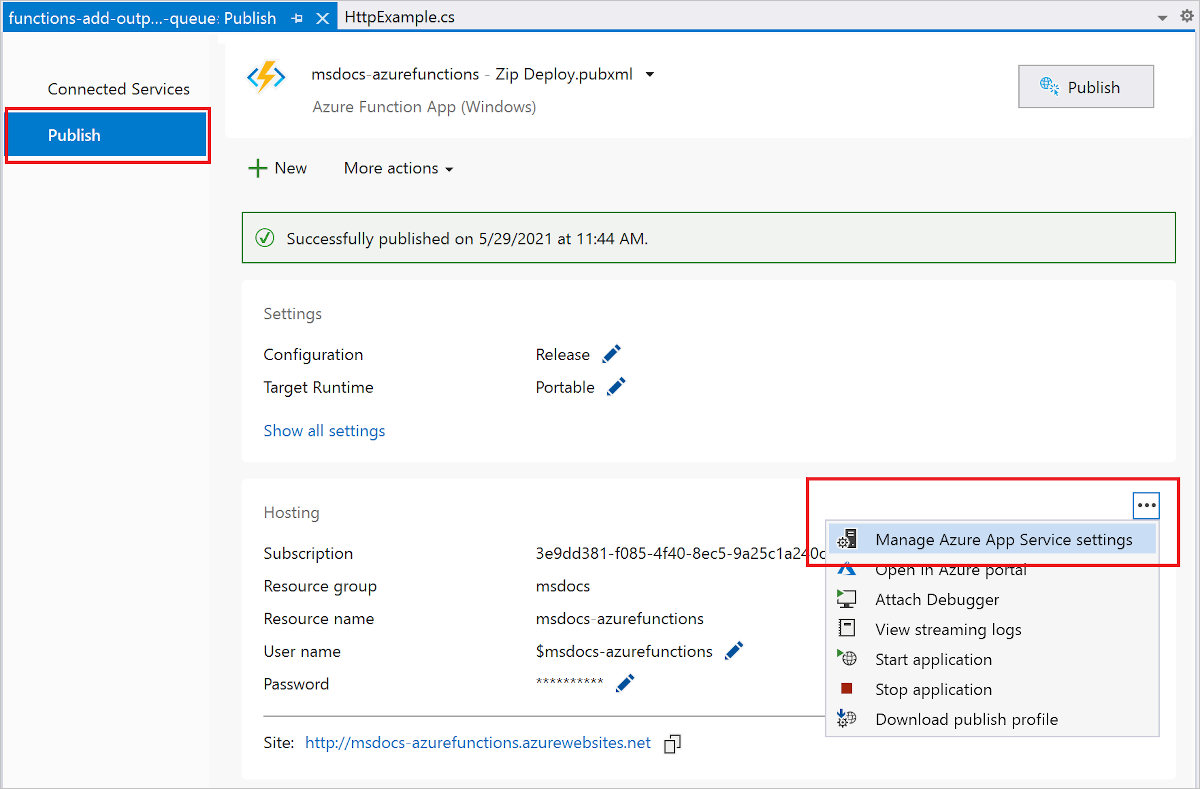
Under AzureWebJobsStorage, copy the Remote string value to Local, and then select OK.
The storage binding, which uses the AzureWebJobsStorage setting for the connection, can now connect to your Queue storage when running locally.
Register binding extensions
Because you're using a Queue storage output binding, you need the Storage bindings extension installed before you run the project. Except for HTTP and timer triggers, bindings are implemented as extension packages.
From the Tools menu, select NuGet Package Manager > Package Manager Console.
In the console, run the following Install-Package command to install the Storage extensions:
Install-Package Microsoft.Azure.Functions.Worker.Extensions.Storage.Queues
Now, you can add the storage output binding to your project.
Add an output binding
In a C# project, the bindings are defined as binding attributes on the function method. Specific definitions depend on whether your app runs in-process (C# class library) or in an isolated worker process.
Open the HttpExample.cs project file and add the following MultiResponse class:
public class MultiResponse
{
    [QueueOutput("outqueue",Connection = "AzureWebJobsStorage")]
    public string[] Messages { get; set; }
    public HttpResponseData HttpResponse { get; set; }
}
The MultiResponse class allows you to write to a storage queue named outqueue and an HTTP success message. Multiple messages could be sent to the queue because the QueueOutput attribute is applied to a string array.
The Connection property sets the connection string for the storage account. In this case, you could omit Connection because you're already using the default storage account.
Add code that uses the output binding
After the binding is defined, you can use the name of the binding to access it as an attribute in the function signature. By using an output binding, you don't have to use the Azure Storage SDK code for authentication, getting a queue reference, or writing data. The Functions runtime and queue output binding do those tasks for you.
Replace the existing HttpExample class with the following code:
    [Function("HttpExample")]
    public static MultiResponse Run([HttpTrigger(AuthorizationLevel.Function, "get", "post")] HttpRequestData req,
        FunctionContext executionContext)
    {
        var logger = executionContext.GetLogger("HttpExample");
        logger.LogInformation("C# HTTP trigger function processed a request.");

        var message = "Welcome to Azure Functions!";

        var response = req.CreateResponse(HttpStatusCode.OK);
        response.Headers.Add("Content-Type", "text/plain; charset=utf-8");
        response.WriteString(message);

        // Return a response to both HTTP trigger and storage output binding.
        return new MultiResponse()
        {
            // Write a single message.
            Messages = new string[] { message },
            HttpResponse = response
        };
    }
}
Run the function locally
To run your function, press F5 in Visual Studio. You might need to enable a firewall exception so that the tools can handle HTTP requests. Authorization levels are never enforced when you run a function locally.
Copy the URL of your function from the Azure Functions runtime output.
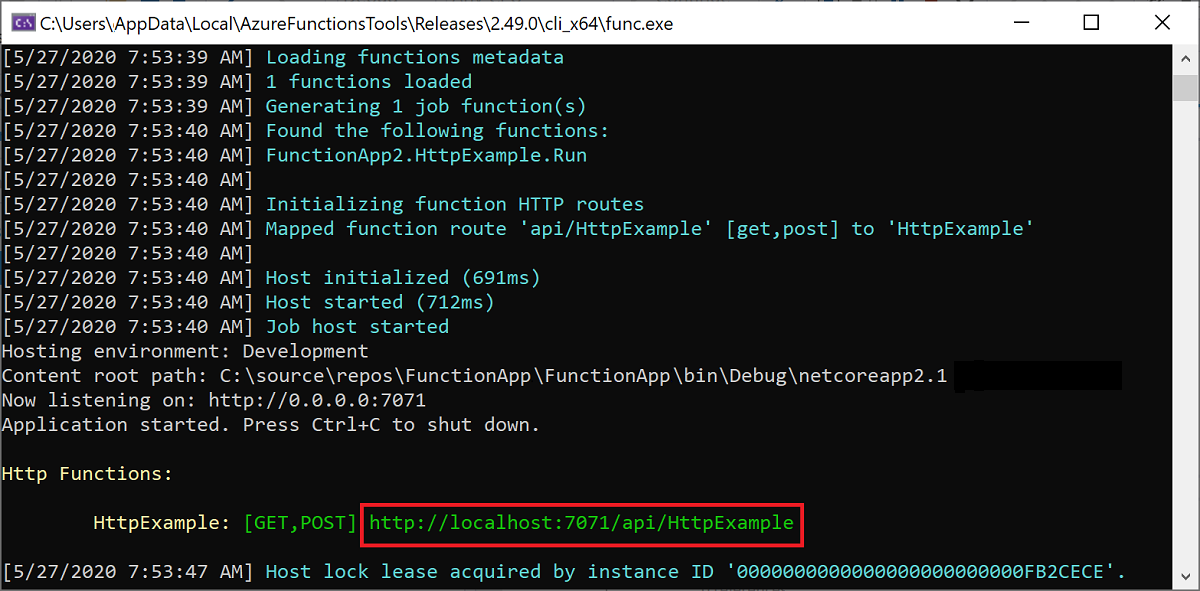
Paste the URL for the HTTP request into your browser's address bar and run the request. The following image shows the response in the browser to the local GET request returned by the function:

To stop debugging, press Shift+F5 in Visual Studio.
A new queue named outqueue is created in your storage account by the Functions runtime when the output binding is first used. You'll use Storage Explorer to verify that the queue was created along with the new message.
Connect Storage Explorer to your account
Skip this section if you've already installed Azure Storage Explorer and connected it to your Azure account.
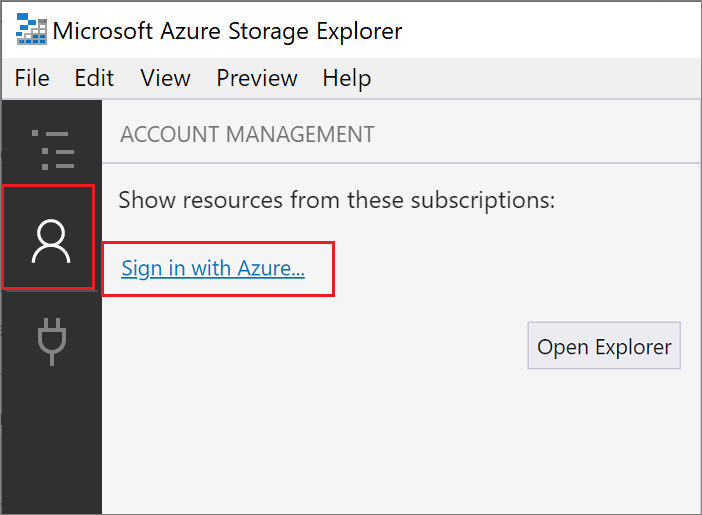
Run the Azure Storage Explorer tool, select the connect icon on the left, and select Add an account.
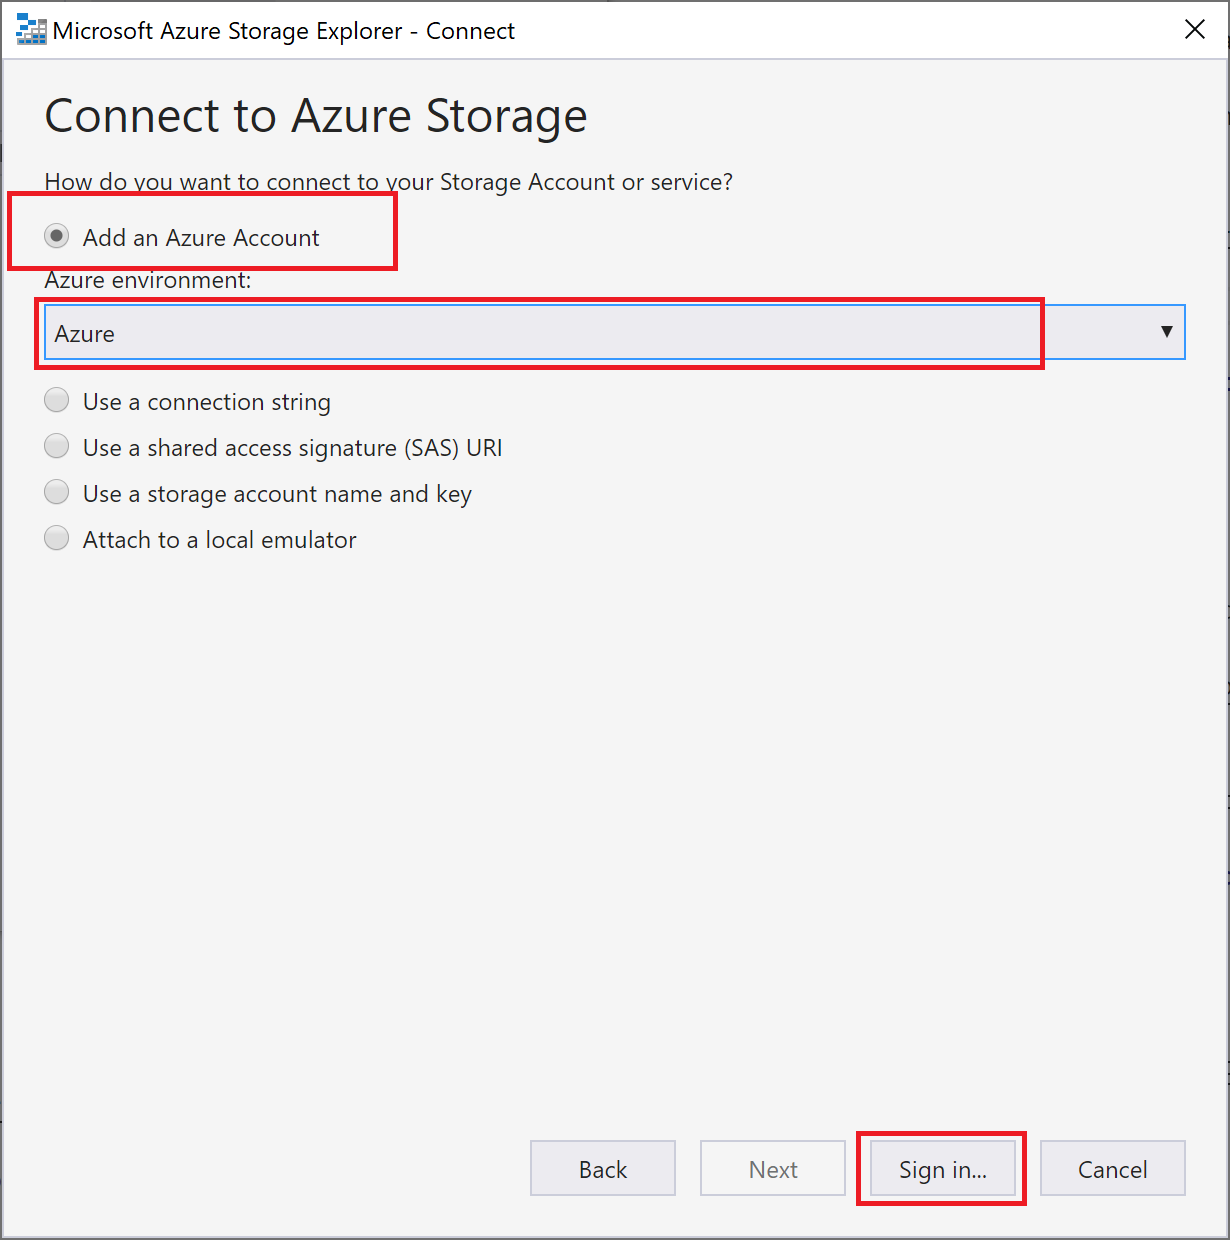
In the Connect dialog, choose Add an Azure account, choose your Azure environment, and then select Sign in....
After you successfully sign in to your account, you see all of the Azure subscriptions associated with your account. Choose your subscription and select Open Explorer.
Examine the output queue
In Storage Explorer, expand the Queues node, and then select the queue named outqueue.
The queue contains the message that the queue output binding created when you ran the HTTP-triggered function. If you invoked the function with the default
namevalue of Azure, the queue message is Name passed to the function: Azure.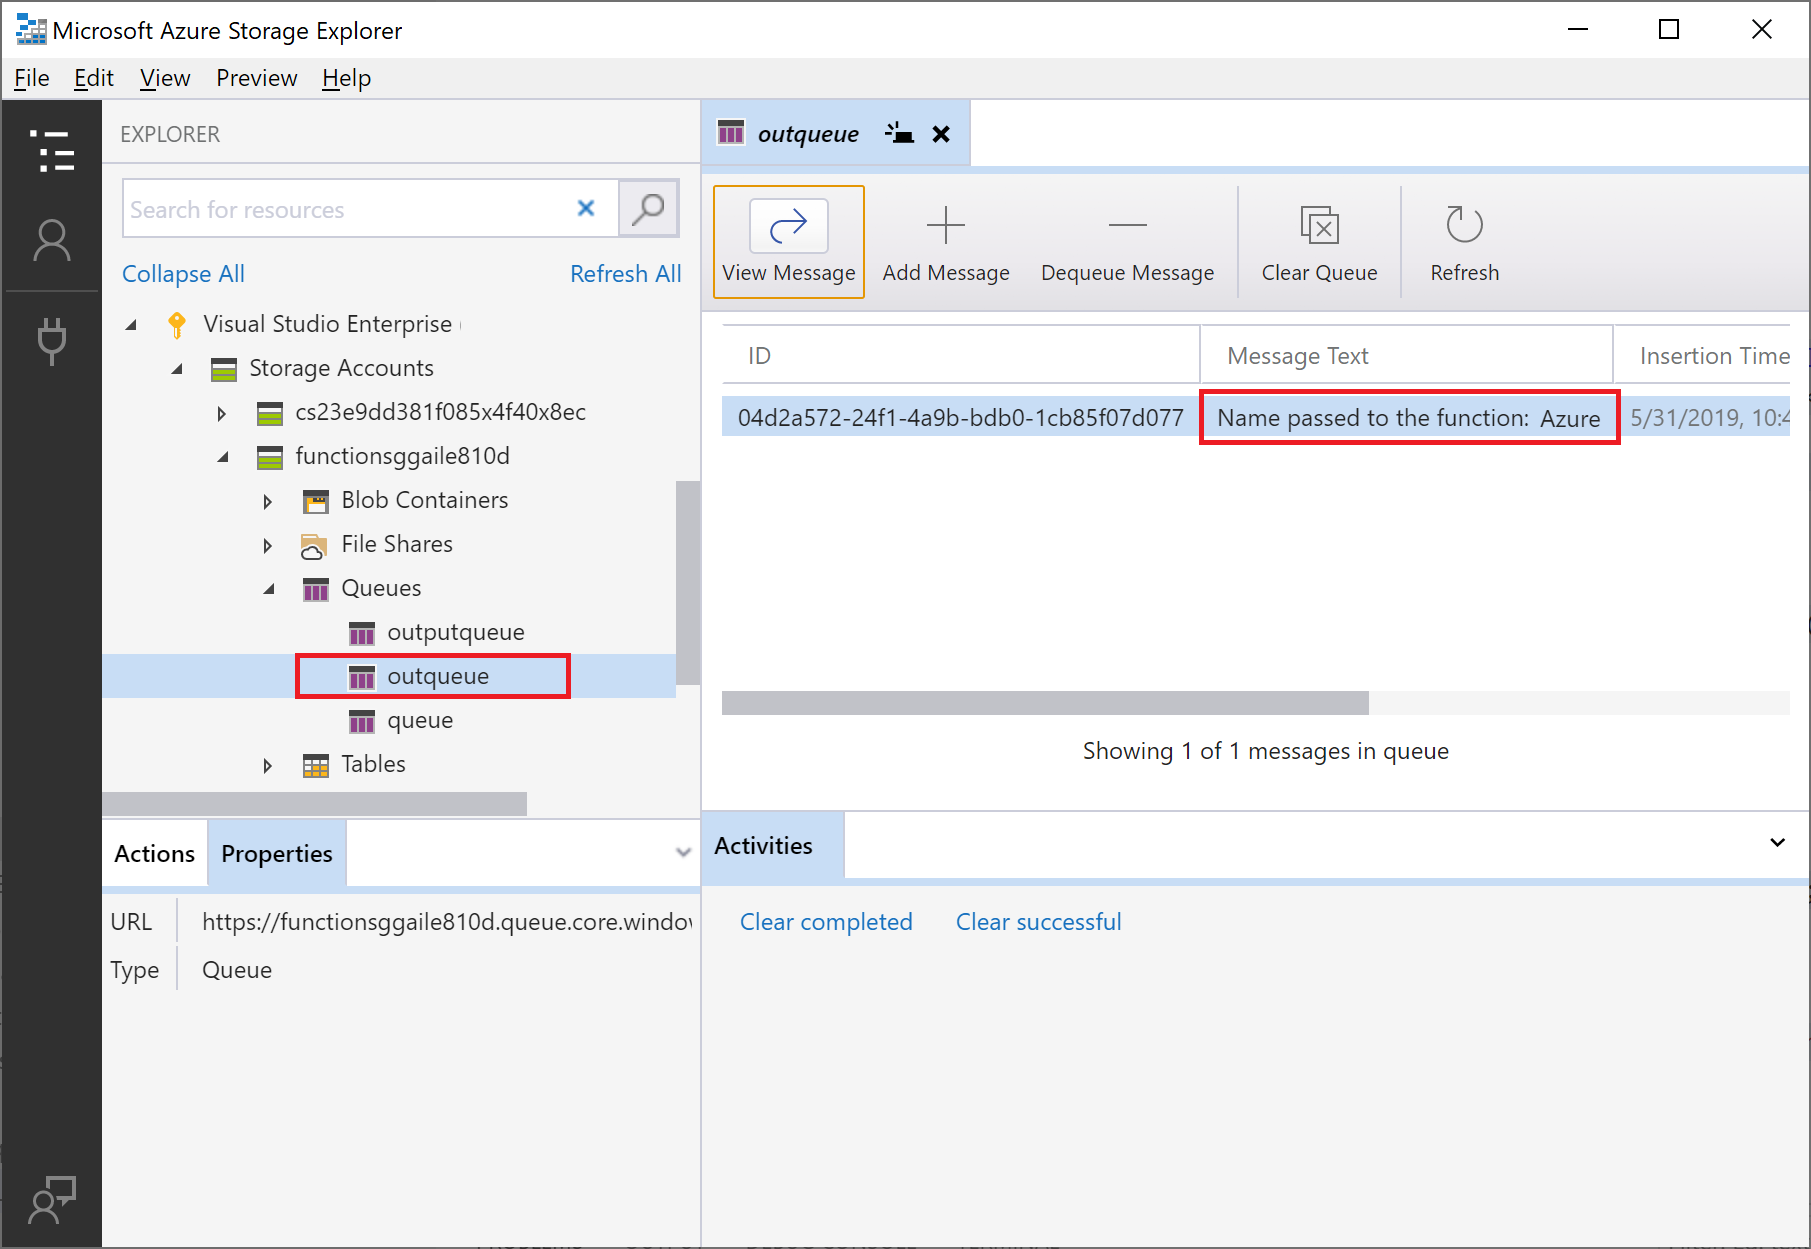
Run the function again, send another request, and you see a new message in the queue.
Now, it's time to republish the updated function app to Azure.
Redeploy and verify the updated app
In Solution Explorer, right-click the project and select Publish, then choose Publish to republish the project to Azure.
After deployment completes, you can again use the browser to test the redeployed function. As before, append the query string
&name=<yourname>to the URL.Again view the message in the storage queue to verify that the output binding again generates a new message in the queue.
Clean up resources
Other quickstarts in this collection build upon this quickstart. If you plan to work with subsequent quickstarts, tutorials, or with any of the services you've created in this quickstart, don't clean up the resources.
Resources in Azure refer to function apps, functions, storage accounts, and so forth. They're grouped into resource groups, and you can delete everything in a group by deleting the group.
You've created resources to complete these quickstarts. You might be billed for these resources, depending on your account status and service pricing. If you don't need the resources anymore, here's how to delete them:
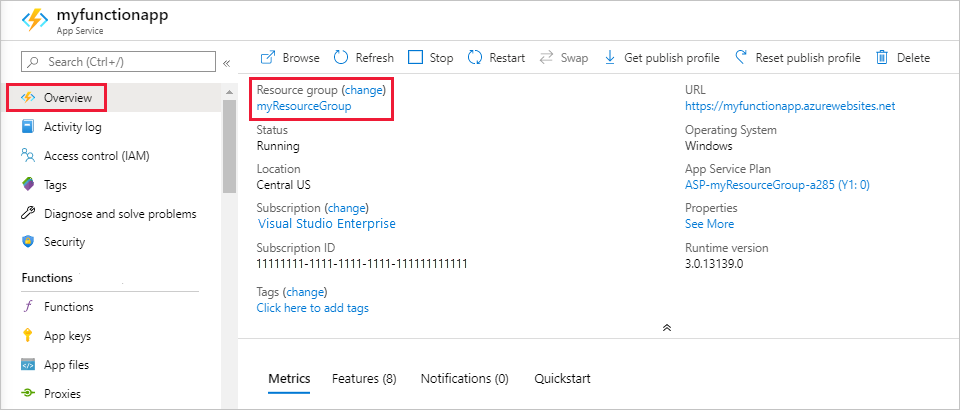
In the Azure portal, go to the Resource group page.
To get to that page from the function app page, select the Overview tab, and then select the link under Resource group.
To get to that page from the dashboard, select Resource groups, and then select the resource group that you used for this article.
In the Resource group page, review the list of included resources, and verify that they're the ones you want to delete.
Select Delete resource group and follow the instructions.
Deletion might take a couple of minutes. When it's done, a notification appears for a few seconds. You can also select the bell icon at the top of the page to view the notification.
Next steps
You've updated your HTTP triggered function to write data to a Storage queue. To learn more about developing Functions, see Develop Azure Functions using Visual Studio.
Next, you should enable Application Insights monitoring for your function app:
Feedback
Coming soon: Throughout 2024 we will be phasing out GitHub Issues as the feedback mechanism for content and replacing it with a new feedback system. For more information see: https://aka.ms/ContentUserFeedback.
Submit and view feedback for