In-place change of SQL Server version - SQL Server on Azure VMs
Applies to: ![]() SQL Server on Azure VM
SQL Server on Azure VM
This article describes how to change the version of Microsoft SQL Server on a Windows virtual machine (VM) in Microsoft Azure.
Plan for a version upgrade
Consider the following prerequisites before upgrading your version of SQL Server:
Decide what version of SQL Server you want to upgrade to:
- What's new in SQL Server 2022
- What's new in SQL Server 2019
- What's new in SQL Server 2017
We recommend that you check the compatibility certification for the version that you change to so that you can use the database compatibility modes to minimize the upgrade's effect.
You can review the following articles to help ensure a successful outcome:
Prerequisites
To do an in-place upgrade of SQL Server, you need the following:
- SQL Server installation media. Customers who have Software Assurance can obtain their installation media from the Volume Licensing Center. Customers who don't have Software Assurance can deploy an Azure Marketplace SQL Server VM image with the desired version of SQL Server and then copy the setup media (typically located in
C:\SQLServerFull) from it to their target SQL Server VM. - Version upgrades should follow the support upgrade paths.
Upgrade SQL Version
Warning
Upgrading the version of SQL Server will restart the service for SQL Server in addition to any associated services, such as Analysis Services and R Services.
To upgrade the version of SQL Server, obtain the SQL Server setup media for the later version that would support the upgrade path of SQL Server, and do the following steps:
Back up the databases, including the system (except
tempdb) and user databases, before you start the process. You can also create an application-consistent VM-level backup by using Azure Backup Services.Start Setup.exe from the SQL Server installation media.
The Installation Wizard starts the SQL Server Installation Center. To upgrade an existing instance of SQL Server, select Installation on the navigation pane, then select Upgrade from an earlier version of SQL Server.
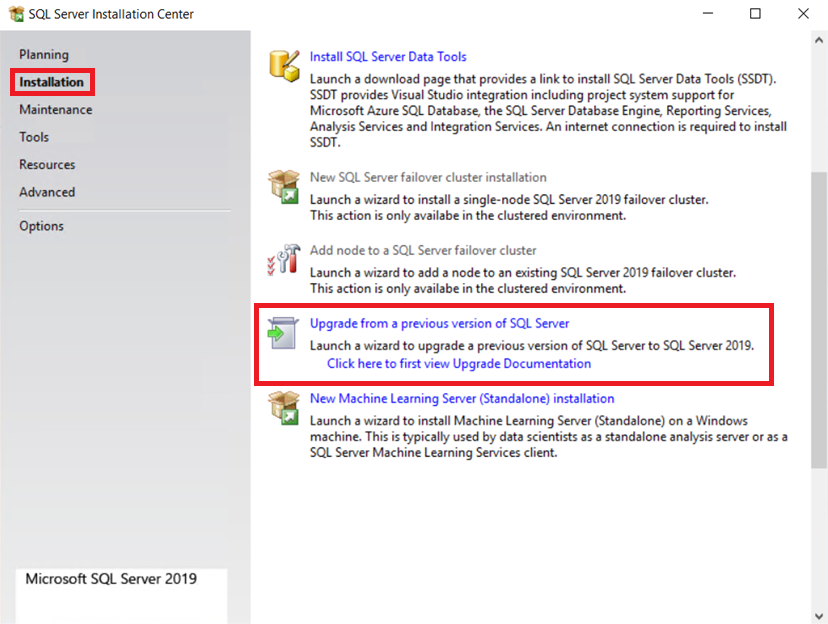
On the Product Key page, select an option to indicate whether you're upgrading to a free edition of SQL Server or you have a PID key for a production version of the product. For more information, see Editions and supported features of SQL Server 2019 (15.x) and Supported version and edition Upgrades (SQL Server 2016).
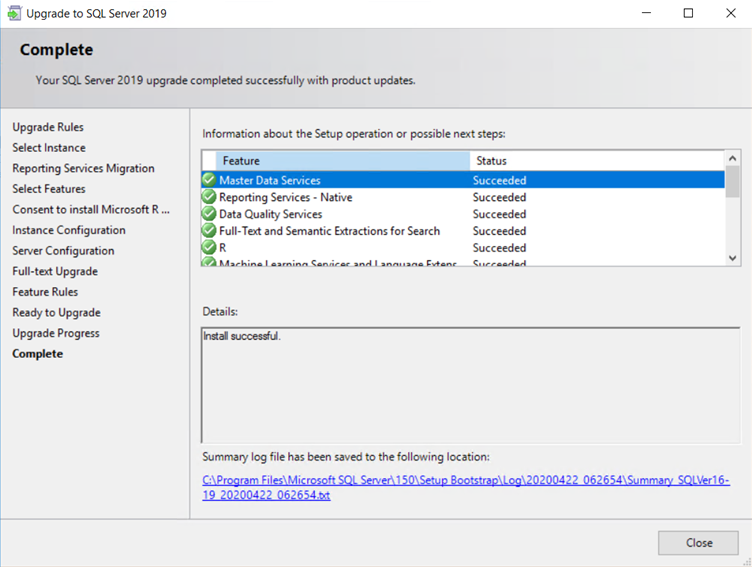
Select Next until you reach the Ready to upgrade page, and then select Upgrade. The setup window might stop responding for several minutes while the change is taking effect. A Complete page confirms that your upgrade is completed. For a step-by-step procedure to upgrade, see the complete procedure.

If you have changed the SQL Server edition in addition to changing the version, also update the edition, and refer to the Verify Version and Edition in Portal section to change the SQL VM instance.

Downgrade the version of SQL Server
To downgrade the version of SQL Server, you have to completely uninstall SQL Server, and reinstall it again by using the desired version. This is similar to a fresh installation of SQL Server because you can't restore the earlier database from a later version to the newly installed earlier version. The databases have to be re-created from scratch. If you also changed the edition of SQL Server during the upgrade, change the Edition property of the SQL Server VM in the Azure portal to the new edition value. This updates the metadata and billing that is associated with this VM.
Warning
An in-place downgrade of SQL Server is not supported.
You can downgrade the version of SQL Server by following these steps:
Back up all databases, including system (except
tempdb) and user databases.Export all the necessary server-level objects (such as server triggers, roles, logins, linked servers, jobs, credentials, and certificates).
If you don't have scripts to re-create your user databases on the earlier version, you must script out all objects and export all data by using BCP.exe, SSIS, or DACPAC.
Ensure you select the correct options when you script such items as the target version, dependent objects, and advanced options.
Completely uninstall SQL Server and all associated services.
Restart the VM.
Install SQL Server by using the media for the desired version of the program.
Install the latest service packs and cumulative updates.
Import all the necessary server-level objects (that were exported in Step 3).
Re-create all the necessary user databases from scratch (by using created scripts or the files from Step 4).

Verify the version and edition in the portal
After you change the version of SQL Server, register your SQL Server VM with the SQL IaaS Agent extension again so that you can use the Azure portal to view the version of SQL Server. The listed version number should now reflect your SQL Server installation's newly upgraded version and edition.

Remarks
- We recommend that you initiate backups/update statistics/rebuild indexes/check consistency after the upgrade is finished. You can also check the individual database compatibility levels to ensure they reflect your desired level.
- After SQL Server is updated on the VM, make sure that the Edition property of SQL Server in the Azure portal matches the installed edition number for billing.
- The ability to change the edition is a feature of the SQL IaaS Agent extension. Deploying an Azure Marketplace image through the Azure portal automatically registers a SQL Server VM with the extension. However, customers who self-install SQL Server have to manually register their SQL Server VM.
- If you drop your SQL Server VM resource, the hard-coded edition setting of the image is restored.
Related content
Feedback
Coming soon: Throughout 2024 we will be phasing out GitHub Issues as the feedback mechanism for content and replacing it with a new feedback system. For more information see: https://aka.ms/ContentUserFeedback.
Submit and view feedback for