Note
Access to this page requires authorization. You can try signing in or changing directories.
Access to this page requires authorization. You can try changing directories.
This article is part two in a four-part tutorial series. Part one provides an overview of customer-managed keys, their features, and considerations before you enable one on your registry. This article walks you through the steps of enabling a customer-managed key by using the Azure CLI, the Azure portal, or an Azure Resource Manager template.
Prerequisites
- Install the Azure CLI or prepare to use Azure Cloud Shell.
- Sign in to the Azure portal.
Enable a customer-managed key by using the Azure CLI
Create a resource group
Run the az group create command to create a resource group that will hold your key vault, container registry, and other required resources:
az group create --name <resource-group-name> --location <location>
Create a user-assigned managed identity
Configure a user-assigned managed identity for the registry so that you can access the key vault:
Run the az identity create command to create the managed identity:
az identity create \
  --resource-group <resource-group-name> \
  --name <managed-identity-name>
In the command output, take note of the
idandprincipalIdvalues to configure registry access with the key vault:{ "clientId": "00001111-aaaa-2222-bbbb-3333cccc4444", "clientSecretUrl": "https://control-eastus.identity.azure.net/subscriptions/aaaa0a0a-bb1b-cc2c-dd3d-eeeeee4e4e4e/resourcegroups/myresourcegroup/providers/Microsoft.ManagedIdentity/userAssignedIdentities/myidentityname/credentials?tid=aaaabbbb-0000-cccc-1111-dddd2222eeee&oid=aaaaaaaa-0000-1111-2222-bbbbbbbbbbbb&aid=00001111-aaaa-2222-bbbb-3333cccc4444", "id": "/subscriptions/aaaa0a0a-bb1b-cc2c-dd3d-eeeeee4e4e4e/resourcegroups/myresourcegroup/providers/Microsoft.ManagedIdentity/userAssignedIdentities/myresourcegroup", "location": "eastus", "name": "myidentityname", "principalId": "xxxxxxxx-xxxx-xxxx-xxxx-xxxxxxxxxxxx", "resourceGroup": "myresourcegroup", "tags": {}, "tenantId": "xxxxxxxx-xxxx-xxxx-xxxx-xxxxxxxxxxxx", "type": "Microsoft.ManagedIdentity/userAssignedIdentities" }For convenience, store the
idandprincipalIdvalues in environment variables:identityID=$(az identity show --resource-group <resource-group-name> --name <managed-identity-name> --query 'id' --output tsv) identityPrincipalID=$(az identity show --resource-group <resource-group-name> --name <managed-identity-name> --query 'principalId' --output tsv)
Create a key vault
Run the az keyvault create command to create a key vault where you can store a customer-managed key for registry encryption.
By default, the new key vault automatically enables the soft delete setting. To prevent data loss from accidental deletion of keys or key vaults, we recommend enabling the purge protection setting:
az keyvault create --name <key-vault-name> \
  --resource-group <resource-group-name> \
  --enable-purge-protection
For convenience, take a note of the key vault's resource ID and store the value in environment variables:
keyvaultID=$(az keyvault show --resource-group <resource-group-name> --name <key-vault-name> --query 'id' --output tsv)
Enable trusted services to access the key vault
If the key vault is in protection with a firewall or virtual network (private endpoint), you must enable the network settings to allow access by trusted Azure services. For more information, see Configure Azure Key Vault networking settings.
Enable managed identities to access the key vault
There are two ways to enable managed identities to access your key vault.
The first option is to configure the access policy for the key vault and set key permissions for access with a user-assigned managed identity:
Run the az keyvault set policy command. Pass the previously created and stored environment variable value of
principalID.Set key permissions to
get,unwrapKey, andwrapKey:az keyvault set-policy \ --resource-group <resource-group-name> \ --name <key-vault-name> \ --object-id $identityPrincipalID \ --key-permissions get unwrapKey wrapKey
The second option is to use Azure role-based access control (RBAC) to assign permissions to the user-assigned managed identity and access the key vault. Run the az role assignment create command and assign the Key Vault Crypto Service Encryption User role to a user-assigned managed identity:
az role assignment create --assignee $identityPrincipalID \
  --role "Key Vault Crypto Service Encryption User" \
  --scope $keyvaultID
Create a key and get the key ID
Run the az keyvault key create command to create a key in the key vault:
az keyvault key create \
  --name <key-name> \
  --vault-name <key-vault-name>
In the command output, take note of the key ID (
kid):[...] "key": { "crv": null, "d": null, "dp": null, "dq": null, "e": "AQAB", "k": null, "keyOps": [ "encrypt", "decrypt", "sign", "verify", "wrapKey", "unwrapKey" ], "kid": "https://mykeyvault.vault.azure.net/keys/mykey/<version>", "kty": "RSA", [...]For convenience, store the format that you choose for the key ID in the
$keyIDenvironment variable. You can use a key ID with or without a version.
Key rotation
You can choose manual or automatic key rotation.
Encrypting a registry with a customer-managed key that has a key version will allow only manual key rotation in Azure Container Registry. This example stores the key's kid property:
keyID=$(az keyvault key show \
  --name <keyname> \
  --vault-name <key-vault-name> \
  --query 'key.kid' --output tsv)
Encrypting a registry with a customer-managed key by omitting a key version will enable automatic key rotation to detect a new key version in Azure Key Vault. This example removes the version from the key's kid property:
keyID=$(az keyvault key show \
  --name <keyname> \
  --vault-name <key-vault-name> \
  --query 'key.kid' --output tsv)

keyID=$(echo $keyID | sed -e "s/\/[^/]*$//")
Create a registry with a customer-managed key
Run the az acr create command to create a registry in the Premium service tier and enable the customer-managed key.
Pass the managed identity ID (
id) and key ID (kid) values stored in the environment variables in previous steps:az acr create \ --resource-group <resource-group-name> \ --name <container-registry-name> \ --identity $identityID \ --key-encryption-key $keyID \ --sku Premium
Show encryption status
Run the az acr encryption show command to show the status of the registry encryption with a customer-managed key:
az acr encryption show --name <container-registry-name>
Depending on the key that's used to encrypt the registry, the output is similar to:
{
  "keyVaultProperties": {
    "identity": "xxxxxxxx-xxxx-xxxx-xxxx-xxxxxxxxxxxx",
    "keyIdentifier": "https://myvault.vault.azure.net/keys/myresourcegroup/abcdefg123456789...",
    "keyRotationEnabled": true,
    "lastKeyRotationTimestamp": xxxxxxxx
    "versionedKeyIdentifier": "https://myvault.vault.azure.net/keys/myresourcegroup/abcdefg123456789...",
  },
  "status": "enabled"
}
Enable a customer-managed key by using the Azure portal
Create a user-assigned managed identity
To create a user-assigned managed identity for Azure resources in the Azure portal:
Follow the steps to create a user-assigned identity.
Save the identity's name to use it in later steps.

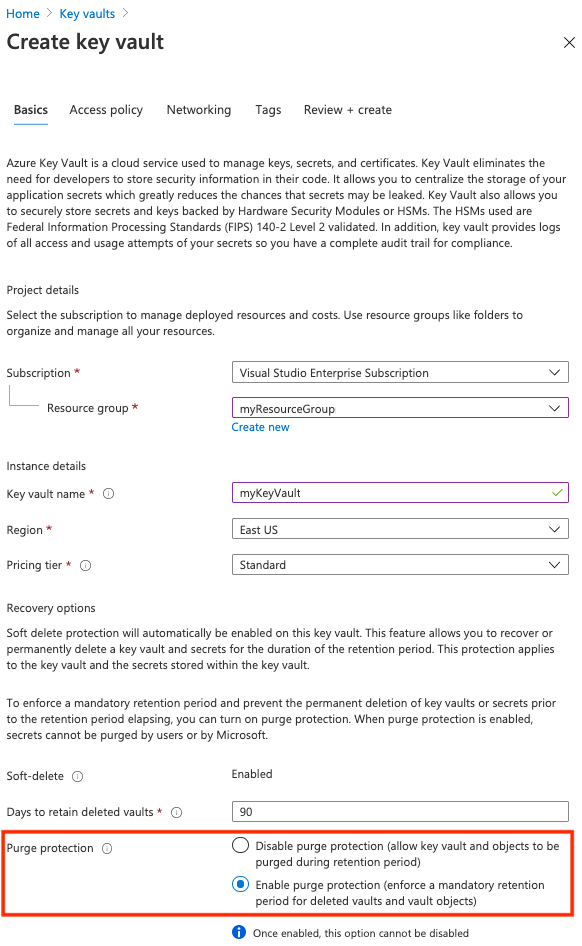
Create a key vault
Follow the steps in Quickstart: Create a key vault using the Azure portal.
When you're creating a key vault for a customer-managed key, on the Basics tab, enable the Purge protection setting. This setting helps prevent data loss from accidental deletion of keys or key vaults.
Enable trusted services to access the key vault
If the key vault is in protection with a firewall or virtual network (private endpoint), enable the network setting to allow access by trusted Azure services. For more information, see Configure Azure Key Vault networking settings.
Enable managed identities to access the key vault
There are two ways to enable managed identities to access your key vault.
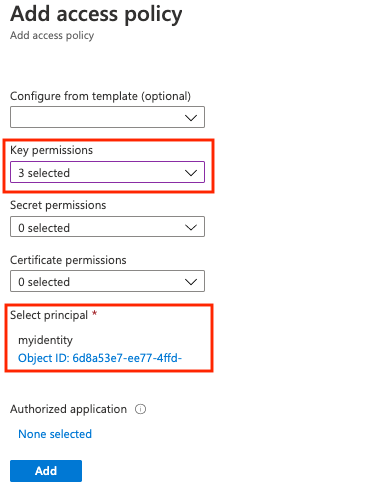
The first option is to configure the access policy for the key vault and set key permissions for access with a user-assigned managed identity:
- Go to your key vault.
- Select Settings > Access policies > +Add Access Policy.
- Select Key permissions, and then select Get, Unwrap Key, and Wrap Key.
- In Select principal, select the resource name of your user-assigned managed identity.
- Select Add, and then select Save.
The other option is to assign the Key Vault Crypto Service Encryption User RBAC role to the user-assigned managed identity at the key vault scope. For detailed steps, see Assign Azure roles using the Azure portal.
Create a key
Create a key in the key vault and use it to encrypt the registry. Follow these steps if you want to select a specific key version as a customer-managed key. You might also need to create a key before creating the registry if key vault access is restricted to a private endpoint or selected networks.
- Go to your key vault.
- Select Settings > Keys.
- Select +Generate/Import and enter a unique name for the key.
- Accept the remaining default values, and then select Create.
- After creation, select the key and then select the current version. Copy the Key identifier for the key version.
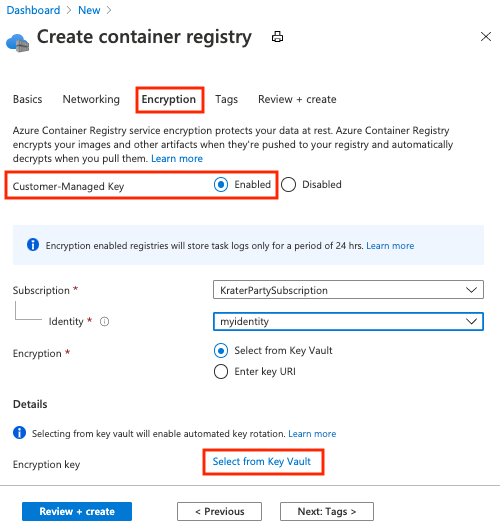
Create a container registry
- Select Create a resource > Containers > Container Registry.
- On the Basics tab, select or create a resource group, and then enter a registry name. In SKU, select Premium.
- On the Encryption tab, for Customer-managed key, select Enabled.
- For Identity, select the managed identity that you created.
- For Encryption, choose one of the following options:
- Choose Select from Key Vault, and then either select an existing key vault and key or select Create new. The key that you select is unversioned and enables automatic key rotation.
- Select Enter key URI, and provide the identifier of an existing key. You can provide either a versioned key URI (for a key that must be rotated manually) or an unversioned key URI (which enables automatic key rotation). See the previous section for steps to create a key.
- Select Review + create.
- Select Create to deploy the registry instance.
Show the encryption status
To see the encryption status of your registry in the portal, go to your registry. Under Settings, select Encryption.
Enable a customer-managed key by using a Resource Manager template
You can use a Resource Manager template to create a container registry and enable encryption with a customer-managed key:
Copy the following content of a Resource Manager template to a new file and save it as CMKtemplate.json:
{
  "$schema": "https://schema.management.azure.com/schemas/2015-01-01/deploymentTemplate.json#",
  "contentVersion": "1.0.0.0",
  "parameters": {
    "vault_name": {
      "defaultValue": "",
      "type": "String"
    },
    "registry_name": {
      "defaultValue": "",
      "type": "String"
    },
    "identity_name": {
      "defaultValue": "",
      "type": "String"
    },
    "kek_id": {
      "type": "String"
    }
  },
  "variables": {},
  "resources": [
    {
      "type": "Microsoft.ContainerRegistry/registries",
      "apiVersion": "2019-12-01-preview",
      "name": "[parameters('registry_name')]",
      "location": "[resourceGroup().location]",
      "sku": {
        "name": "Premium",
        "tier": "Premium"
      },
      "identity": {
        "type": "UserAssigned",
        "userAssignedIdentities": {
          "[resourceID('Microsoft.ManagedIdentity/userAssignedIdentities', parameters('identity_name'))]": {}
        }
      },
      "dependsOn": [
        "[resourceId('Microsoft.ManagedIdentity/userAssignedIdentities', parameters('identity_name'))]"
      ],
      "properties": {
        "adminUserEnabled": false,
        "encryption": {
          "status": "enabled",
          "keyVaultProperties": {
            "identity": "[reference(resourceId('Microsoft.ManagedIdentity/userAssignedIdentities', parameters('identity_name')), '2018-11-30').clientId]",
            "KeyIdentifier": "[parameters('kek_id')]"
          }
        },
        "networkRuleSet": {
          "defaultAction": "Allow",
          "virtualNetworkRules": [],
          "ipRules": []
        },
        "policies": {
          "quarantinePolicy": {
            "status": "disabled"
          },
          "trustPolicy": {
            "type": "Notary",
            "status": "disabled"
          },
          "retentionPolicy": {
            "days": 7,
            "status": "disabled"
          }
        }
      }
    },
    {
      "type": "Microsoft.KeyVault/vaults/accessPolicies",
      "apiVersion": "2018-02-14",
      "name": "[concat(parameters('vault_name'), '/add')]",
      "dependsOn": [
        "[resourceId('Microsoft.ManagedIdentity/userAssignedIdentities', parameters('identity_name'))]"
      ],
      "properties": {
        "accessPolicies": [
          {
            "tenantId": "[subscription().tenantId]",
            "objectId": "[reference(resourceId('Microsoft.ManagedIdentity/userAssignedIdentities', parameters('identity_name')), '2018-11-30').principalId]",
            "permissions": {
              "keys": [
                "get",
                "unwrapKey",
                "wrapKey"
              ]
            }
          }
        ]
      }
    },
    {
      "type": "Microsoft.ManagedIdentity/userAssignedIdentities",
      "apiVersion": "2018-11-30",
      "name": "[parameters('identity_name')]",
      "location": "[resourceGroup().location]"
    }
  ]
}
Follow the steps in the previous sections to create the following resources:
- Key vault, identified by name
- Key vault key, identified by key ID
Run the az deployment group create command to create the registry by using the preceding template file. When indicated, provide a new registry name and a user-assigned managed identity name, along with the key vault name and key ID that you created.
az deployment group create \
  --resource-group <resource-group-name> \
  --template-file CMKtemplate.json \
  --parameters \
    registry_name=<registry-name> \
    identity_name=<managed-identity> \
    vault_name=<key-vault-name> \
    key_id=<key-vault-key-id>
Run the az acr encryption show command to show the status of registry encryption:
az acr encryption show --name <registry-name>
Next steps
Advance to the next article to walk through rotating customer-managed keys, updating key versions, and revoking a customer-managed key.