Tutorial: Deploy an ASP.NET web application by using Azure Cosmos DB for NoSQL, managed identity, and AKS via Bicep
APPLIES TO: ![]() NoSQL
NoSQL
In this tutorial, you deploy a reference ASP.NET web application on an Azure Kubernetes Service (AKS) cluster that connects to Azure Cosmos DB for NoSQL.
Azure Cosmos DB is a fully managed distributed database platform for modern application development with NoSQL or relational databases.
AKS is a managed Kubernetes service that helps you quickly deploy and manage clusters.
Important
- This article requires the latest version of the Azure CLI. For more information, see Install the Azure CLI. If you're using Azure Cloud Shell, the latest version is already installed.
- This article also requires the latest version of the Bicep CLI within the Azure CLI. For more information, see Install Bicep tools.
- If you're running the commands in this tutorial locally instead of in Azure Cloud Shell, ensure that you use an administrator account.
Prerequisites
The following tools are required to compile the ASP.NET web application and create its container image:
Overview
This tutorial uses an infrastructure as code (IaC) approach to deploy the resources to Azure. You use Bicep, which is a new declarative language that offers the same capabilities as Azure Resource Manager templates. However, Bicep includes a syntax that's more concise and easier to use.
The Bicep modules deploy the following Azure resources within the targeted subscription scope:
- A resource group to organize the resources
- A managed identity for authentication
- A container registry for storing container images
- An AKS cluster
- A virtual network for configuring AKS
- An Azure Cosmos DB for NoSQL account, along with a database, a container, and the SQL role
- A key vault to store secure keys
- (Optional) A Log Analytics workspace
This tutorial uses the following best practices for Azure Cosmos DB security:
- Implement access control by using role-based access control (RBAC) and a managed identity. These features eliminate the need for developers to manage secrets, credentials, certificates, and keys for secure communication between services.
- Limit Azure Cosmos DB access to the AKS subnet by configuring a virtual network service endpoint.
- Set
disableLocalAuth = truein thedatabaseAccountresource to enforce RBAC as the only authentication method.
Tip
The steps in this tutorial use Azure Cosmos DB for NoSQL. However, you can apply the same concepts to Azure Cosmos DB for MongoDB.
Download the Bicep modules
Download or clone the Bicep modules from the Bicep folder of the azure-samples/cosmos-aks-samples GitHub repository:
git clone https://github.com/Azure-Samples/cosmos-aks-samples.git

cd Bicep/
Connect to your Azure subscription
Use az sign in to connect to your default Azure subscription:
az login
Optionally, use az account set with the name or ID of a specific subscription to set the active subscription if you have multiple subscriptions:
az account set \
  --subscription <subscription-id>
Initialize the deployment parameters
Create a param.json file by using the JSON in the following example. Replace the {resource group name}, {Azure Cosmos DB account name}, and {Azure Container Registry instance name} placeholders with your own values.
Important
All resource names that you use in the following code should comply with the naming rules and restrictions for Azure resources. Also ensure that the placeholder values are replaced consistently and match the values in param.json.
{
  "$schema": "https://schema.management.azure.com/schemas/2019-04-01/deploymentParameters.json#",
  "contentVersion": "1.0.0.0",
  "parameters": {
    "rgName": {
      "value": "{resource group name}"
    },
    "cosmosName" :{
      "value": "{Azure Cosmos DB account name}"
    },
    "acrName" :{
      "value": "{Azure Container Registry instance name}"
    }
  }
}
Create a Bicep deployment
Set shell variables by using the following commands. Replace the {deployment name} and {location} placeholders with your own values.
deploymentName='{deployment name}'  # Name of the deployment
location='{location}' # Location for deploying the resources
Within the Bicep folder, use az deployment sub create to deploy the template to the current subscription scope:
az deployment sub create \
  --name $deploymentName \
  --location $location \
  --template-file main.bicep \
  --parameters @param.json
During deployment, the console outputs a message indicating that the deployment is still running:
/ Running ..
The deployment could take 20 to 30 minutes. After provisioning is completed, the console will output JSON with Succeeded as the provisioning state:
      }
    ],
    "provisioningState": "Succeeded",
    "templateHash": "0000000000000000",
    "templateLink": null,
    "timestamp": "2022-01-01T00:00:00.000000+00:00",
    "validatedResources": null
  },
  "tags": null,
  "type": "Microsoft.Resources/deployments"
}
You can also see the deployment status in the resource group:

Note
When you create an AKS cluster, a second resource group is automatically created to store the AKS resources. For more information, see Why are two resource groups created with AKS?.
Link Azure Container Registry with AKS
Use the following commands to link your Azure Container Registry instance with AKS. Replace the {Azure Container Registry instance name} and {resource group name} placeholders with your own values.
acrName='{Azure Container Registry instance name}'
rgName='{resource group name}'
aksName=$rgName'aks'
Run az aks update to attach the existing Azure Container Registry resource with the AKS cluster:
az aks update \
  --resource-group $rgName \
  --name $aksName \
  --attach-acr $acrName
Connect to the AKS cluster
To manage a Kubernetes cluster, you use kubectl, the Kubernetes command-line client. If you use Azure Cloud Shell, kubectl is already installed. To install kubectl locally, use az aks install-cli:
az aks install-cli
To configure kubectl to connect to your Kubernetes cluster, use az aks get-credentials. This command downloads credentials and configures the Kubernetes CLI to use them.
az aks get-credentials \
  --resource-group $rgName \
  --name $aksName
Connect the AKS pods to Azure Key Vault
Microsoft Entra pod-managed identities use AKS primitives to associate managed identities for Azure resources and identities in Microsoft Entra ID with pods. You use these identities to grant access to the Azure Key Vault Provider for Secrets Store Container Storage Interface (CSI) Driver.
Use the following command to find the values of the tenant ID (homeTenantId):
az account show
Use the following YAML template to create a secretproviderclass.yml file. Replace the {Tenant Id} and {resource group name} placeholders with your own values. Also ensure that the value for {resource group name} matches the value in param.json.
# This is a SecretProviderClass example that uses aad-pod-identity to access the key vault
apiVersion: secrets-store.csi.x-k8s.io/v1
kind: SecretProviderClass
metadata:
  name: azure-kvname-podid
spec:
  provider: azure
  parameters:
    usePodIdentity: "true"
    keyvaultName: "{resource group name}kv"       # Replace resource group name. Bicep generates the key vault name.
    tenantId: "{Tenant Id}"              # The tenant ID of your account. Use the 'homeTenantId' attribute value from  the 'az account show' command output.
Apply the SecretProviderClass to the AKS cluster
Use kubectl apply to install the Secrets Store CSI Driver by using the YAML:
kubectl apply \
  --filename secretproviderclass.yml
Build the ASP.NET web application
Download or clone the web application's source code from the Application folder of the azure-samples/cosmos-aks-samples GitHub repository:
git clone https://github.com/Azure-Samples/cosmos-aks-samples.git

cd Application/
Open the Application folder in Visual Studio Code. Run the application by using either the F5 key or the Debug: Start Debugging command.
Push the Docker container image to Azure Container Registry
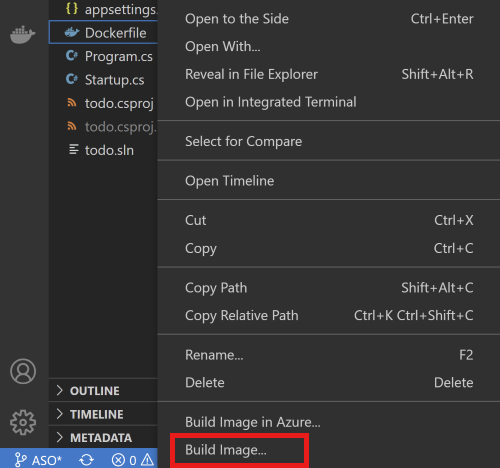
To create a container image from the Explorer tab in Visual Studio Code, right-click Dockerfile, and then select Build Image.
In the prompt that asks for the name and version to tag the image, enter the name todo:latest.
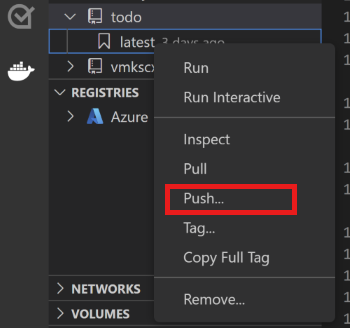
Use the Docker pane to push the built image to Azure Container Registry. You can find the built image under the Images node. Open the todo node, right-click latest, and then select Push.
In the prompts, select your Azure subscription, Azure Container Registry resource, and image tags. The image tag format should be
{acrname}.azurecr.io/todo:latest.Wait for Visual Studio Code to push the container image to Azure Container Registry.
Prepare the deployment YAML
Use the following YAML template to create an akstododeploy.yml file. Replace the {ACR name}, {Image name}, {Version}, and {resource group name} placeholders with your own values.
apiVersion: apps/v1
kind: Deployment
metadata:
  name: todo
  labels:
    aadpodidbinding: "cosmostodo-apppodidentity"
    app: todo
spec:
  replicas: 2
  selector:
    matchLabels:
      app: todo
  template:
    metadata:
      labels:
        app: todo
        aadpodidbinding: "cosmostodo-apppodidentity"
    spec:
      containers:
      - name: mycontainer
        image: "{ACR name}/{Image name}:{Version}"   # Update per your environment; for example, myacrname.azurecr.io/todo:latest. Do not add https:// in ACR Name.
        ports:
        - containerPort: 80
        env:
        - name: KeyVaultName
          value: "{resource group name}kv"       # Replace resource group name. Key Vault name is generated by Bicep.
      nodeSelector:
        kubernetes.io/os: linux
      volumes:
        - name: secrets-store01-inline
          csi:
            driver: secrets-store.csi.k8s.io
            readOnly: true
            volumeAttributes:
              secretProviderClass: "azure-kvname-podid"
---

kind: Service
apiVersion: v1
metadata:
  name: todo
spec:
  selector:
    app: todo
    aadpodidbinding: "cosmostodo-apppodidentity"
  type: LoadBalancer
  ports:
  - protocol: TCP
    port: 80
    targetPort: 80
Apply the deployment YAML
Use kubectl apply again to deploy the application pods and expose the pods via a load balancer:
kubectl apply \
  --filename akstododeploy.yml \
  --namespace 'my-app'
Test the application
When the application runs, a Kubernetes service exposes the application's front end to the internet. This process can take a few minutes to complete.
Use kubectl get to view the external IP that the load balancer exposes:
kubectl get services \
  --namespace "my-app"
To access the application, open the IP address that you received as output in a browser.
Clean up the resources
To avoid Azure charges, clean up unneeded resources when you no longer need the cluster. Use az group delete and az deployment sub delete to delete the resource group and subscription deployment, respectively:
az group delete \
  --resource-group $rgName
  --yes

az deployment sub delete \
  --name $deploymentName