Azure EA agreements and amendments
The article describes how Azure EA agreements and amendments might affect your access, use, and payments for Azure services.
Enrollment provisioning status
The date that the regional operations center processes the new Azure Prepayment (previously called monetary commitment) defines the new start date. Since Azure Prepayment orders via the Azure portal are processed in the UTC time zone, you might experience some delay if your Azure Prepayment purchase order was processed in a different region. The coverage start date on the purchase order shows the start of the Azure Prepayment. The coverage start date is when the Azure Prepayment appears in the Azure portal.
Support for enterprise customers
The Azure Enterprise Agreement Support Plan Offer is available for some customers.
Enrollment status
An enrollment has one of the following status values. Each value determines how you can use and access an enrollment. The enrollment status determines at which stage your enrollment is. It tells you if the enrollment needs to be activated before it can be used. Or, if the initial period expired and you're charged for usage overage.
Pending - The enrollment administrator needs to sign in to the Azure portal. After the administrator signs in, the enrollment switches to Active status.
Active - The enrollment is accessible and usable. You can create departments, accounts, and subscriptions in the Azure portal. The enrollment remains active until the enterprise agreement end date.
Indefinite Extended Term - Indefinite extended term status occurs after the enterprise agreement end date is reached and is expired. When an agreement enters into an extended term, it doesn't receive discounted pricing. Instead, pricing is at retail rates. Before the EA enrollment reaches the enterprise agreement end date, the Enrollment Administrator should decide to:
- Renew the enrollment by adding more Azure Prepayment
- Transfer the existing enrollment to a new enrollment
- Migrate to the Microsoft Online Subscription Program (MOSP)
- Confirm disablement of all services associated with the enrollment
EA credit expires when the EA enrollment ends for all programs except the EU program.
Expired - The EA enrollment expires when it reaches the enterprise agreement end date and is opted out of the extended term. Sign a new enrollment contract as soon as possible. Although your service isn't disabled immediately, there's a risk of it getting disabled.
As of August 1, 2019, new opt-out forms aren't accepted for Azure commercial customers. Instead, all enrollments go into indefinite extended term. If you want to stop using Azure services, close your subscription in the Azure portal. Or, your partner can submit a termination request. There's no change for customers with government agreement types.
Transferred - Transferred status is applied to enrollments that have their associated accounts and services transferred to a new enrollment. Enrollments don't automatically transfer if a new enrollment number is generated during renewal. The prior enrollment number must be included in the customer's renewal request for an automatic transfer.
Partner markup
In the Azure portal, Partner Price Markup helps to enable better cost reporting for customers. The Azure portal shows usage and prices configured by partners for their customers.
Markup allows partner administrators to add a percentage markup to their indirect enterprise agreements. Percentage markup applies to all Microsoft first party service information in the Azure portal such as: meter rates, Azure Prepayment, and orders. After the partner publishes the markup, the customer sees Azure costs in the Azure portal. For example, usage summary, price lists, and downloaded usage reports.
Starting in September 2019, partners can apply markup anytime during a term. They don't need to wait until the term next anniversary to apply markup.
Microsoft doesn't access or utilize the provided markup and associated prices for any purpose unless explicitly authorized by the channel partner.
How the calculation works
The Licensing Solution Partners (LSP) provides a single percentage number in the Azure portal. All commercial information on the portal gets uplifted with the percentage provided by the LSP. Example:
- Customer signs an EA with Azure Prepayment of USD 100,000.
- The meter rate for Service A is USD 10 / Hour.
- LSP sets markup percentage of 10% on the Azure portal.
- The following example is how the customer sees the commercial information:
- Monetary Balance: USD 110,000.
- Meter rate for Service A: USD 11 / Hour.
- Usage/hosting information for service A when used for 100 hours: USD 1,100.
- Monetary Balance available to the customer post deduction of Service A consumption: USD 108,900.
When to use a markup
Use the feature if you set the same markup percentage on all commercial transactions in the EA. For example, if you mark-up the Azure Prepayment information, the meter rates, the order information, and so on.
Don't use the markup feature if:
- You use different rates between Azure Prepayment and meter rates.
- You use different rates for different meters.
If you're using different rates for different meters, we recommend developing a custom solution based on the API key. The customer can provide the API key to pull consumption data and provide reports.
Other important information
This feature is meant to provide an estimation of the Azure cost to the end customer. The LSP is responsible for all financial transactions with the customer under the EA.
Make sure to review the commercial information - monetary balance information, price list, etc. before publishing the marked-up prices to end customer.
Partner markup view limitations
- If the user has both Partner admin and EA admin role, the partner admin role takes precedence and prices are displayed without markup.
- The Partner admin sees prices without markup in the downloaded usage files. However, the Partner admin can download the Charges by service file that includes markup details.
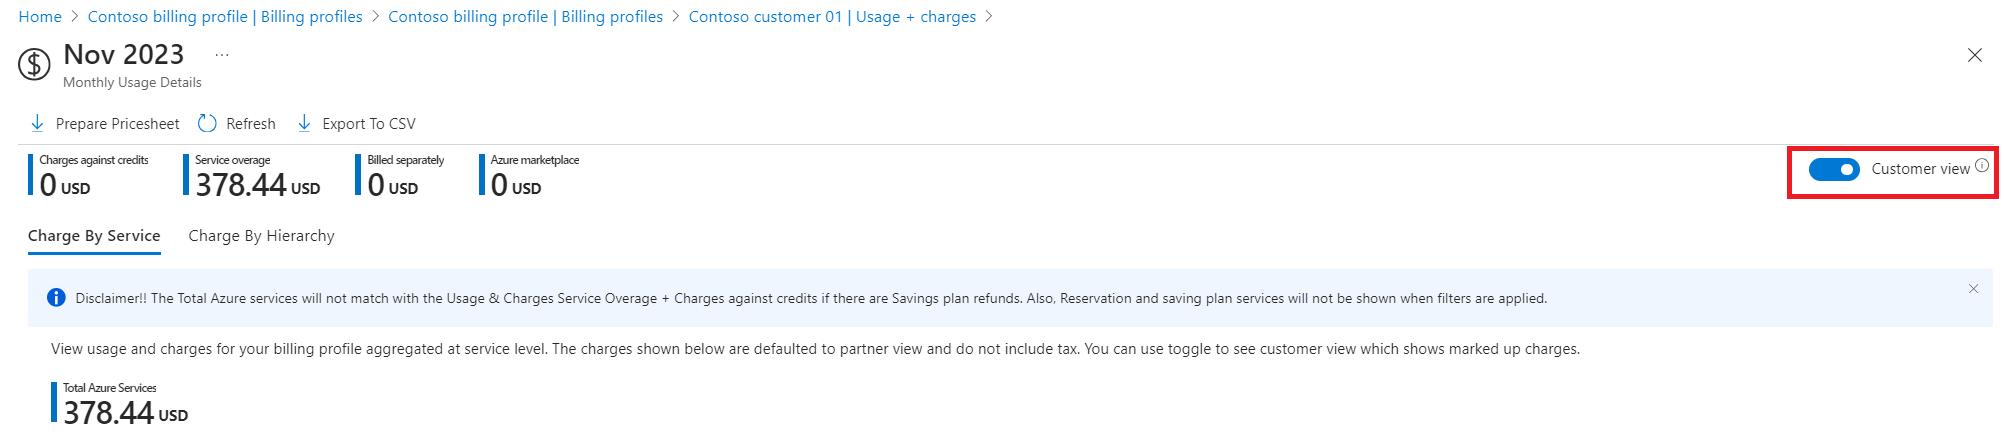
- Partners can switch from the default Partner view to the Customer view to see the costs with markup. As a Partner admin, use the following steps to view costs as a customer:
- In the Azure portal, sign in with your partner administrator credentials.
- Search for Cost management + Billing and select it.
- In the left navigation menu, select Billing scopes and then select the billing account that you want to work with.
- In the left navigation menu, select Billing profiles and then select the billing profile that you want to work with.
- Select the agreement number that you want to check.
- In the left navigation menu, select Usage + charges.
- In the list of Usage + Charges, select a month.
- On the Monthly Usage Details page, in the top-right corner, change from Partner view to Customer view.

Azure savings plan purchases
For Azure Savings plan purchases, in some situations, indirect EA end customers could see minor variances in their utilization percentage when they view their cost reports in Cost Management. Actual purchase and usage charges are always computed in partner prices and not in customer prices (for example, with markup). Subsequent markdown and uplift could result in floating point numbers exceeding eight decimal point precision. Azure rounds calculations to eight decimal precision, which can cause minor variances in the utilization numbers for end customers.
Let's look at an example. Assume that a customer enters an Azure Savings Plan commitment amount of 3.33/hour. If the markup is 13%, after the markdown to arrive at the partner price and the subsequent markup in the cost and usage reports, there's minor variance in numbers:
- Customer entered value: 3.33/hour
- Mark up: 13%
- Partner commitment calculated from customer value and rounded to eight decimal point precision: 2.94690265
- Final customer viewed commit (uplifting partner price): 3.32999999
How to add a price markup
You can add price markup on Azure portal with the following steps:
- In the Azure portal, sign in as a partner administrator.
- Search for Cost Management + Billing and select it.
- In the left navigation menu, select Billing scopes and then select the billing account that you want to work with.
- In the left navigation menu, select Billing Profile and then select the billing profile that you want to work with.
- In the left navigation menu, select Markup.
- To add markup, select Set markup.
- Enter the markup percentage and select Preview.
- Review the credit and usage charges before and after markup update.
- Accept the disclaimer and select Publish to publish the markup.
- The customer can now view credits and charges details.
Which enrollments have a markup enabled?
To check if an enrollment has a markup published, select Manage in the left navigation menu, then select the Enrollment tab. Select the enrollment box to check, and view the markup status under Enrollment Detail. It displays the current status of the markup feature for that EA as Disabled, Preview, or Published.
To check markup status of an enrollment in the Azure portal, follow the below steps:
- In the Azure portal, sign in as a partner administrator.
- Search for Cost Management + Billing and select it.
- Select Billing scopes and then select the billing account that you want to work with.
- In the left navigation menu, select Billing scopes and then select the billing account that you want to work with.
- In the left navigation menu, select Billing Profile.
- You can view the markup status of an enrollment.
How can the customer download usage estimates?
Once partner markup is published, the indirect customer has access to the balance and charge CSV monthly files and usage detail files. The usage detail files include the resource rate and extended cost.
How can I as partner apply markup to existing EA customers that were earlier with another partner?
Partners can use the markup feature in the Azure portal after a Change of Channel Partner is processed. There's no need to wait for the next anniversary term.
Resource Prepayment and requesting quota increases
The system enforces the following default quotas per subscription:
| Resource | Default Quota | Comments |
|---|---|---|
| Microsoft Azure Compute Instances | 20 concurrent small compute instances or their equivalent of the other compute instance sizes. | The following table provides how to calculate the equivalent number of small instances:
|
| Microsoft Azure Compute Instances v2 VMs | EA: 350 Cores | GA IaaS v2 VMs:
|
| Microsoft Azure Hosted Services | six hosted services | This limit of hosted services can't be increased beyond six for an individual subscription. If you require more hosted services, add more subscriptions. |
| Microsoft Azure Storage | Five storage accounts, each of a maximum size of 100 TB each. | You can increase the number of storage accounts to up to 20 per subscription. If you require more storage accounts, add more subscriptions. |
| SQL Azure | 149 databases of either type (for example, Web Edition or Business Edition). | |
| Access Control | 50 Namespaces per account. 100 million Access Control transactions per month | |
| Service Bus | 50 Namespaces per account. 40 Service Bus connections | Customers purchasing Service Bus connections through connection packs have quotas equal to the midpoint between the connection pack they purchased and the next highest connection pack amount. Customers choosing a 500 Pack have a quota of 750. |
Resource Prepayment
Microsoft provides services to you up to at least the level of the associated usage included in the monthly Prepayment that you purchased (the Service Prepayment). However, all other increases in usage levels of service resources are subject to the availability of these service resources. For example, adding to the number of compute instances running, or increasing the amount of storage in use.
Quotas described previously aren't Service Prepayment. You can determine the number of simultaneous small compute instances, or their equivalent, that Microsoft provides as part of a Service Prepayment. Divide the number of committed small compute instance hours purchased for a month by the number of hours in the shortest month of the year. For example, February – 672 hours.
Requesting a quota increase
You can request a quota increase at any time by submitting an online request. To process your request, provide the following information:
- The Microsoft account or work or school account associated with the account owner of your subscription. It's the email address used to sign in to the Microsoft Azure portal to manage your subscriptions. Verify that the account is associated with an EA enrollment.
- The resources and amount for which you desire a quota increase.
- The Azure Developer Portal Subscription ID associated with your service.
- For information on how to obtain your subscription ID, contact support.
Plan SKUs
Plan SKUs offer the ability to purchase a suite of integrated services together at a discounted rate. The Plan SKUs are designed to complement each other through further integrated offerings and suite for greater cost savings.
One example would be the Operations Management Suite (OMS) subscription. OMS offers a simple way to access a full set of cloud-based management capabilities. It includes analytics, configuration, automation, security, backup, and disaster recovery. OMS subscriptions include rights to System Center components to provide a complete solution for hybrid cloud environments.
View the price sheet and check included quantity
You can view your price sheet in the Azure portal. For more information, see Download pricing for an enterprise agreement.
Next steps
Feedback
Coming soon: Throughout 2024 we will be phasing out GitHub Issues as the feedback mechanism for content and replacing it with a new feedback system. For more information see: https://aka.ms/ContentUserFeedback.
Submit and view feedback for