Manage OT plans and licenses
Your Microsoft Defender for IoT deployment for OT monitoring is managed through a site-based license, purchased in the Microsoft 365 admin center. After you've purchased your license, apply that license to your OT plan in the Azure portal.
If you're looking to manage support for enterprise IoT security, see Manage enterprise IoT monitoring support with Microsoft Defender for IoT.
This article is relevant for commercial Defender for IoT customers. If you're a government customer, contact your Microsoft sales representative for more information.
Prerequisites
Before performing the procedures in this article, make sure that you have:
A Microsoft 365 tenant, with access to the Microsoft 365 admin center as Global or Billing admin.
For more information, see Buy or remove Microsoft 365 licenses for a subscription and About admin roles in the Microsoft 365 admin center.
An Azure subscription. If you need to, sign up for a free account.
A Security admin, Contributor, or Owner user role for the Azure subscription that you're using for the integration
An understanding of your site size. For more information, see Calculate devices in your network.
Purchase a Defender for IoT license
This procedure describes how to purchase Defender for IoT licenses in the Microsoft 365 admin center.
To purchase Defender for IoT licenses:
Go to the Microsoft 365 admin center Billing > Purchase services. If you don't have this option, select Marketplace instead.
Search for Microsoft Defender for IoT, and then locate the Microsoft Defender for IoT license for your site size.
Follow the options through to buy the license and add it to your Microsoft 365 products.
Make sure to select the number of licenses you want to purchase, based on the number of sites you want to monitor at the selected size.
Important
All license management procedures are done from the Microsoft 365 admin center, including buying, canceling, renewing, setting to auto-renew, auditing, and more. For more information, see the Microsoft 365 admin center help.
Add an OT plan to your Azure subscription
This procedure describes how to add an OT plan for Defender for IoT in the Azure portal, based on the licenses you'd purchased in the Microsoft 365 admin center.
To add an OT plan in Defender for IoT:
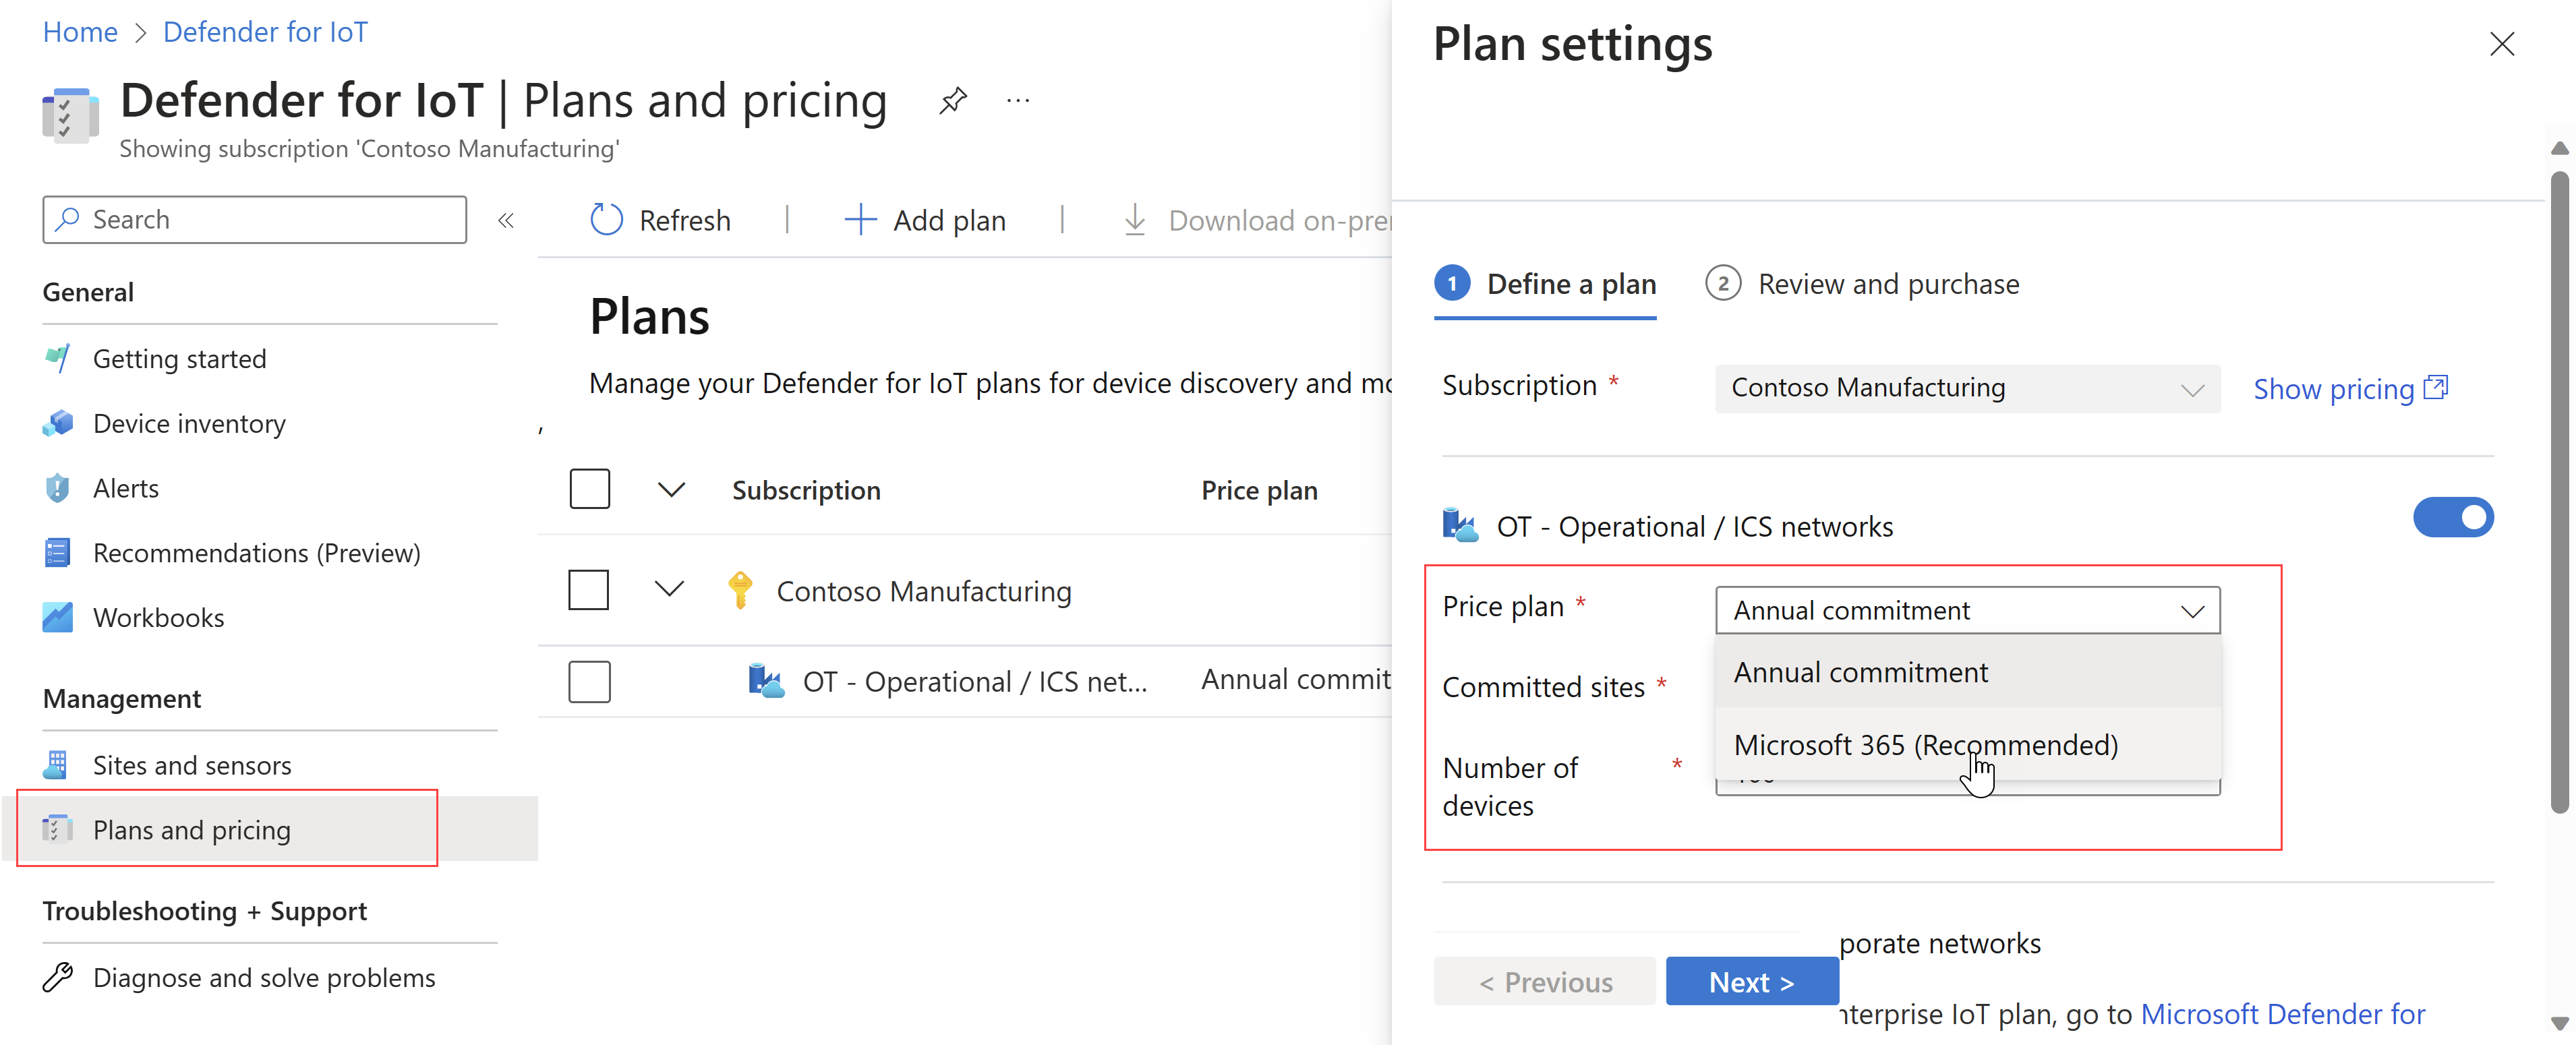
In Defender for IoT, select Plans and pricing > Add plan.
In the Plan settings pane, select the Azure subscription where you want to add a plan. You can only add a single subscription, and you need a Security admin, Contributor, or Owner role for the selected subscription.
Note
If your subscription isn't listed, check your account details and confirm your permissions with the subscription owner. Also make sure that you have the right subscriptions selected in your Azure settings > Directories + subscriptions page.
The Price plan value is updated automatically to reflect your Microsoft 365 licenses.
Select Next and review the details for any of your licensed sites. The details listed on the Review and purchase pane reflect any licenses you've purchased from the Microsoft 365 admin center.
Do one or both of the following:
- Select the terms and conditions.
- If you're working with an on-premises management console, select Download OT activation file (Optional).
When you're finished, select Save. If you've selected to download the on-premises management console activation file, the file is downloaded and you're prompted to save it locally. You'll use it later, when activating your on-premises management console.
Important
Defender for IoT now recommends using Microsoft cloud services or existing IT infrastructure for central monitoring and sensor management, and plans to retire the on-premises management console on January 1st, 2025.
For more information, see Deploy hybrid or air-gapped OT sensor management.
Your new plan is listed under the relevant subscription on the Plans and pricing > Plans page.
Cancel a Defender for IoT plan for OT networks
You might need to cancel a Defender for IoT plan from your Azure subscription, for example, if you need to work with a different subscription, or if you no longer need the service.
Prerequisites: Before canceling your plan, make sure to delete any sensors that are associated with the subscription. For more information, see Sensor management options from the Azure portal.
To cancel an OT network plan:
In the Azure portal, go to Defender for IoT > Plans and pricing.
On the subscription row, select the options menu (...) at the right and select Cancel plan.
In the cancellation dialog, select I agree to cancel the Defender for IoT plan from the subscription.
Your changes take effect one hour after confirmation.
Cancel your Defender for IoT licenses
Canceling an OT plan in the Azure portal doesn't also cancel your Defender for IoT license. To change your billed licenses, make sure that you also cancel your Defender for IoT license from the Microsoft 365 admin center.
For more information, see the Microsoft 365 admin center documentation.
Migrate from a legacy OT plan
If you're an existing customer with a legacy OT plan, we recommend migrating your plan to a site-based Microsoft 365 plan. After you've edited your plan, make sure to update your site details with a site size that matches your Microsoft 365 license.
After migrating your plan to a site-based Microsoft 365 plan, edits are supported only in the Microsoft 365 admin center.
Note
Defender for IoT supports migration for a single subscription only. If you have multiple subscriptions, choose the one you want to migrate, and then move all sensors to that subscription before you update your plan settings.
For more information, see Move existing sensors to a different subscription.
To migrate your plan:
Purchase a new, site-based license in the Microsoft 365 Marketplace for the site size that you need. For more information, see Purchase a Defender for IoT license.
In Defender for IoT in the Azure portal, go to Plans and pricing and locate the subscription for the plan you want to migrate.
On the subscription row, select the options menu (...) at the right > select Edit plan.
In the Price plan field, select Microsoft 365 (recommended) > Next. For example:
Review your plan details and select Save.
To update your site sizes:
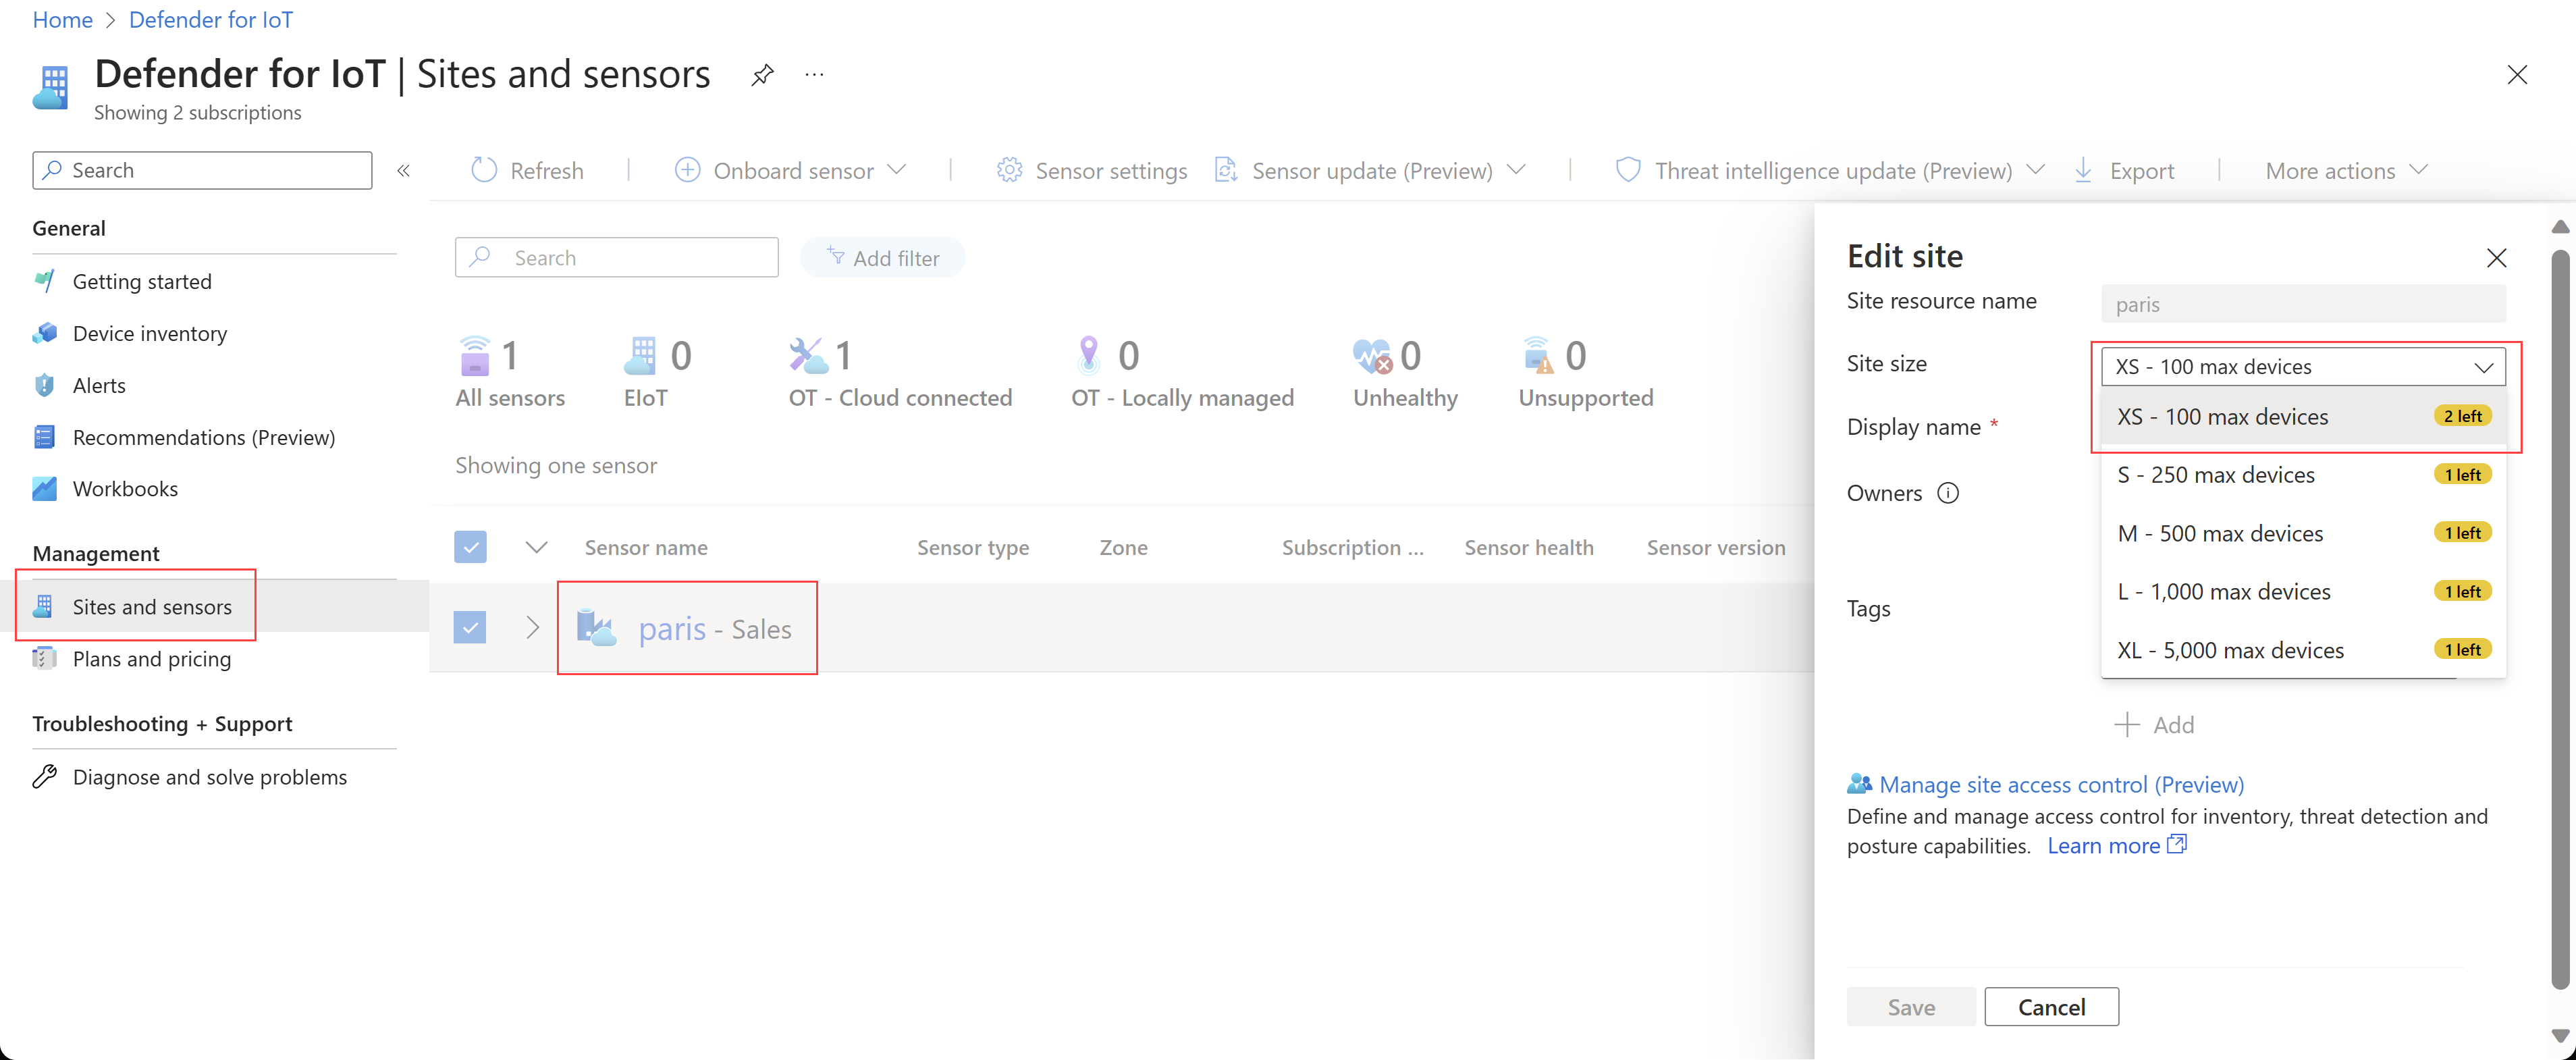
In Defender for IoT in the Azure portal, select Sites and sensors and then select the name of the site you want to migrate.
In the Edit site pane, in the Size field, edit your site size to match your licensed sites. For example:
Legacy procedures for plan management in the Azure portal
Starting June 1, 2023, Microsoft Defender for IoT licenses for OT monitoring are available for purchase only in the Microsoft 365 admin center, and OT sensors are onboarded to Defender for IoT based on your licensed site sizes. For more information, see OT plans billed by site-based licenses.
Existing customers can continue to use any legacy OT plan, with no changes in functionality. For legacy customers, committed devices are the number of devices you're monitoring. For more information, see Devices monitored by Defender for IoT.
Warnings for exceeding committed devices
If the number of actual devices detected by Defender for IoT exceeds the number of committed devices currently listed on your subscription, you might see a warning message in the Azure portal and on your OT sensor that you have exceeded the maximum number of devices for your subscription.
This warning indicates you need to update the number of committed devices on the relevant subscription to the actual number of devices being monitored. Select the link in the warning message to take you to the Plans and pricing page, with the Edit plan pane already open.
Move existing sensors to a different subscription
If you have multiple legacy subscriptions and are migrating to a Microsoft 365 plan, you'll first need to consolidate your sensors to a single subscription. To do this, you need to register the sensors under the new subscription and remove them from the original subscription.
Devices are synchronized from the sensor to the new subscription automatically.
Manual edits made in the portal aren't migrated.
New alerts created by the sensor are created under the new subscription, and existing alerts in the old subscription can be closed in bulk.
To move sensors to a different subscription:
In the Azure portal, onboard the sensor from scratch to the new subscription in order to create a new activation file. When onboarding your sensor:
Replicate site and sensor hierarchy as is.
For sensors monitoring overlapping network segments, create the activation file under the same zone. Identical devices that are detected in more than one sensor in a zone are merged into one device.
On your sensor, upload the new activation file.
Delete the sensor identities from the previous subscription. For more information, see Site management options from the Azure portal.
If relevant, cancel the Defender for IoT plan from the previous subscription. For more information, see Cancel a Defender for IoT plan for OT networks.
Edit a legacy plan on the Azure portal
In the Azure portal, go to Defender for IoT > Plans and pricing.
On the subscription row, select the options menu (...) at the right > select Edit plan.
Make any of the following changes as needed:
- Change your price plan from a trial to a monthly, annual, or Microsoft 365 plan
- Update the number of committed devices (monthly and annual plans only)
- Update the number of sites (annual plans only)
Select the I accept the terms and conditions option, and then select Save.
After any changes are made, make sure to reactivate your sensors. For more information, see Reactivate an OT sensor.
If you have an on-premises management console, make sure to upload a new activation file, which reflects the changes made. For more information, see Upload a new activation file.
Changes to your plan will take effect one hour after confirming the change. This change appears on your next monthly statement, and you're charged based on the length of time each plan was in effect.
Next steps
For more information, see: