Note
Access to this page requires authorization. You can try signing in or changing directories.
Access to this page requires authorization. You can try changing directories.
You can create an alias record for your apex domain name to reference an Azure Traffic Manager profile. Instead of using a redirecting service, you configure Azure DNS to reference a Traffic Manager profile directly from your zone.
In this tutorial, you learn how to:
- Create a virtual network and a subnet.
- Create a web server virtual machine with a public IP.
- Add a DNS label to a public IP.
- Create a Traffic Manager profile.
- Create an alias record.
- Test the alias record.
If you don’t have an Azure subscription, create a free account before you begin.
Prerequisites
- An Azure account with an active subscription.
- A domain name hosted in Azure DNS. If you don't have an Azure DNS zone, you can create a DNS zone, then delegate your domain to Azure DNS.
Note
In this tutorial, contoso.com is used as an example domain name. Replace contoso.com with your own domain name.
Sign in to Azure
Sign in to the Azure portal.
Register the Microsoft.Network resource provider
To create alias records, you must register the Microsoft.Network resource provider. If the DNS zone and the alias target resource are in different subscriptions, both subscriptions must be registered. You can register resource providers using Azure CLI, PowerShell, or the Azure portal. See the following example:
az provider register --namespace Microsoft.Network
For more information, see Resolve errors for resource provider registration.
Create the network infrastructure
Create a virtual network and a subnet to place your web servers in.
In the Azure portal, enter virtual network in the search box at the top of the portal, and then select Virtual networks from the search results.
In Virtual networks, select + Create.
In Create virtual network, enter or select the following information in the Basics tab:
Setting Value Project Details Subscription Select your Azure subscription. Resource Group Select Create new.
In Name, enter TMResourceGroup.
Select OK.Instance details Name Enter myTMVNet. Region Select your region. Select the IP Addresses tab or select the Next: IP Addresses button at the bottom of the page.
In the IP Addresses tab, enter the following information:
Setting Value IPv4 address space Enter 10.10.0.0/16. Select + Add subnet, and enter this information in the Add subnet:
Setting Value Subnet name Enter WebSubnet. Subnet address range Enter 10.10.0.0/24. Select Add.
Select the Review + create tab or select the Review + create button.
Select Create.
Create web server virtual machines
Create two Linux virtual machines, install NGINX web server on them, and then add DNS labels to their public IPs.
Create the virtual machines
Create two Ubuntu virtual machines.
In the Azure portal, enter virtual machine in the search box at the top of the portal, and then select Virtual machines from the search results.
In Virtual machines, select + Create and then select Azure virtual machine.
In Create a virtual machine, enter or select the following information in the Basics tab:
Setting Value Project Details Subscription Select your Azure subscription. Resource Group Select TMResourceGroup. Instance details Virtual machine name Enter web-01. Region Select (US) East US. Availability options Select No infrastructure redundancy required. Security type Select Standard. Image Select Ubuntu Server 24.04 LTS - x64 Gen2. Size Select your VM size. Administrator account Authentication type Select SSH public key. Username Enter a username. SSH public key source Select Generate new key pair. Key pair name Enter a name for the key pair. Inbound port rules Public inbound ports Select None. Select the Networking tab, or select Next: Disks, then Next: Networking.
In the Networking tab, enter or select the following information:
Setting Value Network interface Virtual network Select myTMVNet. Subnet Select WebSubnet. Public IP Select Create new, and then enter web-01-ip in Name. Select Standard for the SKU. NIC network security group Select Basic. Public inbound ports Select Allow selected ports. Select inbound ports Select HTTP (80) and HTTPS (443). Select Review + create.
Review the settings, and then select Create.
Repeat previous steps to create the second virtual machine. Enter web-02 in the Virtual machine name and web-02-ip in the Name of Public IP. For the other settings, use the same information from the previous steps used with first virtual machine.
Each virtual machine deployment may take a few minutes to complete.
Note
The network security group rules block inbound SSH access from the internet. To run commands on the virtual machines, use the Run command feature in the Azure portal or deploy Azure Bastion. For more information about Azure Bastion, see Quickstart: Deploy Azure Bastion with default settings.
Install NGINX web server
Install NGINX on both web-01 and web-02 virtual machines using the Run command feature in the Azure portal.
In the search box at the top of the portal, enter virtual machine. Select Virtual machines in the search results.
Select the web-01 virtual machine.
In the Operations section of the left menu, select Run command.
Select RunShellScript.
In the Run Command Script pane, enter the following command:
sudo apt-get update && sudo apt-get install -y nginx && echo 'Hello World from web-01' | sudo tee /var/www/html/index.htmlSelect Run.
Wait for the command to complete. The output displays the installation progress and finishes when NGINX is installed.
Repeat the previous steps for the web-02 virtual machine. Use the following command instead:
sudo apt-get update && sudo apt-get install -y nginx && echo 'Hello World from web-02' | sudo tee /var/www/html/index.html
Add a DNS label
Public IP addresses need DNS labels to work with Traffic Manager.
In the Azure portal, enter TMResourceGroup in the search box at the top of the portal, and then select TMResourceGroup from the search results.
In the TMResourceGroup resource group, select the web-01-ip public IP address.
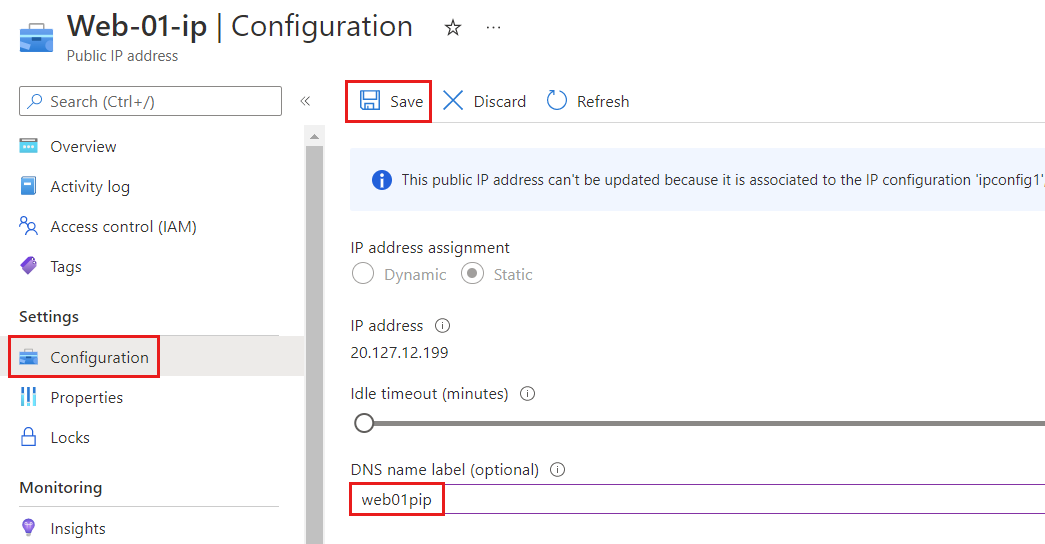
Under Settings, select Configuration.
Enter web01pip in the DNS name label.
Select Save.
Repeat the previous steps for the web-02-ip public IP address and enter web02pip in the DNS name label.

Create a Traffic Manager profile
In the Overview page of web-01-ip public IP address, note the IP address for later use. Repeat this step for the web-02-ip public IP address.
In the Azure portal, enter Traffic Manager profile in the search box at the top of the portal, and then select Traffic Manager profiles.
Select + Create.
In the Create Traffic Manager profile page, enter or select the following information:
Setting Value Name Enter TM-alias-test. Routing method Select Priority. Subscription Select your Azure subscription. Resource group Select TMResourceGroup. 
Select Create.
After TM-alias-test deployment finishes, select Go to resource.
In the Endpoints page of TM-alias-test Traffic Manager profile, select + Add and enter or select the following information:
Setting Value Type Select External endpoint. Name Enter EP-Web01. Fully qualified domain name (FQDN) or IP Enter the IP address for web-01-ip that you noted previously. Priority Enter 1. 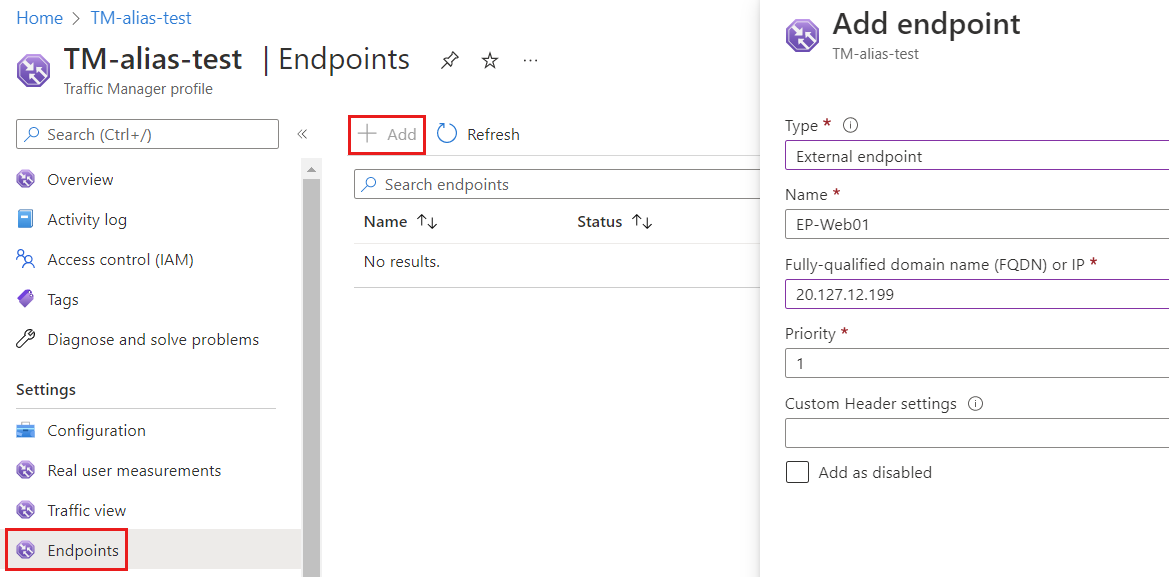
Select Add.
Repeat the last two steps to create the second endpoint. Enter or select the following information:
Setting Value Type Select External endpoint. Name Enter EP-Web02. Fully qualified domain name (FQDN) or IP Enter the IP address for web-02-ip that you noted previously. Priority Enter 2.

Create an alias record
Create an alias record that points to the Traffic Manager profile.
In the Azure portal, enter contoso.com in the search box at the top of the portal, and then select contoso.com DNS zone from the search results.
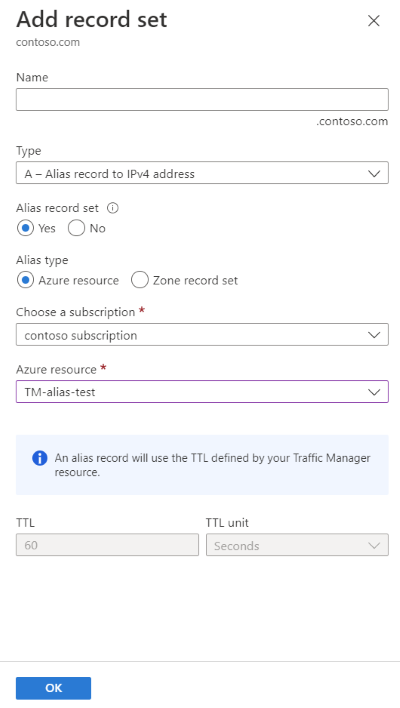
On the Overview page of contoso.com DNS zone, select the + Record set button.
In Add record set, leave the Name box empty to represent the apex domain name. An example is
contoso.com.Select A for the Type.
Select Yes for the Alias record set, and then select the Azure Resource for the Alias type.
Select the TM-alias-test Traffic Manager profile for the Azure resource.
Select OK.

Note
DNS Queries to your newly aliased Traffic Manager recordset are displayed in your Traffic Manager profile billing. For more information on Traffic Manager billing, see Traffic Manager pricing.
Test the alias record
- From a web browser, browse to
contoso.comor your apex domain name. You see the NGINX page withHello World from web-01. The Traffic Manager directed traffic to web-01 because it has the highest priority. Close the web browser and shut down web-01 virtual machine. Wait a few minutes for the virtual machine to completely shut down. - Open a new web browser, and browse again to
contoso.comor your apex domain name. - You should see the NGINX page with
Hello World from web-02. The Traffic Manager handled the situation and directed traffic to the second web server after shutting down the first server that has the highest priority.
Clean up resources
When no longer needed, you can delete all resources created in this tutorial by following these steps:
- On the Azure portal menu, select Resource groups.
- Select the TMResourceGroup resource group.
- On the Overview page, select Delete resource group.
- Enter TMResourceGroup and select Delete.
- On the Azure portal menu, select All resources.
- Select contoso.com DNS zone.
- On the Overview page, select the @ record created in this tutorial.
- Select Delete and then Yes.
Next steps
In this tutorial, you learned how to create an alias record to use your apex domain name to reference a Traffic Manager profile.
- Learn more about alias records.
- Learn more about zones and records.
- Learn more about Traffic Manager routing methods.