Currently viewing:  Foundry (classic) portal version - Switch to version for the new Foundry portal
Microsoft Foundry Models provides access to a wide variety of models from many providers through a single endpoint and set of credentials. This capability lets you switch between models and use them in your application without making code changes.
This article explains how the Foundry services organize models and how to use the inference endpoint to access them.
Important
Azure AI Inference beta SDK is deprecated and will be retired on August 26, 2026. Switch to the generally available OpenAI/v1 API with a stable OpenAI SDK. Follow the migration guide to switch to OpenAI/v1, using the SDK for your preferred programming language.
Prerequisites
Deployments
Foundry uses deployments as aliases for model access. A deployment gives a model a name and a set of configurations. You access a model by using its deployment name in your requests.
A deployment defines:
- A model name
- A model version
- A provisioning or capacity type1
- A content filtering configuration1
- A rate limiting configuration1
1 These configurations can change depending on the selected model.
A Foundry resource can have many model deployments. You only pay for inference performed on model deployments. Deployments are Azure resources, so they're subject to Azure policies.
For more information about creating deployments, see Add and configure model deployments.
Endpoints
Foundry services provide multiple endpoints depending on the type of work you want to perform:
Azure AI inference endpoint
The Azure AI inference endpoint, usually of the form https://<resource-name>.services.ai.azure.com/models, enables you to use a single endpoint with the same authentication and schema to generate inference for the deployed models in the resource. All Foundry Models support this capability. This endpoint follows the Azure AI Model Inference API, which supports the following modalities:
- Text embeddings
- Image embeddings
- Chat completions
Routing
The inference endpoint routes requests to a specific deployment by matching the name parameter in the request to the name of the deployment. This setup means that deployments work as an alias for a model under certain configurations. This flexibility lets you deploy a model multiple times in the service but with different configurations if needed.
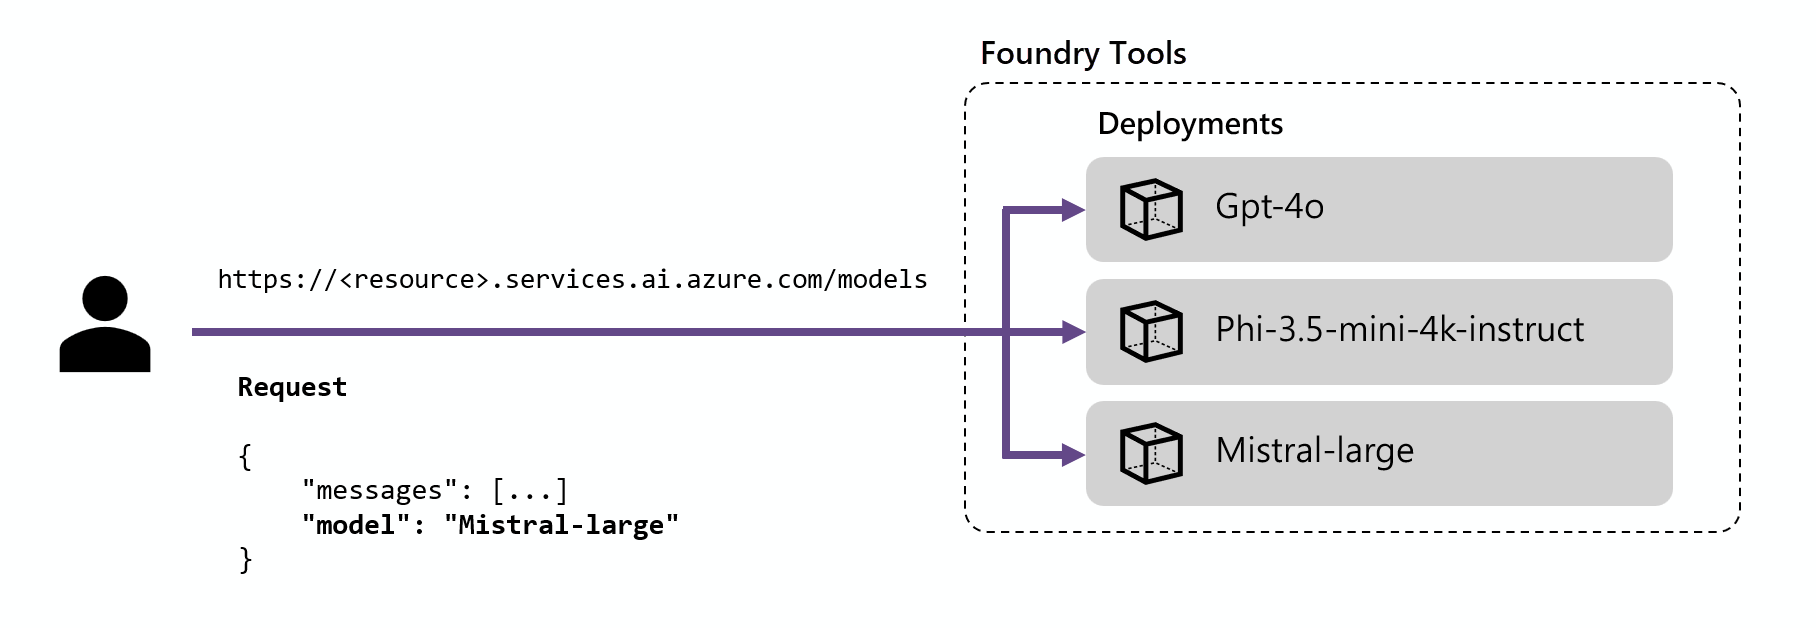
For example, if you create a deployment named Mistral-large, you can invoke that deployment as follows:
Install the package azure-ai-inference using your package manager, like pip:
pip install azure-ai-inference
Then, you can use the package to consume the model. The following example shows how to create a client to consume chat completions:
import os
from azure.ai.inference import ChatCompletionsClient
from azure.core.credentials import AzureKeyCredential

client = ChatCompletionsClient(
    endpoint="https://<resource>.services.ai.azure.com/models",
    credential=AzureKeyCredential(os.environ["AZURE_INFERENCE_CREDENTIAL"]),
)
Explore our samples and read the API reference documentation to get yourself started.
Install the package @azure-rest/ai-inference using npm:
npm install @azure-rest/ai-inference
Then, you can use the package to consume the model. The following example shows how to create a client to consume chat completions:
import ModelClient from "@azure-rest/ai-inference";
import { isUnexpected } from "@azure-rest/ai-inference";
import { AzureKeyCredential } from "@azure/core-auth";

const client = new ModelClient(
    "https://<resource>.services.ai.azure.com/models",
    new AzureKeyCredential(process.env.AZURE_INFERENCE_CREDENTIAL)
);
Explore our samples and read the API reference documentation to get yourself started.
Install the Azure AI inference library with the following command:
dotnet add package Azure.AI.Inference --prerelease
Import the following namespaces:
using Azure;
using Azure.Identity;
using Azure.AI.Inference;
Then, you can use the package to consume the model. The following example shows how to create a client to consume chat completions:
ChatCompletionsClient client = new ChatCompletionsClient(
    new Uri("https://<resource>.services.ai.azure.com/models"),
    new AzureKeyCredential(Environment.GetEnvironmentVariable("AZURE_INFERENCE_CREDENTIAL"))
);
Explore our samples and read the API reference documentation to get yourself started.
Add the package to your project:
<dependency>
    <groupId>com.azure</groupId>
    <artifactId>azure-ai-inference</artifactId>
    <version>1.0.0-beta.1</version>
</dependency>
Then, you can use the package to consume the model. The following example shows how to create a client to consume chat completions:
ChatCompletionsClient client = new ChatCompletionsClientBuilder()
    .credential(new AzureKeyCredential("{key}"))
    .endpoint("https://<resource>.services.ai.azure.com/models")
    .buildClient();
Explore our samples and read the API reference documentation to get yourself started.
Use the reference section to explore the API design and which parameters are available. For example, the reference section for Chat completions details how to use the route /chat/completions to generate predictions based on chat-formatted instructions. Notice that the path /models is included to the root of the URL:
Request
POST https://<resource>.services.ai.azure.com/models/chat/completions?api-version=2024-05-01-preview
api-key: <api-key>
Content-Type: application/json
For a chat model, you can create a request as follows:
from azure.ai.inference.models import SystemMessage, UserMessage

response = client.complete(
    messages=[
        SystemMessage(content="You are a helpful assistant."),
        UserMessage(content="Explain Riemann's conjecture in 1 paragraph"),
    ],
    model="mistral-large"
)

print(response.choices[0].message.content)
var messages = [
    { role: "system", content: "You are a helpful assistant" },
    { role: "user", content: "Explain Riemann's conjecture in 1 paragraph" },
];

var response = await client.path("/chat/completions").post({
    body: {
        messages: messages,
        model: "mistral-large"
    }
});

console.log(response.body.choices[0].message.content)
requestOptions = new ChatCompletionsOptions()
{
    Messages = {
        new ChatRequestSystemMessage("You are a helpful assistant."),
        new ChatRequestUserMessage("Explain Riemann's conjecture in 1 paragraph")
    },
    Model = "mistral-large"
};

response = client.Complete(requestOptions);
Console.WriteLine($"Response: {response.Value.Content}");
List<ChatRequestMessage> chatMessages = new ArrayList<>();
chatMessages.add(new ChatRequestSystemMessage("You are a helpful assistant"));
chatMessages.add(new ChatRequestUserMessage("Explain Riemann's conjecture in 1 paragraph"));

ChatCompletions chatCompletions = client.complete(new ChatCompletionsOptions(chatMessages));

for (ChatChoice choice : chatCompletions.getChoices()) {
    ChatResponseMessage message = choice.getMessage();
    System.out.println("Response:" + message.getContent());
}
Request
POST https://<resource>.services.ai.azure.com/models/chat/completions?api-version=2024-05-01-preview
api-key: <api-key>
Content-Type: application/json
{
    "messages": [
        {
            "role": "system",
            "content": "You are a helpful assistant"
        },
        {
            "role": "user",
            "content": "Explain Riemann's conjecture in 1 paragraph"
        }
    ],
    "model": "mistral-large"
}
If you specify a model name that doesn't match any model deployment, you get an error that the model doesn't exist. You control which models are available to users by creating model deployments. For more information, see add and configure model deployments.
Azure OpenAI inference endpoint
The Azure OpenAI API exposes the full capabilities of OpenAI models and supports more features like assistants, threads, files, and batch inference. You can also use it to access non-OpenAI models.
Azure OpenAI endpoints are formatted as https://<resource-name>.openai.azure.com. Endpoints map to deployments, and each deployment has its own associated URL. However, you can use the same authentication mechanism to consume more than one deployment. For more information, see the reference page for Azure OpenAI API.
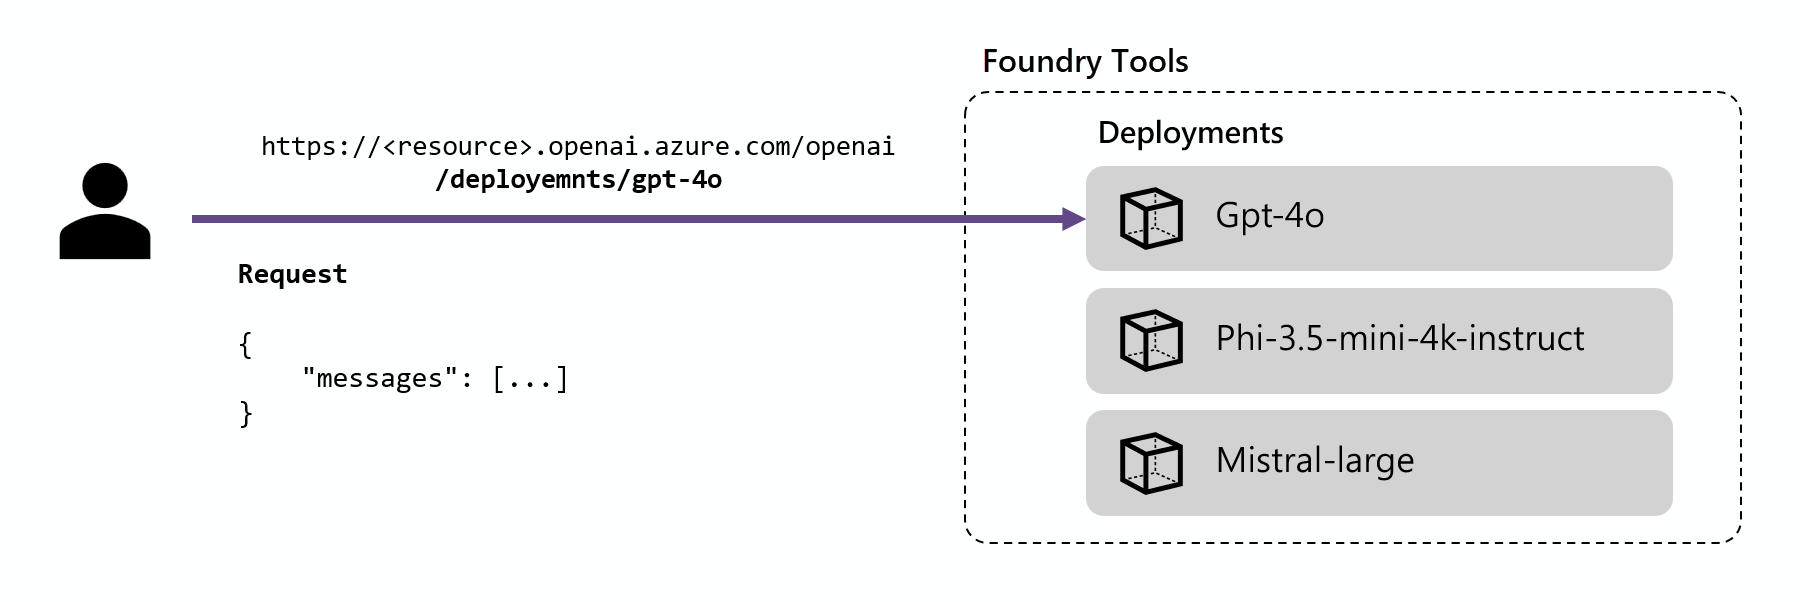
Deployment URLs are formed by concatenating the Azure OpenAI base URL and the route /deployments/<model-deployment-name>. When you use the OpenAI v1 API, call the /openai/v1/ route on the base URL, https://<resource-name>.openai.azure.com/openai/v1/, and pass the deployment name in the model field of your request. The /openai/v1/ route uses implicit versioning, so you don't pass an api-version.
The following examples use the Responses API, which supports the latest inference features.
Note
The Responses API works with Azure OpenAI models and with Foundry Models sold by Azure that support it, such as DeepSeek, Llama, and Grok models. If a deployment doesn't support the Responses API, the request returns 400 Model not supported. In that case, use the Chat Completions API by calling client.chat.completions.create instead.
Use API key authentication
You can authenticate inference requests with an API key from your Foundry resource. API keys are quick to set up, but they grant full access to the resource, are hard to scope to specific users or actions, and require manual rotation to stay secure. For production workloads, use keyless authentication with Microsoft Entra ID instead.
In the following example, deepseek-v3-0324 is the name of a model deployment in the Microsoft Foundry resource. Replace it with your own deployment name, and store your API key in the AZURE_INFERENCE_CREDENTIAL environment variable.
Install the openai package by using pip:
pip install openai --upgrade
Create a client that points to the Azure OpenAI v1 endpoint, and then generate a response. The /openai/v1/ route uses implicit versioning, so you don't pass an api-version. Pass your deployment name in the model field:
import os
from openai import OpenAI

client = OpenAI(
    base_url="https://<resource>.openai.azure.com/openai/v1/",
    api_key=os.environ["AZURE_INFERENCE_CREDENTIAL"],
)

response = client.responses.create(
    model="deepseek-v3-0324",  # Replace with your model deployment name.
    input="Explain the Riemann hypothesis in one paragraph.",
)

print(response.output_text)
Install the openai package by using npm:
npm install openai
Create a client that points to the Azure OpenAI v1 endpoint, and then generate a response:
import OpenAI from "openai";

const client = new OpenAI({
    baseURL: "https://<resource>.openai.azure.com/openai/v1/",
    apiKey: process.env.AZURE_INFERENCE_CREDENTIAL,
});

const response = await client.responses.create({
    model: "deepseek-v3-0324", // Replace with your model deployment name.
    input: "Explain the Riemann hypothesis in one paragraph.",
});

console.log(response.output_text);
Install the OpenAI library:
dotnet add package OpenAI
Create a client that points to the Azure OpenAI v1 endpoint, and then generate a response:
using System.ClientModel;
using OpenAI;
using OpenAI.Responses;

OpenAIClient client = new(
    new ApiKeyCredential(Environment.GetEnvironmentVariable("AZURE_INFERENCE_CREDENTIAL")),
    new OpenAIClientOptions
    {
        Endpoint = new Uri("https://<resource>.openai.azure.com/openai/v1/")
    });

OpenAIResponseClient responseClient = client.GetResponsesClient("deepseek-v3-0324");

OpenAIResponse response = responseClient.CreateResponse(
    "Explain the Riemann hypothesis in one paragraph.");

Console.WriteLine(response.GetOutputText());
Add the OpenAI Java SDK to your project. Check the OpenAI Java repository for the latest version.
Create a client that points to the Azure OpenAI v1 endpoint, and then generate a response:
import com.openai.client.OpenAIClient;
import com.openai.client.okhttp.OpenAIOkHttpClient;
import com.openai.models.responses.Response;
import com.openai.models.responses.ResponseCreateParams;

OpenAIClient client = OpenAIOkHttpClient.builder()
    .baseUrl("https://<resource>.openai.azure.com/openai/v1/")
    .apiKey(System.getenv("AZURE_INFERENCE_CREDENTIAL"))
    .build();

Response response = client.responses().create(
    ResponseCreateParams.builder()
        .model("deepseek-v3-0324") // Replace with your model deployment name.
        .input("Explain the Riemann hypothesis in one paragraph.")
        .build());

// The Responses API has no single output-text accessor; concatenate the output items.
response.output().stream()
    .flatMap(item -> item.message().stream())
    .flatMap(message -> message.content().stream())
    .flatMap(content -> content.outputText().stream())
    .forEach(outputText -> System.out.println(outputText.text()));
Send requests directly to the v1 route. The /openai/v1/ path uses implicit versioning, so you don't include an api-version query parameter. Pass your key in the Authorization header as a bearer token:
curl -X POST https://<resource>.openai.azure.com/openai/v1/responses \
  -H "Content-Type: application/json" \
  -H "Authorization: Bearer $AZURE_INFERENCE_CREDENTIAL" \
  -d '{
      "model": "deepseek-v3-0324",
      "input": "Explain the Riemann hypothesis in one paragraph."
    }'
For more information about how to use the Azure OpenAI endpoint, see Azure OpenAI SDK language support.
Use keyless authentication
Deployed Foundry Models support keyless authorization with Microsoft Entra ID. Keyless authorization enhances security, simplifies the user experience, reduces operational complexity, and provides robust compliance support. Use keyless authorization if your organization uses secure and scalable identity management solutions.
To use keyless authentication, configure your resource and grant access to users to perform inference. After you configure the resource and grant access, authenticate as follows:
Install the OpenAI SDK using a package manager like pip:
pip install openai
For Microsoft Entra ID authentication, also install:
pip install azure-identity
Use the package to consume the model. The following example shows how to create a client and make a test call to the Responses API by using Microsoft Entra ID and your model deployment.
Replace <resource> with your Foundry resource name. Find it in the Azure portal or by running az cognitiveservices account list. Replace deepseek-v3-0324 with your actual deployment name.
from openai import OpenAI
from azure.identity import DefaultAzureCredential, get_bearer_token_provider

token_provider = get_bearer_token_provider(
    DefaultAzureCredential(),
    "https://ai.azure.com/.default"
)

client = OpenAI(
    base_url="https://<resource>.openai.azure.com/openai/v1/",
    api_key=token_provider,
)

response = client.responses.create(
    model="deepseek-v3-0324",  # Replace with your model deployment name.
    input="What is Azure AI?",
)

print(response.output_text)
Expected output
Azure AI is a comprehensive suite of artificial intelligence services and tools from Microsoft that enables developers to build intelligent applications. It includes services for natural language processing, computer vision, speech recognition, and machine learning capabilities.
Reference: OpenAI Python SDK and DefaultAzureCredential class.
Install the OpenAI SDK:
dotnet add package OpenAI
For Microsoft Entra ID authentication, also install the Azure.Identity package:
dotnet add package Azure.Identity
Then, use the package to consume the model. The following example shows how to create a client and make a test call to the Responses API by using Microsoft Entra ID and your model deployment.
Replace <resource> with your Foundry resource name (find it in the Azure portal). Replace deepseek-v3-0324 with your actual deployment name.
using Azure.Identity;
using OpenAI;
using OpenAI.Responses;
using System.ClientModel.Primitives;

#pragma warning disable OPENAI001

BearerTokenPolicy tokenPolicy = new(
    new DefaultAzureCredential(),
    "https://ai.azure.com/.default"
);

OpenAIResponseClient client = new(
    model: "deepseek-v3-0324", // Replace with your model deployment name.
    authenticationPolicy: tokenPolicy,
    options: new OpenAIClientOptions()
    {
        Endpoint = new Uri("https://<resource>.openai.azure.com/openai/v1/")
    }
);

OpenAIResponse response = client.CreateResponse("What is Azure AI?");

Console.WriteLine(response.GetOutputText());
Expected output:
Azure AI is a comprehensive suite of artificial intelligence services and tools from Microsoft that enables developers to build intelligent applications. It includes services for natural language processing, computer vision, speech recognition, and machine learning capabilities.
Reference: OpenAI .NET SDK and DefaultAzureCredential class.
Install the OpenAI SDK with npm:
npm install openai
For Microsoft Entra ID authentication, also install:
npm install @azure/identity
Then, use the package to consume the model. The following example shows how to create a client and make a test call to the Responses API by using Microsoft Entra ID and your model deployment.
Replace <resource> with your Foundry resource name (find it in the Azure portal or by running az cognitiveservices account list). Replace deepseek-v3-0324 with your actual deployment name.
import { DefaultAzureCredential, getBearerTokenProvider } from "@azure/identity";
import { OpenAI } from "openai";

const tokenProvider = getBearerTokenProvider(
    new DefaultAzureCredential(),
    'https://ai.azure.com/.default'
);

const client = new OpenAI({
    baseURL: "https://<resource>.openai.azure.com/openai/v1/",
    apiKey: tokenProvider
});

const response = await client.responses.create({
    model: "deepseek-v3-0324", // Replace with your model deployment name.
    input: "What is Azure AI?"
});

console.log(response.output_text);
Expected output:
Azure AI is a comprehensive suite of artificial intelligence services and tools from Microsoft that enables developers to build intelligent applications. It includes services for natural language processing, computer vision, speech recognition, and machine learning capabilities.
Reference: OpenAI Node.js SDK and DefaultAzureCredential class.
Add the OpenAI SDK to your project. Check the OpenAI Java GitHub repository for the latest version and installation instructions.
For Microsoft Entra ID authentication, also add:
<dependency>
    <groupId>com.azure</groupId>
    <artifactId>azure-identity</artifactId>
    <version>1.18.0</version>
</dependency>
Then, use the package to consume the model. The following example shows how to create a client and make a test call to the Responses API by using Microsoft Entra ID and your model deployment.
Replace <resource> with your Foundry resource name (find it in the Azure portal). Replace deepseek-v3-0324 with your actual deployment name.
import com.azure.identity.AuthenticationUtil;
import com.azure.identity.DefaultAzureCredential;
import com.azure.identity.DefaultAzureCredentialBuilder;
import com.openai.client.OpenAIClient;
import com.openai.client.okhttp.OpenAIOkHttpClient;
import com.openai.credential.BearerTokenCredential;
import com.openai.models.responses.Response;
import com.openai.models.responses.ResponseCreateParams;

DefaultAzureCredential tokenCredential = new DefaultAzureCredentialBuilder().build();

OpenAIClient client = OpenAIOkHttpClient.builder()
    .baseUrl("https://<resource>.openai.azure.com/openai/v1/")
    .credential(BearerTokenCredential.create(
        AuthenticationUtil.getBearerTokenSupplier(
            tokenCredential,
            "https://ai.azure.com/.default"
        )
    ))
    .build();

ResponseCreateParams params = ResponseCreateParams.builder()
    .model("deepseek-v3-0324") // Replace with your model deployment name.
    .input("What is Azure AI?")
    .build();

Response response = client.responses().create(params);

// The Responses API has no single output-text accessor; concatenate the output items.
response.output().stream()
    .flatMap(item -> item.message().stream())
    .flatMap(message -> message.content().stream())
    .flatMap(content -> content.outputText().stream())
    .forEach(outputText -> System.out.println(outputText.text()));
Expected output:
Azure AI is a comprehensive suite of artificial intelligence services and tools from Microsoft that enables developers to build intelligent applications. It includes services for natural language processing, computer vision, speech recognition, and machine learning capabilities.
Reference: OpenAI Java SDK and DefaultAzureCredential class.
Explore the API design in the reference section to see which parameters are available. Insert the authentication (bearer) token in the Authorization header.
For example, the Responses API reference section details how to use the /responses route to generate predictions. The /openai/v1/ path is included in the root of the URL:
Request
Replace <resource> with your Foundry resource name (find it in the Azure portal or by running az cognitiveservices account list). Replace deepseek-v3-0324 with your actual deployment name.
The base URL accepts both https://<resource>.openai.azure.com/openai/v1/ and https://<resource>.services.ai.azure.com/openai/v1/ formats.
curl -X POST https://<resource>.openai.azure.com/openai/v1/responses \
  -H "Content-Type: application/json" \
  -H "Authorization: Bearer $AZURE_OPENAI_AUTH_TOKEN" \
  -d '{
      "model": "deepseek-v3-0324",
      "input": "Explain what the bitter lesson is?"
    }'
Response
If authentication is successful, you receive a 200 OK response with the response results in the response body:
{
  "id": "resp_...",
  "object": "response",
  "created_at": 1738368234,
  "model": "deepseek-v3-0324",
  "status": "completed",
  "output": [
    {
      "type": "message",
      "role": "assistant",
      "content": [
        {
          "type": "output_text",
          "text": "The bitter lesson refers to a key insight in AI research that emphasizes the importance of general-purpose learning methods that leverage computation, rather than human-designed domain-specific approaches. It suggests that methods which scale with increased computation tend to be more effective in the long run."
        }
      ]
    }
  ],
  "usage": {
    "input_tokens": 28,
    "output_tokens": 52,
    "total_tokens": 80
  }
}
Tokens must be issued with scope https://ai.azure.com/.default.
For testing purposes, the easiest way to get a valid token for your user account is to use the Azure CLI. In a console, sign in and request a token by running the following Azure CLI commands:
az login
az account get-access-token --resource https://ai.azure.com --query "accessToken" --output tsv
This command outputs an access token that you can store in the $AZURE_OPENAI_AUTH_TOKEN environment variable.
Reference: Responses API
Limitations
- You can't use Azure OpenAI Batch with the Foundry Models endpoint. You have to use the dedicated deployment URL as explained in Batch API support in Azure OpenAI documentation.
- Real-time API isn't supported in the inference endpoint. Use the dedicated deployment URL.
Related content
