Configure HTTPS on an Azure Front Door custom domain by using the Azure portal
Azure Front Door enables secure Transport Layer Security (TLS) delivery to your applications by default when you use your own custom domains. To learn more about custom domains, including how custom domains work with HTTPS, see Domains in Azure Front Door.
Azure Front Door supports Azure-managed certificates and customer-managed certificates. In this article, you learn how to configure both types of certificates for your Azure Front Door custom domains.
Prerequisites
- Before you can configure HTTPS for your custom domain, you must first create an Azure Front Door profile. For more information, see Create an Azure Front Door profile.
- If you don't already have a custom domain, you must first purchase one with a domain provider. For example, see Buy a custom domain name.
- If you're using Azure to host your DNS domains, you must delegate the domain provider's domain name system (DNS) to an Azure DNS. For more information, see Delegate a domain to Azure DNS. Otherwise, if you're using a domain provider to handle your DNS domain, you must manually validate the domain by entering prompted DNS TXT records.
Azure Front Door-managed certificates for non-Azure prevalidated domains
If you have your own domain, and the domain isn't already associated with another Azure service that prevalidates domains for Azure Front Door, follow these steps:
Under Settings, select Domains for your Azure Front Door profile. Then select + Add to add a new domain.
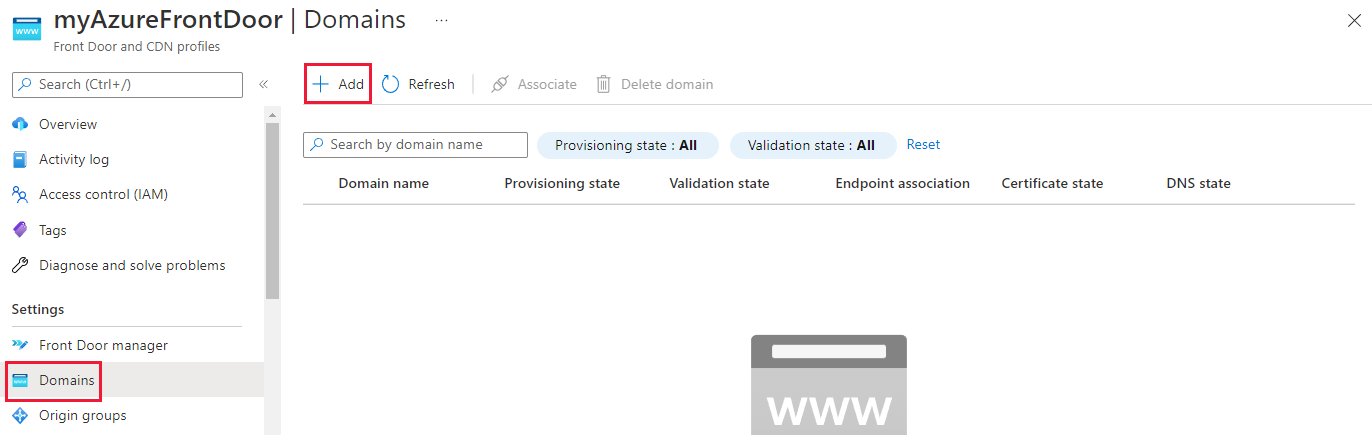
On the Add a domain pane, enter or select the following information. Then select Add to onboard the custom domain.
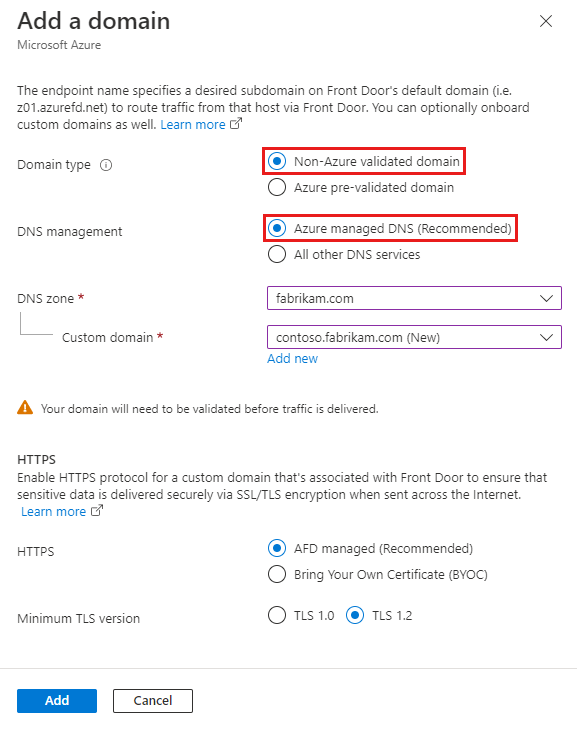
Setting Value Domain type Select Non-Azure pre-validated domain. DNS management Select Azure managed DNS (Recommended). DNS zone Select the Azure DNS zone that hosts the custom domain. Custom domain Select an existing domain or add a new domain. HTTPS Select AFD managed (Recommended). Validate and associate the custom domain to an endpoint by following the steps to enable a custom domain.
After the custom domain is successfully associated with an endpoint, Azure Front Door generates a certificate and deploys it. This process might take from several minutes to an hour to finish.
Azure-managed certificates for Azure prevalidated domains
If you have your own domain, and the domain is associated with another Azure service that prevalidates domains for Azure Front Door, follow these steps:
Under Settings, select Domains for your Azure Front Door profile. Then select + Add to add a new domain.
On the Add a domain pane, enter or select the following information. Then select Add to onboard the custom domain.
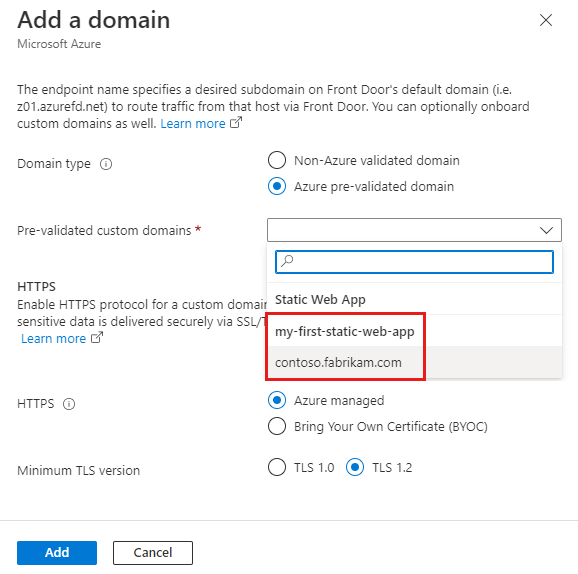
Setting Value Domain type Select Azure pre-validated domain. Pre-validated custom domains Select a custom domain name from the dropdown list of Azure services. HTTPS Select Azure managed. Validate and associate the custom domain to an endpoint by following the steps to enable a custom domain.
After the custom domain is successfully associated with an endpoint, an Azure Front Door-managed certificate gets deployed to Azure Front Door. This process might take from several minutes to an hour to finish.
Use your own certificate
You can also choose to use your own TLS certificate. Your TLS certificate must meet certain requirements. For more information, see Certificate requirements.
Prepare your key vault and certificate
Create a separate Azure Key Vault instance in which you store your Azure Front Door TLS certificates. For more information, see Create a Key Vault instance. If you already have a certificate, you can upload it to your new Key Vault instance. Otherwise, you can create a new certificate through Key Vault from one of the certificate authority (CA) partners.
There are currently two ways to authenticate Azure Front Door to access your Key Vault:
- Managed identity: Azure Front Door uses a managed identity to authenticate to your Key Vault. This method is recommended because it's more secure and doesn't require you to manage credentials. For more information, see Use managed identities in Azure Front Door. Skip to Select the certificate for Azure Front Door to deploy if you're using this method.
- App registration: Azure Front Door uses an app registration to authenticate to your Key Vault. This method is being deprecated and will be retired in the future. For more information, see Use app registration in Azure Front Door.
Warning
*Azure Front Door currently only supports Key Vault in the same subscription. Selecting Key Vault under a different subscription results in a failure.
- Azure Front Door doesn't support certificates with elliptic curve cryptography algorithms. Also, your certificate must have a complete certificate chain with leaf and intermediate certificates. The root CA also must be part of the Microsoft Trusted CA List.
Register Azure Front Door
Register the service principal for Azure Front Door as an app in your Microsoft Entra ID by using Microsoft Graph PowerShell or the Azure CLI.
Note
- This action requires you to have Global Administrator permissions in Microsoft Entra ID. The registration only needs to be performed once per Microsoft Entra tenant.
- The application IDs of 205478c0-bd83-4e1b-a9d6-db63a3e1e1c8 and d4631ece-daab-479b-be77-ccb713491fc0 are predefined by Azure for Azure Front Door Standard and Premium across all Azure tenants and subscriptions. Azure Front Door (classic) has a different application ID.
If needed, install Microsoft Graph PowerShell in PowerShell on your local machine.
Use PowerShell to run the following command:
Azure public cloud:
New-MgServicePrincipal -AppId '205478c0-bd83-4e1b-a9d6-db63a3e1e1c8'Azure government cloud:
New-MgServicePrincipal -AppId 'd4631ece-daab-479b-be77-ccb713491fc0'
Grant Azure Front Door access to your key vault
Grant Azure Front Door permission to access the certificates in the new Key Vault account that you created specifically for Azure Front Door. You only need to give GET permission to the certificate and secret in order for Azure Front Door to retrieve the certificate.
In your Key Vault account, select Access policies.
Select Add new or Create to create a new access policy.
In Secret permissions, select Get to allow Azure Front Door to retrieve the certificate.
In Certificate permissions, select Get to allow Azure Front Door to retrieve the certificate.
In Select principal, search for 205478c0-bd83-4e1b-a9d6-db63a3e1e1c8 and select Microsoft.AzureFrontDoor-Cdn. Select Next.
In Application, select Next.
In Review + create, select Create.
Note
If your key vault is protected with network access restrictions, make sure to allow trusted Microsoft services to access your key vault.
Azure Front Door can now access this key vault and the certificates it contains.
Select the certificate for Azure Front Door to deploy
Return to your Azure Front Door Standard/Premium in the portal.
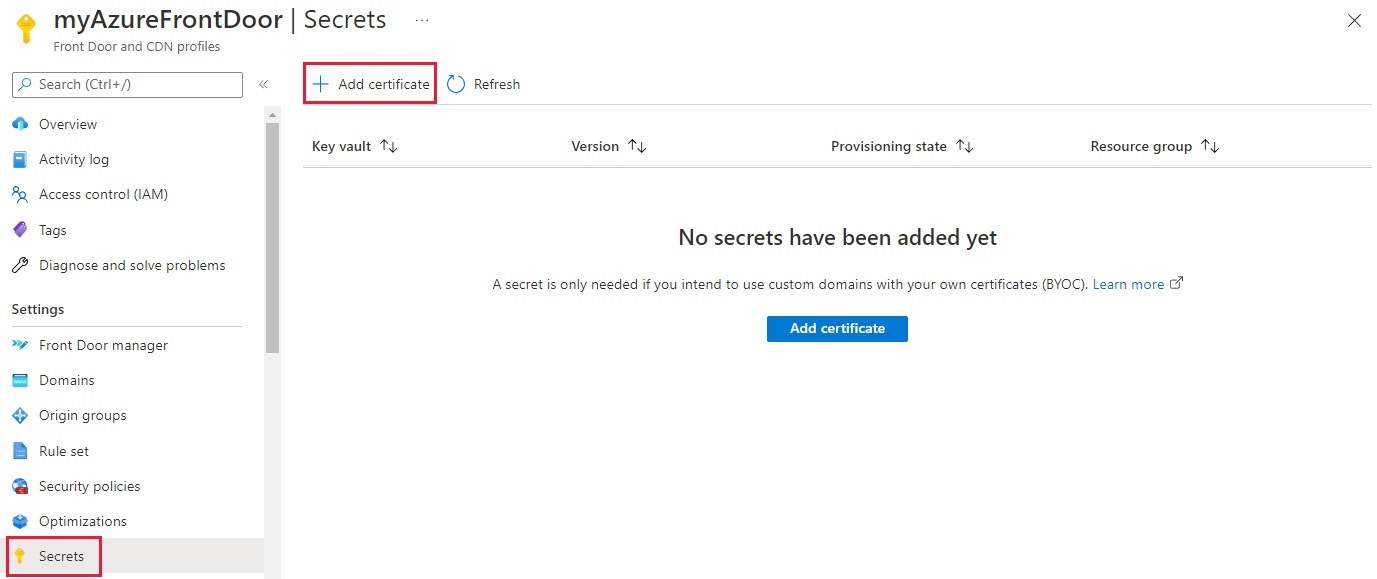
Under Settings, go to Secrets and select + Add certificate.
On the Add certificate pane, select the checkbox for the certificate you want to add to Azure Front Door Standard/Premium.
When you select a certificate, you must select the certificate version. If you select Latest, Azure Front Door automatically updates whenever the certificate is rotated (renewed). You can also select a specific certificate version if you prefer to manage certificate rotation yourself.
Leave the version selection as Latest and select Add.

After the certificate gets provisioned successfully, you can use it when you add a new custom domain.

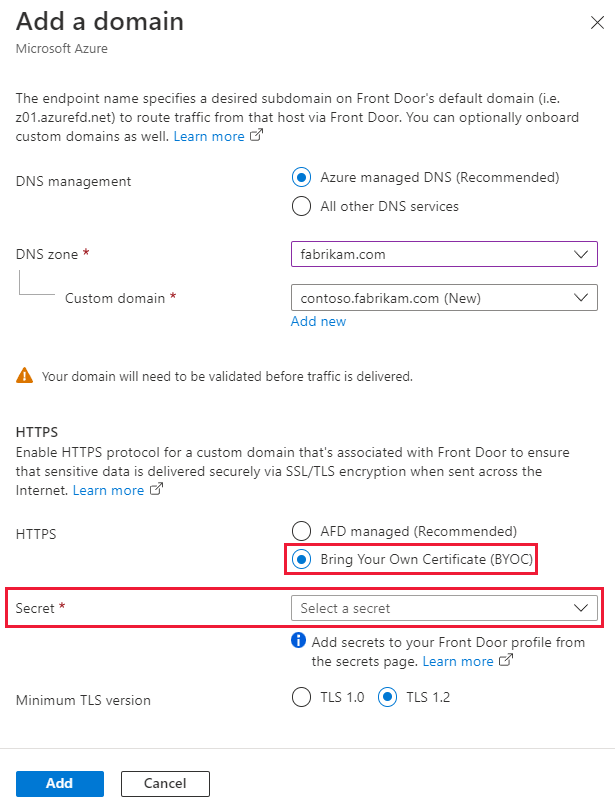
Under Settings, go to Domains and select + Add to add a new custom domain. On the Add a domain pane, for HTTPS, select Bring Your Own Certificate (BYOC). For Secret, select the certificate you want to use from the dropdown list.
Note
The common name of the selected certificate must match the custom domain being added.
Follow the onscreen steps to validate the certificate. Then associate the newly created custom domain to an endpoint as outlined in Configure a custom domain.
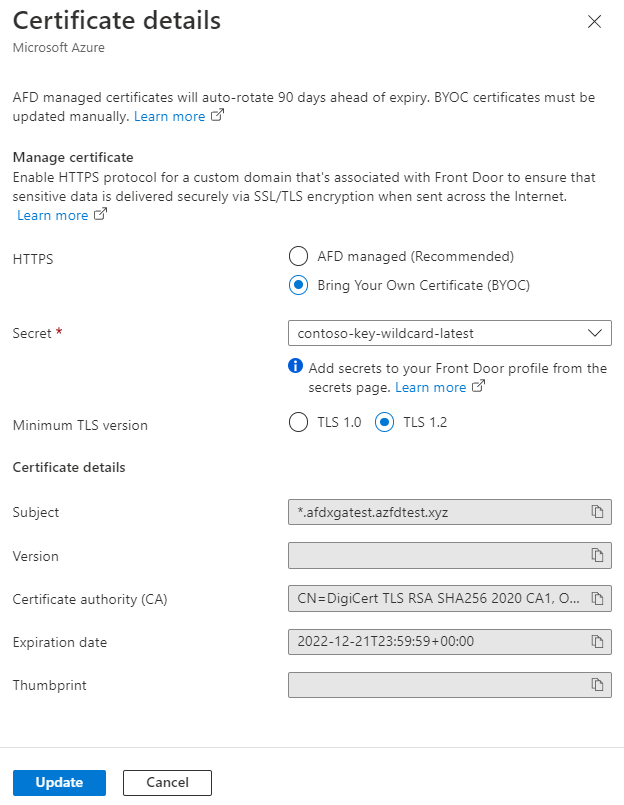
Switch between certificate types
You can change a domain between using an Azure Front Door-managed certificate and a customer-managed certificate. For more information, see Domains in Azure Front Door.
Select the certificate state to open the Certificate details pane.
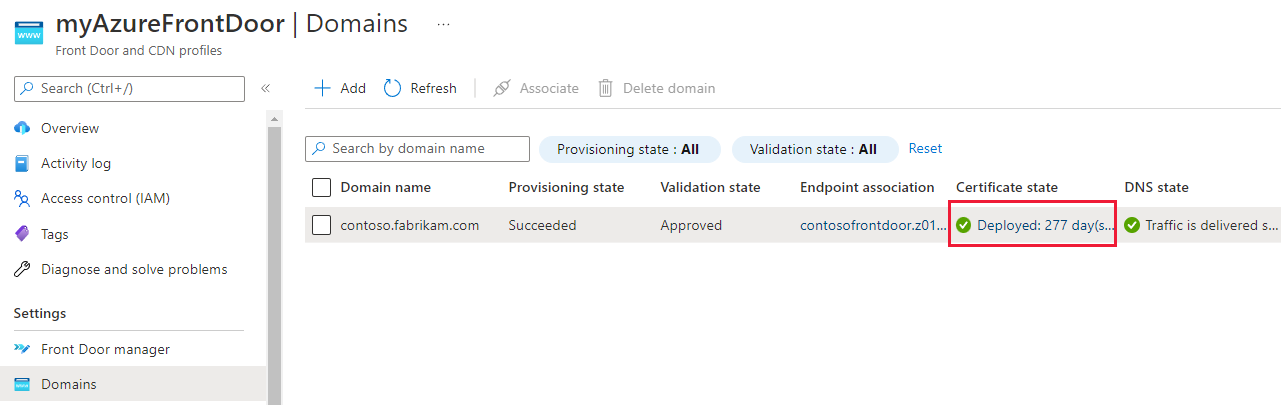
On the Certificate details pane, you can change between Azure Front Door managed and Bring Your Own Certificate (BYOC).
If you select Bring Your Own Certificate (BYOC), follow the preceding steps to select a certificate.
Select Update to change the associated certificate with a domain.
Next steps
- Learn about caching with Azure Front Door Standard/Premium.
- Understand custom domains on Azure Front Door.
- Learn about end-to-end TLS with Azure Front Door.