Note
Access to this page requires authorization. You can try signing in or changing directories.
Access to this page requires authorization. You can try changing directories.
Learn how to create and manage load tests in your Azure load testing resource.
Prerequisites
- An Azure account with an active subscription. If you don't have an Azure subscription, create a free account before you begin.
- An Azure load testing resource. To create a load testing resource, see Create and run a load test.
Create a test
There are two options to create a load test in the Azure portal:
- Create a quick test by using a web application URL (URL-based test).
- Create a test by uploading a test script (JMX). You can upload a JMeter script or a Locust script.
Create a quick test by using a URL
To load test a single HTTP endpoint, you can use the quick test experience in the Azure portal, also known as a URL-based load test. Create a load test without prior knowledge of JMeter scripting by entering the target URL and basic load parameters.
When you create a quick test, Azure Load Testing generates the corresponding JMeter script, determines the load test configuration, and runs the load test.
To specify the target load, choose from two options. For each option, you can then enter different settings to define the application load.
| Load type | Description | Load settings |
|---|---|---|
| Virtual users | The load test simulates the target number of virtual users. The target is reached in increments during the ramp-up time. Azure Load Testing configures the total number of test engine instances as follows:#instances = #virtual users / 250Each test engine instance then simulates (#total virtual users / #test engines) virtual users. The maximum number of virtual users for a quick test is 11250. |
- Number of virtual users - Test duration in seconds - Ramp-up time in seconds |
| Requests per second | The load test simulates a target number of requests per second (RPS), given an estimated endpoint response time. Azure Load Testing determines the total number of virtual users for the load test based on the RPS and response time: #virtual users = (RPS * response time) / 1000The service then configures the number of test engine instances and virtual users per instance based on the total number of virtual users. |
- Requests per second - Response time in milliseconds - Test duration in seconds - Ramp-up time in seconds |
To create a quick test in the Azure portal:
In the Azure portal, and go to your load testing resource.
Select Add HTTP requests on the Overview page.
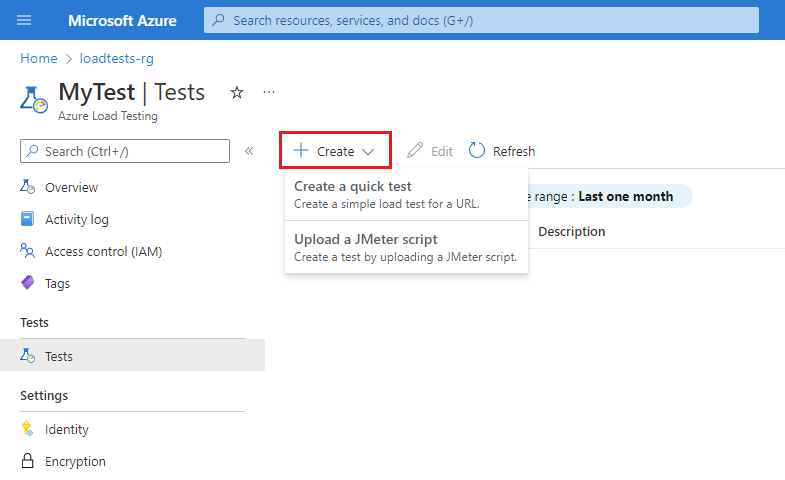
Alternately, select Tests in the left pane, select + Create, and then select Create a URL-based test.
Enter the target URL and load parameters.
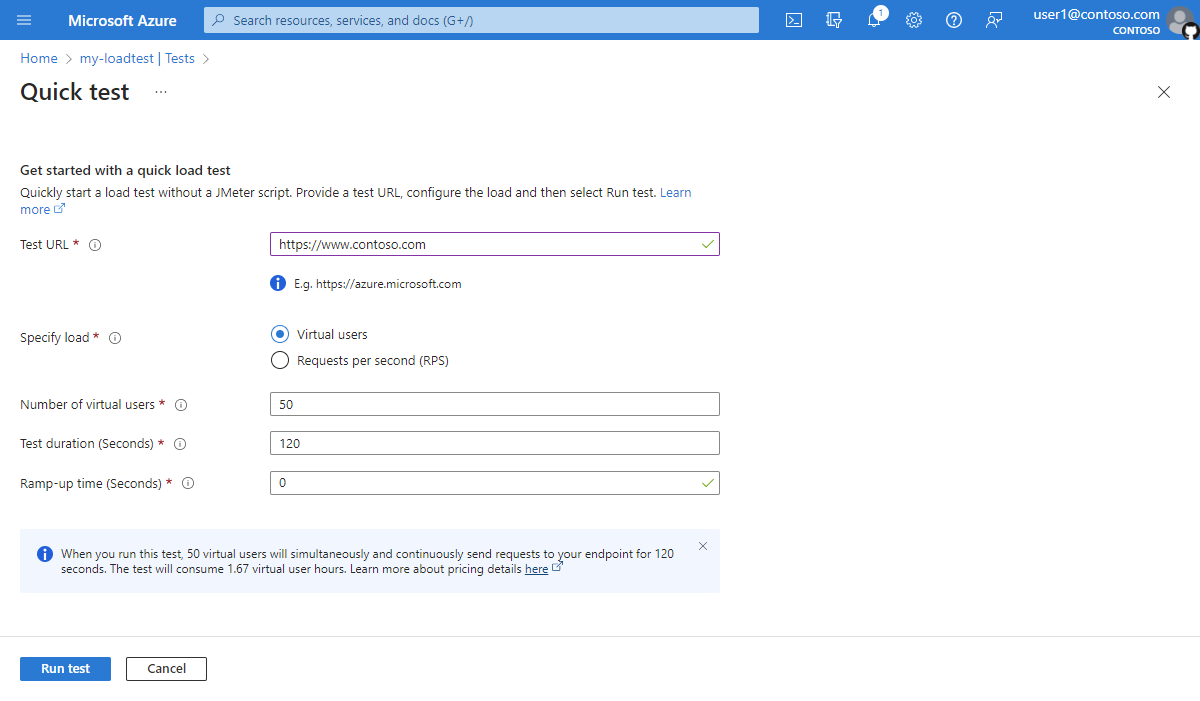
Select Run test to start the load test.
Azure Load Testing automatically generates a JMeter test script, and configures your test to scale across multiple test engines, based on your load parameters.
After running a quick test, you can further edit the load test configuration. For example, you can add app components to monitor server-side metrics, configure high scale load, or to edit the generated JMeter script.
Create a test by using a test script
To reuse an existing JMeter or Locust test script, or for more advanced test scenarios, create a test by uploading the test script. For example, to read data from a CSV input file, or to configure JMeter user properties. For more information, see Create a load test by using an existing JMeter script and Create a load test with a Locust script.
If you're not familiar with creating a JMeter script, see Getting started with Apache JMeter. To get started with Locust, see Getting started with Locust
In the Azure portal, and go to your load testing resource.
Select Create on the Overview page.
Alternately, select Tests in the left pane, select + Create, and then select Upload scripts.
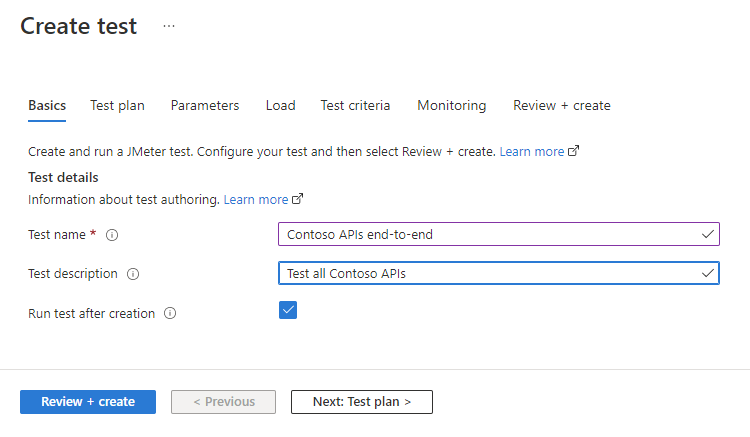
On the Basics page, enter the basic test information.
If you select Run test after creation, the test will start automatically. You can start your test manually at any time, after creating it.
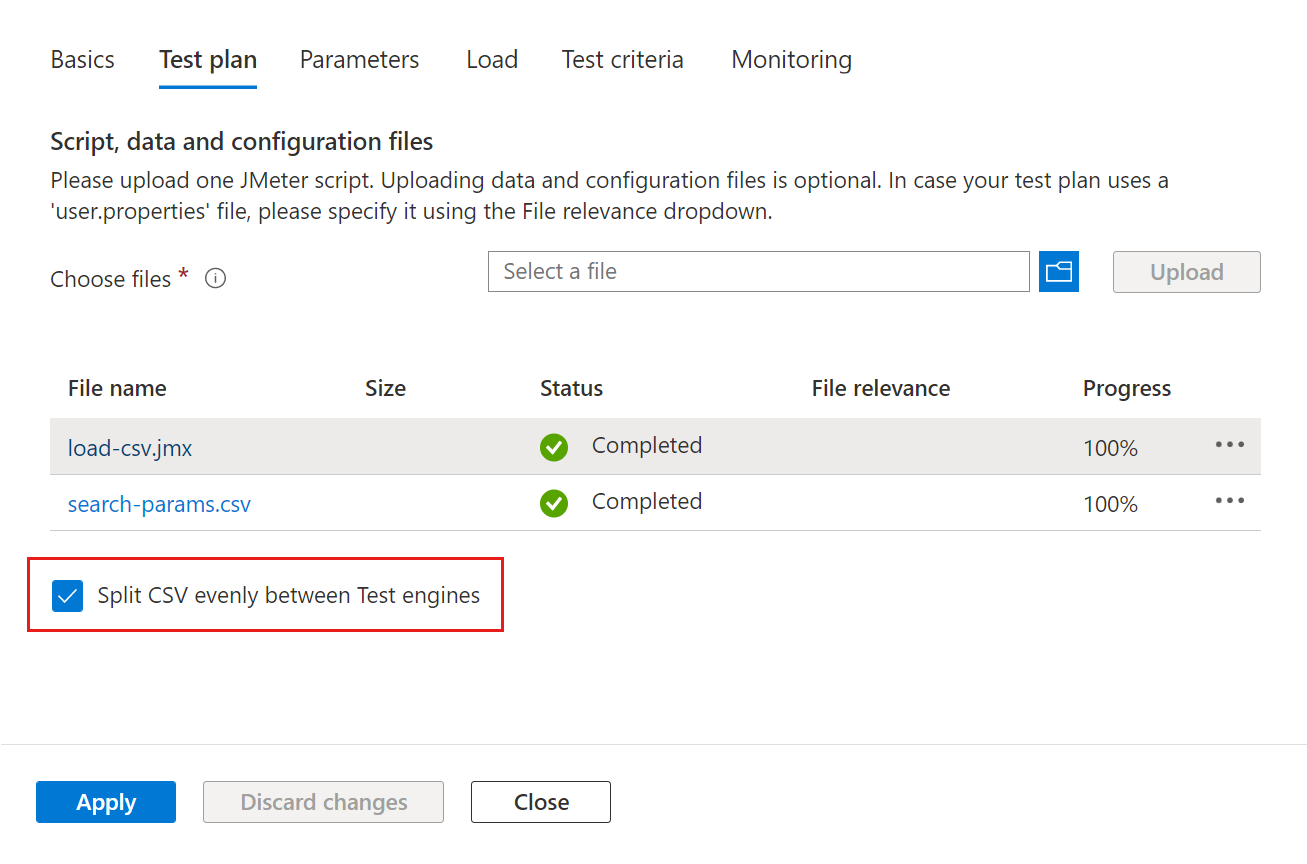
Test plan
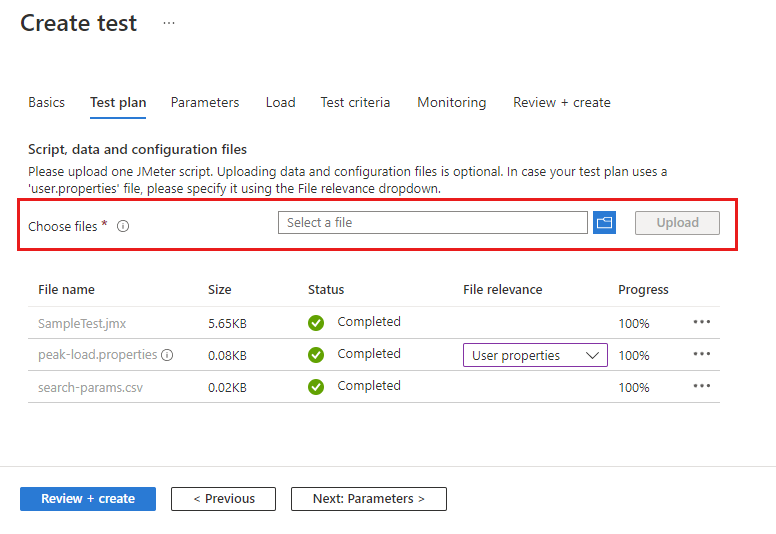
The test plan contains all files that are needed for running your load test. At a minimum, the test plan should contain one *.jmx JMeter script or one .py Locust script.
Alongside the test script, you can upload a user property file, configuration files, or input data files, such as CSV files.
Go to the Test plan.
Select all files from your local machine, and upload them to Azure.
Azure Load Testing stores all files in a single repository. If your test script references configuration or data files, make sure to remove any relative path names in the test script.
If your test uses CSV input data, you can choose to enable Split CSV evenly between test engines.
By default, Azure Load Testing copies and processes your input files unmodified across all test engine instances. Azure Load Testing enables you to split the CSV input data evenly across all engine instances. If you have multiple CSV files, each file is split evenly.
For example, if you have a large customer CSV input file, and the load test runs on 10 parallel test engines, then each instance processes 1/10th of the customers. Learn more about how to read a CSV file in your load test.
Tip
You can download a file from the Test plan tab by selecting the file name in the list. For example, you might download the generated JMeter script for a quick test, modify it, and then upload the file again.
Parameters
You can use parameters to make your test plan configurable instead of hard-coding values in the test script. Specify key-value pairs in the load test configuration, and reference the value in the test script by using the parameter name. For more information, see Parameterize a load test with environment variables and secrets.
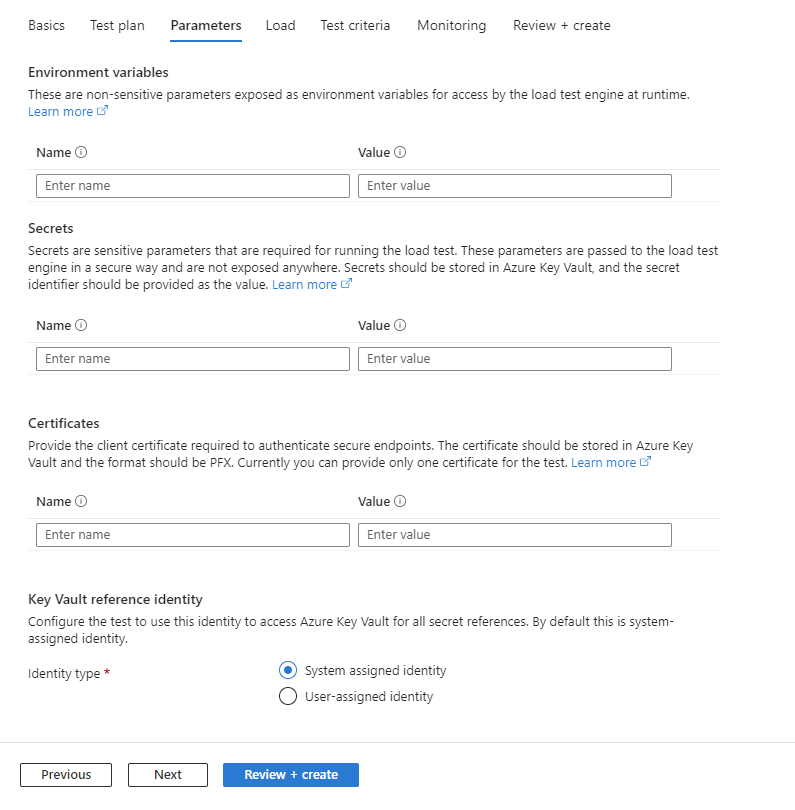
Specify environment variables to pass nonsensitive parameters to your test script.
For example, you could use an environment variable to pass the target domain name or port number to the test script. Learn more about using environment variables in a load test.
Add references to secrets, backed by Azure Key Vault.
Use secrets to pass sensitive parameters, such as passwords or authentication tokens, to the test script. You store the secret values in your Azure key vault, and add a reference to the key in the load test configuration. You can then reference the key in your script by using the parameter name. Azure Load Testing then retrieves the key value from Azure Key Vault.
Learn more about using secrets in a load test.
Add references to client certificates, backed by Azure Key Vault.
If you're load testing application endpoints that use certificate-based authentication, you can add the certificates to your Azure key vault, and add a reference to the certificate in the load test configuration. Azure Load Testing automatically injects the certificates in the web requests in your JMeter script.
Learn more about using certificate-based authentication with Azure Load Testing.
Select the managed identity that is used for accessing your key vault for secrets or certificates.
Learn more about using managed identities with Azure Load Testing.
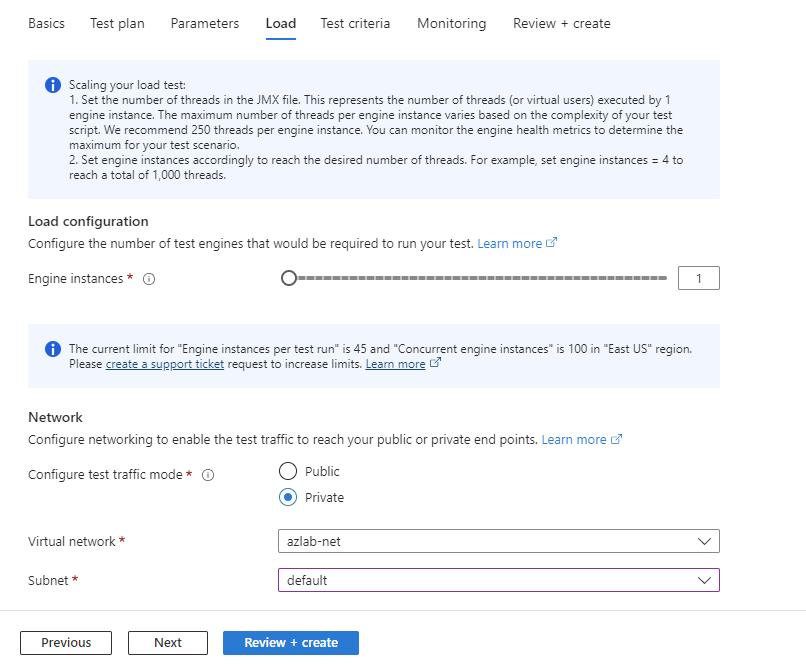
Load
Specify the number of test engine instances.
Azure Load Testing automatically scales your load test across all instances. The JMeter test script is run in parallel across all instances. The total number of simulated users equals the number of virtual users (threads) you specify in the JMeter script, multiplied by the number of test engine instances. For Locust-based tests, specify the total users required in the load configuration in Azure Load Testing, in the test script, or in the Locust configuration file and select the engine instances required to generate the load. For more information, see Configure a test for high-scale load.
Configure virtual network connectivity.
You can connect your load test to an Azure virtual network for load testing privately hosted or on-premises endpoints. Learn more about scenarios for deploying Azure Load Testing in a virtual network.
To connect to a virtual network, select the Private Traffic mode, and then select the Virtual network and Subnet.
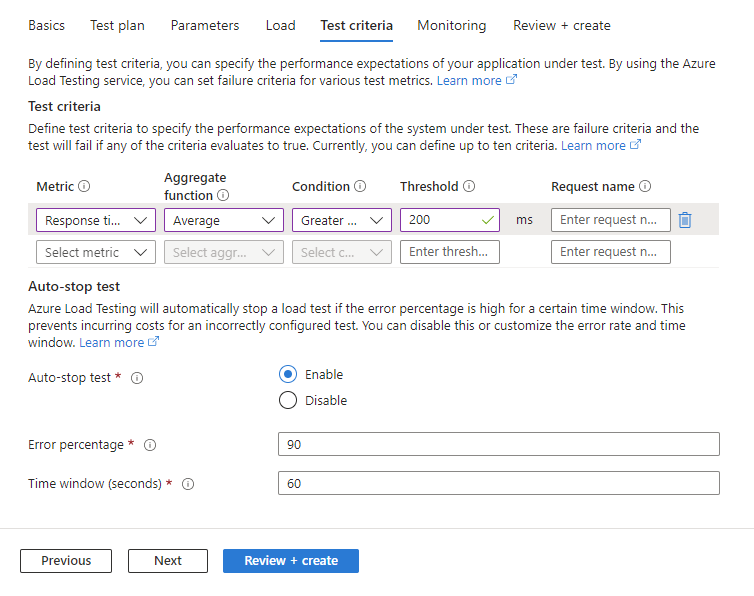
Test criteria
Specify test failure criteria based on client metrics.
When the load test surpasses the threshold for a metric, the load test gets the failed status. Azure Load Testing currently supports the following client-side metrics for fail criteria:
- Response time
- Requests per second
- Total number of requests
- Latency
- Error percentage
You can specify fail criteria for the entire load test, or assign them to specific requests in the test script. For example, to validate that the home page response time doesn't exceed a specific response time. For more information, see Configure test fail criteria.
Configure auto stop criteria.
Azure Load Testing can automatically stop a load test run when the error rate surpasses a given threshold. You can enable or disable this functionality, and configure the specific error rate threshold and time window. Learn more about configuring auto stop criteria.
Monitoring
For Azure-hosted applications, add Azure app components to monitor during the load test run. Azure Load Testing captures detailed resource metrics for the selected Azure app components. Use these metrics to identify potential performance bottlenecks in your application.
When you add an app component, Azure Load Testing automatically selects the most relevant resource metrics for the component. You can add or remove resource metrics for each of the app components at any time.
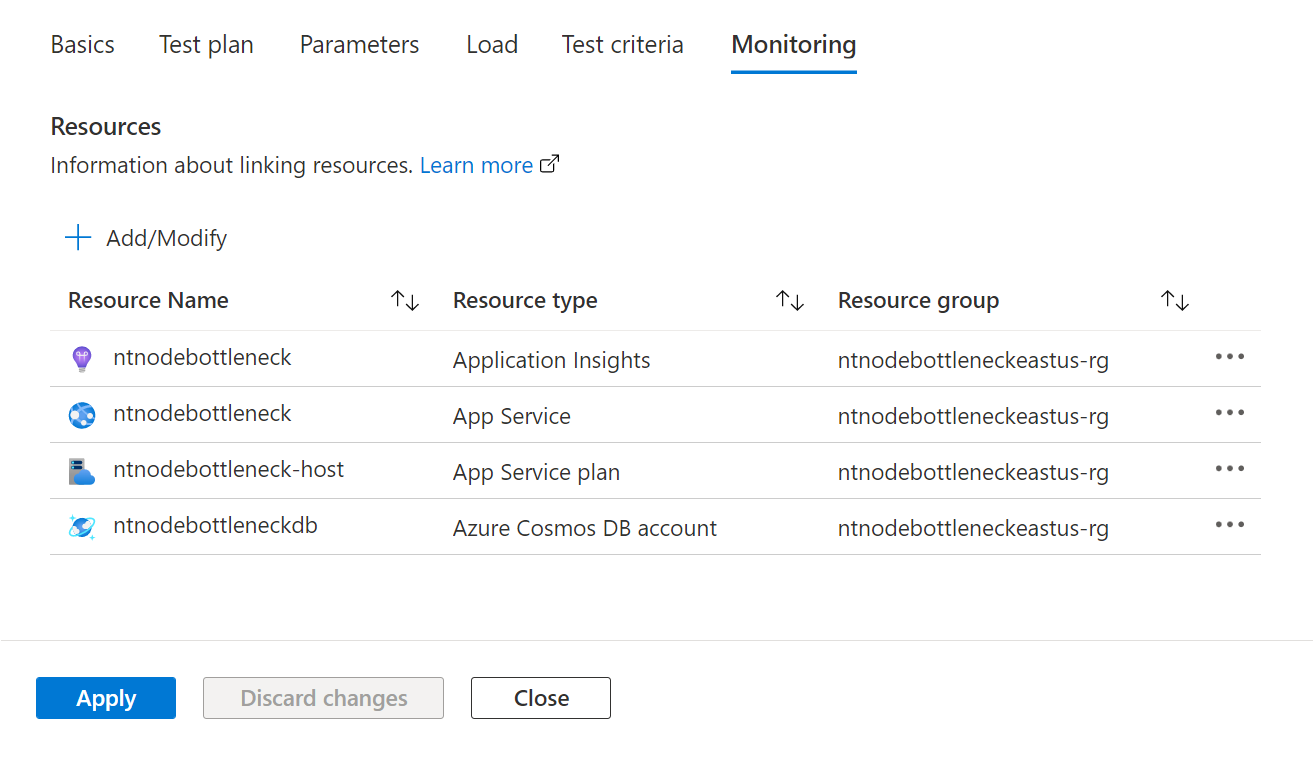
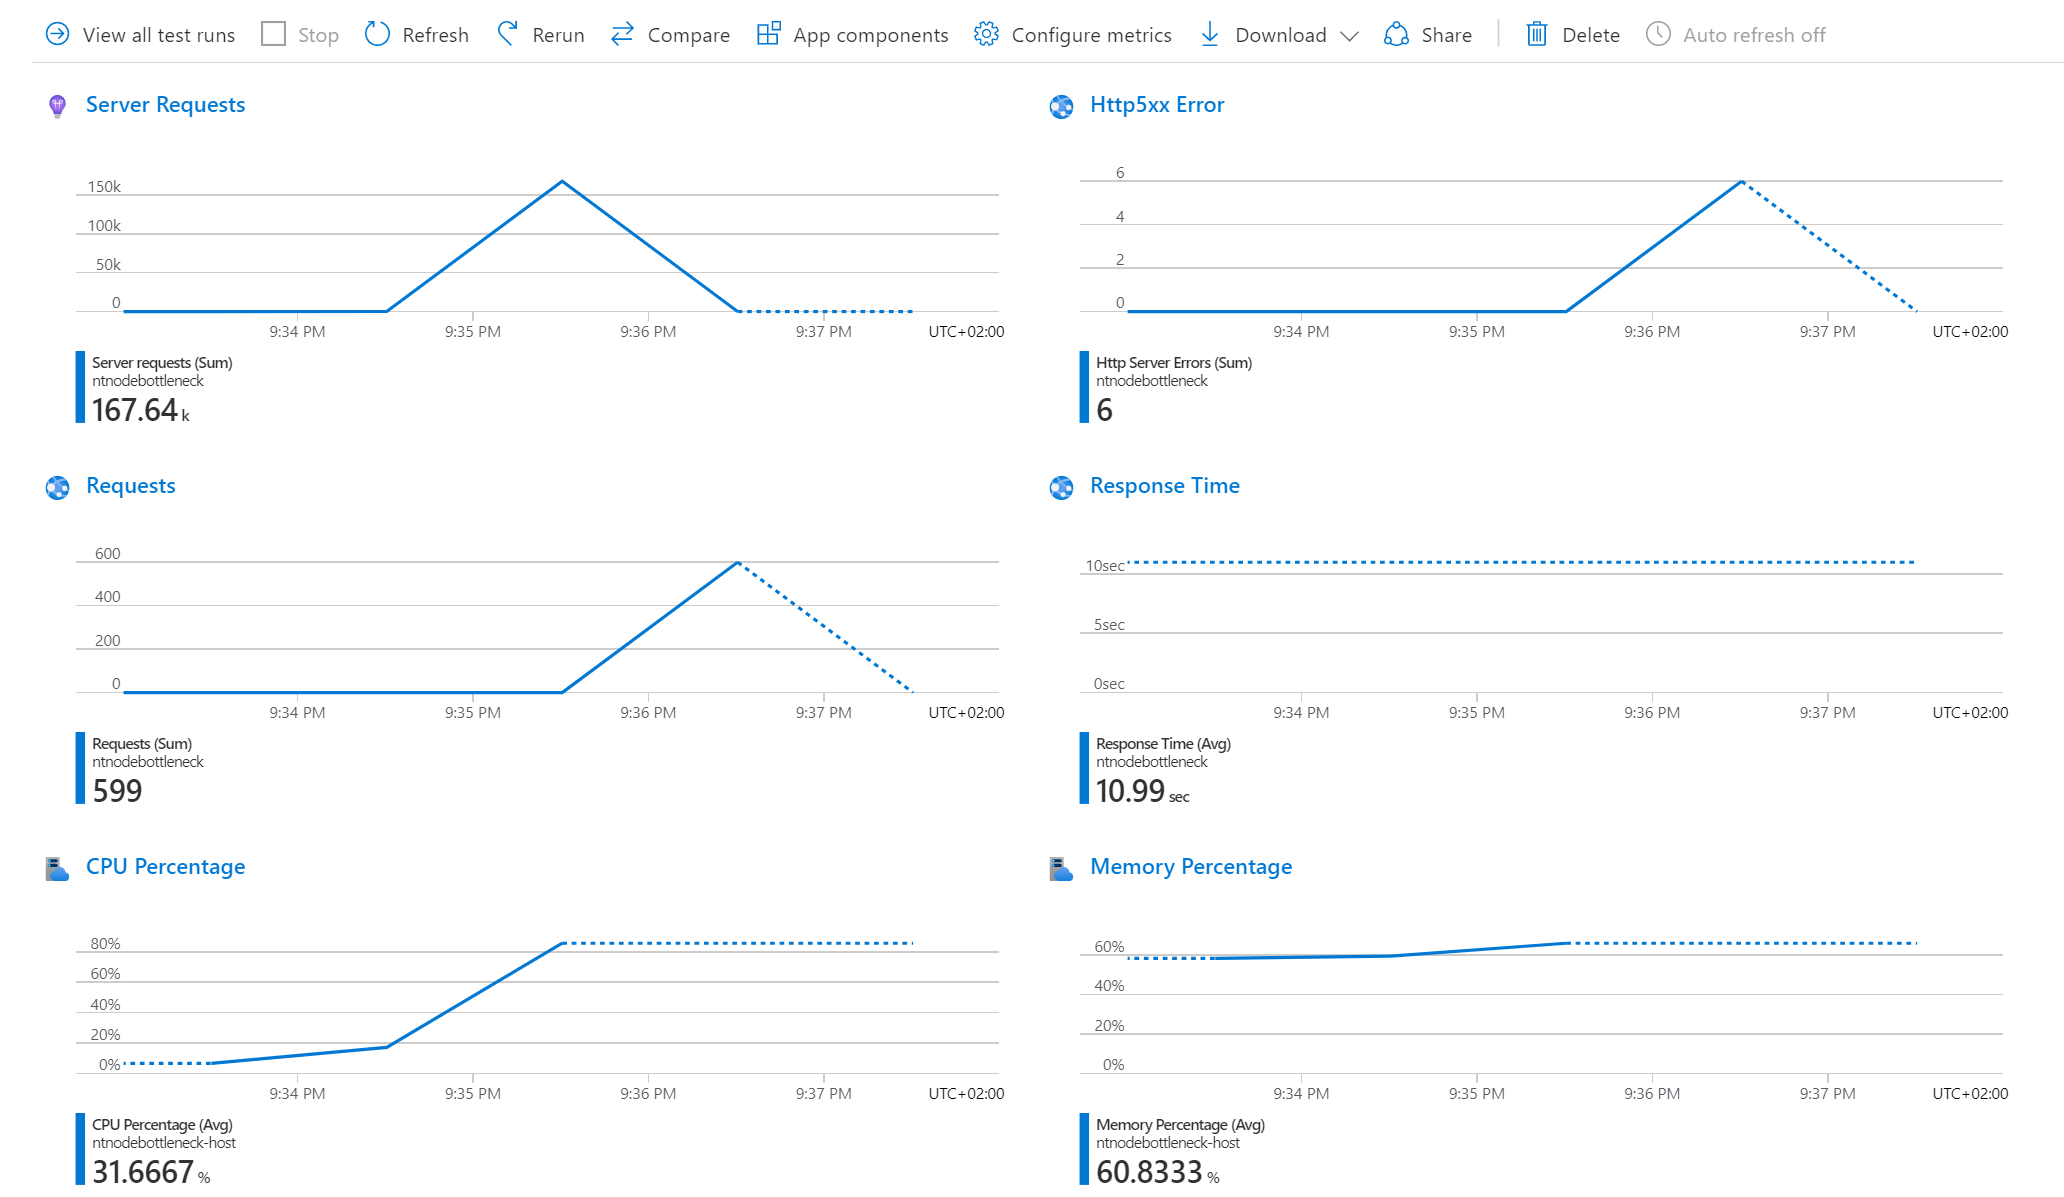
When the load test finishes, the test result dashboard shows a graph for each of the Azure app components and resource metrics.
For more information, see Configure server-side monitoring.
Run a test
When you run or rerun a load test, Azure Load Testing uses the most recent load test configuration settings to create a new test run. If you edit a test configuration and check the Run test after applying changes checkbox, the load test automatically starts after saving the changes.
To run a load test in the Azure portal:
In the Azure portal, and go to your load testing resource.
Select Tests in the left pane, and go to the test details by selecting the test name in the list.
Select Run.
On the Run page, you can choose to enter a test run description and override load test parameters.
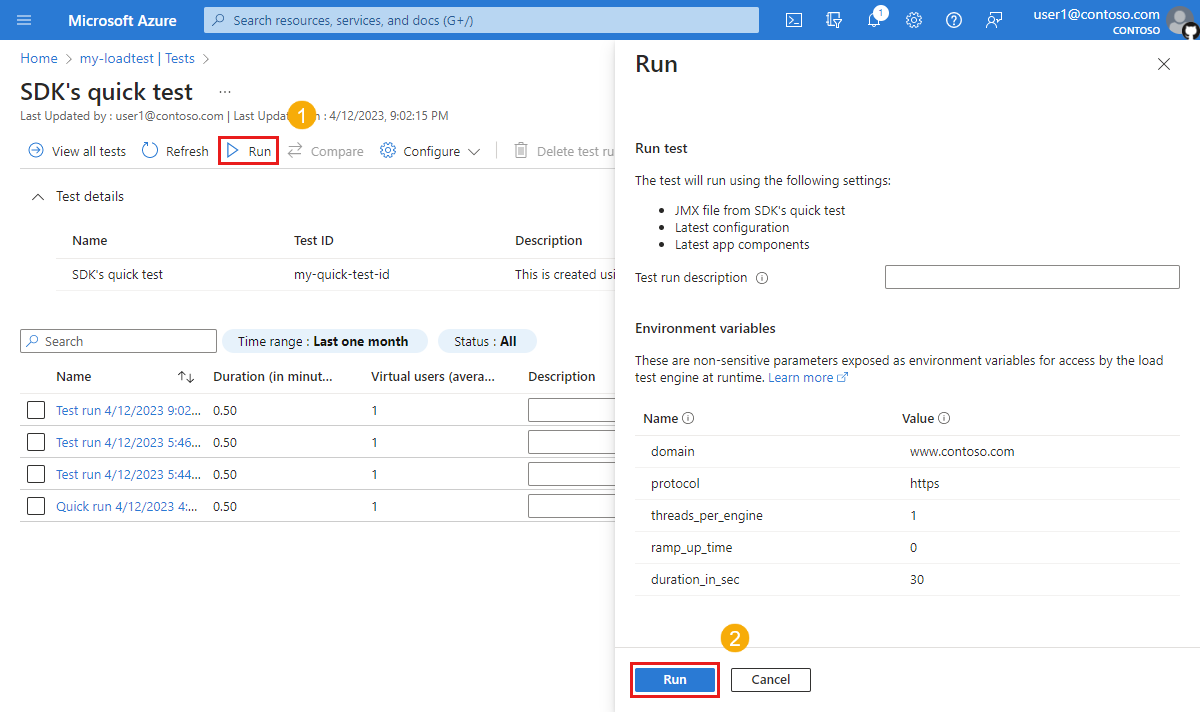
Select Run to start the load test.
The service creates a new test run, with the description you provided.
Edit a test
When you edit the load test configuration settings, these settings are used for future test runs. When you rerun a previous test run, the settings of the test run are used and not the updated settings of the test.
To edit a test in the Azure portal:
In the Azure portal, and go to your load testing resource.
Select Tests in the left pane, and select a test from the list by checking the corresponding checkbox.
Select Edit to update the test configuration settings.
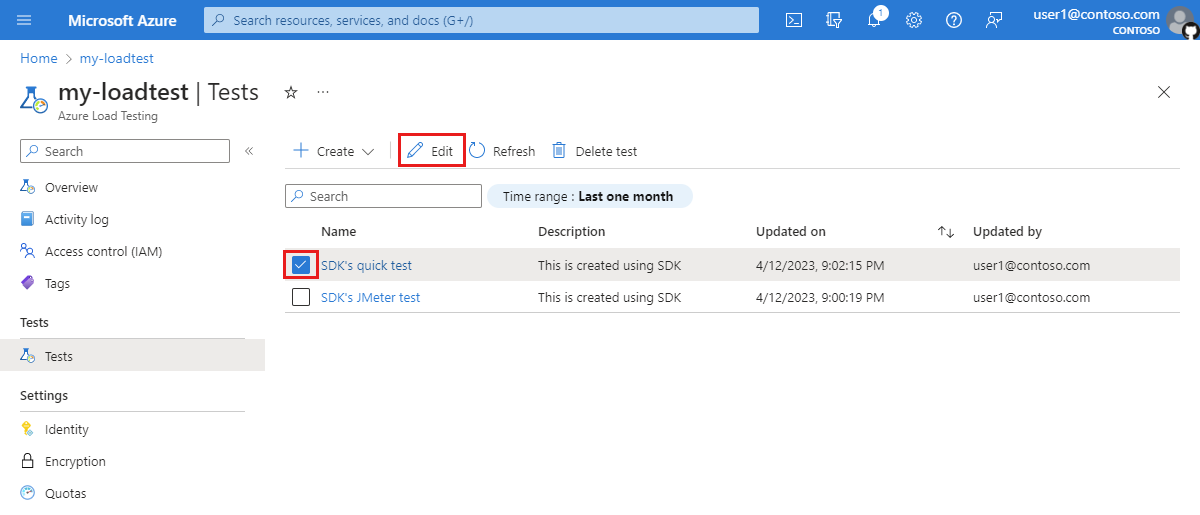
Alternately, select the test from the list, and then select Configure > Test.
Select Apply in the Edit test page to save the changes.
The next time you run the test, the updated test configuration settings are used.
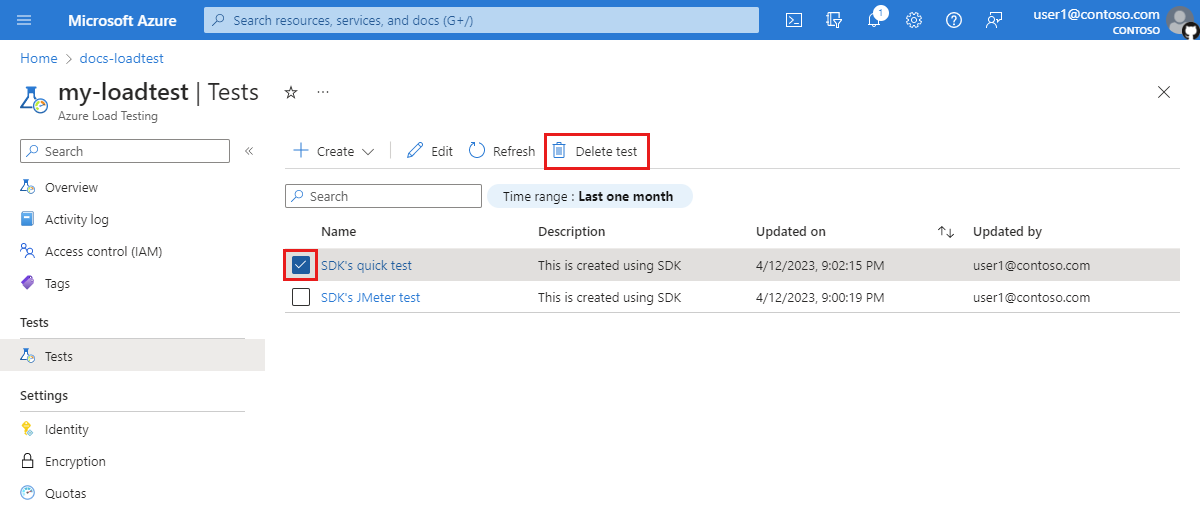
Delete a test
To delete a test in the Azure portal:
In the Azure portal, and go to your load testing resource.
Select Tests in the left pane, and select a test from the list by checking the corresponding checkbox.
Select Delete test to delete the test.
Alternately, select the test from the list, and then select Delete test on the test details page.
On the Delete test page, select Delete to confirm the deletion of the test.
Caution
When you delete a test, all test runs, logs, results, and metrics data are also deleted.