Note
Access to this page requires authorization. You can try signing in or changing directories.
Access to this page requires authorization. You can try changing directories.
This guide walks you through deploying a complete Microsoft Discovery stack where all traffic stays within your virtual network. By the end, your workspace data-plane APIs, bookshelf search, supercomputer jobs, and customer blob storage are all accessible exclusively through private endpoints - with zero public internet exposure.
What you build
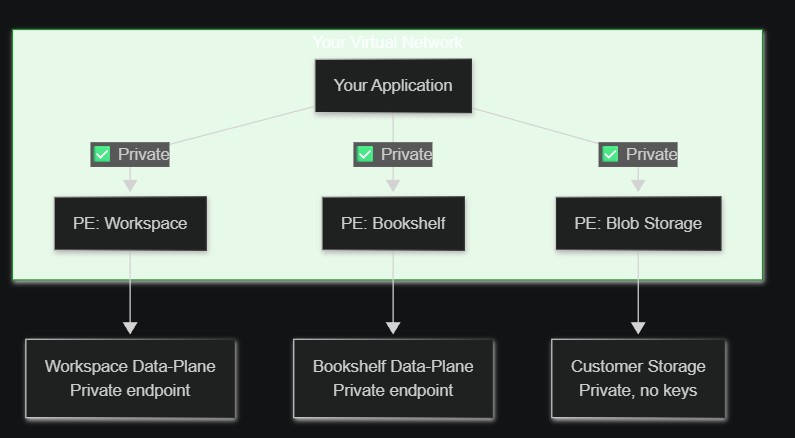
| Component | Network protection | Access path |
|---|---|---|
| Workspace data-plane | Private endpoint to Azure backbone | {name}.workspace.discovery.azure.com resolves to private IP |
| Bookshelf data-plane | Private endpoint to Azure backbone | {name}.bookshelf.discovery.azure.com resolves to private IP |
| Managed resources | Network Security Perimeter (NSP) Enforced + MRG private endpoints | Accessible only to Discovery service components |
| Supercomputer / Nodepool | Virtual network injected | Runs in your virtual network subnet, accesses managed resources through private endpoints |
| Customer blob storage | Private endpoint + no public access + no keys | Accessible only through PE with managed identity RBAC |
Prerequisites
- An Azure subscription with Microsoft.Discovery registered
- Azure CLI 2.50+
- A user-assigned managed identity (UAMI)
- Network hardening prerequisites completed (see Configure network security)
Step 1: Plan your virtual network
Create a virtual network with dedicated subnets for each component:
az network vnet create \
  --resource-group {rg} --name {vnetName} \
  --address-prefixes 10.200.0.0/16 --location {region}
Create the subnets:
| Subnet | CIDR | Purpose |
|---|---|---|
agent-ws |
10.200.1.0/24 |
Workspace agent workloads |
workspace-ws |
10.200.2.0/24 |
Workspace services |
pe-ws |
10.200.3.0/27 |
Private endpoints (workspace + bookshelf) |
bs-search |
10.200.4.0/27 |
Bookshelf search services |
sc-aks |
10.200.6.0/24 |
Supercomputer cluster |
sc-nodepool |
10.200.5.0/24 |
Supercomputer nodepool |
pe-storage |
10.200.11.0/27 |
Customer blob storage PE |
az network vnet subnet create --resource-group {rg} --vnet-name {vnetName} --name agent-ws --address-prefixes 10.200.1.0/24
az network vnet subnet create --resource-group {rg} --vnet-name {vnetName} --name workspace-ws --address-prefixes 10.200.2.0/24
az network vnet subnet create --resource-group {rg} --vnet-name {vnetName} --name pe-ws --address-prefixes 10.200.3.0/27
az network vnet subnet create --resource-group {rg} --vnet-name {vnetName} --name bs-search --address-prefixes 10.200.4.0/27
az network vnet subnet create --resource-group {rg} --vnet-name {vnetName} --name sc-aks --address-prefixes 10.200.6.0/24
az network vnet subnet create --resource-group {rg} --vnet-name {vnetName} --name sc-nodepool --address-prefixes 10.200.5.0/24
az network vnet subnet create --resource-group {rg} --vnet-name {vnetName} --name pe-storage --address-prefixes 10.200.11.0/27
Important
All subnets must be in the same virtual network so managed resources, supercomputer, and storage can communicate privately through VNet-injected endpoints and private endpoints.
Step 2: Create the Discovery resource stack
Supercomputer (virtual network injected)
Create the supercomputer first so it can be referenced by the workspace. The compute cluster is injected directly into your virtual network subnet. Workload traffic stays private.
Note
Known limitation: The supercomputer's AKS API server has a public FQDN. Workload traffic stays within the virtual network, but the Kubernetes API server endpoint is publicly accessible. Private cluster support is planned for a future release.
az rest --method PUT \
  --uri "https://management.azure.com/subscriptions/{sub}/resourceGroups/{rg}/providers/Microsoft.Discovery/supercomputers/{scName}?api-version=2026-02-01-preview" \
  --body '{
    "location": "{region}",
    "properties": {
      "subnetId": "/subscriptions/{sub}/resourceGroups/{rg}/providers/Microsoft.Network/virtualNetworks/{vnet}/subnets/sc-aks",
      "identities": {
        "clusterIdentity": { "id": "{uamiResourceId}" },
        "kubeletIdentity": { "id": "{uamiResourceId}" },
        "workloadIdentities": { "{uamiResourceId}": {} }
      }
    }
  }'
Add a nodepool after the supercomputer is provisioned:
az rest --method PUT \
  --uri "https://management.azure.com/subscriptions/{sub}/resourceGroups/{rg}/providers/Microsoft.Discovery/supercomputers/{scName}/nodepools/{nodepoolName}?api-version=2026-02-01-preview" \
  --body '{
    "location": "{region}",
    "properties": { "vmSize": "Standard_D16s_v5", "minNodeCount": 0, "maxNodeCount": 3, "scaleSetPriority": "Regular" }
  }'
Bookshelf
az rest --method PUT \
  --uri "https://management.azure.com/subscriptions/{sub}/resourceGroups/{rg}/providers/Microsoft.Discovery/bookshelves/{bsName}?api-version=2026-02-01-preview" \
  --body '{
    "location": "{region}",
    "properties": {
      "searchSubnetId": "/subscriptions/{sub}/resourceGroups/{rg}/providers/Microsoft.Network/virtualNetworks/{vnet}/subnets/bs-search",
      "privateEndpointSubnetId": "/subscriptions/{sub}/resourceGroups/{rg}/providers/Microsoft.Network/virtualNetworks/{vnet}/subnets/pe-ws",
      "workloadIdentities": { "{uamiResourceId}": {} }
    }
  }'
Workspace
Create the workspace after the supercomputer so you can include supercomputerIds directly:
az rest --method PUT \
  --uri "https://management.azure.com/subscriptions/{sub}/resourceGroups/{rg}/providers/Microsoft.Discovery/workspaces/{wsName}?api-version=2026-02-01-preview" \
  --body '{
    "location": "{region}",
    "properties": {
      "agentSubnetId": "/subscriptions/{sub}/resourceGroups/{rg}/providers/Microsoft.Network/virtualNetworks/{vnet}/subnets/agent-ws",
      "privateEndpointSubnetId": "/subscriptions/{sub}/resourceGroups/{rg}/providers/Microsoft.Network/virtualNetworks/{vnet}/subnets/pe-ws",
      "workspaceSubnetId": "/subscriptions/{sub}/resourceGroups/{rg}/providers/Microsoft.Network/virtualNetworks/{vnet}/subnets/workspace-ws",
      "workspaceIdentity": { "id": "{uamiResourceId}" },
      "supercomputerIds": [
        "/subscriptions/{sub}/resourceGroups/{rg}/providers/Microsoft.Discovery/supercomputers/{scName}"
      ]
    }
  }'
Step 3: Create private endpoints and configure DNS
Create private endpoints for workspace, bookshelf, and blob storage data-plane access, then configure private DNS zones. For detailed steps including CLI, PowerShell, and portal instructions, see Create private endpoints for data-plane access.
Step 4: Add network-hardened customer blob storage
For workloads that need access to customer data (training data, documents), create a fully locked-down Azure Blob Storage account accessible only through your virtual network:
Create the storage account (no public access, no keys)
az storage account create --resource-group {rg} \
  --name {storageAccountName} --location {region} \
  --sku Standard_LRS --kind StorageV2 \
  --min-tls-version TLS1_2 \
  --allow-blob-public-access false \
  --public-network-access Disabled \
  --allow-shared-key-access false \
  --default-action Deny --https-only true
Assign RBAC (managed identity, no keys)
az role assignment create \
  --assignee-object-id {uamiPrincipalId} \
  --assignee-principal-type ServicePrincipal \
  --role "Storage Blob Data Contributor" \
  --scope "/subscriptions/{sub}/resourceGroups/{rg}/providers/Microsoft.Storage/storageAccounts/{storageAccountName}"
Create PE for blob access from your virtual network
az network private-endpoint create \
  --resource-group {rg} --name pe-blob-storage \
  --vnet-name {vnet} --subnet pe-storage \
  --private-connection-resource-id "/subscriptions/{sub}/resourceGroups/{rg}/providers/Microsoft.Storage/storageAccounts/{storageAccountName}" \
  --group-id blob --connection-name pe-blob-conn
Register the storage with Discovery
Create a Discovery storage container resource that references your blob storage:
az rest --method PUT \
  --uri "https://management.azure.com/subscriptions/{sub}/resourceGroups/{rg}/providers/Microsoft.Discovery/storageContainers/{scName}?api-version=2026-02-01-preview" \
  --body '{
    "location": "{region}",
    "properties": {
      "storageStore": {
        "kind": "AzureStorageBlob",
        "storageAccountId": "/subscriptions/{sub}/resourceGroups/{rg}/providers/Microsoft.Storage/storageAccounts/{storageAccountName}"
      }
    }
  }'
Tip
The same UAMI used for the workspace can access the blob storage through RBAC — no storage keys are needed. All access flows through the private endpoint within your virtual network.
Step 5: Verify end-to-end network hardening
After deploying all resources and creating private endpoints, verify that DNS resolves to private IPs and connectivity works from within your virtual network. For detailed verification steps, see Verify connectivity.
How traffic flows end to end
The following table shows how each traffic path stays within your virtual network:
| Traffic path | Source | Network mechanism | Public internet? |
|---|---|---|---|
| Your app to Workspace API | App in virtual network or connected via VPN/ExpressRoute/VNet peering | Private endpoint to Azure backbone | No |
| Your app to Bookshelf API | App in virtual network or connected via VPN/ExpressRoute/VNet peering | Private endpoint to Azure backbone | No |
| Your app to Blob storage | App in virtual network or connected via VPN/ExpressRoute/VNet peering | Private endpoint | No |
| Discovery service to workspace MRG resources | Discovery service | NSP + private endpoints in managed resource group | No |
| Discovery service to bookshelf MRG resources | Discovery service | NSP + private endpoints in managed resource group | No |
| Discovery service to supercomputer MRG resources | Discovery service | NSP + private endpoints in managed resource group | No |
| Workspace to customer blob | Workspace workload | UAMI + RBAC through private endpoint | No |
| Bookshelf to customer blob | Bookshelf workload | UAMI + RBAC through private endpoint | No |
| Supercomputer to customer blob | Virtual network injected compute | UAMI + RBAC through private endpoint | No |
How Discovery resources access managed and customer data
All Discovery resources (workspace, bookshelf, supercomputer) access their managed resources and customer data entirely through your virtual network:
- The workload resolves the target FQDN through private DNS to a private IP address.
- Traffic flows through private endpoints within your virtual network — never over the public internet.
- Authentication uses managed identity (UAMI) with RBAC for customer resources — no storage keys or shared secrets.
Tip
By using the same UAMI across workspace, bookshelf, and supercomputer — and assigning it Storage Blob Data Contributor on your storage account — all three components can access customer data through the same private endpoint path with zero keys and zero public access.
Important
After verifying connectivity, consider disabling public network access on your workspace and bookshelf to ensure that only private endpoint traffic is accepted.
Security summary
When you complete this deployment, you have:
- Zero public endpoints - all managed resources have
publicNetworkAccess: DisabledorSecuredByPerimeter - Zero internet traversal - all data-plane traffic stays on Azure backbone through Private Link
- Defense in depth - NSP (network perimeter) + PE (private connectivity) + virtual network injection (compute isolation) + RBAC (identity-based access)
Next steps
- Configure network security - detailed network hardening and PE setup
- Bookshelf and Knowledge Bases