Connect your threat intelligence platform to Microsoft Sentinel
Note
This data connector is on a path for deprecation. More details will be published on the precise timeline. Use the new threat intelligence upload indicators API data connector for new solutions going forward. For more information, see Connect your threat intelligence platform to Microsoft Sentinel with the upload indicators API.
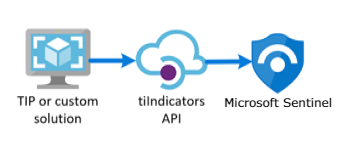
Many organizations use threat intelligence platform (TIP) solutions to aggregate threat indicator feeds from various sources. From the aggregated feed, the data is curated to apply to security solutions such as network devices, EDR/XDR solutions, or SIEMs such as Microsoft Sentinel. The Threat Intelligence Platforms data connector allows you to use these solutions to import threat indicators into Microsoft Sentinel.
Because the TIP data connector works with the Microsoft Graph Security tiIndicators API to accomplish this, you can use the connector to send indicators to Microsoft Sentinel (and to other Microsoft security solutions like Microsoft Defender XDR) from any other custom threat intelligence platform that can communicate with that API.
Learn more about Threat Intelligence in Microsoft Sentinel, and specifically about the threat intelligence platform products that can be integrated with Microsoft Sentinel.
Note
For information about feature availability in US Government clouds, see the Microsoft Sentinel tables in Cloud feature availability for US Government customers.
Important
Microsoft Sentinel is now generally available within the Microsoft unified security operations platform in the Microsoft Defender portal. For more information, see Microsoft Sentinel in the Microsoft Defender portal.
Prerequisites
- In order to install, update and delete standalone content or solutions in content hub, you need the Microsoft Sentinel Contributor role at the resource group level.
- You must have either the Global administrator or Security administrator Microsoft Entra roles in order to grant permissions to your TIP product or to any other custom application that uses direct integration with the Microsoft Graph Security tiIndicators API.
- You must have read and write permissions to the Microsoft Sentinel workspace to store your threat indicators.
Instructions
Follow these steps to import threat indicators to Microsoft Sentinel from your integrated TIP or custom threat intelligence solution:
- Obtain an Application ID and Client Secret from your Microsoft Entra ID
- Input this information into your TIP solution or custom application
- Enable the Threat Intelligence Platforms data connector in Microsoft Sentinel
Sign up for an Application ID and Client secret from your Microsoft Entra ID
Whether you are working with a TIP or with a custom solution, the tiIndicators API requires some basic information to allow you to connect your feed to it and send it threat indicators. The three pieces of information you need are:
- Application (client) ID
- Directory (tenant) ID
- Client secret
You can get this information from your Microsoft Entra ID through a process called App Registration which includes the following three steps:
- Register an app with Microsoft Entra ID
- Specify the permissions required by the app to connect to the Microsoft Graph tiIndicators API and send threat indicators
- Get consent from your organization to grant these permissions to this application.
Register an application with Microsoft Entra ID
From the Azure portal, navigate to the Microsoft Entra ID service.
Select App Registrations from the menu and select New registration.
Choose a name for your application registration, select the Single tenant radio button, and select Register.
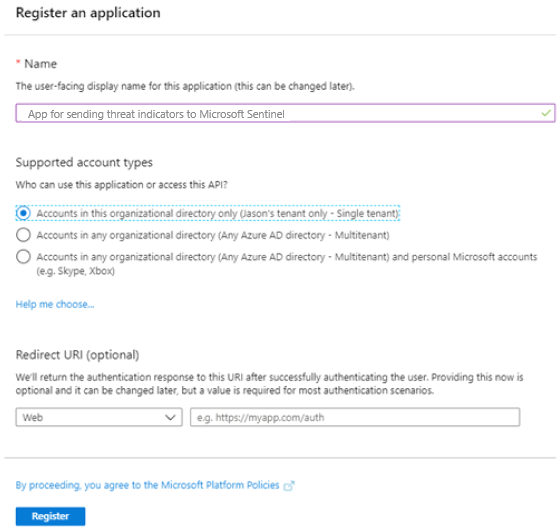
From the resulting screen, copy the Application (client) ID and Directory (tenant) ID values. These are the first two pieces of information you’ll need later to configure your TIP or custom solution to send threat indicators to Microsoft Sentinel. The third, the Client secret, comes later.
Specify the permissions required by the application
Go back to the main page of the Microsoft Entra ID service.
Select App Registrations from the menu and select your newly registered app.
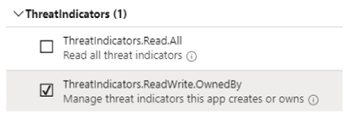
Select API Permissions from the menu and select the Add a permission button.
On the Select an API page, select the Microsoft Graph API and then choose from a list of Microsoft Graph permissions.
At the prompt "What type of permissions does your application require?" select Application permissions. This is the type of permissions used by applications authenticating with App ID and App Secrets (API Keys).
Select ThreatIndicators.ReadWrite.OwnedBy and select Add permissions to add this permission to your app’s list of permissions.
Get consent from your organization to grant these permissions
To get consent, you need a Microsoft Entra Global Administrator to select the Grant admin consent for your tenant button on your app’s API permissions page. If you do not have the Global Administrator role on your account, this button will not be available, and you will need to ask a Global Administrator from your organization to perform this step.
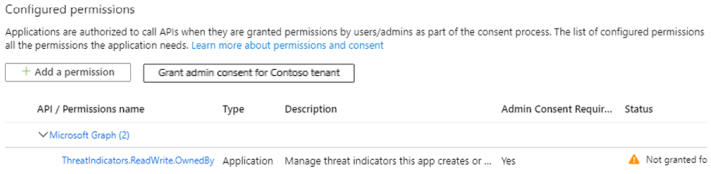
Once consent has been granted to your app, you should see a green check mark under Status.
Now that your app has been registered and permissions have been granted, you can get the last thing on your list - a client secret for your app.
Go back to the main page of the Microsoft Entra ID service.
Select App Registrations from the menu and select your newly registered app.
Select Certificates & secrets from the menu and select the New client secret button to receive a secret (API key) for your app.
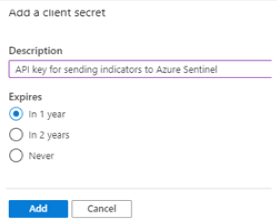
Select the Add button and copy the client secret.
Important
You must copy the client secret before leaving this screen. You cannot retrieve this secret again if you navigate away from this page. You will need this value when you configure your TIP or custom solution.
Input this information into your TIP solution or custom application
You now have all three pieces of information you need to configure your TIP or custom solution to send threat indicators to Microsoft Sentinel.
- Application (client) ID
- Directory (tenant) ID
- Client secret
Enter these values in the configuration of your integrated TIP or custom solution where required.
For the target product, specify Azure Sentinel. (Specifying "Microsoft Sentinel" will result in an error.)
For the action, specify alert.
Once this configuration is complete, threat indicators will be sent from your TIP or custom solution, through the Microsoft Graph tiIndicators API, targeted at Microsoft Sentinel.
Enable the Threat Intelligence Platforms data connector in Microsoft Sentinel
The last step in the integration process is to enable the Threat Intelligence Platforms data connector in Microsoft Sentinel. Enabling the connector is what allows Microsoft Sentinel to receive the threat indicators sent from your TIP or custom solution. These indicators will be available to all Microsoft Sentinel workspaces for your organization. Follow these steps to enable the Threat Intelligence Platforms data connector for each workspace:
For Microsoft Sentinel in the Azure portal, under Content management, select Content hub.
For Microsoft Sentinel in the Defender portal, select Microsoft Sentinel > Content management > Content hub.Find and select the Threat Intelligence solution.
Select the
 Install/Update button.
For more information about how to manage the solution components, see Discover and deploy out-of-the-box content.
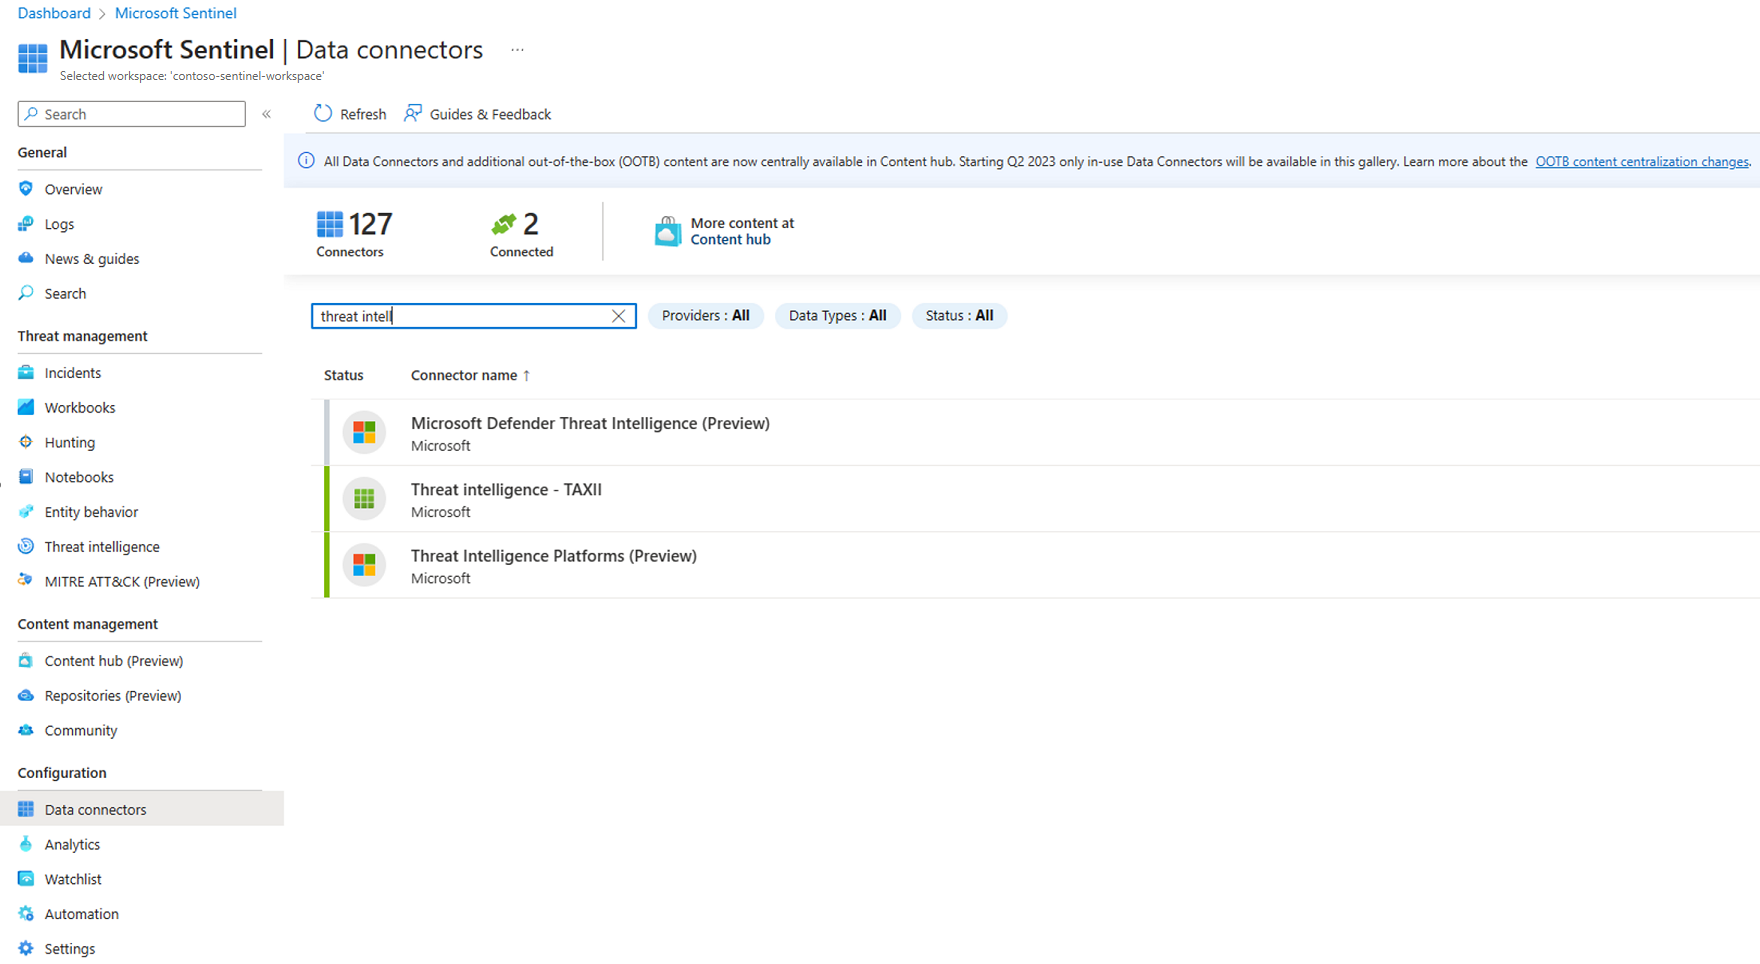
To configure the TIP data connector, select Configuration > Data connectors.
Find and select the Threat Intelligence Platforms data connector > Open connector page button.
As you've already completed the app registration and configured your TIP or custom solution to send threat indicators, the only step left is to select the Connect button.

Within a few minutes, threat indicators should begin flowing into this Microsoft Sentinel workspace. You can find the new indicators in the Threat intelligence blade, accessible from the Microsoft Sentinel navigation menu.
Related content
In this document, you learned how to connect your threat intelligence platform to Microsoft Sentinel. To learn more about Microsoft Sentinel, see the following articles.
- Learn how to get visibility into your data and potential threats.
- Get started detecting threats with Microsoft Sentinel.
Feedback
Coming soon: Throughout 2024 we will be phasing out GitHub Issues as the feedback mechanism for content and replacing it with a new feedback system. For more information see: https://aka.ms/ContentUserFeedback.
Submit and view feedback for