Secure a linked service with Private Links
In this article, you'll learn how to secure a linked service in Synapse with a private endpoint.
Prerequisites
- Azure subscription: If you don't have an Azure subscription, create a free Azure account before you begin.
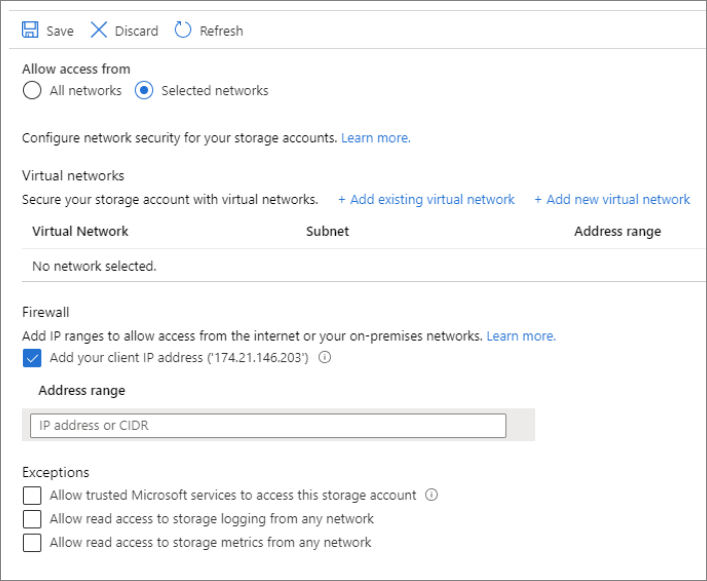
- Azure Storage account: You use Azure Data Lake Gen 2 as a source data store. If you don't have a storage account, see Create an Azure Storage account for steps to create one. Make sure that the Storage Account has the Synapse Studio IP filtering for accessing it and that you only allow Selected networks to access the Storage account. The setting under the blade Firewalls and virtual networks should look like the picture below.
Create a linked service with Private Links
In Azure Synapse Analytics, a linked service is where you define your connection information to other services. In this section, you'll add Azure Synapse Analytics and Azure Data Lake Gen 2 as linked services.
- Open the Synapse Studio and go to the Manage tab.
- Under External connections, select Linked services.
- To add a linked service, select New.
- Select the Azure Data Lake Storage Gen2 tile from the list and select Continue.
- Make sure you enable Interactive Authoring. It might take around 1 minute to be enabled.
- Enter your authentication credentials. Account key, service principal, and managed identity are currently supported authentication types. Select test connection to verify your credentials are correct.
- Select Test connection, it should fail because the Storage Account doesn't enable access into it without the creation and approval of a Private Endpoint. In the error message, you should see a link to create a private endpoint that you can follow to go to the next part. If you follow that link, skip the next part.
- Select Create when finished.
Create a managed private endpoint
If you didn't select into the hyperlink when testing the connection above, follow the following path. Create a managed private endpoint that you'll connect to the linked service created above.
- Go to the Manage tab.
- Go to the Managed Virtual Networks section.
- Select + New under Managed private endpoint.
- Select the Azure Data Lake Storage Gen2 tile from the list and select Continue.
- Enter the name of the Storage Account you created above.
- Select Create
- You should see after waiting some seconds that the private link created needs an approval.
Private link approval
- Select the Private Endpoint that you created above. You can see a hyperlink that will let you approve the Private Endpoint at the Storage Account level. An alternative is to go directly to the Azure portal Storage Account and go into the Private endpoint connections blade.
- Tick the Private endpoint you created in the Studio and select Approve.
- Add a description and select yes
- Go back to Synapse Studio in under the Managed Virtual Networks section of the Manage tab.
- It should take around 1 minute to get the approval reflected for your private endpoint.
Check the connection works
- Go to the Manage tab and select the linked service you created.
- Make sure that Interactive authoring is active.
- Select Test connection. You should see the connection be successful.
You've now established a secure and private connection between Synapse and your linked service.
Next steps
To develop further understanding of Managed private endpoint in Azure Synapse Analytics, see Managed private endpoints.
For more information on data integration for Azure Synapse Analytics, see the Ingesting data into a Data Lake article.
Feedback
Coming soon: Throughout 2024 we will be phasing out GitHub Issues as the feedback mechanism for content and replacing it with a new feedback system. For more information see: https://aka.ms/ContentUserFeedback.
Submit and view feedback for