Note
Access to this page requires authorization. You can try signing in or changing directories.
Access to this page requires authorization. You can try changing directories.
Important
Some or all of the functionality noted in this topic is available as part of a preview release. The content and the functionality are subject to change.
This article describes policy types and how to create a policy with rules in Dynamics 365 Intelligent Order Management.
Policy types
Use policies and their associated rules for different purposes in the Intelligent Order Management orchestration flow. Policies fall into different policy types. Policy types help you select the right policies in the orchestration flow. The following table lists the two supported policy types.
| Policy type | Description |
|---|---|
| Filter policy | Validates data running through an orchestration flow. For example, you might want to drive a specific orchestration for a specific provider. Filter policy filters the orchestration step to run based on the policy success criteria. |
| Execution policy | Checks and updates data running through an orchestration flow. For example, you might want to assign a specific Fulfillment location to your order when your order quantity is greater than 100. An execution policy makes this assignment simple and configurable. |
Policy fields
A policy consists of five fields, as shown in the following table.
| Policy field | Description |
|---|---|
| Policy Name | A unique name that you provide. |
| Policy Type | Select one of two policy types: Filter policy or Execution policy. |
| Policy Criticality | Select one of two options: Information - The rules of the policy are evaluated but the orchestration flow doesn't stop if the evaluation isn't successful. Critical information - The rules of the policy are evaluated and the orchestration flow stops if the evaluation isn't successful. |
| Status | A policy and its associated rules can be in one of two status states: Unpublished - The default status of a policy. You can't select a policy and its rules in the orchestration flow when in this state. Published - This status is obtained when you publish the policy and its associated rules by using the Publish action. You can select the policy and its rules in the orchestration flow when in this state. |
| Associated Entity | Select one of four primary entities for the policy: Order, Order product, Fulfillment order, Fulfillment order product. Use the rules you define against the primary entity or any related entity in the data model. |
Create a new policy
To create a new policy, follow these steps:
- Go to Orchestration > Policies.
- Select New.
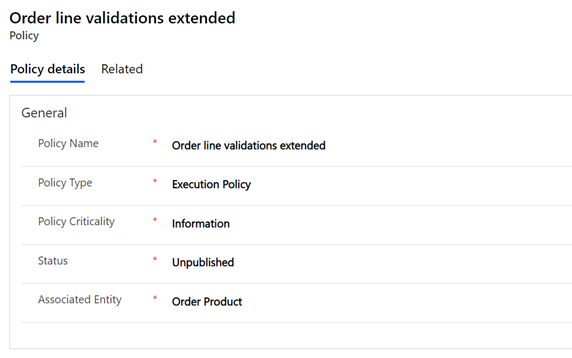
- Enter a unique name in the Policy Name field (for example, "Order line validations extended").
- Select Execution Policy in the Policy Type field.
- Select Information in the Policy Criticality field.
- Select Order Product in the Associated Entity field.
- Select Save.
The following image shows the policy details entered for the "Order line validations extended" policy example.
Rules
You can create conditional rules in Intelligent Order Management by using Condition Builder's user interface.
To add a condition to your policy, select New IOM Rule. An Add button appears in the rule definition that, when selected, displays the following options:
- Add row: Each individual condition that you check for, such as "the value is greater than 10," or "the list doesn't contain Test," creates a new row in Condition Builder.
- Add group: You can combine one or more rows together in a group. Each group is combined by using either an And or an Or operator. If you select And, then all the condition rows must be true. If you select Or, then only one of the condition rows needs to be true.
- Add related entity: You can add conditions against values in related entities. You can also select between entities that are related to the primary entity of the policy. The supported relations are Many to One and One to Many.
You can have as many rows or groups as you need to build out your logic. You can continue adding rows or groups both at the top level of the condition and inside groups by using Add buttons. If you want a simplified view of the condition, you can collapse it by using a button at the top-right of each group.
Additionally, an ellipsis menu ("...") on the right side of each row and group allows you to delete a row or group. Check boxes on the left side of each row or group allows you to select several different rows. Then, you can select Group from the ellipsis menu to combine the rows into a single group.
The supported operators differ for each field type, as shown in the following table.
| Operator | Field | Entity-based field |
|---|---|---|
| Equals | Y | Y |
| Doesn't equal | Y | Y |
| Is greater than | Y | |
| Is greater than or equal to | Y | |
| Is less than | Y | |
| Is less than or equal to | Y | |
| Contains data | Y | Y |
| Doesn't contain data | Y | Y |
Create a rule
To create a new example rule, follow these steps:
- Go to Orchestration > Policies.
- Select a policy record, such as "Order line validations extended."
- Select New IOM Rule to start creating the rule.
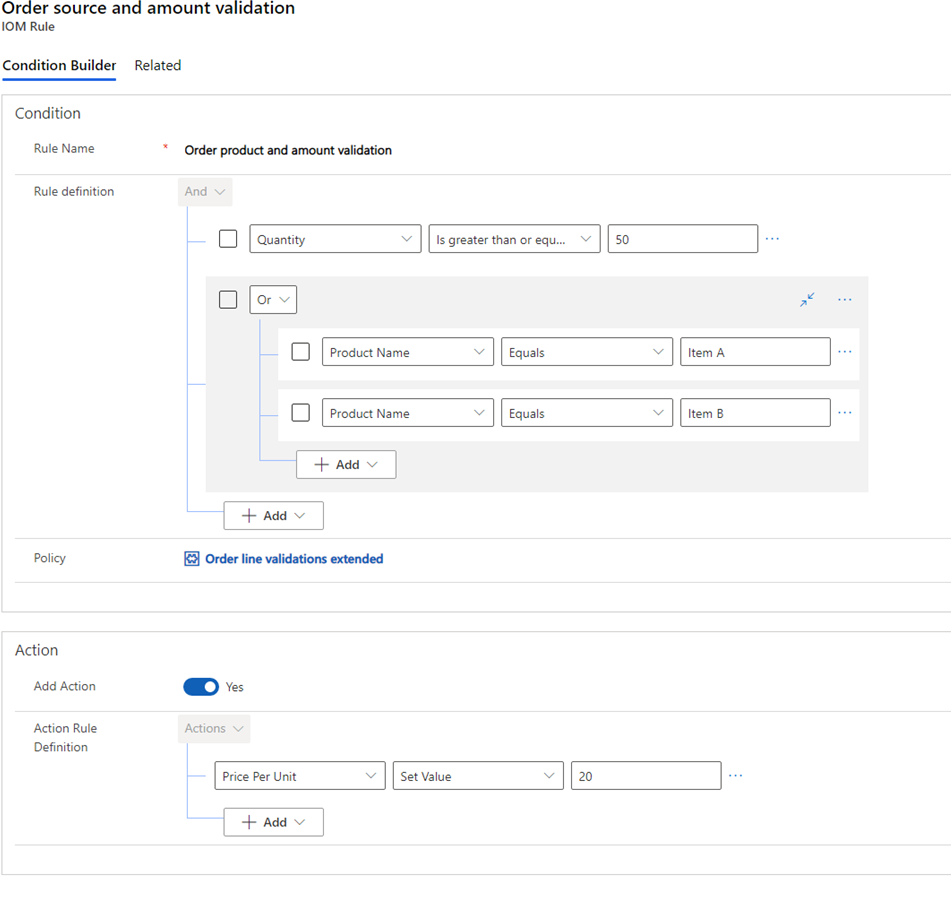
- In the Rule Name field, enter a unique name, such as "Order product and amount validation."
Create a condition
- Select Add, and then select Add Row.
- Select Quantity.
- Select the Is greater than or equal to operator.
- Enter "50".
- Select Add, and then select Add Group.
- Change the condition to "Or".
- Select Product Name.
- Select the Equals operator.
- Enter "Item A".
- Select Add at the bottom of the Or group, and then select Add Row.
- Select Product Name.
- Select the Equals operator.
- Enter "Item B".
Create an action
- Change Add Action to Yes.
- Select Add, and then select Add Row.
- Select Price Per Unit.
- Select Set Value operator.
- Enter "20".
- Select Save & Close.
- Select Publish.
The following image shows the "Order product and amount validation" rule example as it appears in the rule editor screen.
Add custom action
You can add custom actions only for execution policies. To add a custom action that the orchestration flow doesn't trigger when it evaluates a rule, under Action, select Yes for Add Action.
Select the fields to set for the associated entity that you chose when you created the policy.